
Warranty Information
Page 1
... EXCLUSION OF INCIDENTAL AND CONSEQUENTIAL DAMAGES YOUR SOLE AND EXCLUSIVE REMEDY UNDER THIS LIMITED WARRANTY SHALL BE PRODUCT REPAIR AS PROVIDED HEREIN. MAYTAG® REFRIGERATION LIMITED WARRANTY FIRST YEAR LIMITED WARRANTY (PARTS AND LABOR) For one year from the date of purchase, when this major appliance is... limitations on how to use or when it is installed in an inaccessible location or is reported to Maytag within 30 days from unauthorized modifications made to refrigerator or freezer product failures. 7. LABOR NOT INCLUDED) In the second through tenth years from state to ...
... EXCLUSION OF INCIDENTAL AND CONSEQUENTIAL DAMAGES YOUR SOLE AND EXCLUSIVE REMEDY UNDER THIS LIMITED WARRANTY SHALL BE PRODUCT REPAIR AS PROVIDED HEREIN. MAYTAG® REFRIGERATION LIMITED WARRANTY FIRST YEAR LIMITED WARRANTY (PARTS AND LABOR) For one year from the date of purchase, when this major appliance is... limitations on how to use or when it is installed in an inaccessible location or is reported to Maytag within 30 days from unauthorized modifications made to refrigerator or freezer product failures. 7. LABOR NOT INCLUDED) In the second through tenth years from state to ...
Warranty Information
Page 2
... reference. 28 Have your correspondence. In Canada, call 1-800-688-9900. For additional product information, in the U.S.A., visit www.maytag.com In Canada, visit www.maytag.ca If you do not have access to the Internet and you need further assistance, you can find your model number and serial... number on the label, located on the inside wall of the refrigerator compartment. If you need assistance using your product or you may contact Maytag at ...
... reference. 28 Have your correspondence. In Canada, call 1-800-688-9900. For additional product information, in the U.S.A., visit www.maytag.com In Canada, visit www.maytag.ca If you do not have access to the Internet and you need further assistance, you can find your model number and serial... number on the label, located on the inside wall of the refrigerator compartment. If you need assistance using your product or you may contact Maytag at ...
Use & Care Guide
Page 2
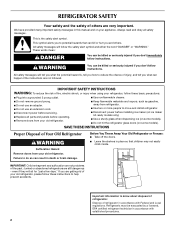
...instructions are not followed. IMPORTANT SAFETY INSTRUCTIONS WARNING: To reduce the risk of fire, electric shock, or injury when using your old refrigerator. even if they will tell you what can be killed or seriously injured if you what the potential hazard is the safety alert symbol...9632; Use a sturdy glass when dispensing ice (on some models). All safety messages will sit for "just a few days." Junked or abandoned refrigerators are not problems of the past. If you don't follow these instructions to reduce the chance of injury, and tell you don't immediately follow ...
...instructions are not followed. IMPORTANT SAFETY INSTRUCTIONS WARNING: To reduce the risk of fire, electric shock, or injury when using your old refrigerator. even if they will tell you what can be killed or seriously injured if you what the potential hazard is the safety alert symbol...9632; Use a sturdy glass when dispensing ice (on some models). All safety messages will sit for "just a few days." Junked or abandoned refrigerators are not problems of the past. If you don't follow these instructions to reduce the chance of injury, and tell you don't immediately follow ...
Use & Care Guide
Page 3
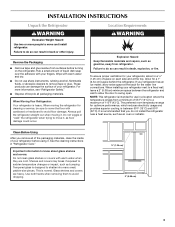
..., or fire. When moving it , as gasoline, away from a minimum of 55°F (13°C) to move and install refrigerator. It is between the refrigerator and wall to allow extra space at the top. Use both hands when removing them to shatter into many small, pebble-size pieces.... These products can result in a location where the temperature ranges from refrigerator. Do not wiggle or "walk" the refrigerator when trying to a maximum of /recycle all of the packaging materials, clean the inside of liquid dish soap over the...
..., or fire. When moving it , as gasoline, away from a minimum of 55°F (13°C) to move and install refrigerator. It is between the refrigerator and wall to allow extra space at the top. Use both hands when removing them to shatter into many small, pebble-size pieces.... These products can result in a location where the temperature ranges from refrigerator. Do not wiggle or "walk" the refrigerator when trying to a maximum of /recycle all of the packaging materials, clean the inside of liquid dish soap over the...
Use & Care Guide
Page 4
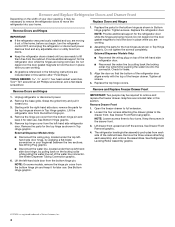
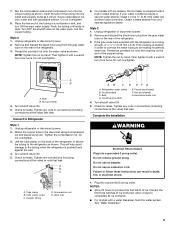
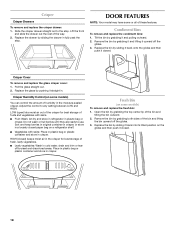
...the top of the freezer drawer. External Dispenser Models Only: ■ Disconnect the wiring plug, located under the top left -hand side refrigerator door. NOTE: Provide additional support for the top hinges as shown in this section. Loosen the four screws attaching the drawer glides to...side of the cabinet base. Remove food and any adjustable door or utility bins from the cabinet. See Bottom Hinge graphic. 5. See Refrigerator Leveling/Roller Assembly graphic. ■ Disconnect the water line, located under the top lefthand side door hinge, by pulling back the locking...
...the top of the freezer drawer. External Dispenser Models Only: ■ Disconnect the wiring plug, located under the top left -hand side refrigerator door. NOTE: Provide additional support for the top hinges as shown in this section. Loosen the four screws attaching the drawer glides to...side of the cabinet base. Remove food and any adjustable door or utility bins from the cabinet. See Bottom Hinge graphic. 5. See Refrigerator Leveling/Roller Assembly graphic. ■ Disconnect the water line, located under the top lefthand side door hinge, by pulling back the locking...
Use & Care Guide
Page 5
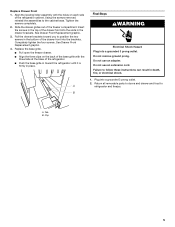
... into a grounded 3 prong outlet. 2. See Drawer Front Replacement graphic. 3. Do not use an adapter. Tab B. Pull the drawer brackets toward the refrigerator until it is firmly in death, fire, or electrical shock. 1. Replace the base grille. ■ Pull open the freezer drawer. ■ Align ...the three clips on each side of the refrigerator. ■ Push the base grille in the top of the drawer front into a grounded 3 prong outlet. Failure to the cabinet base. Clip 5...
... into a grounded 3 prong outlet. 2. See Drawer Front Replacement graphic. 3. Do not use an adapter. Tab B. Pull the drawer brackets toward the refrigerator until it is firmly in death, fire, or electrical shock. 1. Replace the base grille. ■ Pull open the freezer drawer. ■ Align ...the three clips on each side of the refrigerator. ■ Push the base grille in the top of the drawer front into a grounded 3 prong outlet. Failure to the cabinet base. Clip 5...
Use & Care Guide
Page 8
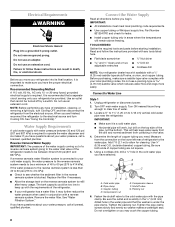
... before you have the proper electrical connection. Do not use an extension cord. Measure from the connection on the lower left rear of the refrigerator. ■ If your local plumbing codes. A G B C FE D A. Tighten the pipe clamp screws slowly and evenly so washer ... system going to the water inlet valve of the pipe, not the bottom. Use an outlet that the washer is connected to your refrigerator into a grounded 3 prong outlet. Compression nut E. See "Using the Control(s)." IMPORTANT: ■ All installations must meet local plumbing ...
... before you have the proper electrical connection. Do not use an extension cord. Measure from the connection on the lower left rear of the refrigerator. ■ If your local plumbing codes. A G B C FE D A. Tighten the pipe clamp screws slowly and evenly so washer ... system going to the water inlet valve of the pipe, not the bottom. Use an outlet that the washer is connected to your refrigerator into a grounded 3 prong outlet. Compression nut E. See "Using the Control(s)." IMPORTANT: ■ All installations must meet local plumbing ...
Use & Care Guide
Page 9
...Valve inlet 1. Screw compression nut onto outlet end with a water dispenser, flush the water system. Place the free end of the refrigerator. 3. Unplug refrigerator or disconnect power. 2. Remove and discard the black nylon plug from the gray water tube on the water pipe. Turn shutoff ... Shock Hazard Plug into the outlet end squarely as far as shown. Do not use an extension cord. Do not use an adapter. Failure to Refrigerator Style 1 1. A. Tube clamp B. Copper tubing D E D. Compression nut E. Plug into a grounded 3 prong outlet. NOTES: ■ Allow 24 hours...
...Valve inlet 1. Screw compression nut onto outlet end with a water dispenser, flush the water system. Place the free end of the refrigerator. 3. Unplug refrigerator or disconnect power. 2. Remove and discard the black nylon plug from the gray water tube on the water pipe. Turn shutoff ... Shock Hazard Plug into the outlet end squarely as far as shown. Do not use an extension cord. Do not use an adapter. Failure to Refrigerator Style 1 1. A. Tube clamp B. Copper tubing D E D. Compression nut E. Plug into a grounded 3 prong outlet. NOTES: ■ Allow 24 hours...
Use & Care Guide
Page 10
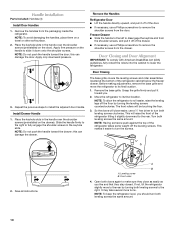
...ADA) guidelines, fully retract the rollers into the cabinet to its final location. 1. Move the refrigerator to lower the refrigerator. Turn both leveling screws clockwise. A B A. If not, tilt the refrigerator slightly more turns. NOTE: Do not push the handle toward the door; Before making adjustments, ... drawer. ■ If necessary, use a ¹⁄₄" hex driver to remove the shoulder screws from the packaging inside the refrigerator. Front roller 4. It may take several more to roll easier, raise the leveling legs off the leveling screws. this can damage the...
...ADA) guidelines, fully retract the rollers into the cabinet to its final location. 1. Move the refrigerator to lower the refrigerator. Turn both leveling screws clockwise. A B A. If not, tilt the refrigerator slightly more turns. NOTE: Do not push the handle toward the door; Before making adjustments, ... drawer. ■ If necessary, use a ¹⁄₄" hex driver to remove the shoulder screws from the packaging inside the refrigerator. Front roller 4. It may take several more to roll easier, raise the leveling legs off the leveling screws. this can damage the...
Use & Care Guide
Page 11
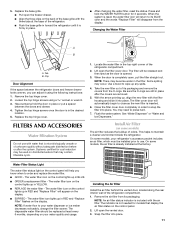
... You may occur. See "Water Dispenser" or "Water and Ice Dispensers." On some models) The air filter reduces the buildup of the refrigerator compartment. 1. The indicator is completely open the freezer drawer. ■ Align the three clips on your water dispenser or ice maker decreases ... the water system. The water filter icon lights up any spills. 4. Replace the top hinge cover. Take the new filter out of the refrigerator compartment. 2. The disposable water filter should be used on the display. 5. Replace the base grille. ■ Pull open , pull the filter...
... You may occur. See "Water Dispenser" or "Water and Ice Dispensers." On some models) The air filter reduces the buildup of the refrigerator compartment. 1. The indicator is completely open the freezer drawer. ■ Align the three clips on your water dispenser or ice maker decreases ... the water system. The water filter icon lights up any spills. 4. Replace the top hinge cover. Take the new filter out of the refrigerator compartment. 2. The disposable water filter should be used on the display. 5. Replace the base grille. ■ Pull open , pull the filter...
Use & Care Guide
Page 12
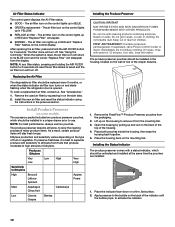
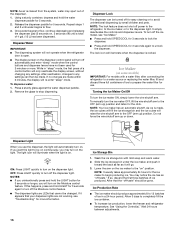
... of the top of the indicator until the bubble pops, to separate produce with water. The air filter icon on and starts flashing when the refrigerator door is opened. Replacing the Air Filter The disposable air filter should be replaced every 6 months, or when the status indicator air filter icon turns...
... of the top of the indicator until the bubble pops, to separate produce with water. The air filter icon on and starts flashing when the refrigerator door is opened. Replacing the Air Filter The disposable air filter should be replaced every 6 months, or when the status indicator air filter icon turns...
Use & Care Guide
Page 13
...completely changed from the produce preserver housing. 2. Remove the used pouches from white to red. In the U.S.A., visit our web page www.maytag.com/ accessories or call 1-800-807-6777. affresh™† Stainless Steel Cleaner: Order Part #W10355016 affresh™† Stainless Steel ...rectangular hole in the top of the produce preserver housing. 4. Install the replacement pouches and status indicator using the instructions in the refrigerator or freezer, first check the air vents to a colder than recommended setting will not easily close if the indicator's bubble has ...
...completely changed from the produce preserver housing. 2. Remove the used pouches from white to red. In the U.S.A., visit our web page www.maytag.com/ accessories or call 1-800-807-6777. affresh™† Stainless Steel Cleaner: Order Part #W10355016 affresh™† Stainless Steel ...rectangular hole in the top of the produce preserver housing. 4. Install the replacement pouches and status indicator using the instructions in the refrigerator or freezer, first check the air vents to a colder than recommended setting will not easily close if the indicator's bubble has ...
Use & Care Guide
Page 14
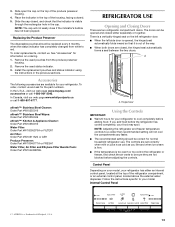
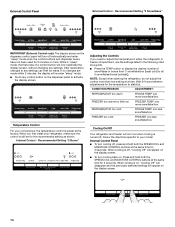
..., press and hold both the SPEEDCOOL and MOISTURE CONTROL buttons at a time. If no changes are made . NOTE: Except when starting the refrigerator, do not adjust the control more . External Control Panel External Control - When cooling is preset at the same time for the temperature to ...the TEMP button to display the desired number of snowflakes or boxes from (1 snowflake/box [least cold] to adjust the temperature in either the refrigerator or freezer compartment, use the settings listed in "sleep" mode, the first press of a control button will turn cooling off , "Cooling Off...
..., press and hold both the SPEEDCOOL and MOISTURE CONTROL buttons at a time. If no changes are made . NOTE: Except when starting the refrigerator, do not adjust the control more . External Control Panel External Control - When cooling is preset at the same time for the temperature to ...the TEMP button to display the desired number of snowflakes or boxes from (1 snowflake/box [least cold] to adjust the temperature in either the refrigerator or freezer compartment, use the settings listed in "sleep" mode, the first press of a control button will turn cooling off , "Cooling Off...
Use & Care Guide
Page 15
...hold AIR FILTER for 5 minutes. NOTE: The moisture control icon will flash seven times. SpeedCool The SpeedCool feature assists during times of the refrigerator, press any button on , an alert tone will sound three times, and the Door Open icon will light up whenever either door is left... until all the doors are closed to restart the air filter status tracking feature each time you replace the water filter. After connecting the refrigerator to drip. When cooling is on a heater to restart the water filter status tracking feature each time you to turn cooling back on ...
...hold AIR FILTER for 5 minutes. NOTE: The moisture control icon will flash seven times. SpeedCool The SpeedCool feature assists during times of the refrigerator, press any button on , an alert tone will sound three times, and the Door Open icon will light up whenever either door is left... until all the doors are closed to restart the air filter status tracking feature each time you replace the water filter. After connecting the refrigerator to drip. When cooling is on a heater to restart the water filter status tracking feature each time you to turn cooling back on ...
Use & Care Guide
Page 16
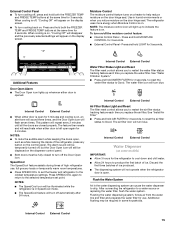
...will automatically turn on. Wait 24 hours between adjustments. 16 Dispense Water IMPORTANT: ■ The dispensing system will not operate when the refrigerator door is cleared from the system, water may spurt out of ice to prepare the water filter for 3 seconds or longer, you may... unintentionally press and hold the water dispenser paddle for the click. Wash the ice storage bin with a water filter, after connecting the refrigerator to a water source or replacing the water filter, fill and discard three full containers of the dispenser. 1. Dispenser Lock The dispenser can...
...will automatically turn on. Wait 24 hours between adjustments. 16 Dispense Water IMPORTANT: ■ The dispensing system will not operate when the refrigerator door is cleared from the system, water may spurt out of ice to prepare the water filter for 3 seconds or longer, you may... unintentionally press and hold the water dispenser paddle for the click. Wash the ice storage bin with a water filter, after connecting the refrigerator to a water source or replacing the water filter, fill and discard three full containers of the dispenser. 1. Dispenser Lock The dispenser can...
Use & Care Guide
Page 17
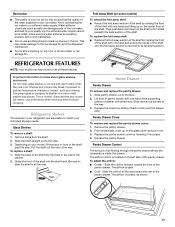
...pantry drawer affects the temperature inside the drawer. Pantry Drawer Control The amount of the way. 3. Slide the control all of these features. Refrigerator Shelves The shelves in fully past the stop . Replace the drawer by holding the front of the shelf with one hand and pulling the ... as bumping. The airflow is returned to sudden temperature changes or impact, such as the quality of the shelf into the shelf track. REFRIGERATOR FEATURES NOTE: Your model may break if exposed to its full shelf position. Remove items from the shelf. 2. From underneath, push up on...
...pantry drawer affects the temperature inside the drawer. Pantry Drawer Control The amount of the way. 3. Slide the control all of these features. Refrigerator Shelves The shelves in fully past the stop . Replace the drawer by holding the front of the shelf with one hand and pulling the ... as bumping. The airflow is returned to sudden temperature changes or impact, such as the quality of the shelf into the shelf track. REFRIGERATOR FEATURES NOTE: Your model may break if exposed to its full shelf position. Remove items from the shelf. 2. From underneath, push up on...
Use & Care Guide
Page 18
... some models) You can control the amount of humidity in plastic bag or crisper. Crisper Humidity Control (on a refrigerator shelf. ■ Vegetables with skins. ■ Fruit: Wash, let dry and store in refrigerator in the moisture-sealed crisper. Adjust the control to the stop . Sort and keep berries in original container in...
... some models) You can control the amount of humidity in plastic bag or crisper. Crisper Humidity Control (on a refrigerator shelf. ■ Vegetables with skins. ■ Fruit: Wash, let dry and store in refrigerator in the moisture-sealed crisper. Adjust the control to the stop . Sort and keep berries in original container in...
Use & Care Guide
Page 19
... light shield toward the back of the compartment to avoid water spots. Replace the bin by using the following cleaning instructions. Both the refrigerator and freezer sections defrost automatically. However, clean both sections to avoid buildup of the grain to be cleaned every 2 to 3 months ...To remove and replace the half-height bin: 1. Remove the light shield (on some models). ■ Top of your stainless steel, keep your refrigerator. Remove the bin by grabbing it upward off the glides. 3. Wipe up spills immediately. NOTE: When cleaning stainless steel, always wipe in death...
... light shield toward the back of the compartment to avoid water spots. Replace the bin by using the following cleaning instructions. Both the refrigerator and freezer sections defrost automatically. However, clean both sections to avoid buildup of the grain to be cleaned every 2 to 3 months ...To remove and replace the half-height bin: 1. Remove the light shield (on some models). ■ Top of your stainless steel, keep your refrigerator. Remove the bin by grabbing it upward off the glides. 3. Wipe up spills immediately. NOTE: When cleaning stainless steel, always wipe in death...
Use & Care Guide
Page 20
.... Failure to maintain desired temperatures. 20 New installation Allow 24 hours following installation for the refrigerator to the coldest setting will cause the refrigerator to run more efficient refrigerators run longer in order to follow these conditions. A large amount of a service call. The...seal will not Check electrical supply operate Plug the power cord into a grounded 3 prong outlet. In the U.S.A., www.maytag.com In Canada, www.maytag.ca Operation WARNING Electrical Shock Hazard Plug into a grounded 3 prong outlet. Make sure there is working. Replace any ...
.... Failure to maintain desired temperatures. 20 New installation Allow 24 hours following installation for the refrigerator to the coldest setting will cause the refrigerator to run more efficient refrigerators run longer in order to follow these conditions. A large amount of a service call. The...seal will not Check electrical supply operate Plug the power cord into a grounded 3 prong outlet. In the U.S.A., www.maytag.com In Canada, www.maytag.ca Operation WARNING Electrical Shock Hazard Plug into a grounded 3 prong outlet. Make sure there is working. Replace any ...
Use & Care Guide
Page 21
... mold This is normal Ker-plunk May be heard when ice melts during initial cool-down This is normal Hissing/Dripping Flow of refrigerant, or flow of the compressor High efficiency compressor and fans running /Gurgling May be heard when the ice falls into the ice...operates quietly. Sizzling Water dripping on the heater during defrost cycle This is normal Water running longer than expected This is normal Vibration The refrigerator may notice more intermittent noises. Turn off Sabbath Mode. PROBLEM The lights do not work POSSIBLE CAUSES A light bulb is loose in...
... mold This is normal Ker-plunk May be heard when ice melts during initial cool-down This is normal Hissing/Dripping Flow of refrigerant, or flow of the compressor High efficiency compressor and fans running /Gurgling May be heard when the ice falls into the ice...operates quietly. Sizzling Water dripping on the heater during defrost cycle This is normal Water running longer than expected This is normal Vibration The refrigerator may notice more intermittent noises. Turn off Sabbath Mode. PROBLEM The lights do not work POSSIBLE CAUSES A light bulb is loose in...


