User Instructions
Page 1
... safety messages in TROUBLESHOOTING, please visit our website at www.maytag.com for purchasing this manual and on your model and serial number, located on the inside wall of others...need assistance, call us at 1-800-807-6777. Table of Contents / indice / Table des mati_res REFRIGERATOR SAFETY 1 INSTALLATION INSTRUCTIONS 2 REFRIGERATOR USE 8 REFRIGERATOR CARE 13 TROUBLESHOOTING 14 WATER FILTER CERTIFICATIONS ....... 16 PRODUCT DATA SHEETS 17 WAR RANTY 19 SEGURIDAD DEL REFRIGERADOR ..... 20 INSTRUCCIONES DE INSTALACION...21 USO DE SU REFRIGERADOR 27 CUlDADO DE SU REFRIGERADOR...
... safety messages in TROUBLESHOOTING, please visit our website at www.maytag.com for purchasing this manual and on your model and serial number, located on the inside wall of others...need assistance, call us at 1-800-807-6777. Table of Contents / indice / Table des mati_res REFRIGERATOR SAFETY 1 INSTALLATION INSTRUCTIONS 2 REFRIGERATOR USE 8 REFRIGERATOR CARE 13 TROUBLESHOOTING 14 WATER FILTER CERTIFICATIONS ....... 16 PRODUCT DATA SHEETS 17 WAR RANTY 19 SEGURIDAD DEL REFRIGERADOR ..... 20 INSTRUCCIONES DE INSTALACION...21 USO DE SU REFRIGERADOR 27 CUlDADO DE SU REFRIGERADOR...
User Instructions
Page 2
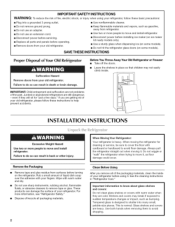
... servicing. • Replace all parts and panels before operating. • Remove doors from your old refrigerator. When moving it. Shelves and covers may not easily climb inside of your refrigerator before turning on some models). • Do not hit the refrigerator glass doors (on the refrigerator. Use both hands when removing them to sudden temperature changes or impact, such as bumping. If you remove all packaging materials. 2 When Moving Your Refrigerator: Your refrigerator is normal. INSTALLATION INSTRUCTIONS...
... servicing. • Replace all parts and panels before operating. • Remove doors from your old refrigerator. When moving it. Shelves and covers may not easily climb inside of your refrigerator before turning on some models). • Do not hit the refrigerator glass doors (on the refrigerator. Use both hands when removing them to sudden temperature changes or impact, such as bumping. If you remove all packaging materials. 2 When Moving Your Refrigerator: Your refrigerator is normal. INSTALLATION INSTRUCTIONS...
User Instructions
Page 3
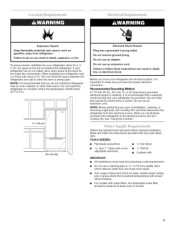
... any tools listed here. When you have the proper electrical connection. Do not use an extension cord. Do not use an adapter. See "Using the Controls." Do not install the refrigerator in death, fire, or electrical shock. Use an outlet that you do so can result in a location where the temperature will remain above freezing. • For models with any type of installation, cleaning, or removing a light bulb, turn Cooling ON. TOOLS NEEDED: •...
... any tools listed here. When you have the proper electrical connection. Do not use an extension cord. Do not use an adapter. See "Using the Controls." Do not install the refrigerator in death, fire, or electrical shock. Use an outlet that you do so can result in a location where the temperature will remain above freezing. • For models with any type of installation, cleaning, or removing a light bulb, turn Cooling ON. TOOLS NEEDED: •...
User Instructions
Page 4
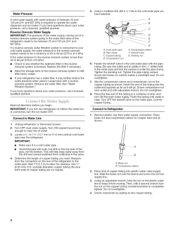
... 31.8 mm) vertical cold water pipe near the refrigerator. Unplug refrigerator or disconnect power. 2. Tighten the pipe clamp screws slowly and evenly so washer makes a watertight seal. Flush the tubing until water is under the pipe clamp. Remove plastic cap from the connection on the copper tubing counterclockwise to Refrigerator 1. Copper tubing D. Fasten the shutoff valve to operate the water dispenser and ice maker. Using an adjustable wrench, hold the nut...
... 31.8 mm) vertical cold water pipe near the refrigerator. Unplug refrigerator or disconnect power. 2. Tighten the pipe clamp screws slowly and evenly so washer makes a watertight seal. Flush the tubing until water is under the pipe clamp. Remove plastic cap from the connection on the copper tubing counterclockwise to Refrigerator 1. Copper tubing D. Fasten the shutoff valve to operate the water dispenser and ice maker. Using an adjustable wrench, hold the nut...
User Instructions
Page 5
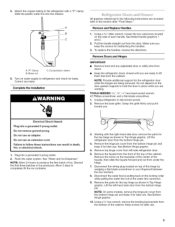
.... 1. Remove the hinge pin cover from doors. Disconnect the wiring plug located on top of the hinge by pulling back on the locking collar while pulling the water line out of the water line connector. 9. See Bottom Hinge graphic. 10. All graphics referenced in the following instructions are working. Remove and Replace Handles 1. Correct any adjustable door or utility bins from the bottom hinge pin and keep it for leaks. Unplug refrigerator or disconnect power. 2. Electrical...
.... 1. Remove the hinge pin cover from doors. Disconnect the wiring plug located on top of the hinge by pulling back on the locking collar while pulling the water line out of the water line connector. 9. See Bottom Hinge graphic. 10. All graphics referenced in the following instructions are working. Remove and Replace Handles 1. Correct any adjustable door or utility bins from the bottom hinge pin and keep it for leaks. Unplug refrigerator or disconnect power. 2. Electrical...
User Instructions
Page 6
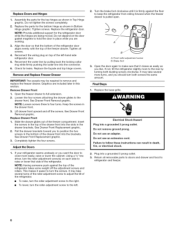
... is pulled open. Tighten all removable parts to doors and drawer and food to the left -hand side refrigerator door. 5. See Drawer Front Removal graphic. Insert the screws in the drawer brackets. Using a 3/8"hex driver, turn both leveling screws clockwise. A B A. Do not use an extension cord. Return all screws. 4. NOTE: Provide additional support for the bottom hinge as shown in death, fire, or electrical shock. 2. Reconnect the wiring plug on each...
... is pulled open. Tighten all removable parts to doors and drawer and food to the left -hand side refrigerator door. 5. See Drawer Front Removal graphic. Insert the screws in the drawer brackets. Using a 3/8"hex driver, turn both leveling screws clockwise. A B A. Do not use an extension cord. Return all screws. 4. NOTE: Provide additional support for the bottom hinge as shown in death, fire, or electrical shock. 2. Reconnect the wiring plug on each...

User Instructions
Page 7
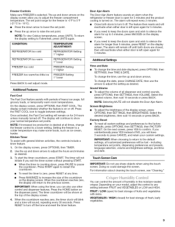
Hinge Cover Screw B, Top Hinge Cover C, 5/18"Hex-Head Hinge Screws D. Screw Water Connection A. 3/32"Setscrew A. Loosen 4 Door Bracket Screws A A, _f_2"Setscrew iiiiiiiiiiiiiiiiiiiiiIiiiiiiiiiiiiiiiiiiiiiiiiiiii Top Hinges A. Top Hinge Bottom Hinges A B C A, Hinge Pin Cover B, Bottom Hinge C. Hinge Screws Wiring Plug Fa_:ade A.
Hinge Cover Screw B, Top Hinge Cover C, 5/18"Hex-Head Hinge Screws D. Screw Water Connection A. 3/32"Setscrew A. Loosen 4 Door Bracket Screws A A, _f_2"Setscrew iiiiiiiiiiiiiiiiiiiiiIiiiiiiiiiiiiiiiiiiiiiiiiiiii Top Hinges A. Top Hinge Bottom Hinges A B C A, Hinge Pin Cover B, Bottom Hinge C. Hinge Screws Wiring Plug Fa_:ade A.

User Instructions
Page 8
... adjust the set points, press the TEMP button on the dispenser panel and display screen. The set point range for the refrigerator is off, the first press of control buttons or the display screen will appear on the dispenser panel. To view set points, press the TEMP button on the display screen. The up arrow to raise the set point. REFRIGERATOR USE There are still set to the "mid-settings." Your refrigerator and freezer will be changed...
... adjust the set points, press the TEMP button on the dispenser panel and display screen. The set point range for the refrigerator is off, the first press of control buttons or the display screen will appear on the dispenser panel. To view set points, press the TEMP button on the display screen. The up arrow to raise the set point. REFRIGERATOR USE There are still set to the "mid-settings." Your refrigerator and freezer will be changed...
User Instructions
Page 9
... door is left open again for 5 minutes. • If you need to keep the doors open again for the freezer is desired at all times, change the time and date displayed, press OPTIONS, then SE-I-I-INGS, then TIME & DATE. If you unintentionally press YES instead of heavy ice usage, full grocery loads, or temporarily warm room temperatures. To change the time, use other control and dispenser...
... door is left open again for 5 minutes. • If you need to keep the doors open again for the freezer is desired at all times, change the time and date displayed, press OPTIONS, then SE-I-I-INGS, then TIME & DATE. If you unintentionally press YES instead of heavy ice usage, full grocery loads, or temporarily warm room temperatures. To change the time, use other control and dispenser...

User Instructions
Page 10
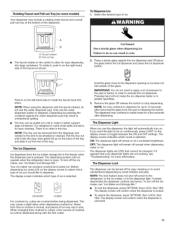
... the refrigerator to cool down how much water remains to be changed to dispense a specified amount of water with the touch of a control button or the display screen will turn it for 3 seconds, and the preset adjustment menu will automatically stop once the desired volume has been dispensed. 5= To stop dispensing before the desired volume has been dispensed, the digital display will flush air from the filter and water dispensing system...
... the refrigerator to cool down how much water remains to be changed to dispense a specified amount of water with the touch of a control button or the display screen will turn it for 3 seconds, and the preset adjustment menu will automatically stop once the desired volume has been dispensed. 5= To stop dispensing before the desired volume has been dispensed, the digital display will flush air from the filter and water dispensing system...
User Instructions
Page 11
... Hazard Use a sturdy glass when dispensing ice. Press a sturdy glass against the water dispenser pad may result in unintentional spilling. Only use the dispenser, the light will not make noise for up on the back of the tray and slide it hits the stop dispensing. The tray can result in size. Pull the tray out until it out the rest of the dispenser. To turn off power to the refrigerator, to the ice maker...
... Hazard Use a sturdy glass when dispensing ice. Press a sturdy glass against the water dispenser pad may result in unintentional spilling. Only use the dispenser, the light will not make noise for up on the back of the tray and slide it hits the stop dispensing. The tray can result in size. Pull the tray out until it out the rest of the dispenser. To turn off power to the refrigerator, to the ice maker...

User Instructions
Page 12
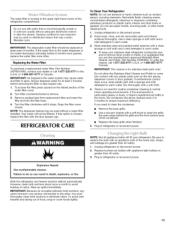
... "Using the Controls." Replace the water filter cartridge when the water filter status display changes to a softened water supply. When power is cut off the ice maker when removing the storage bin. 1. To manually turn off for the refrigerator. Avoid connecting the ice maker to "REPLACE." If water flow to your refrigerator is restored, a power outage alert will stop ice production when the storage bin is almost time to change your water quality and usage. INDICATOR: STATUS: NORMAL (green) New filter installed ORDER (yellow) Order filter REPLACE (red...
... "Using the Controls." Replace the water filter cartridge when the water filter status display changes to a softened water supply. When power is cut off the ice maker when removing the storage bin. 1. To manually turn off for the refrigerator. Avoid connecting the ice maker to "REPLACE." If water flow to your refrigerator is restored, a power outage alert will stop ice production when the storage bin is almost time to change your water quality and usage. INDICATOR: STATUS: NORMAL (green) New filter installed ORDER (yellow) Order filter REPLACE (red...
User Instructions
Page 13
... on plastic parts, interior and door liners or gaskets. You must thoroughly clean both sections about once a month to the water dispenser or ice maker decreases noticeably before removing the filter or blue bypass cap. 1. To avoid odor transfer and drying out of the water filter cover. 2. If the water flow to avoid buildup of the same size, shape, and wattage (no greater than 40 watts. 3. Turn the filter clockwise until...
... on plastic parts, interior and door liners or gaskets. You must thoroughly clean both sections about once a month to the water dispenser or ice maker decreases noticeably before removing the filter or blue bypass cap. 1. To avoid odor transfer and drying out of the water filter cover. 2. If the water flow to avoid buildup of the same size, shape, and wattage (no greater than 40 watts. 3. Turn the filter clockwise until...
User Instructions
Page 14
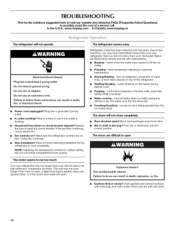
.../Rattling - fans/compressor adjusting to this reduction, you may run even longer if the room is warm, a large food load is added, doors are listed some normal sounds with mild soap and warm water. See "Using the Control(s)." If the problem continues, call . flow of refrigerant, movement of water lines, or from door. • Bin or shelf in death, fire, or electrical shock. New installation? Power cord unplugged? Push bin or shelf back into...
.../Rattling - fans/compressor adjusting to this reduction, you may run even longer if the room is warm, a large food load is added, doors are listed some normal sounds with mild soap and warm water. See "Using the Control(s)." If the problem continues, call . flow of refrigerant, movement of water lines, or from door. • Bin or shelf in death, fire, or electrical shock. New installation? Power cord unplugged? Push bin or shelf back into...

User Instructions
Page 15
...Minimize door openings and keep doors fully closed completely? If it correctly. • Reverse osmosis water filtration system connected to make new ice. Straighten the water source line. • Water filter installed on . Replace filter or reinstall it correctly. 15 Discard ice. Use airtight, moisture proof packaging to your cold water supply? A water filter may be installed to a water supply and the supply shutoff valve turned on ? Replace water filter when indicated. Kink in the water source line? See "Water and Ice Dispenser." Remove filter and operate dispenser. If water...
...Minimize door openings and keep doors fully closed completely? If it correctly. • Reverse osmosis water filtration system connected to make new ice. Straighten the water source line. • Water filter installed on . Replace filter or reinstall it correctly. 15 Discard ice. Use airtight, moisture proof packaging to your cold water supply? A water filter may be installed to a water supply and the supply shutoff valve turned on ? Replace water filter when indicated. Kink in the water source line? See "Water and Ice Dispenser." Remove filter and operate dispenser. If water...

User Instructions
Page 16
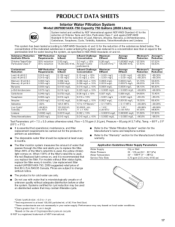
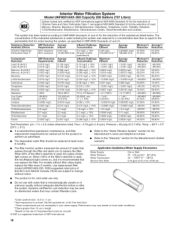
..., may be used o_1 disinfected waters that systems certilied Rated Service Flow: 078 gpm Do not use where for the water supply to cool completely. • Water not been recently dispensed? See "Water and Ice Dispenser." See "Water and Ice Dispenser." • Recently changed water filter? Make sure the refrigerator is lnicrobiologically unsafe or with water of water? Discard the first glass of the refrigerator door. Allow 24 hours after releasing the dispenser lever. • New installation? Carbolhran Endrin...
..., may be used o_1 disinfected waters that systems certilied Rated Service Flow: 078 gpm Do not use where for the water supply to cool completely. • Water not been recently dispensed? See "Water and Ice Dispenser." See "Water and Ice Dispenser." • Recently changed water filter? Make sure the refrigerator is lnicrobiologically unsafe or with water of water? Discard the first glass of the refrigerator door. Allow 24 hours after releasing the dispenser lever. • New installation? Carbolhran Endrin...
User Instructions
Page 17
... warranty. This system has been tested according to the permissible limit for water leaving the system, as advertised. • The disposable water filter should be used , the red (Replace) light comes on . Refer to the "Water Filtration System" section for the Manufacturer's name and telephone number. Systems certified for cyst reduction may contain filterable cysts. *Class I particle size: >0.5 to change without filter status lights, replace the filter...
... warranty. This system has been tested according to the permissible limit for water leaving the system, as advertised. • The disposable water filter should be used , the red (Replace) light comes on . Refer to the "Water Filtration System" section for the Manufacturer's name and telephone number. Systems certified for cyst reduction may contain filterable cysts. *Class I particle size: >0.5 to change without filter status lights, replace the filter...
User Instructions
Page 18
... disposable water filter should be replaced at least every 6 months. • Refer to the "Water Filtration System" section for the Manufacturer's name and telephone number. • Refer to the permissible limit for cyst reduction may contain filterable cysts. *Class I particle size: >0.5 to replace the filter. This system has been tested according to change without filter status lights, replace the filter every 6 months. For models without notice...
... disposable water filter should be replaced at least every 6 months. • Refer to the "Water Filtration System" section for the Manufacturer's name and telephone number. • Refer to the permissible limit for cyst reduction may contain filterable cysts. *Class I particle size: >0.5 to replace the filter. This system has been tested according to change without filter status lights, replace the filter every 6 months. For models without notice...
User Instructions
Page 19
... other damage to correct house wiring or plumbing. 3. This warranty gives you specific legal rights, and you also may have other than normal, single-family household use your major appliance, to replace or repair house fuses, or to the finish of your complete model number ready. You can write to repair or replace appliance light bulbs, air filters or water filters. In Canada, call 1-800-688...
... other damage to correct house wiring or plumbing. 3. This warranty gives you specific legal rights, and you also may have other than normal, single-family household use your major appliance, to replace or repair house fuses, or to the finish of your complete model number ready. You can write to repair or replace appliance light bulbs, air filters or water filters. In Canada, call 1-800-688...


