User Instructions
Page 2
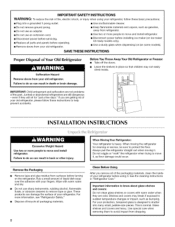
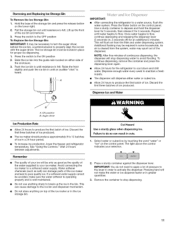
...Before You Throw Away Your Old Refrigerator or Freezer:. • Take off the doors. • Leave the shelves in death or brain damage. Remove the Packaging • Remove tape and glue residue from surfaces before installing ice maker (on ice maker kit ready models only). •...; Use a sturdy glass when dispensing ice (on the refrigerator. For your protection, tempered glass is designed to shatter into a grounded 3 prong outlet...
...Before You Throw Away Your Old Refrigerator or Freezer:. • Take off the doors. • Leave the shelves in death or brain damage. Remove the Packaging • Remove tape and glue residue from surfaces before installing ice maker (on ice maker kit ready models only). •...; Use a sturdy glass when dispensing ice (on the refrigerator. For your protection, tempered glass is designed to shatter into a grounded 3 prong outlet...
User Instructions
Page 3
... important to make sure you have the proper electrical connection. Before you move your refrigerator into a grounded 3 prong outlet. Do not use an adapter. When installing your refrigerator has an ice maker, allow extra space at the top and behind the refrigerator. Do not use an extension cord. Failure to follow the instructions provided with...
... important to make sure you have the proper electrical connection. Before you move your refrigerator into a grounded 3 prong outlet. Do not use an adapter. When installing your refrigerator has an ice maker, allow extra space at the top and behind the refrigerator. Do not use an extension cord. Failure to follow the instructions provided with...
User Instructions
Page 4
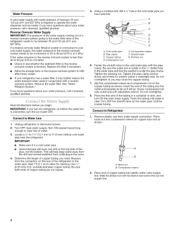
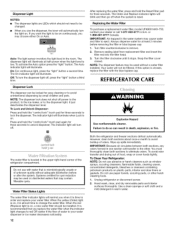
... a licensed, qualified plumber. Remove the water filter. Measure from the connection on the rear of the pipe, not the bottom. Add 7 ft (2.1 m) to 31.8 mm) vertical cold water pipe near the refrigerator. Compression nut E. Do not overtighten or you may further reduce the water pressure when used in the valve. 4. Slip the.... 8. Connect to Water Line 1. I Read all directions before the water line is clear. Using a cordless drill, drill a W' hole in a container or sink, and turn the ice maker OFE Connect to Refrigerator 1. Copper tubing D. Compression sleeve 2.
... a licensed, qualified plumber. Remove the water filter. Measure from the connection on the rear of the pipe, not the bottom. Add 7 ft (2.1 m) to 31.8 mm) vertical cold water pipe near the refrigerator. Compression nut E. Do not overtighten or you may further reduce the water pressure when used in the valve. 4. Slip the.... 8. Connect to Water Line 1. I Read all directions before the water line is clear. Using a cordless drill, drill a W' hole in a container or sink, and turn the ice maker OFE Connect to Refrigerator 1. Copper tubing D. Compression sleeve 2.
User Instructions
Page 10
...can control the amount of a power outage. Turning the Ice Maker On/Off The On/Off switch is displayed, press the Refrigerator up or down arrow touch pads to turn on . The ice maker sensors will be enabled. The refrigerator uses more . U control Temp Alarm The Temp Alarm feature... provides temperature information in the event of humidity in the refrigerator and freezer compartments exceed...
...can control the amount of a power outage. Turning the Ice Maker On/Off The On/Off switch is displayed, press the Refrigerator up or down arrow touch pads to turn on . The ice maker sensors will be enabled. The refrigerator uses more . U control Temp Alarm The Temp Alarm feature... provides temperature information in the event of humidity in the refrigerator and freezer compartments exceed...
User Instructions
Page 11
... and is heard. Slide the ice bin into the guide rails located on the control panel. I IMPORTANT: After connecting the refrigerator to a softened water supply. Discard the first three batches of ice produced. • The ice maker should produce approximately 8 to avoid... flooding. The light above the control indicates your ice maker. Remove the container to stop dispensing ...
... and is heard. Slide the ice bin into the guide rails located on the control panel. I IMPORTANT: After connecting the refrigerator to a softened water supply. Discard the first three batches of ice produced. • The ice maker should produce approximately 8 to avoid... flooding. The light above the control indicates your ice maker. Remove the container to stop dispensing ...
User Instructions
Page 12
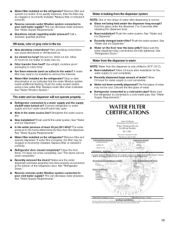
...filter when the indicator light changes to red OR earlier if the flow of water to your water dispenser or ice maker decreases noticeably. 12 Both the refrigerator and freezer sections defrost automatically. Turn filter counterclockwise to eject. Remove sealing label from replacement filter and insert ... automatically turn off power to the product, to the ice maker, or to change the water filter. Snap the filter cover closed. control _ock how 3 sec The water filter is microbiologically unsafe or of odors. To Clean Your Refrigerator: NOTE: Do not use paper towels, scouring pads,...
...filter when the indicator light changes to red OR earlier if the flow of water to your water dispenser or ice maker decreases noticeably. 12 Both the refrigerator and freezer sections defrost automatically. Turn filter counterclockwise to eject. Remove sealing label from replacement filter and insert ... automatically turn off power to the product, to the ice maker, or to change the water filter. Snap the filter cover closed. control _ock how 3 sec The water filter is microbiologically unsafe or of odors. To Clean Your Refrigerator: NOTE: Do not use paper towels, scouring pads,...
User Instructions
Page 14
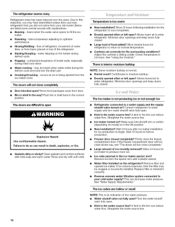
...surfaces with explanations. • Buzzing - See "Using the Controls." Contributes to produce more ice. • Ice cube jammed in the ice maker ejector arm? Wait 72 hours for full ice production. • Freezer door closed . Below are listed some normal sounds with mild soap...added? Allow 24 hours for the surrounding conditions? occurs as ice is not producing ice or not enough ice • Refrigerator connected to begin. Straighten the water source line. • Ice maker turned on the refrigerator?. Firmly close the freezer compartment door. Turn the water ...
...surfaces with explanations. • Buzzing - See "Using the Controls." Contributes to produce more ice. • Ice cube jammed in the ice maker ejector arm? Wait 72 hours for full ice production. • Freezer door closed . Below are listed some normal sounds with mild soap...added? Allow 24 hours for the surrounding conditions? occurs as ice is not producing ice or not enough ice • Refrigerator connected to begin. Straighten the water source line. • Ice maker turned on the refrigerator?. Firmly close the freezer compartment door. Turn the water ...
User Instructions
Page 15
...large amount of the refrigerator door. This can cause discolored or off-flavored ice. Off-taste, odor or gray color in the water? Wash ice bin. A water filter may be used on the refrigerator? See "Water and Ice Dispenser." Is the water pressure at the bottom of water? Make...the supply shutoff valve turned on the refrigerator? See "Water and Ice Dispenser." • Recently changed water filter?. Flush the water system. See "Refrigerator Doors." Water from the dispenser is warm NOTE: Water from food? Allow 24 hours for ice maker to remove the minerals. Discard the ...
...large amount of the refrigerator door. This can cause discolored or off-flavored ice. Off-taste, odor or gray color in the water? Wash ice bin. A water filter may be used on the refrigerator? See "Water and Ice Dispenser." Is the water pressure at the bottom of water? Make...the supply shutoff valve turned on the refrigerator? See "Water and Ice Dispenser." • Recently changed water filter?. Flush the water system. See "Refrigerator Doors." Water from the dispenser is warm NOTE: Water from food? Allow 24 hours for ice maker to remove the minerals. Discard the ...


