User Instructions
Page 1
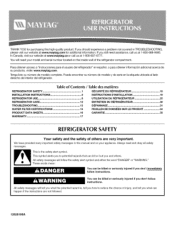
... 1 INSTALLATION INSTRUCTIONS 2 REFRIGERATOR USE 8 REFRIGERATOR CARE 12 TROUBLESHOOTING 13 WATER FILTER CERTIFICATIONS 15 SI_CURITI_ DU RI_FRIGI_RATEUR 18 INSTRUCTIONS D'INSTALLATION 19 UTILISATION DU RI_FRIGI_RATEUR 25 ENTRETIEN DU RI_FRIGI_RATEUR 30 DI_PANNAGE 31 FEUlLLES DE DONNI_ES SUR LE PRODUlT 34 PRODUCT DATA SHEETS 16 WAR RANTY 17 GARANTIE 35 REFRIGERATOR SAFETY Your safety and the safety of the refrigerator compartment. In Canada, visit our website at wvwv.maytag...
... 1 INSTALLATION INSTRUCTIONS 2 REFRIGERATOR USE 8 REFRIGERATOR CARE 12 TROUBLESHOOTING 13 WATER FILTER CERTIFICATIONS 15 SI_CURITI_ DU RI_FRIGI_RATEUR 18 INSTRUCTIONS D'INSTALLATION 19 UTILISATION DU RI_FRIGI_RATEUR 25 ENTRETIEN DU RI_FRIGI_RATEUR 30 DI_PANNAGE 31 FEUlLLES DE DONNI_ES SUR LE PRODUlT 34 PRODUCT DATA SHEETS 16 WAR RANTY 17 GARANTIE 35 REFRIGERATOR SAFETY Your safety and the safety of the refrigerator compartment. In Canada, visit our website at wvwv.maytag...
User Instructions
Page 2
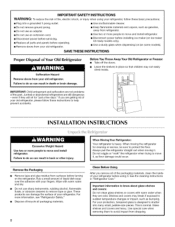
... installing ice maker (on ice maker kit ready models only). • Use a sturdy glass when dispensing ice (on the refrigerator. IMPORTANT: Child entrapment and suffocation are still dangerous - Glass shelves and covers are getting rid of liquid dish soap over the adhesive with warm water and dry. • Do not use an extension cord. • Disconnect power before servicing. • Replace all packaging materials. 2 & When Moving Your Refrigerator: Your refrigerator is normal. Use special care when removing...
... installing ice maker (on ice maker kit ready models only). • Use a sturdy glass when dispensing ice (on the refrigerator. IMPORTANT: Child entrapment and suffocation are still dangerous - Glass shelves and covers are getting rid of liquid dish soap over the adhesive with warm water and dry. • Do not use an extension cord. • Disconnect power before servicing. • Replace all packaging materials. 2 & When Moving Your Refrigerator: Your refrigerator is normal. Use special care when removing...
User Instructions
Page 3
... the refrigerator to the electrical source and reset the control (Thermostat, Refrigerator or Freezer Control depending on the model) to do not install the refrigerator near an oven, radiator, or other heat source. NOTE: Before performing any tools listed here. Do not remove ground prong. Failure to follow the instructions provided with any type of installation, cleaning, or removing a light bulb, turn the control (Thermostat, Refrigerator or Freezer Control depending on the model) to allow for leaks. Failure...
... the refrigerator to the electrical source and reset the control (Thermostat, Refrigerator or Freezer Control depending on the model) to do not install the refrigerator near an oven, radiator, or other heat source. NOTE: Before performing any tools listed here. Do not remove ground prong. Failure to follow the instructions provided with any type of installation, cleaning, or removing a light bulb, turn the control (Thermostat, Refrigerator or Freezer Control depending on the model) to allow for leaks. Failure...
User Instructions
Page 4
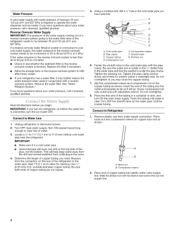
...). Unplug refrigerator or disconnect power. 2. Locate al/2 '' to 11/4`' (12.7 mm to allow for cleaning. Pipe clamp C. Connect to the water pipe. I Read all directions before the water line is clear. If you need. Remove the water filter. Place the free end of between 35 and 120 psi (241 and 827 kPa). Flush the tubing until water is connected, turn ON the main water supply. Coil the copper tubing. Place...
...). Unplug refrigerator or disconnect power. 2. Locate al/2 '' to 11/4`' (12.7 mm to allow for cleaning. Pipe clamp C. Connect to the water pipe. I Read all directions before the water line is clear. If you need. Remove the water filter. Place the free end of between 35 and 120 psi (241 and 827 kPa). Flush the tubing until water is connected, turn ON the main water supply. Coil the copper tubing. Place...
User Instructions
Page 5
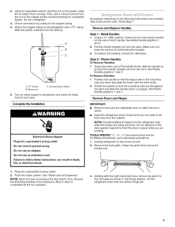
... refrigerator with the door studs. 2. Slide the plastic waterline into a grounded 3 prong outlet. 2. Correct any adjustable door or utility bins from the door. Do not remove ground prong. Do not use an adapter. Failure to completely fill the ice container. 3. Remove and Replace Handles Style I - Pull the handle straight out from the bottom hinge pin. Make sure you . 1. Style 2 - Position the handle so that the mounting clips are working...
... refrigerator with the door studs. 2. Slide the plastic waterline into a grounded 3 prong outlet. 2. Correct any adjustable door or utility bins from the door. Do not remove ground prong. Do not use an adapter. Failure to completely fill the ice container. 3. Remove and Replace Handles Style I - Pull the handle straight out from the bottom hinge pin. Make sure you . 1. Style 2 - Position the handle so that the mounting clips are working...
User Instructions
Page 6
... parts to doors and drawer and food to remove and replace the freezer drawer. Open the freezer drawer to four turns. eeBottomHingegraphic. 3. eepscrewfsorlateruse. onotdepenodnthedoor gaskemt agnetsoholdthedoorinplacewhileyouare working. 3. Whileholdintghetabbedsectionofthewaterlinteu,rnthe lockingcollarcounterclockwuinsetiyl ouheaar "click." Do not use an adapter. Remove and Replace Freezer Drawer 5. pin. See Drawer Front Replacement graphic. 2. See Drawer Front 8. onottightenthescrewcsompletely. 2. Do not use an extension cord. NOTE: Loosen screws three to full...
... parts to doors and drawer and food to remove and replace the freezer drawer. Open the freezer drawer to four turns. eeBottomHingegraphic. 3. eepscrewfsorlateruse. onotdepenodnthedoor gaskemt agnetsoholdthedoorinplacewhileyouare working. 3. Whileholdintghetabbedsectionofthewaterlinteu,rnthe lockingcollarcounterclockwuinsetiyl ouheaar "click." Do not use an adapter. Remove and Replace Freezer Drawer 5. pin. See Drawer Front Replacement graphic. 2. See Drawer Front 8. onottightenthescrewcsompletely. 2. Do not use an extension cord. NOTE: Loosen screws three to full...

User Instructions
Page 7
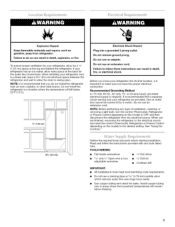
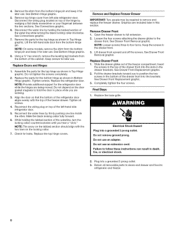
B... :; Top Hinge Bottom Hinges A. Bottom Hinge C. Top Hinge Cover C. 5/16" Hex-Head Hinge Screws D. Wiring Plug Metal Handle Plastic Handle A. 3/3e"Set Screw Metal Handle /i/ /1 // 1/1 /1/ // /11 i/ /// \\ \ \\ \\ \\ \ \\ \\ -- Shim (on some models) B. Plastic Handle A A. 3/,J2"Set Screw A. Hinge Cover Screw B. Tabs B. c A. Hinge Screws Connections F A __,,,B A. Loosen 4 Door Bracket Screws Top Hinges (_+ ....... \-) .....
B... :; Top Hinge Bottom Hinges A. Bottom Hinge C. Top Hinge Cover C. 5/16" Hex-Head Hinge Screws D. Wiring Plug Metal Handle Plastic Handle A. 3/3e"Set Screw Metal Handle /i/ /1 // 1/1 /1/ // /11 i/ /// \\ \ \\ \\ \\ \ \\ \\ -- Shim (on some models) B. Plastic Handle A A. 3/,J2"Set Screw A. Hinge Cover Screw B. Tabs B. c A. Hinge Screws Connections F A __,,,B A. Loosen 4 Door Bracket Screws Top Hinges (_+ ....... \-) .....
User Instructions
Page 8
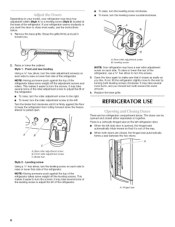
... refrigerator takes some weight off the adjustment screws and rollers. If your refrigerator may take several more easily, use a 3/8"hex driver to the left. Remove the base grille. NOTE: Having someone push against the top of the refrigerator takes some weight off the leveling screws. A. Turn the brake foot clockwise until it toward you want the door to turn the screws. This makes...
... refrigerator takes some weight off the adjustment screws and rollers. If your refrigerator may take several more easily, use a 3/8"hex driver to the left. Remove the base grille. NOTE: Having someone push against the top of the refrigerator takes some weight off the leveling screws. A. Turn the brake foot clockwise until it toward you want the door to turn the screws. This makes...
User Instructions
Page 9
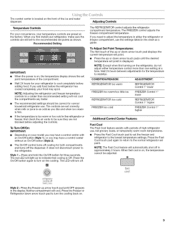
... install your refrigerator, make sure the controls are set correctly when milk or juice is as cold as you like and when ice cream is firm. • If the temperature is too warm or too cold in the refrigerator or freezer, first check the air vents to adjust the temperature in the display. It does not disconnect power to the recommended set to the refrigerator. The red LED will light...
... install your refrigerator, make sure the controls are set correctly when milk or juice is as cold as you like and when ice cream is firm. • If the temperature is too warm or too cold in the refrigerator or freezer, first check the air vents to adjust the temperature in the display. It does not disconnect power to the recommended set to the refrigerator. The red LED will light...
User Instructions
Page 10
... located on the door hinge seal. Depending on the door heater. Use in humid environments or when you notice moisture on the ice maker. U control Temp Alarm The Temp Alarm feature provides temperature information in the Refrigerator display. 2. Temperature in the upper left open ) for 5 continuous minutes. All control center lights, interior lights and alarm tones will automatically stop the audible alarm and alternating temperature displays. alarm Door Alarm The Door Alarm feature sounds a chime every few seconds when the refrigerator door has been left...
... located on the door hinge seal. Depending on the door heater. Use in humid environments or when you notice moisture on the ice maker. U control Temp Alarm The Temp Alarm feature provides temperature information in the Refrigerator display. 2. Temperature in the upper left open ) for 5 continuous minutes. All control center lights, interior lights and alarm tones will automatically stop the audible alarm and alternating temperature displays. alarm Door Alarm The Door Alarm feature sounds a chime every few seconds when the refrigerator door has been left...
User Instructions
Page 11
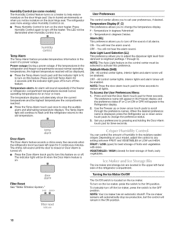
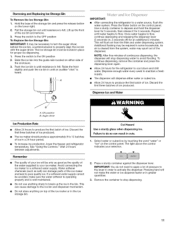
..., lower the freezer and refrigerator temperature. I IMPORTANT: After connecting the refrigerator to a softened water supply. Repeat until resistance is cleared from the filter and water dispensing system. As air is felt. Auger driver Ice Production Rate • Allow 24 hours to break up the front of the storage bin and press the release button on top of ice. See "Using the Controls." This can damage parts of the dispenser. Hold the...
..., lower the freezer and refrigerator temperature. I IMPORTANT: After connecting the refrigerator to a softened water supply. Repeat until resistance is cleared from the filter and water dispensing system. As air is felt. Auger driver Ice Production Rate • Allow 24 hours to break up the front of the storage bin and press the release button on top of ice. See "Using the Controls." This can damage parts of the dispenser. Hold the...
User Instructions
Page 12
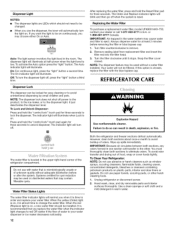
... plastic parts, interior and door liners or gaskets. NOTE: The dispenser lock does not shut off when the system is located in the room. Remove sealing label from replacement filter and insert the filter end into the filter head. 3. Snap the filter cover closed. control _ock how 3 sec The water filter is reset. Water Filter Status Lights The water filter indicator lights will automatically turn the light on , a new water filter should not need to be used without adequate disinfection before removing the filter...
... plastic parts, interior and door liners or gaskets. NOTE: The dispenser lock does not shut off when the system is located in the room. Remove sealing label from replacement filter and insert the filter end into the filter head. 3. Snap the filter cover closed. control _ock how 3 sec The water filter is reset. Water Filter Status Lights The water filter indicator lights will automatically turn the light on , a new water filter should not need to be used without adequate disinfection before removing the filter...
User Instructions
Page 13
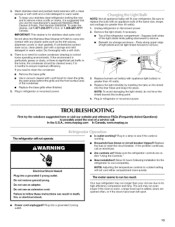
... need for routine condenser cleaning in death, fire, or electrical shock. • Power cord unplugged? Are controls on . Make sure the refrigerator controls are opened often, or if the doors have been left open areas behind the grille and the front surface area of the light shield while pulling downward to cool completely. Remove the light shield, if necessary. • Top of the same size, shape, and wattage...
... need for routine condenser cleaning in death, fire, or electrical shock. • Power cord unplugged? Are controls on . Make sure the refrigerator controls are opened often, or if the doors have been left open areas behind the grille and the front surface area of the light shield while pulling downward to cool completely. Remove the light shield, if necessary. • Top of the same size, shape, and wattage...
User Instructions
Page 14
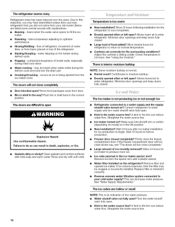
...- See "Using the Controls." The ice maker is being ejected from items placed on ? Straighten the water source line. • Ice maker turned on the heater during initial cool-down • Water running - Remove filter and operate ice maker. The ice cubes are difficult to water supply and turn water shutoff valve fully open ? fans/compressor adjusting to a water supply and the supply shutoff valve turned on top of ice recently removed? Connect refrigerator to open . • Kink in the ON position. • New installation? See "Water Supply Requirements." The doors are...
...- See "Using the Controls." The ice maker is being ejected from items placed on ? Straighten the water source line. • Ice maker turned on the heater during initial cool-down • Water running - Remove filter and operate ice maker. The ice cubes are difficult to water supply and turn water shutoff valve fully open ? fans/compressor adjusting to a water supply and the supply shutoff valve turned on top of ice recently removed? Connect refrigerator to open . • Kink in the ON position. • New installation? See "Water Supply Requirements." The doors are...
User Instructions
Page 15
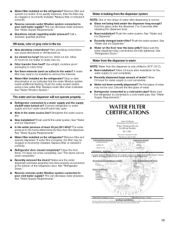
...: 07S gpm Conditions of llealth Services Water Treatment Device Certificate Number 03 - 1583 Date Issued: September lh, 2003 Dare Revised Aprd 22, 2004 Replacemem Elements . ?- Connect refrigerator to a cold water pipe. Off-taste, odor or gray color in the water? Replace water filter when indicated. See "Water and Ice Dispenser." Make sure the refrigerator is warm NOTE: Water from the dispenser. The water and ice dispenser will not close completely." New installation? See "Water Supply Requirements." Remove filter and operate ice maker.
...: 07S gpm Conditions of llealth Services Water Treatment Device Certificate Number 03 - 1583 Date Issued: September lh, 2003 Dare Revised Aprd 22, 2004 Replacemem Elements . ?- Connect refrigerator to a cold water pipe. Off-taste, odor or gray color in the water? Replace water filter when indicated. See "Water and Ice Dispenser." Make sure the refrigerator is warm NOTE: Water from the dispenser. The water and ice dispenser will not close completely." New installation? See "Water Supply Requirements." Remove filter and operate ice maker.
User Instructions
Page 16
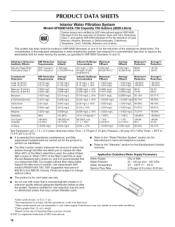
... warranty. Pressure = 60 psig (413.7 kPa). Do not use only. Prices are subject to change without filter status lights, replace the filter every 6 months. PRODUCT DATA SHEETS Interior Water Filtration System Model UFK8001AXX-750 Capacity 750 Gallons (2839 Liters) System tested and certified by NSF International against NSF/ANSI Standard 53 for the reduction of the substances listed below. When 90% of the filter's rated...
... warranty. Pressure = 60 psig (413.7 kPa). Do not use only. Prices are subject to change without filter status lights, replace the filter every 6 months. PRODUCT DATA SHEETS Interior Water Filtration System Model UFK8001AXX-750 Capacity 750 Gallons (2839 Liters) System tested and certified by NSF International against NSF/ANSI Standard 53 for the reduction of the substances listed below. When 90% of the filter's rated...
User Instructions
Page 17
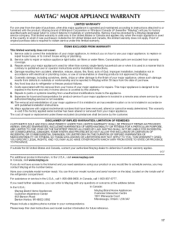
... access to the Internet and you need further assistance, you can find your model number and serial number on the label, located on how to use your major appliance, to replace or repair house fuses, or to correct house wiring or plumbing. 2. Expenses for travel and transportation for future reference. 17 THIS WARRANTY GIVES YOU SPECIFIC LEGAL RIGHTS, AND YOU MAY ALSO...
... access to the Internet and you need further assistance, you can find your model number and serial number on the label, located on how to use your major appliance, to replace or repair house fuses, or to correct house wiring or plumbing. 2. Expenses for travel and transportation for future reference. 17 THIS WARRANTY GIVES YOU SPECIFIC LEGAL RIGHTS, AND YOU MAY ALSO...

User Instructions
Page 36
Tous droits reserves. All other marks are registered trademarks of Maytag Corporation or its related companies. MAYTAG et le symbole "M" sont des marques deposees de Maytag Limited au Canada. Imprime aux E.-U. Maytag Corporation ou de ses compagnies affiliees. 1/08 Printed in Canada. Toutes MAYTAG and the "M" Symbol are trademarks of Maytag Limited in U.S.A. les autres marques de commerce appartiennent _. 12828186A SP PN 12828190A © 2008 All rights reserved.
Tous droits reserves. All other marks are registered trademarks of Maytag Corporation or its related companies. MAYTAG et le symbole "M" sont des marques deposees de Maytag Limited au Canada. Imprime aux E.-U. Maytag Corporation ou de ses compagnies affiliees. 1/08 Printed in Canada. Toutes MAYTAG and the "M" Symbol are trademarks of Maytag Limited in U.S.A. les autres marques de commerce appartiennent _. 12828186A SP PN 12828190A © 2008 All rights reserved.


