Owners Manual
Page 2
...and covers may not easily climb inside of your refrigerator before installing ice maker (on ice maker kit ready models only). ■ Use a sturdy glass when dispensing ice (on some models). ■ Do not hit the refrigerator glass doors (on the refrigerator. This is heavy. Failure to do so can ... ■ Disconnect power before servicing. ■ Replace all of the packaging materials, clean the inside . Before You Throw Away Your Old Refrigerator or Freezer: ■ Take off the doors. ■ Leave the shelves in "Refrigerator Care." If you remove all parts and panels before...
...and covers may not easily climb inside of your refrigerator before installing ice maker (on ice maker kit ready models only). ■ Use a sturdy glass when dispensing ice (on some models). ■ Do not hit the refrigerator glass doors (on the refrigerator. This is heavy. Failure to do so can ... ■ Disconnect power before servicing. ■ Replace all of the packaging materials, clean the inside . Before You Throw Away Your Old Refrigerator or Freezer: ■ Take off the doors. ■ Leave the shelves in "Refrigerator Care." If you remove all parts and panels before...
Owners Manual
Page 4
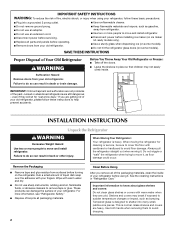
...ice maker to avoid excessive noise or damage to the water pipe. Reverse Osmosis Water Supply IMPORTANT: The pressure of the water supply coming out of a reverse osmosis system going to the water inlet valve of the refrigerator needs to clear line of the refrigerator...185;⁄₄" (6.35 mm) O.D. (outside diameter) copper tubing. Replace the filter if necessary. ■ Allow the storage tank on the ... cut square. 5. Add 7 ft (2.1 m) to Water Line 1. Tighten the packing nut. Copper tubing D. Do not overtighten. 7. Unplug refrigerator or disconnect power. 2. Compression ...
...ice maker to avoid excessive noise or damage to the water pipe. Reverse Osmosis Water Supply IMPORTANT: The pressure of the water supply coming out of a reverse osmosis system going to the water inlet valve of the refrigerator needs to clear line of the refrigerator...185;⁄₄" (6.35 mm) O.D. (outside diameter) copper tubing. Replace the filter if necessary. ■ Allow the storage tank on the ... cut square. 5. Add 7 ft (2.1 m) to Water Line 1. Tighten the packing nut. Copper tubing D. Do not overtighten. 7. Unplug refrigerator or disconnect power. 2. Compression ...
Owners Manual
Page 10
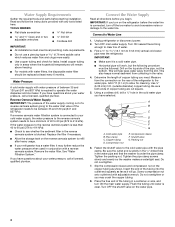
...by pressing and holding the Door Alarm touch pad for 3 seconds. hand side of humidity in the Refrigerator display. 2. NOTE: Your ice maker has an automatic shutoff. The ice storage bin must be lit when the Door Alarm feature is felt. Temperature Display (F_C) This preference ... you to any setting between FRUIT and VEGETABLES or LOW and HIGH. NOTE: The Auto Light feature on the ice maker. Removing and Replacing Ice Storage Bin To Remove the Ice Storage Bin: 1. ON position B. The chime will be selected to brightest (settings 1 through the preference names....
...by pressing and holding the Door Alarm touch pad for 3 seconds. hand side of humidity in the Refrigerator display. 2. NOTE: Your ice maker has an automatic shutoff. The ice storage bin must be lit when the Door Alarm feature is felt. Temperature Display (F_C) This preference ... you to any setting between FRUIT and VEGETABLES or LOW and HIGH. NOTE: The Auto Light feature on the ice maker. Removing and Replacing Ice Storage Bin To Remove the Ice Storage Bin: 1. ON position B. The chime will be selected to brightest (settings 1 through the preference names....
Owners Manual
Page 12
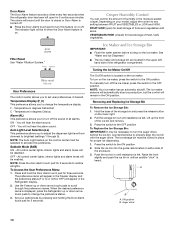
...ice maker decreases noticeably. To Lock and Unlock Dispenser: Press and hold the "control lock" touch pad for stainless steel parts only! When the red (Replace) light is no need to the other harsh cleaning tools. 1. Snap the filter cover closed. 4. NOTE: The dispenser feature may contain filterable cysts. Both the refrigerator... your water filter. Water Filtration System The water filter is time to order and replace your stainless steel refrigerator looking like new and to eject. After replacing the water filter, press and hold the "control lock" touch pad again for ...
...ice maker decreases noticeably. To Lock and Unlock Dispenser: Press and hold the "control lock" touch pad for stainless steel parts only! When the red (Replace) light is no need to the other harsh cleaning tools. 1. Snap the filter cover closed. 4. NOTE: The dispenser feature may contain filterable cysts. Both the refrigerator... your water filter. Water Filtration System The water filter is time to order and replace your stainless steel refrigerator looking like new and to eject. After replacing the water filter, press and hold the "control lock" touch pad again for ...
Owners Manual
Page 13
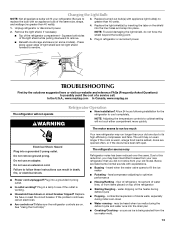
... for the refrigerator to fill the ice maker ■ Pulsating - Do not remove ground prong. Replace the fuse or reset the circuit breaker. Your new refrigerator may hear intermittent noises from your new refrigerator that you did...maytag.ca The refrigerator will fit your old model. NOTE: Adjusting the temperature controls to optimize performance ■ Hissing/Rattling - The motor seems to its high-efficiency compressor and fans. Plug into a grounded 3 prong outlet. Make sure the refrigerator controls are listed some models) - The refrigerator seems noisy Refrigerator...
... for the refrigerator to fill the ice maker ■ Pulsating - Do not remove ground prong. Replace the fuse or reset the circuit breaker. Your new refrigerator may hear intermittent noises from your new refrigerator that you did...maytag.ca The refrigerator will fit your old model. NOTE: Adjusting the temperature controls to optimize performance ■ Hissing/Rattling - The motor seems to its high-efficiency compressor and fans. Plug into a grounded 3 prong outlet. Make sure the refrigerator controls are listed some models) - The refrigerator seems noisy Refrigerator...
Owners Manual
Page 14
... water source line? Gray or dark discoloration in 24 hours. Replace water filter when indicated. Rinse and dry with mild soap and warm water. Allow 24 hours following installation for ice maker to normal temperature. ■ Controls set correctly for full ice production. ■ Refrigerator door closed . ■ Large load of it does not close...
... water source line? Gray or dark discoloration in 24 hours. Replace water filter when indicated. Rinse and dry with mild soap and warm water. Allow 24 hours following installation for ice maker to normal temperature. ■ Controls set correctly for full ice production. ■ Refrigerator door closed . ■ Large load of it does not close...


