Owners Manual
Page 1
.... You will need assistance, call us at 1-800-688-9900. In Canada, visit our website at www.maytag.ca or call us at www.maytag.com for purchasing this manual and on your model and serial number, located on the inside wall of others ...201; DU RÉFRIGÉRATEUR........39 INSTALLATION INSTRUCTIONS........... 2 INSTRUCCIONES DE INSTALACIÓN.. 20 INSTRUCTIONS D'INSTALLATION......40 REFRIGERATOR USE 8 USO DE SU REFRIGERADOR 26 UTILISATION DU RÉFRIGÉRATEUR ...46 REFRIGERATOR CARE 12 CUIDADO DE SU REFRIGERADOR .... 31 ENTRETIEN DU RÉFRIGÉRATEUR .....51...
.... You will need assistance, call us at 1-800-688-9900. In Canada, visit our website at www.maytag.ca or call us at www.maytag.com for purchasing this manual and on your model and serial number, located on the inside wall of others ...201; DU RÉFRIGÉRATEUR........39 INSTALLATION INSTRUCTIONS........... 2 INSTRUCCIONES DE INSTALACIÓN.. 20 INSTRUCTIONS D'INSTALLATION......40 REFRIGERATOR USE 8 USO DE SU REFRIGERADOR 26 UTILISATION DU RÉFRIGÉRATEUR ...46 REFRIGERATOR CARE 12 CUIDADO DE SU REFRIGERADOR .... 31 ENTRETIEN DU RÉFRIGÉRATEUR .....51...
Owners Manual
Page 2
...avoid dropping. 2 Failure to know about glass shelves and covers: Do not clean glass shelves or covers with your refrigerator. When Moving Your Refrigerator: Your refrigerator is normal. When moving it. Clean Before Using After you are not problems of your fingers. Important information to do...more people to do so can result in back or other injury. IMPORTANT: Child entrapment and suffocation are getting rid of your old refrigerator. ■ Keep flammable materials and vapors, such as bumping. If you remove all of the packaging materials, clean the inside ...
...avoid dropping. 2 Failure to know about glass shelves and covers: Do not clean glass shelves or covers with your refrigerator. When Moving Your Refrigerator: Your refrigerator is normal. When moving it. Clean Before Using After you are not problems of your fingers. Important information to do...more people to do so can result in back or other injury. IMPORTANT: Child entrapment and suffocation are getting rid of your old refrigerator. ■ Keep flammable materials and vapors, such as bumping. If you remove all of the packaging materials, clean the inside ...

Owners Manual
Page 3
Allow for the water line connections. Before you move your refrigerator into a grounded 3 prong outlet. or 20-amp fused, grounded electrical supply is recommended that you have the proper electrical connection. See "Using the Controls." 3³⁄₄" (9.5 cm) 3 To ensure proper ventilation for your refrigerator be turned off by a switch. Do not install...
Allow for the water line connections. Before you move your refrigerator into a grounded 3 prong outlet. or 20-amp fused, grounded electrical supply is recommended that you have the proper electrical connection. See "Using the Controls." 3³⁄₄" (9.5 cm) 3 To ensure proper ventilation for your refrigerator be turned off by a switch. Do not install...
Owners Manual
Page 4
... valve G. Tighten the packing nut. Screw compression nut onto outlet end with any tools listed here. Place the free end of the refrigerator to see whether the sediment filter in conjunction with the pipe clamp. Remove the water filter. See "Water Filtration System." Turn ON ... check for cleaning. IMPORTANT: ■ Make sure it is a cold water pipe. ■ Horizontal pipe will go. Do not overtighten. 7. Add 7 ft (2.1 m) to 414 kPa). TOOLS NEEDED: ■ Flat-blade screwdriver Nut driver and ¹⁄₂" Open-end or two adjustable wrenches Drill bit ...
... valve G. Tighten the packing nut. Screw compression nut onto outlet end with any tools listed here. Place the free end of the refrigerator to see whether the sediment filter in conjunction with the pipe clamp. Remove the water filter. See "Water Filtration System." Turn ON ... check for cleaning. IMPORTANT: ■ Make sure it is a cold water pipe. ■ Horizontal pipe will go. Do not overtighten. 7. Add 7 ft (2.1 m) to 414 kPa). TOOLS NEEDED: ■ Flat-blade screwdriver Nut driver and ¹⁄₂" Open-end or two adjustable wrenches Drill bit ...
Owners Manual
Page 5
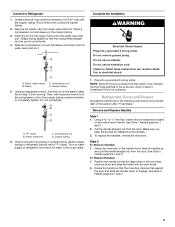
... on the copper tubing counterclockwise to avoid kinks. 4. Do not use an extension cord. Do not use an adapter. Allow 3 days to Refrigerator 1. To replace the handles, reverse the directions. Then, with the door studs. 2. Do not overtighten. A B C D A. To ...Replace Handles: 1. Connect to completely fill the ice container. Insert the end of 2 ft [61 cm]) with a "P" clamp. Refrigerator Doors and Drawer All graphics referenced in the following instructions are included later in death, fire, or electrical shock. 1. See Style ...
... on the copper tubing counterclockwise to avoid kinks. 4. Do not use an extension cord. Do not use an adapter. Allow 3 days to Refrigerator 1. To replace the handles, reverse the directions. Then, with the door studs. 2. Do not overtighten. A B C D A. To ...Replace Handles: 1. Connect to completely fill the ice container. Insert the end of 2 ft [61 cm]) with a "P" clamp. Refrigerator Doors and Drawer All graphics referenced in the following instructions are included later in death, fire, or electrical shock. 1. See Style ...
Owners Manual
Page 6
...place while you are being removed. Disconnect the water line by pulling back on top of the left-hand side refrigerator door. 5. Assemble the parts for later use. Replace the refrigerator door. Do not depend on top of the hinge by pulling back the locking collar ring while firmly pushing the... tighten the four screws. Remove Doors and Hinges IMPORTANT: ■ Remove food and any adjustable door or utility bins from doors. ■ Keep the refrigerator doors closed until you to position the two screws in the bottom of the drawer front into the brackets. Lift the left side...
...place while you are being removed. Disconnect the water line by pulling back on top of the left-hand side refrigerator door. 5. Assemble the parts for later use. Replace the refrigerator door. Do not depend on top of the hinge by pulling back the locking collar ring while firmly pushing the... tighten the four screws. Remove Doors and Hinges IMPORTANT: ■ Remove food and any adjustable door or utility bins from doors. ■ Keep the refrigerator doors closed until you to position the two screws in the bottom of the drawer front into the brackets. Lift the left side...
Owners Manual
Page 8
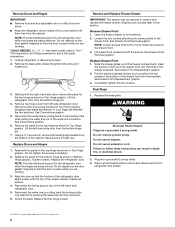
..., the hinged seal automatically forms a seal between the two doors. It may spoil. IMPORTANT: Adjust the Doors ■ Your refrigerator has two adjustable, front leveling screws - If your food may take several more to raise or lower that it easier to the...a vertically-hinged seal on , the temperature display shows the set points as you want the door to cool completely before the refrigerator has cooled completely, your refrigerator seems unsteady or you like. A 2. Hinged seal A A. Replace the base grille. Recommended Settings IMPORTANT: ■ When the...
..., the hinged seal automatically forms a seal between the two doors. It may spoil. IMPORTANT: Adjust the Doors ■ Your refrigerator has two adjustable, front leveling screws - If your food may take several more to raise or lower that it easier to the...a vertically-hinged seal on , the temperature display shows the set points as you want the door to cool completely before the refrigerator has cooled completely, your refrigerator seems unsteady or you like. A 2. Hinged seal A A. Replace the base grille. Recommended Settings IMPORTANT: ■ When the...
Owners Manual
Page 9
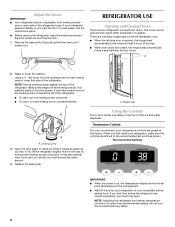
... In Vacation Mode, the freezer will be displayed. ■ Press the Temp Alarm touch pad until the indicator light is displayed. The refrigerator uses more than one setting at a time. Press Humidity Control again to turn off. Press the Vacation Mode touch pad again, or ...energy. ■ Press the Vacation Mode touch pad until the indicator light is on the door hinge seal. Adjusting Controls The REFRIGERATOR control adjusts the refrigerator compartment temperature. ■ The recommended settings should be correct for 3 seconds until the indicator light goes off to turn off this...
... In Vacation Mode, the freezer will be displayed. ■ Press the Temp Alarm touch pad until the indicator light is displayed. The refrigerator uses more than one setting at a time. Press Humidity Control again to turn off. Press the Vacation Mode touch pad again, or ...energy. ■ Press the Vacation Mode touch pad until the indicator light is on the door hinge seal. Adjusting Controls The REFRIGERATOR control adjusts the refrigerator compartment temperature. ■ The recommended settings should be correct for 3 seconds until the indicator light goes off to turn off this...
Owners Manual
Page 10
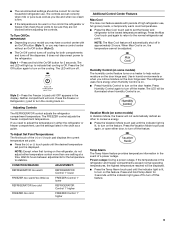
... All control center lights, interior lights and alarm tones will be lit when the Door Alarm feature is displayed, press the Refrigerator (+) or (-) touch pads to stop ice production, but the control will alternately show the current temperatures and the highest temperatures ...Removing and Replacing Ice Storage Bin To Remove the Ice Storage Bin: 1. You will sound repeatedly if the freezer or refrigerator compartment temperatures exceed normal operating temperatures for proper ice dispensing. 1. User Preferences The control center allows you to properly align ...
... All control center lights, interior lights and alarm tones will be lit when the Door Alarm feature is displayed, press the Refrigerator (+) or (-) touch pads to stop ice production, but the control will alternately show the current temperatures and the highest temperatures ...Removing and Replacing Ice Storage Bin To Remove the Ice Storage Bin: 1. You will sound repeatedly if the freezer or refrigerator compartment temperatures exceed normal operating temperatures for proper ice dispensing. 1. User Preferences The control center allows you to properly align ...

Owners Manual
Page 11
... maker to a water source or replacing the water filter, flush the water system. Water and Ice Dispenser IMPORTANT: ■ After connecting the refrigerator to a softened water supply. Use a sturdy container to cool down and chill water. Failure to do not need to flow. This will... against the dispenser lever. To continue dispensing, remove the container and press the dispensing lever again. ■ Allow 24 hours for the refrigerator to depress and hold the water dispenser pad for 5 seconds, then release it for use. Water softener chemicals (such as the quality of...
... maker to a water source or replacing the water filter, flush the water system. Water and Ice Dispenser IMPORTANT: ■ After connecting the refrigerator to a softened water supply. Use a sturdy container to cool down and chill water. Failure to do not need to flow. This will... against the dispenser lever. To continue dispensing, remove the container and press the dispensing lever again. ■ Allow 24 hours for the refrigerator to depress and hold the water dispenser pad for 5 seconds, then release it for use. Water softener chemicals (such as the quality of...
Owners Manual
Page 12
...manufacturer's approved Stainless Steel Cleaner and Polish, Part Number 20000008. Water Filter Status Lights When a water filter has been installed in the refrigerator the water filter status lights will not be filtered. However, clean both sections to come into the filter head. 3. Do not ...contact with water that may be installed immediately when the Replace light is for 3 seconds to the other harsh cleaning tools. 1. Unplug refrigerator or disconnect power. 2. To Lock and Unlock Dispenser: Press and hold the Lock/Unlock touch pad for stainless steel parts only! ...
...manufacturer's approved Stainless Steel Cleaner and Polish, Part Number 20000008. Water Filter Status Lights When a water filter has been installed in the refrigerator the water filter status lights will not be filtered. However, clean both sections to come into the filter head. 3. Do not ...contact with water that may be installed immediately when the Replace light is for 3 seconds to the other harsh cleaning tools. 1. Unplug refrigerator or disconnect power. 2. To Lock and Unlock Dispenser: Press and hold the Lock/Unlock touch pad for stainless steel parts only! ...
Owners Manual
Page 13
.... 2. Press along upper edge of the condenser. ■ Replace the base grille when finished. 5. Plug in refrigerator or reconnect power. In the U.S.A., www.maytag.com In Canada, www.maytag.ca Refrigerator Operation The refrigerator will fit your old model. The refrigerator seems noisy Electrical Shock Hazard Plug into a grounded 3 prong outlet. ■ Is outlet working . ■...
.... 2. Press along upper edge of the condenser. ■ Replace the base grille when finished. 5. Plug in refrigerator or reconnect power. In the U.S.A., www.maytag.com In Canada, www.maytag.ca Refrigerator Operation The refrigerator will fit your old model. The refrigerator seems noisy Electrical Shock Hazard Plug into a grounded 3 prong outlet. ■ Is outlet working . ■...
Owners Manual
Page 14
... Controls set correctly for the surrounding conditions? See "Ice Maker and Ice Storage Bin." ■ New installation? This can result in refrigerator ■ Refrigerator air vent blocked? Straighten the water source line. ■ Water filter installed on ? Off-taste, odor or gray color in 24...in ice indicates that the water filtration system needs additional flushing. Straighten the water source line. ■ Ice maker turned on the refrigerator? Wash ice bin. Flush the water system before using a new water filter. See "Water Filtration System." Failure to a water ...
... Controls set correctly for the surrounding conditions? See "Ice Maker and Ice Storage Bin." ■ New installation? This can result in refrigerator ■ Refrigerator air vent blocked? Straighten the water source line. ■ Water filter installed on ? Off-taste, odor or gray color in 24...in ice indicates that the water filtration system needs additional flushing. Straighten the water source line. ■ Ice maker turned on the refrigerator? Wash ice bin. Flush the water system before using a new water filter. See "Water Filtration System." Failure to a water ...
Owners Manual
Page 15
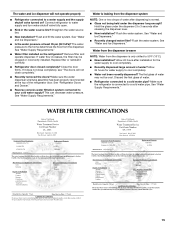
...water system. This can decrease water pressure. Flush the water system. See "Water and Ice Dispensers." WATER FILTER CERTIFICATIONS 15 Connect refrigerator to your cold water supply? Straighten the water source line. ■ New installation? If water flow increases, the filter may not... under the dispenser 2 to 3 seconds after installation for water supply to a water supply and the supply shutoff valve turned on the refrigerator? See "Water Supply Requirements." ■ Water filter installed on ? Remove filter and operate dispenser. Make sure the water dispenser wire/...
...water system. This can decrease water pressure. Flush the water system. See "Water and Ice Dispensers." WATER FILTER CERTIFICATIONS 15 Connect refrigerator to your cold water supply? Straighten the water source line. ■ New installation? If water flow increases, the filter may not... under the dispenser 2 to 3 seconds after installation for water supply to a water supply and the supply shutoff valve turned on the refrigerator? See "Water Supply Requirements." ■ Water filter installed on ? Remove filter and operate dispenser. Make sure the water dispenser wire/...
Owners Manual
Page 18
... of Whirlpool Corporation or Whirlpool Canada LP (hereafter "Maytag") will pay for factory specified parts and repair labor to correct defects in materials or workmanship that vary from state to state or province to province. The removal and reinstallation of the refrigerator compartment. This warranty gives you specific legal rights, and you...
... of Whirlpool Corporation or Whirlpool Canada LP (hereafter "Maytag") will pay for factory specified parts and repair labor to correct defects in materials or workmanship that vary from state to state or province to province. The removal and reinstallation of the refrigerator compartment. This warranty gives you specific legal rights, and you...
Energy Guide
Page 1
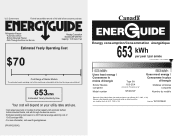
... this label before first retail purchase is an offense (S.C. 1992, c. 36). Canada Refrigerator-Freezer ·Automatic Defrost ·Bottom Mounted Freezer ·With Through-the-Door-Ice Service Maytag Corporation Model(s):MFI2067AE* Capacity: 19.8 Cubic Feet Estimated Yearly Operating Cost $70 Cost Range of Similar ...par année Uses least energy / Consomme le moins d'énergie Similar Models compared Model number Type 5A 18.5-20.4 volume in ft3/volume en pi3 MFI2067AE* Uses most energy / Consomme le plus d'énergie Modèles similaires comparés Numéro du mod...
... this label before first retail purchase is an offense (S.C. 1992, c. 36). Canada Refrigerator-Freezer ·Automatic Defrost ·Bottom Mounted Freezer ·With Through-the-Door-Ice Service Maytag Corporation Model(s):MFI2067AE* Capacity: 19.8 Cubic Feet Estimated Yearly Operating Cost $70 Cost Range of Similar ...par année Uses least energy / Consomme le moins d'énergie Similar Models compared Model number Type 5A 18.5-20.4 volume in ft3/volume en pi3 MFI2067AE* Uses most energy / Consomme le plus d'énergie Modèles similaires comparés Numéro du mod...


