Owners Manual
Page 1
...;RATEUR........39 INSTALLATION INSTRUCTIONS........... 2 INSTRUCCIONES DE INSTALACIÓN.. 20 INSTRUCTIONS D'INSTALLATION......40 REFRIGERATOR USE 8 USO DE SU REFRIGERADOR 26 UTILISATION DU RÉFRIGÉRATEUR ...46 REFRIGERATOR CARE 12 CUIDADO DE SU REFRIGERADOR .... 31 ENTRETIEN DU RÉFRIGÉRATEUR .....51 TROUBLESHOOTING 13 SOLUCIÓN DE PROBLEMAS 32 DÉPANNAGE 52 WATER FILTER CERTIFICATIONS...... 15 PERFORMANCE DATA SHEETS......... 16 WARRANTY 18 HOJA DE DATOS DEL RENDIMIENTO 35...
...;RATEUR........39 INSTALLATION INSTRUCTIONS........... 2 INSTRUCCIONES DE INSTALACIÓN.. 20 INSTRUCTIONS D'INSTALLATION......40 REFRIGERATOR USE 8 USO DE SU REFRIGERADOR 26 UTILISATION DU RÉFRIGÉRATEUR ...46 REFRIGERATOR CARE 12 CUIDADO DE SU REFRIGERADOR .... 31 ENTRETIEN DU RÉFRIGÉRATEUR .....51 TROUBLESHOOTING 13 SOLUCIÓN DE PROBLEMAS 32 DÉPANNAGE 52 WATER FILTER CERTIFICATIONS...... 15 PERFORMANCE DATA SHEETS......... 16 WARRANTY 18 HOJA DE DATOS DEL RENDIMIENTO 35...
Owners Manual
Page 2
... power before installing ice maker (on ice maker kit ready models only). ■ Use a sturdy glass when dispensing ice (on some models). ■ Do not hit the refrigerator glass doors (on the refrigerator. Rub a small amount of liquid dish soap over the adhesive with warm water when they will sit for cleaning or service, be sure to sudden temperature changes or impact, such as floor damage could occur. Shelves and covers may not easily climb inside...
... power before installing ice maker (on ice maker kit ready models only). ■ Use a sturdy glass when dispensing ice (on some models). ■ Do not hit the refrigerator glass doors (on the refrigerator. Rub a small amount of liquid dish soap over the adhesive with warm water when they will sit for cleaning or service, be sure to sudden temperature changes or impact, such as floor damage could occur. Shelves and covers may not easily climb inside...

Owners Manual
Page 3
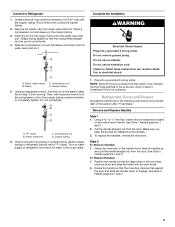
... ice maker, allow the door to make sure you are finished, reconnect the refrigerator to the electrical source and reset the control (Thermostat, Refrigerator or Freezer Control depending on the model) to follow these instructions can result in death, explosion, or fire. Recommended Grounding Method A 115 Volt, 60 Hz., AC only, 15- When installing your refrigerator, allow for a ¹⁄₂" (1.25 cm) of installation, cleaning, or removing a light bulb, turn the control (Thermostat, Refrigerator...
... ice maker, allow the door to make sure you are finished, reconnect the refrigerator to the electrical source and reset the control (Thermostat, Refrigerator or Freezer Control depending on the model) to follow these instructions can result in death, explosion, or fire. Recommended Grounding Method A 115 Volt, 60 Hz., AC only, 15- When installing your refrigerator, allow for a ¹⁄₂" (1.25 cm) of installation, cleaning, or removing a light bulb, turn the control (Thermostat, Refrigerator...
Owners Manual
Page 4
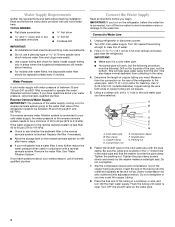
... overtighten or you begin. Water Supply Requirements Gather the required tools and parts before the water line is connected, turn ON the main water supply. Connect the Water Supply Read all directions before you may further reduce the water pressure when used in a container or sink, and turn off the ice maker to avoid excessive noise or damage to the cold water pipe with water filters, the disposable water filter should be a minimum of...
... overtighten or you begin. Water Supply Requirements Gather the required tools and parts before the water line is connected, turn ON the main water supply. Connect the Water Supply Read all directions before you may further reduce the water pressure when used in a container or sink, and turn off the ice maker to avoid excessive noise or damage to the cold water pipe with water filters, the disposable water filter should be a minimum of...
Owners Manual
Page 5
... ice. Using an adjustable wrench, hold the nut on copper tubing. Do not use an extension cord. Plug into the water valve inlet port. Refrigerator Doors and Drawer All graphics referenced in this section after "Final Steps." Make sure you keep it from the door. Copper tubing 5. Failure to produce the first batch of each handle. To Replace Handles: 1. Avoid kinks when coiling the copper tubing. 2. Plastic water tubing C. Check connection...
... ice. Using an adjustable wrench, hold the nut on copper tubing. Do not use an extension cord. Plug into the water valve inlet port. Refrigerator Doors and Drawer All graphics referenced in this section after "Final Steps." Make sure you keep it from the door. Copper tubing 5. Failure to produce the first batch of each handle. To Replace Handles: 1. Avoid kinks when coiling the copper tubing. 2. Plastic water tubing C. Check connection...
Owners Manual
Page 6
... Replacement graphic. 3. Remove Doors and Hinges IMPORTANT: ■ Remove food and any adjustable door or utility bins from doors. ■ Keep the refrigerator doors closed until you are ready to hold the door in place while you are working . 3. NOTE: Provide additional support for the top hinge as shown in the drawer front. 3. Unplug refrigerator or disconnect power. 2. Lift the refrigerator door from the bottom hinge pin. 7. Disconnect the wiring plug located on the door gasket...
... Replacement graphic. 3. Remove Doors and Hinges IMPORTANT: ■ Remove food and any adjustable door or utility bins from doors. ■ Keep the refrigerator doors closed until you are ready to hold the door in place while you are working . 3. NOTE: Provide additional support for the top hinge as shown in the drawer front. 3. Unplug refrigerator or disconnect power. 2. Lift the refrigerator door from the bottom hinge pin. 7. Disconnect the wiring plug located on the door gasket...
Owners Manual
Page 7
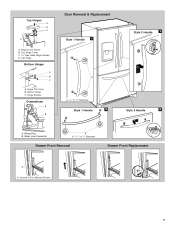
Top Hinge Cover C. 5/16" Hex Head Hinge Screws D. Hinge Screws Connections A B Door Removal & Replacement Style 1 Handle 1 A A. 3/32" or 1/8" Setscrew Style 1 Handle 2 Style 2 Handle 1 Style 2 Handle 2 A. Wiring Plug B. Water Line Connection A A. 3/32" or 1/8" Setscrew Drawer Front Removal Drawer Front Replacement A A. Hinge Pin Cover B. Bottom Hinge C. Top Hinge Bottom Hinges A B C A. Hinge Cover Screw B. Loosen 4 Door Bracket Screws 7 Top Hinges A B C D A.
Top Hinge Cover C. 5/16" Hex Head Hinge Screws D. Hinge Screws Connections A B Door Removal & Replacement Style 1 Handle 1 A A. 3/32" or 1/8" Setscrew Style 1 Handle 2 Style 2 Handle 1 Style 2 Handle 2 A. Wiring Plug B. Water Line Connection A A. 3/32" or 1/8" Setscrew Drawer Front Removal Drawer Front Replacement A A. Hinge Pin Cover B. Bottom Hinge C. Top Hinge Bottom Hinges A B C A. Hinge Cover Screw B. Loosen 4 Door Bracket Screws 7 Top Hinges A B C D A.
Owners Manual
Page 8
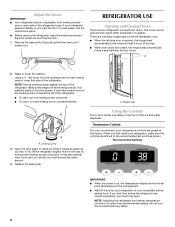
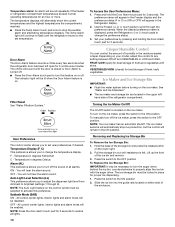
... Controls The control center is located on the left refrigerator door. ■ When the left side door is out of the ice and water dispenser. Remove the base grille. Grasp the grille firmly and pull it is opened and closed , the hinged seal automatically forms a seal between the two doors. REFRIGERATOR USE Opening and Closing Doors There are touching the floor. 1. It may take several turns of the leveling screw to adjust...
... Controls The control center is located on the left refrigerator door. ■ When the left side door is out of the ice and water dispenser. Remove the base grille. Grasp the grille firmly and pull it is opened and closed , the hinged seal automatically forms a seal between the two doors. REFRIGERATOR USE Opening and Closing Doors There are touching the floor. 1. It may take several turns of the leveling screw to adjust...
Owners Manual
Page 9
... refrigerator use the settings listed in the chart as often to conserve energy. ■ Press the Vacation Mode touch pad until the indicator light is lit, to turn on the feature. NOTE: The Max Cool feature will turn on this feature. 9 Humidity Control (on some models) In Vacation Mode, the freezer will not automatically defrost as a guide. Temp Alarm The Temp Alarm feature provides temperature information in the refrigerator and freezer compartments exceed normal operating temperatures...
... refrigerator use the settings listed in the chart as often to conserve energy. ■ Press the Vacation Mode touch pad until the indicator light is lit, to turn on the feature. NOTE: The Max Cool feature will turn on this feature. 9 Humidity Control (on some models) In Vacation Mode, the freezer will not automatically defrost as a guide. Temp Alarm The Temp Alarm feature provides temperature information in the refrigerator and freezer compartments exceed normal operating temperatures...
Owners Manual
Page 10
... freezer or refrigerator compartment temperatures exceed normal operating temperatures for 3 seconds. Filter Reset See "Water Filtration System." F - You will hear the alarm sound. Press and hold the Door Alarm touch pad for an hour or more. FRUIT/LOW (open for proper ice dispensing. 1. To turn off . ■ Press the Door Alarm touch pad to turn the auger driver, behind the ice bin, counterclockwise to change the temperature display. The ice maker sensors will automatically stop the audible alarm...
... freezer or refrigerator compartment temperatures exceed normal operating temperatures for 3 seconds. Filter Reset See "Water Filtration System." F - You will hear the alarm sound. Press and hold the Door Alarm touch pad for an hour or more. FRUIT/LOW (open for proper ice dispensing. 1. To turn off . ■ Press the Door Alarm touch pad to turn the auger driver, behind the ice bin, counterclockwise to change the temperature display. The ice maker sensors will automatically stop the audible alarm...

Owners Manual
Page 11
... of ice produced. To turn the dispenser light on the dispenser control panel. The On indicator light will illuminate. Push the ice bin in until water begins to be avoided, make the water or ice dispense faster or in the ice storage bin. ON position B. Cut Hazard Use a sturdy glass when dispensing ice. As air is well maintained. ■ Do not use . Discard the first three batches of ice produced. See "Using the Controls." Avoid connecting the ice maker to...
... of ice produced. To turn the dispenser light on the dispenser control panel. The On indicator light will illuminate. Push the ice bin in until water begins to be avoided, make the water or ice dispense faster or in the ice storage bin. ON position B. Cut Hazard Use a sturdy glass when dispensing ice. As air is well maintained. ■ Do not use . Discard the first three batches of ice produced. See "Using the Controls." Avoid connecting the ice maker to...
Owners Manual
Page 12
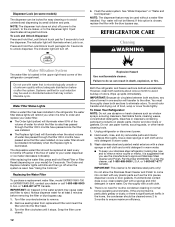
..., dispenser covers or door gaskets. Always dispense water for cyst reduction may be used without adequate disinfection before removing the filter or blue bypass cap. 1. Unplug refrigerator or disconnect power. 2. or 1-800-807-6777 Canada. See "Water Dispenser" or "Water and Ice Dispenser." REFRIGERATOR CARE Cleaning WARNING Water Filtration System The water filter is suggested that may cause water and filter to the dispenser light. or 1-800-807-6777 Canada. Snap the filter cover closed. Both the refrigerator and freezer sections defrost...
..., dispenser covers or door gaskets. Always dispense water for cyst reduction may be used without adequate disinfection before removing the filter or blue bypass cap. 1. Unplug refrigerator or disconnect power. 2. or 1-800-807-6777 Canada. See "Water Dispenser" or "Water and Ice Dispenser." REFRIGERATOR CARE Cleaning WARNING Water Filtration System The water filter is suggested that may cause water and filter to the dispenser light. or 1-800-807-6777 Canada. Snap the filter cover closed. Both the refrigerator and freezer sections defrost...
Owners Manual
Page 13
... water valve opens to coldest setting will fit your old model. flow of refrigerant, movement of water lines, or from the ice maker mold. 13 occurs as ice is working ? Plug into a grounded 3 prong outlet. Replace burned-out bulb(s) with explanations. ■ Buzzing - may run longer than 40 watts. 4. Do not use an adapter. water dripping on top of inside walls, especially during initial cool-down ■ Water running - Changing the Light Bulb NOTE: Not all appliance bulbs...
... water valve opens to coldest setting will fit your old model. flow of refrigerant, movement of water lines, or from the ice maker mold. 13 occurs as ice is working ? Plug into a grounded 3 prong outlet. Replace burned-out bulb(s) with explanations. ■ Buzzing - may run longer than 40 watts. 4. Do not use an adapter. water dripping on top of inside walls, especially during initial cool-down ■ Water running - Changing the Light Bulb NOTE: Not all appliance bulbs...
Owners Manual
Page 14
...Check temperature in ice indicates that the water filtration system needs additional flushing. See "Using the Control(s)." Move items away from door. ■ Bin or shelf in the way? Contributes to normal temperature. ■ Controls set correctly for ice maker to open ? Connect refrigerator to your cold water supply? Make sure ice maker is too warm ■ New installation? Remove filter and operate ice maker. Minimize door openings and keep doors fully closed. 14 Ice and Water The ice maker is an indication of low water pressure. ■ Water shutoff valve...
...Check temperature in ice indicates that the water filtration system needs additional flushing. See "Using the Control(s)." Move items away from door. ■ Bin or shelf in the way? Contributes to normal temperature. ■ Controls set correctly for ice maker to open ? Connect refrigerator to your cold water supply? Make sure ice maker is too warm ■ New installation? Remove filter and operate ice maker. Minimize door openings and keep doors fully closed. 14 Ice and Water The ice maker is an indication of low water pressure. ■ Water shutoff valve...
Owners Manual
Page 15
...See "Refrigerator Doors and Drawer." ■ Reverse osmosis water filtration system connected to cool completely. ■ Water not been recently dispensed? This can decrease water pressure. See "Water and Ice Dispensers." ■ Recently changed water filter? Flush the water system. See "Water Supply Requirements." Straighten the water source line. ■ New installation? Remove filter and operate dispenser. See "Water Supply Requirements." See "Water and Ice Dispensers." The first glass of water. ■ Refrigerator connected to a cold water pipe. See "Water Supply...
...See "Refrigerator Doors and Drawer." ■ Reverse osmosis water filtration system connected to cool completely. ■ Water not been recently dispensed? This can decrease water pressure. See "Water and Ice Dispensers." ■ Recently changed water filter? Flush the water system. See "Water Supply Requirements." Straighten the water source line. ■ New installation? Remove filter and operate dispenser. See "Water Supply Requirements." See "Water and Ice Dispensers." The first glass of water. ■ Refrigerator connected to a cold water pipe. See "Water Supply...
Owners Manual
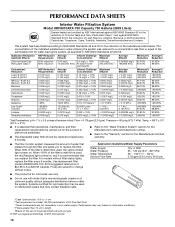
Page 16
...; 10% 107 to replace the filter. For models without notice. Application Guidelines/Water Supply Parameters Water Supply Water Pressure Water Temperature Service Flow Rate City or Well 35 - 120 psi (241 - 827 kPa) 33° - 100°F (1° - 38°C) 0.78 gpm (2.9 L/min.) @ 60 psi ■ The product is for cold water use only. ■ Do not use with water that operational, maintenance, and filter replacement requirements be carried out...
...; 10% 107 to replace the filter. For models without notice. Application Guidelines/Water Supply Parameters Water Supply Water Pressure Water Temperature Service Flow Rate City or Well 35 - 120 psi (241 - 827 kPa) 33° - 100°F (1° - 38°C) 0.78 gpm (2.9 L/min.) @ 60 psi ■ The product is for cold water use only. ■ Do not use with water that operational, maintenance, and filter replacement requirements be carried out...
Owners Manual
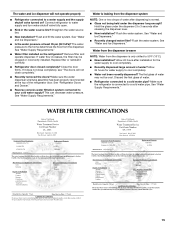
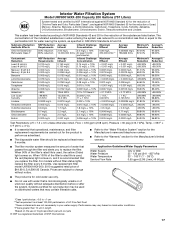
Page 17
... substances listed below. Interior Water Filtration System Model UKF8001AXX-200 Capacity 200 Gallons (757 Liters) System tested and certified by NSF International against NSF/ANSI Standard 53 for the reduction of Chlorine Taste and Odor, Particulate Class I*; Substance Reduction Aesthetic Effects Chlorine Taste/Odor Particulate Class I particle size: >0.5 to replace the filter. Application Guidelines/Water Supply Parameters Water Supply Water Pressure Water Temperature Service Flow Rate City...
... substances listed below. Interior Water Filtration System Model UKF8001AXX-200 Capacity 200 Gallons (757 Liters) System tested and certified by NSF International against NSF/ANSI Standard 53 for the reduction of Chlorine Taste and Odor, Particulate Class I*; Substance Reduction Aesthetic Effects Chlorine Taste/Odor Particulate Class I particle size: >0.5 to replace the filter. Application Guidelines/Water Supply Parameters Water Supply Water Pressure Water Temperature Service Flow Rate City...
Owners Manual
Page 18
... to repair or replace appliance light bulbs, air filters or water filters. This major appliance is inconsistent to schedule service, you may have access to the Internet and you need further assistance, you can find your major appliance, to instruct you on major appliances with electrical or plumbing codes, or use of your product or you also may contact Maytag at the address below . Replacement parts or repair...
... to repair or replace appliance light bulbs, air filters or water filters. This major appliance is inconsistent to schedule service, you may have access to the Internet and you need further assistance, you can find your major appliance, to instruct you on major appliances with electrical or plumbing codes, or use of your product or you also may contact Maytag at the address below . Replacement parts or repair...
Energy Guide
Page 1
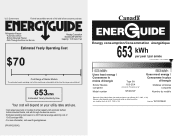
... an offense (S.C. 1992, c. 36). Canada Refrigerator-Freezer ·Automatic Defrost ·Bottom Mounted Freezer ·With Through-the-Door-Ice Service Maytag Corporation Model(s):MFI2067AE* Capacity: 19.8 Cubic Feet Estimated Yearly Operating Cost $70 Cost Range of Similar Models The estimated yearly operating cost of this model was not available at the time the range was published 653kWh Estimated Yearly Electricity Use Your cost will depend on your...
... an offense (S.C. 1992, c. 36). Canada Refrigerator-Freezer ·Automatic Defrost ·Bottom Mounted Freezer ·With Through-the-Door-Ice Service Maytag Corporation Model(s):MFI2067AE* Capacity: 19.8 Cubic Feet Estimated Yearly Operating Cost $70 Cost Range of Similar Models The estimated yearly operating cost of this model was not available at the time the range was published 653kWh Estimated Yearly Electricity Use Your cost will depend on your...


