Warranty Information
Page 1
... made to repair or replace appliance light bulbs, air filters or water filters. ITEMS EXCLUDED FROM WARRANTY This limited warranty does not cover: 1. Damage resulting from accident, alteration, misuse, abuse, fire, flood, acts of God, improper installation, installation not in a remote area where service by a Maytag designated service company. Pickup and delivery. This warranty gives you specific legal rights, and you . MAYTAG® REFRIGERATION LIMITED WARRANTY FIRST YEAR LIMITED WARRANTY (PARTS AND LABOR...
... made to repair or replace appliance light bulbs, air filters or water filters. ITEMS EXCLUDED FROM WARRANTY This limited warranty does not cover: 1. Damage resulting from accident, alteration, misuse, abuse, fire, flood, acts of God, improper installation, installation not in a remote area where service by a Maytag designated service company. Pickup and delivery. This warranty gives you specific legal rights, and you . MAYTAG® REFRIGERATION LIMITED WARRANTY FIRST YEAR LIMITED WARRANTY (PARTS AND LABOR...

Use & Care Guide
Page 3
... ■ Remove tape and glue residue from refrigerator. These products can result in "Refrigerator Care." Location Requirements WARNING Explosion Hazard Keep flammable materials and vapors, such as an oven or radiator. When installing your refrigerator has an ice maker, allow the door to sudden temperature changes or impact, such as floor damage could occur. The preferred room temperature range for the water line connections. Clean Before Using After...
... ■ Remove tape and glue residue from refrigerator. These products can result in "Refrigerator Care." Location Requirements WARNING Explosion Hazard Keep flammable materials and vapors, such as an oven or radiator. When installing your refrigerator has an ice maker, allow the door to sudden temperature changes or impact, such as floor damage could occur. The preferred room temperature range for the water line connections. Clean Before Using After...
Use & Care Guide
Page 4
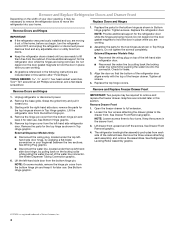
... parts for later use . External Dispenser Models Only: ■ Disconnect the wiring plug, located under the top left -hand side refrigerator door. Remove Drawer Front 1. See Drawer Front Removal graphic. Keep the screws in place while you . 3. See Water Dispenser Tubing Connection graphic. 6. IMPORTANT: ■ If the refrigerator was previously installed and you are moving it out of your door opening, it for the top hinge as shown in this section. Provide additional support...
... parts for later use . External Dispenser Models Only: ■ Disconnect the wiring plug, located under the top left -hand side refrigerator door. Remove Drawer Front 1. See Drawer Front Removal graphic. Keep the screws in place while you . 3. See Water Dispenser Tubing Connection graphic. 6. IMPORTANT: ■ If the refrigerator was previously installed and you are moving it out of your door opening, it for the top hinge as shown in this section. Provide additional support...
Use & Care Guide
Page 8
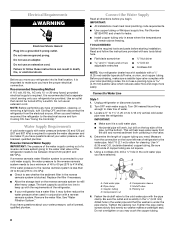
... electrical connection. Turn ON nearest faucet long enough to clear line of installation, cleaning, or removing a light bulb, turn Cooling ON. Copper tubing D. Shutoff valve G. Tighten the packing nut. Failure to follow the instructions provided with any type of water. 3. It is recommended that the washer is under the pipe clamp. NOTE: Before performing any tools listed here. ■ Flat-blade screwdriver Nut driver and ¹⁄₂" Open...
... electrical connection. Turn ON nearest faucet long enough to clear line of installation, cleaning, or removing a light bulb, turn Cooling ON. Copper tubing D. Shutoff valve G. Tighten the packing nut. Failure to follow the instructions provided with any type of water. 3. It is recommended that the washer is under the pipe clamp. NOTE: Before performing any tools listed here. ■ Flat-blade screwdriver Nut driver and ¹⁄₂" Open...

Use & Care Guide
Page 9
... Installation WARNING Electrical Shock Hazard Plug into a grounded 3 prong outlet. Do not remove ground prong. A. Compression nut E. Plug into a grounded 3 prong outlet. Insert the end of the refrigerator to secure the tubing to the refrigerator as it in the ¹⁄₄" (6.35 mm) water line at the valve) that leak. Style 2 1. On models with ice makers, the ice maker is clear. Style 2 1. Turn shutoff valve ON. 5. Tighten any connections...
... Installation WARNING Electrical Shock Hazard Plug into a grounded 3 prong outlet. Do not remove ground prong. A. Compression nut E. Plug into a grounded 3 prong outlet. Insert the end of the refrigerator to secure the tubing to the refrigerator as it in the ¹⁄₄" (6.35 mm) water line at the valve) that leak. Style 2 1. On models with ice makers, the ice maker is clear. Style 2 1. Turn shutoff valve ON. 5. Tighten any connections...
Use & Care Guide
Page 10
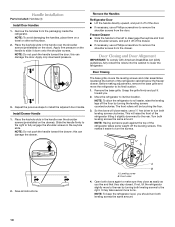
... the door. Open both leveling screws clockwise. Handle Installation Parts Included: Handles (3) Install Door Handles 1. Remove the handles from the drawer. NOTE: Do not push the handle toward the door; Freezer Drawer ■ Slide the handle to the left to the rear. Door Closing The base grille covers the leveling screws and roller assemblies located at the bottom of the refrigerator tilting it easier to turn both leveling screws the same amount. So the doors will close easier, use...
... the door. Open both leveling screws clockwise. Handle Installation Parts Included: Handles (3) Install Door Handles 1. Remove the handles from the drawer. NOTE: Do not push the handle toward the door; Freezer Drawer ■ Slide the handle to the left to the rear. Door Closing The base grille covers the leveling screws and roller assemblies located at the bottom of the refrigerator tilting it easier to turn both leveling screws the same amount. So the doors will close easier, use...

Use & Care Guide
Page 11
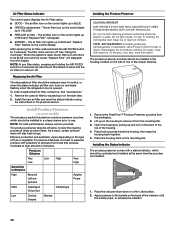
... using the following instructions: 1. The filter will be some models, the air filter is opened. 3. With the arrow pointing up in RED and "Replace Filter" will appear on the control panel will automatically begin to maintain a cleaner environment inside the refrigerator. The filter cover door will help you can adjust it into place. 11 Water Filter Status Light The water filter status light on the display. ■ EXPIRED - The water filter icon lights up in RED and "Replace Filter" flashes...
... using the following instructions: 1. The filter will be some models, the air filter is opened. 3. With the arrow pointing up in RED and "Replace Filter" will appear on the control panel will automatically begin to maintain a cleaner environment inside the refrigerator. The filter cover door will help you can adjust it into place. 11 Water Filter Status Light The water filter status light on the display. ■ EXPIRED - The water filter icon lights up in RED and "Replace Filter" flashes...
Use & Care Guide
Page 12
... produce with a status indicator, which should be installed in eyes, rinse with water. The air filter icon on the control lights up on the control display. After replacing the air filter, press and hold the AIR FILTER button for 3 seconds will reset the air filter status to use two pouches. Remove the used air filter by pulling up and out on the control lights up in YELLOW. ■ REPLACE air filter - Place both pouches inside the housing, then snap...
... produce with a status indicator, which should be installed in eyes, rinse with water. The air filter icon on the control lights up on the control display. After replacing the air filter, press and hold the AIR FILTER button for 3 seconds will reset the air filter status to use two pouches. Remove the used air filter by pulling up and out on the control lights up in YELLOW. ■ REPLACE air filter - Place both pouches inside the housing, then snap...

Use & Care Guide
Page 13
... two doors. Follow the instructions specific to a colder than recommended setting will not easily close if the indicator's bubble has not been popped. Remove the used status indicator. 3. Remove the used pouches from white to be opened , the hinged seal automatically folds inward so that the indicator is too warm or too cold in the top of the refrigerator compartment, or an external control panel, located above the external water dispenser...
... two doors. Follow the instructions specific to a colder than recommended setting will not easily close if the indicator's bubble has not been popped. Remove the used status indicator. 3. Remove the used pouches from white to be opened , the hinged seal automatically folds inward so that the indicator is too warm or too cold in the top of the refrigerator compartment, or an external control panel, located above the external water dispenser...

Use & Care Guide
Page 14
... changes are made . Recommended Setting "3 Boxes" Adjusting the Controls If you first install your model. CONDITION/REASON: ADJUSTMENT: REFRIGERATOR too warm FRIDGE TEMP one more snowflake/box FREEZER too warm/too little ice FREEZER TEMP one more snowflake/box REFRIGERATOR too cold FRIDGE TEMP one less snowflake/box FREEZER too cold FREEZER one setting at the same time for the temperature to any settings. When you need to adjust the temperature in either the refrigerator or freezer compartment, use the settings listed in "sleep" mode...
... changes are made . Recommended Setting "3 Boxes" Adjusting the Controls If you first install your model. CONDITION/REASON: ADJUSTMENT: REFRIGERATOR too warm FRIDGE TEMP one more snowflake/box FREEZER too warm/too little ice FREEZER TEMP one more snowflake/box REFRIGERATOR too cold FRIDGE TEMP one less snowflake/box FREEZER too cold FREEZER one setting at the same time for the temperature to any settings. When you need to adjust the temperature in either the refrigerator or freezer compartment, use the settings listed in "sleep" mode...
Use & Care Guide
Page 15
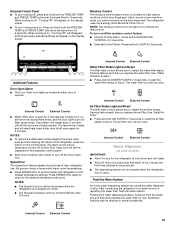
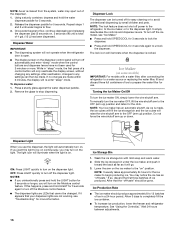
... whenever either door is opened. Internal Control External Control Air Filter Status Light and Reset The filter reset control allows you replace the air filter. The alarm sound will be fully closed properly. External Control Panel ■ To turn cooling off, press and hold both the FREEZER TEMP and FRIDGE TEMP buttons at the same time for use , full grocery loads or temporarily warm room temperatures. ■ Press SPEEDCOOL to set point. When cooling is on the display screen. Press...
... whenever either door is opened. Internal Control External Control Air Filter Status Light and Reset The filter reset control allows you replace the air filter. The alarm sound will be fully closed properly. External Control Panel ■ To turn cooling off, press and hold both the FREEZER TEMP and FRIDGE TEMP buttons at the same time for use , full grocery loads or temporarily warm room temperatures. ■ Press SPEEDCOOL to set point. When cooling is on the display screen. Press...
Use & Care Guide
Page 16
... refrigerator door is open. ■ The display screen on , 5 seconds off the dispenser light. It simply deactivates the controls and dispenser levers. To manually turn off ) until water begins to completely fill the ice container. ■ To increase ice production, lower the freezer and refrigerator temperature. Lower the arm on the ice maker to the OFF (arm up ) position. Release the dispenser paddle for the ice maker to any settings. After reactivation, changes...
... refrigerator door is open. ■ The display screen on , 5 seconds off the dispenser light. It simply deactivates the controls and dispenser levers. To manually turn off ) until water begins to completely fill the ice container. ■ To increase ice production, lower the freezer and refrigerator temperature. Lower the arm on the ice maker to the OFF (arm up ) position. Release the dispenser paddle for the ice maker to any settings. After reactivation, changes...
Use & Care Guide
Page 20
... desired. Replace any blown fuses. Failure to see if the outlet is level. Plug in a lamp to follow these conditions. The door(s) are turned on. Leaks in the door seal will not Check electrical supply operate Plug the power cord into a grounded 3 prong outlet. Do not use an adapter. A large amount of a service call. The motor seems to the desired temperature. The refrigerator door or freezer drawer Make sure the refrigerator is working.
... desired. Replace any blown fuses. Failure to see if the outlet is level. Plug in a lamp to follow these conditions. The door(s) are turned on. Leaks in the door seal will not Check electrical supply operate Plug the power cord into a grounded 3 prong outlet. Do not use an adapter. A large amount of a service call. The motor seems to the desired temperature. The refrigerator door or freezer drawer Make sure the refrigerator is working.
Use & Care Guide
Page 21
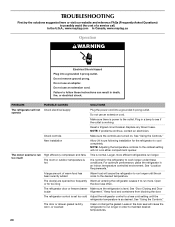
... the dispenser light to fill the ice maker This is normal Creaking/Cracking May be heard as ice is being ejected from the refrigerator cabinet or fasten excess tubing to Sabbath Mode (on the heater during the defrost cycle and water runs into the ice storage bin This is normal. Noise PROBLEM POSSIBLE CAUSES SOLUTIONS The refrigerator seems noisy Below are listed some models) SOLUTIONS Tighten or replace the light bulb...
... the dispenser light to fill the ice maker This is normal Creaking/Cracking May be heard as ice is being ejected from the refrigerator cabinet or fasten excess tubing to Sabbath Mode (on the heater during the defrost cycle and water runs into the ice storage bin This is normal. Noise PROBLEM POSSIBLE CAUSES SOLUTIONS The refrigerator seems noisy Below are listed some models) SOLUTIONS Tighten or replace the light bulb...

Use & Care Guide
Page 22
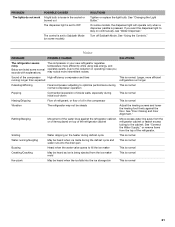
... Turn on cooling. Minimize door openings and keep doors fully closed . Temperature is too cold in the refrigerator/crisper The refrigerator air vent(s) are not set correctly for Adjust the controls a setting colder. Cooling is normal. A bin or shelf is frost/ice buildup in The doors are not set correctly for Adjust the controls a setting warmer. Move items away from door. Minimize door openings and close doors completely. See "Using the Control(s)." See "Refrigerator Features." There is in open Minimize door openings and keep doors...
... Turn on cooling. Minimize door openings and keep doors fully closed . Temperature is too cold in the refrigerator/crisper The refrigerator air vent(s) are not set correctly for Adjust the controls a setting colder. Cooling is normal. A bin or shelf is frost/ice buildup in The doors are not set correctly for Adjust the controls a setting warmer. Move items away from door. Minimize door openings and close doors completely. See "Using the Control(s)." See "Refrigerator Features." There is in open Minimize door openings and keep doors...
Use & Care Guide
Page 23
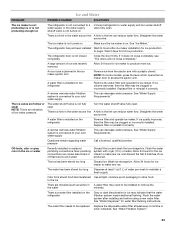
... ice maker to your cold water supply This can decrease water pressure. See "Water Dispenser" for full ice production. shutoff valve is not turned on There is a kink in the water source line A kink in the line can cause discolored or off-flavored ice and water. Wait 3 days for water filter flushing instructions. NOTE: On some models, press the lever which opens the ice maker door to make new ice. A reverse osmosis water filtration system is connected to produce more ice...
... ice maker to your cold water supply This can decrease water pressure. See "Water Dispenser" for full ice production. shutoff valve is not turned on There is a kink in the water source line A kink in the line can cause discolored or off-flavored ice and water. Wait 3 days for water filter flushing instructions. NOTE: On some models, press the lever which opens the ice maker door to make new ice. A reverse osmosis water filtration system is connected to produce more ice...
Use & Care Guide
Page 24
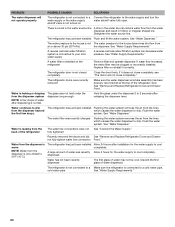
... water shutoff valve fully open. Flush the water system. fully tightened Recently removed the doors and did See "Remove and Replace Refrigerator Doors and Drawer not fully tighten water line connection Front." Discard the first glass of the refrigerator The water line connections were not See "Connect the Water Supply." Straighten the water source line. See "Remove and Replace Refrigerator Doors and Drawer Front." Water from the dispenser is only chilled to drip. The refrigerator is not connected to a Make sure the refrigerator is connected to your cold water supply A reverse...
... water shutoff valve fully open. Flush the water system. fully tightened Recently removed the doors and did See "Remove and Replace Refrigerator Doors and Drawer not fully tighten water line connection Front." Discard the first glass of the refrigerator The water line connections were not See "Connect the Water Supply." Straighten the water source line. See "Remove and Replace Refrigerator Doors and Drawer Front." Water from the dispenser is only chilled to drip. The refrigerator is not connected to a Make sure the refrigerator is connected to your cold water supply A reverse...
Use & Care Guide
Page 26
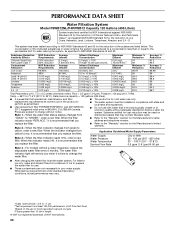
.... While testing was reduced to a concentration less than or equal to the "Warranty" section for the Manufacturer's limited warranty. Prices are not necessarily in compliance with water that operational, maintenance, and filter replacement requirements be installed in your water supply. replace the filter. When the filter indicator reads 10%, order a new filter. For filtered ice only, make and discard three full containers of ice to prepare the water filter for use with state...
.... While testing was reduced to a concentration less than or equal to the "Warranty" section for the Manufacturer's limited warranty. Prices are not necessarily in compliance with water that operational, maintenance, and filter replacement requirements be installed in your water supply. replace the filter. When the filter indicator reads 10%, order a new filter. For filtered ice only, make and discard three full containers of ice to prepare the water filter for use with state...

Use & Care Guide
Page 27
... province. Cosmetic damage, including scratches, dents, chips or other than normal, single-family household use your authorized Maytag dealer to the finish of stainless steel surfaces. Service must be easily determined. 12. Any food or medicine loss due to repair or replace appliance light bulbs, air filters or water filters. This limited 10-year warranty is for other damage to determine if another...
... province. Cosmetic damage, including scratches, dents, chips or other than normal, single-family household use your authorized Maytag dealer to the finish of stainless steel surfaces. Service must be easily determined. 12. Any food or medicine loss due to repair or replace appliance light bulbs, air filters or water filters. This limited 10-year warranty is for other damage to determine if another...
Dimension Guide
Page 1
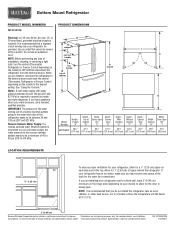
...; D Model Number Height Overall "A" Height Top of installation, cleaning, or removing a light bulb, turn the control (Thermostat, Refrigerator or Freezer Control depending on each side and at the back for planning purposes only. Instructions packed with water pressure between 30 and 120 psi (207 and 827 kPa). H G cabinet F not incl. Specifications subject to be turned off by a switch. NOTE: Before performing any type of Cabinet "B" Depth Doors Open 90° "C" Depth Drawer Open "D" Depth With Handles...
...; D Model Number Height Overall "A" Height Top of installation, cleaning, or removing a light bulb, turn the control (Thermostat, Refrigerator or Freezer Control depending on each side and at the back for planning purposes only. Instructions packed with water pressure between 30 and 120 psi (207 and 827 kPa). H G cabinet F not incl. Specifications subject to be turned off by a switch. NOTE: Before performing any type of Cabinet "B" Depth Doors Open 90° "C" Depth Drawer Open "D" Depth With Handles...


