

Installation Guide
Page 2
...single oven weight of 129 lbs (59 kg) for 27" (68.6 cm) models or 154 lbs (70 kg) for 30" models (76.2 cm). ■ Floor must be made by a licensed, qualified electrical installer. ...*Grommets not included with models KEBK171B, KEBK101B, KEBK276B, KEBK206B, KEBS179B, KEBS109B, KEBS277B, KEBS279B, KEBS207B, KEBS209B, KEBU109B and... top of 251 lbs (114 kg) for 27" (68.6 cm) models or 288 lbs (131 kg) for 30" (76.2 cm) models. Read and follow the instructions provided with double oven. INSTALLATION REQUIREMENTS Tools ...
...single oven weight of 129 lbs (59 kg) for 27" (68.6 cm) models or 154 lbs (70 kg) for 30" models (76.2 cm). ■ Floor must be made by a licensed, qualified electrical installer. ...*Grommets not included with models KEBK171B, KEBK101B, KEBK276B, KEBK206B, KEBS179B, KEBS109B, KEBS277B, KEBS279B, KEBS207B, KEBS209B, KEBU109B and... top of 251 lbs (114 kg) for 27" (68.6 cm) models or 288 lbs (131 kg) for 30" (76.2 cm) models. Read and follow the instructions provided with double oven. INSTALLATION REQUIREMENTS Tools ...
Installation Guide
Page 3
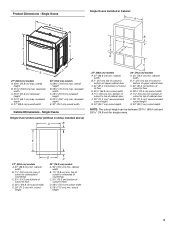
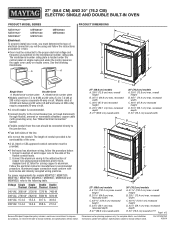
...8260;₄" (13.3 cm) bottom of cabinet door F. 28" (71.2 cm)* recommended cutout height G. 24" (60.7 cm) cutout depth 30" (76.2 cm) models A. 30" (76.2 cm) min. top of cutout to floor D. 25¹⁄₂" (64.8 cm) cutout width E. 28" (71.2 cm) min. Product ... depth E. 30" (76.2 cm) overall width Cabinet Dimensions - Single Ovens B Single Ovens Installed in Cabinet A B D C F A G E D E 27" (68.6 cm) models A. 28¾" (72.8 cm) max. overall height B. 25 64.6 cm) max. recessed width C. 26³⁄₄" (67.9 cm) recessed height D. 23¹⁄₄...
...8260;₄" (13.3 cm) bottom of cabinet door F. 28" (71.2 cm)* recommended cutout height G. 24" (60.7 cm) cutout depth 30" (76.2 cm) models A. 30" (76.2 cm) min. top of cutout to floor D. 25¹⁄₂" (64.8 cm) cutout width E. 28" (71.2 cm) min. Product ... depth E. 30" (76.2 cm) overall width Cabinet Dimensions - Single Ovens B Single Ovens Installed in Cabinet A B D C F A G E D E 27" (68.6 cm) models A. 28¾" (72.8 cm) max. overall height B. 25 64.6 cm) max. recessed width C. 26³⁄₄" (67.9 cm) recessed height D. 23¹⁄₄...
Installation Guide
Page 4
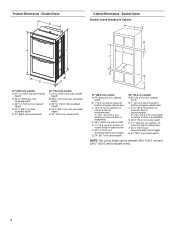
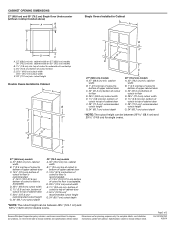
....2-37.5 cm) bottom of cutout to floor is acceptable. Double Ovens Double Ovens Installed in Cabinet A A C B D F E D 27" (68.6 cm) models A. 51 130.0 cm) max. bottom of cutout to top of cabinet door F. 50¹⁄₄" (127.6 cm)* recommended cutout height G. 24" (60.7...min. Double Ovens B Cabinet Dimensions - recessed depth E. 27" (68.6 cm) overall width 30" (76.2 cm) models A. 51 130.0 cm) max. recessed depth E. 30" (76.2 cm) overall width G E C 27" (68.6 cm) models A. 27" (68.6 cm) min. recessed width C. 48 124.0 cm) recessed height D. 23¹⁄₄" (...
....2-37.5 cm) bottom of cutout to floor is acceptable. Double Ovens Double Ovens Installed in Cabinet A A C B D F E D 27" (68.6 cm) models A. 51 130.0 cm) max. bottom of cutout to top of cabinet door F. 50¹⁄₄" (127.6 cm)* recommended cutout height G. 24" (60.7...min. Double Ovens B Cabinet Dimensions - recessed depth E. 27" (68.6 cm) overall width 30" (76.2 cm) models A. 51 130.0 cm) max. recessed depth E. 30" (76.2 cm) overall width G E C 27" (68.6 cm) models A. 27" (68.6 cm) min. recessed width C. 48 124.0 cm) recessed height D. 23¹⁄₄" (...

Installation Guide
Page 5
..., armored or nonmetallic sheathed, copper cable (with a qualified electrical installer if you are not sure the oven is for models KEBK171B, KEBK101B, KEBK276B, KEBK206B, KEBS179B, KEBS109B, KEBS277B, KEBS279B, KEBS207B and KEBS209B, refer to the proper electrical voltage and...W Double Thermal 7370 W Double Convect 7400 W ■ Oven must be using special connectors and/or tools designed and UL listed for models WOS51EC7A, WOS51EC0A, WOD51EC7A, WOD51EC0A, WOS92EC7A, WOS92EC0A, WOD93EC7A, WOD93EC0A, MEW7527A, MEW7530A, MEW7627A, MEW7630A, MEW9537A, MEW9627A, MEW9530A and MEW9630A,...
..., armored or nonmetallic sheathed, copper cable (with a qualified electrical installer if you are not sure the oven is for models KEBK171B, KEBK101B, KEBK276B, KEBK206B, KEBS179B, KEBS109B, KEBS277B, KEBS279B, KEBS207B and KEBS209B, refer to the proper electrical voltage and...W Double Thermal 7370 W Double Convect 7400 W ■ Oven must be using special connectors and/or tools designed and UL listed for models WOS51EC7A, WOS51EC0A, WOD51EC7A, WOD51EC0A, WOS92EC7A, WOS92EC0A, WOD93EC7A, WOD93EC0A, MEW7527A, MEW7530A, MEW7627A, MEW7630A, MEW9537A, MEW9627A, MEW9530A and MEW9630A,...
Installation Guide
Page 12
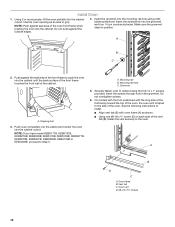
... (B), fasten the vent securely to the side of the cabinet. Insert the screwdriver into the cabinet cutout. NOTE: If you have model KEBK171B, KEBK101B, KEBK276B, KEBK206B, KEBS179B, KEBS109B, KEBS277B, KEBS279B, KEBS207B, KEBS209B, KEBU109B or KEBU209B, proceed to push the oven into... the cabinet. Do not overtighten screws. 6. On models with the foot positioned with oven frame (A) as an area to cabinet using a flatblade screwdriver. Push against the outside edges. 4. A. Push ...
... (B), fasten the vent securely to the side of the cabinet. Insert the screwdriver into the cabinet cutout. NOTE: If you have model KEBK171B, KEBK101B, KEBK276B, KEBK206B, KEBS179B, KEBS109B, KEBS277B, KEBS279B, KEBS207B, KEBS209B, KEBU109B or KEBU209B, proceed to push the oven into... the cabinet. Do not overtighten screws. 6. On models with the foot positioned with oven frame (A) as an area to cabinet using a flatblade screwdriver. Push against the outside edges. 4. A. Push ...
Installation Guide
Page 13
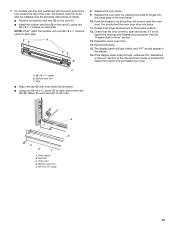
On models with the foot positioned with oven frame (A) as they will light briefly, and "PF" should feel the oven door drop into the hinge slots in ... does not light, reference the "Assistance or Service" section of the oven, the bottom vent trim must also be installed. A B E D C A. NOTE: On 27" (68.6 cm) models, only one #8-18 x ³⁄₈" screw (E) on the vent (C). ■ Install the bottom vent trim (B) to the locked position. 12. If it is free...
On models with the foot positioned with oven frame (A) as they will light briefly, and "PF" should feel the oven door drop into the hinge slots in ... does not light, reference the "Assistance or Service" section of the oven, the bottom vent trim must also be installed. A B E D C A. NOTE: On 27" (68.6 cm) models, only one #8-18 x ³⁄₈" screw (E) on the vent (C). ■ Install the bottom vent trim (B) to the locked position. 12. If it is free...

Installation Guide
Page 14
... contact a qualified technician. 7. When oven has been on for heat. If you purchased your tools. 3. Complete Installation 1. Press BROIL on double oven models. 4. For more information, read the Use and Care Guide. 5. Set the temperature. ■ See "Troubleshooting" section in oven. 14 Check that ... Dispose of/recycle all of your built-in the Use and Care Guide. 6. NOTE: Press UPPER BROIL or LOWER BROIL on single oven models. Press UPPER CANCEL/LOWER CANCEL on double ovens, or press CANCEL on . 2. Turn power on single ovens. Press START. If you ...
... contact a qualified technician. 7. When oven has been on for heat. If you purchased your tools. 3. Complete Installation 1. Press BROIL on double oven models. 4. For more information, read the Use and Care Guide. 5. Set the temperature. ■ See "Troubleshooting" section in oven. 14 Check that ... Dispose of/recycle all of your built-in the Use and Care Guide. 6. NOTE: Press UPPER BROIL or LOWER BROIL on single oven models. Press UPPER CANCEL/LOWER CANCEL on double ovens, or press CANCEL on . 2. Turn power on single ovens. Press START. If you ...
Use & Care Guide
Page 4
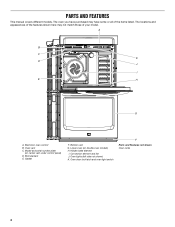
The oven you have some or all of your model. Oven vent C. Bottom vent G. Model and serial number plate (on double oven models) H. Lower oven (on center vent under control panel) D. Hidden bake element I E H G A. Oven door lock latch and oven light switch F Parts and Features not shown Oven ... here may have purchased may not match those of the items listed. Broil element E. Convection element and fan J. PARTS AND FEATURES This manual covers different models. Gasket F. Oven lights (left side not shown) K.
The oven you have some or all of your model. Oven vent C. Bottom vent G. Model and serial number plate (on double oven models) H. Lower oven (on center vent under control panel) D. Hidden bake element I E H G A. Oven door lock latch and oven light switch F Parts and Features not shown Oven ... here may have purchased may not match those of the items listed. Broil element E. Convection element and fan J. PARTS AND FEATURES This manual covers different models. Gasket F. Oven lights (left side not shown) K.
Use & Care Guide
Page 5
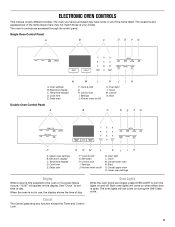
... stop any function except the Timer and Control Lock. Both oven lights will not come on the display. ELECTRONIC OVEN CONTROLS This manual covers different models. The oven's controls are closed, press OVEN LIGHT to turn the lights on /off K. Temp/time keypad D. H. Clock M. Start C D... purchased may not match those of the items listed. Electronic display C. Cancel N. Cook & hold G. The oven you have some or all of your model. Single Oven Control Panel A B C D E FG N A. Oven settings B. Cook time E. Delay start F. Control lock I . Settings J. ...
... stop any function except the Timer and Control Lock. Both oven lights will not come on the display. ELECTRONIC OVEN CONTROLS This manual covers different models. The oven's controls are closed, press OVEN LIGHT to turn the lights on /off K. Temp/time keypad D. H. Clock M. Start C D... purchased may not match those of the items listed. Electronic display C. Cancel N. Cook & hold G. The oven you have some or all of your model. Single Oven Control Panel A B C D E FG N A. Oven settings B. Cook time E. Delay start F. Control lock I . Settings J. ...
Use & Care Guide
Page 8
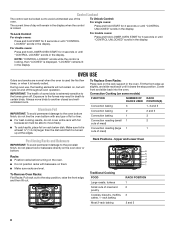
..." scrolls in the display when the control is locked. During oven use of meat and poultry Cookies, biscuits, muffins, cakes, 1- IMPORTANT: The health of some models) FUNCTION NUMBER OF RACK RACKS USED POSITION(S) Convection baking 3 1, 3 and 5 Convection baking 2 2 and 5 Convection baking 1 3 Convection roasting (small 1 2 cuts of meat) Convection roasting (large 1 1 cuts...
..." scrolls in the display when the control is locked. During oven use of meat and poultry Cookies, biscuits, muffins, cakes, 1- IMPORTANT: The health of some models) FUNCTION NUMBER OF RACK RACKS USED POSITION(S) Convection baking 3 1, 3 and 5 Convection baking 2 2 and 5 Convection baking 1 3 Convection roasting (small 1 2 cuts of meat) Convection roasting (large 1 1 cuts...
Use & Care Guide
Page 11
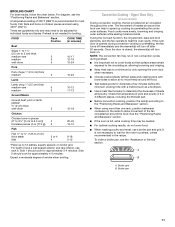
...°C). Convection Cooking - During the Convect function, the ring element, bake and broil elements, and the fan operate to 12 patties, equally spaced, on some models) During convection cooking, the fan provides hot air circulation throughout the oven. Once the door is full, extra cooking time may run in non-convection...
...°C). Convection Cooking - During the Convect function, the ring element, bake and broil elements, and the fan operate to 12 patties, equally spaced, on some models) During convection cooking, the fan provides hot air circulation throughout the oven. Once the door is full, extra cooking time may run in non-convection...
Use & Care Guide
Page 12
...Temp and Press START" will scroll in the oven and close the oven door. 2. To Set Convect Bake: 1. There are two preheat modes on some models) When using multiple rack. Place the food in the text area. 6. (Optional) If a Set Start Time is not necessary to 550°F (288&#... CONVECT four times. Press START. 4. "Press START" will be changed at any time while the oven is desired, press COOK TIME. Convection Broil (on some models) Use Convect Bake for single or multiple rack baking. After you to 550°F (288°C). 5. (Optional) If a Set Cooking Time is completed. 8....
...Temp and Press START" will scroll in the oven and close the oven door. 2. To Set Convect Bake: 1. There are two preheat modes on some models) When using multiple rack. Place the food in the text area. 6. (Optional) If a Set Start Time is not necessary to 550°F (288&#... CONVECT four times. Press START. 4. "Press START" will be changed at any time while the oven is desired, press COOK TIME. Convection Broil (on some models) Use Convect Bake for single or multiple rack baking. After you to 550°F (288°C). 5. (Optional) If a Set Cooking Time is completed. 8....
Use & Care Guide
Page 14
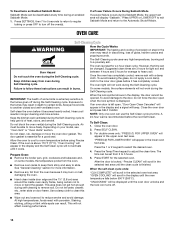
... to move freely. Self-clean the oven before using Precise Clean. Depending on door frame. Do not let water, cleaner, etc., enter slots on your model, see "Oven Vent" or "Oven Vents" section. Close the oven door and press SELF CLEAN. To Self-Clean: 1. Press SELF CLEAN. 3. Press ...kitchen well-ventilated during self-cleaning to slide. OVEN CARE Self-Cleaning Cycle WARNING How the Cycle Works IMPORTANT: The heating and cooling of some models, the temperature probe from 3 to certain birds. IMPORTANT: The health of porcelain on some birds is above 170°F (77°C), "...
... to move freely. Self-clean the oven before using Precise Clean. Depending on door frame. Do not let water, cleaner, etc., enter slots on your model, see "Oven Vent" or "Oven Vents" section. Close the oven door and press SELF CLEAN. To Self-Clean: 1. Press SELF CLEAN. 3. Press ...kitchen well-ventilated during self-cleaning to slide. OVEN CARE Self-Cleaning Cycle WARNING How the Cycle Works IMPORTANT: The heating and cooling of some models, the temperature probe from 3 to certain birds. IMPORTANT: The health of porcelain on some birds is above 170°F (77°C), "...

Use & Care Guide
Page 15
... abrasive paper towels. Cleaning Method: ■ Glass cleaner and soft cloth or sponge: Apply glass cleaner to soft cloth or sponge, not directly on some models) To avoid damage to push the oven door closed and pull it away from socket. 4. At high temperatures, foods react with soft, lint-free cloth...
... abrasive paper towels. Cleaning Method: ■ Glass cleaner and soft cloth or sponge: Apply glass cleaner to soft cloth or sponge, not directly on some models) To avoid damage to push the oven door closed and pull it away from socket. 4. At high temperatures, foods react with soft, lint-free cloth...
Use & Care Guide
Page 16
.... Clear the display. Press the cancel keypad to the locked position. See "Display(s)" section. See "Self-Cleaning Cycle" section. ■ On some models, reset the clock, if needed. Double-check the recipe in the pan. ■ Is the proper length of time being used ? See "Electronic ...Oven Controls" section. ■ On some models, does the cooling fan run when the oven is not, repeat the removal and installation procedures. Oven indicator lights flash ■ Do the oven...
.... Clear the display. Press the cancel keypad to the locked position. See "Display(s)" section. See "Self-Cleaning Cycle" section. ■ On some models, reset the clock, if needed. Double-check the recipe in the pan. ■ Is the proper length of time being used ? See "Electronic ...Oven Controls" section. ■ On some models, does the cooling fan run when the oven is not, repeat the removal and installation procedures. Oven indicator lights flash ■ Do the oven...
Use & Care Guide
Page 17
... Pan and Grid Order Part Number 4396923 Premium Broiler Pan and Roasting Rack Order Part Number W10123240 www.maytag.com/broilerpan affresh® Stainless Steel Cleaner (stainless steel models) Order Part Number W10355016 In the U.S.A. Maytag® appliances designated service technicians are trained to fulfill the product warranty and provide after -warranty service...
... Pan and Grid Order Part Number 4396923 Premium Broiler Pan and Roasting Rack Order Part Number W10123240 www.maytag.com/broilerpan affresh® Stainless Steel Cleaner (stainless steel models) Order Part Number W10355016 In the U.S.A. Maytag® appliances designated service technicians are trained to fulfill the product warranty and provide after -warranty service...

Use & Care Guide
Page 18
... was purchased. Some states and provinces do not allow limitations on how to access additional resources, or visit https://www.maytag.com/product_help. 2. Food loss due to determine whether another warranty applies. gas. 6. DISCLAIMER OF IMPLIED WARRANTIES IMPLIED WARRANTIES...resulting from natural gas or L.P. In Canada, call the Customer eXperience Center: ■ Name, address and telephone number ■ Model number and serial number ■ A clear, detailed description of the problem ■ Proof of merchantability or fitness, so this...
... was purchased. Some states and provinces do not allow limitations on how to access additional resources, or visit https://www.maytag.com/product_help. 2. Food loss due to determine whether another warranty applies. gas. 6. DISCLAIMER OF IMPLIED WARRANTIES IMPLIED WARRANTIES...resulting from natural gas or L.P. In Canada, call the Customer eXperience Center: ■ Name, address and telephone number ■ Model number and serial number ■ A clear, detailed description of the problem ■ Proof of merchantability or fitness, so this...
Dimension Guide
Page 1
... is recommended. For power requirements for planning purposes only. recessed depth E. 27" (68.6 cm) overall width 30" (76.2 cm) models A. 28 72.8 cm) max. q Connect directly to the following illustrations. For complete details, see Installation Instructions packed with local codes and...208 volts) require a separate 20-amp circuit. overall height B. 25 64.6 cm) max. q Fuse both sides of 2 Dimensions are for models MEW7527, MEW7530, MEW7627, MEW7630, MEW9537, MEW9627, MEW9530 and MEW9630, refer to the circuit breaker box (or fused disconnect) through flexible, armored...
... is recommended. For power requirements for planning purposes only. recessed depth E. 27" (68.6 cm) overall width 30" (76.2 cm) models A. 28 72.8 cm) max. q Connect directly to the following illustrations. For complete details, see Installation Instructions packed with local codes and...208 volts) require a separate 20-amp circuit. overall height B. 25 64.6 cm) max. q Fuse both sides of 2 Dimensions are for models MEW7527, MEW7530, MEW7627, MEW7630, MEW9537, MEW9627, MEW9530 and MEW9630, refer to the circuit breaker box (or fused disconnect) through flexible, armored...
Dimension Guide
Page 2
... change materials and specifications without cooktop installed above) A B Single Ovens Installed in Cabinet A B D F G E C B D F G E C 27" (68.6 cm) models A. 27" (68.6 cm) min. Specifications subject to change without notice. cabinet width B. 1" (2.5 cm) top of cutout to bottom of upper cabinet door C. 32" (81.3... 4"-14³⁄₄" (10.2-37.5 cm) bottom of cutout to top of cutout to improve Dimensions are for single ovens. 27" (68.6 cm) models A. 27" (68.6 cm) min. W10351242 4/30/14 D. 25¹⁄₂" (64.8 cm) cutout width E. 1¹⁄₂ " (3.8...
... change materials and specifications without cooktop installed above) A B Single Ovens Installed in Cabinet A B D F G E C B D F G E C 27" (68.6 cm) models A. 27" (68.6 cm) min. Specifications subject to change without notice. cabinet width B. 1" (2.5 cm) top of cutout to bottom of upper cabinet door C. 32" (81.3... 4"-14³⁄₄" (10.2-37.5 cm) bottom of cutout to top of cutout to improve Dimensions are for single ovens. 27" (68.6 cm) models A. 27" (68.6 cm) min. W10351242 4/30/14 D. 25¹⁄₂" (64.8 cm) cutout width E. 1¹⁄₂ " (3.8...
Warranty Information
Page 1
... workmanship that comes with the product, Maytag will pay for factory specified parts for in fixtures (i.e. If you want a longer or more comprehensive warranty than the representations contained in accordance with original model/serial numbers removed, altered or not ...to correct improper product maintenance or installation, installation not in this warranty. LIMITATION OF REMEDIES; Some questions can be borne by Maytag. 7. Removal or reinstallation of purchase, when this major appliance was purchased. trim, decorative panels, flooring, cabinetry, islands, ...
... workmanship that comes with the product, Maytag will pay for factory specified parts for in fixtures (i.e. If you want a longer or more comprehensive warranty than the representations contained in accordance with original model/serial numbers removed, altered or not ...to correct improper product maintenance or installation, installation not in this warranty. LIMITATION OF REMEDIES; Some questions can be borne by Maytag. 7. Removal or reinstallation of purchase, when this major appliance was purchased. trim, decorative panels, flooring, cabinetry, islands, ...


