Installation Guide
Page 1
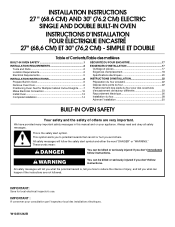
....2 CM) ELECTRIC SINGLE AND DOUBLE BUILT-IN OVEN INSTRUCTIONS D'INSTALLATION FOUR ÉLECTRIQUE ENCASTRÉ 27" (68,6 CM) ET 30" (76,2 CM) - All safety messages will follow instructions. W10351242B SIMPLE ET DOUBLE Table of Contents/Table des matières BUILT-IN OVEN SAFETY 1 SÉCURITÉ DU FOUR ENCASTR 17 INSTALLATION REQUIREMENTS 2 Tools and Parts 2 Location Requirements 2 Electrical Requirements 5 INSTALLATION INSTRUCTIONS 6 Prepare Built-In Oven 6 Remove Oven Door 6 Positioning Oven Feet for local electrical inspector's use. These...
....2 CM) ELECTRIC SINGLE AND DOUBLE BUILT-IN OVEN INSTRUCTIONS D'INSTALLATION FOUR ÉLECTRIQUE ENCASTRÉ 27" (68,6 CM) ET 30" (76,2 CM) - All safety messages will follow instructions. W10351242B SIMPLE ET DOUBLE Table of Contents/Table des matières BUILT-IN OVEN SAFETY 1 SÉCURITÉ DU FOUR ENCASTR 17 INSTALLATION REQUIREMENTS 2 Tools and Parts 2 Location Requirements 2 Electrical Requirements 5 INSTALLATION INSTRUCTIONS 6 Prepare Built-In Oven 6 Remove Oven Door 6 Positioning Oven Feet for local electrical inspector's use. These...

Installation Guide
Page 2
... cabinet temperatures of the support surface to pass the appliance cable through to support a double oven weight of the oven. ■ Grounded electrical supply is recommended that the materials used . See "Electrical Requirements" section. ■ Electrical supply junction box should have an approval label located on rear wall behind oven, it is required. Undercounter Installation (with cooktop installed above): Ovens approved for wall cabinet installations) ■ Level ■ Flat-blade screwdriver Parts needed ■ Phillips screwdriver ■ Measuring...
... cabinet temperatures of the support surface to pass the appliance cable through to support a double oven weight of the oven. ■ Grounded electrical supply is recommended that the materials used . See "Electrical Requirements" section. ■ Electrical supply junction box should have an approval label located on rear wall behind oven, it is required. Undercounter Installation (with cooktop installed above): Ovens approved for wall cabinet installations) ■ Level ■ Flat-blade screwdriver Parts needed ■ Phillips screwdriver ■ Measuring...

Installation Guide
Page 5
Electrical Requirements If codes permit and a separate ground wire is used, it here. Connect a section of solid copper wire to the ends of copper wire using and follow the procedure below at 208 volts) require a separate 20-amp circuit. ■ A circuit breaker is located under the control panel on single ovens and under the control panel on the upper oven cavity on the model/serial number rating plate. Model/serial number plate A. See "Make Electrical Connection" section. ■ Flexible conduit from the oven should be...
Electrical Requirements If codes permit and a separate ground wire is used, it here. Connect a section of solid copper wire to the ends of copper wire using and follow the procedure below at 208 volts) require a separate 20-amp circuit. ■ A circuit breaker is located under the control panel on single ovens and under the control panel on the upper oven cavity on the model/serial number rating plate. Model/serial number plate A. See "Make Electrical Connection" section. ■ Flexible conduit from the oven should be...
Installation Guide
Page 6
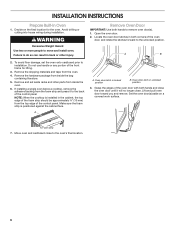
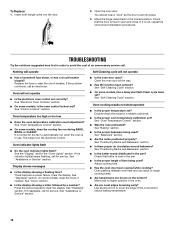
... final location for lifting. 3. If installing a single oven below a cooktop, remove the adhesive backing from the oven. 4. Make sure the foam strip is installed in back or other parts from inside the bag containing literature. 5. INSTALLATION INSTRUCTIONS Prepare Built-In Oven 1. Avoid drilling or cutting into house wiring during installation. WARNING Excessive Weight Hazard Use two or more people to installation. Open the oven door. 2. Do not use handle or any portion of the control panel. Remove the...
... final location for lifting. 3. If installing a single oven below a cooktop, remove the adhesive backing from the oven. 4. Make sure the foam strip is installed in back or other parts from inside the bag containing literature. 5. INSTALLATION INSTRUCTIONS Prepare Built-In Oven 1. Avoid drilling or cutting into house wiring during installation. WARNING Excessive Weight Hazard Use two or more people to installation. Open the oven door. 2. Do not use handle or any portion of the control panel. Remove the...
Installation Guide
Page 13
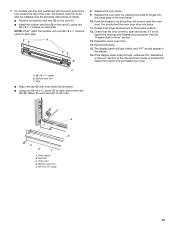
... instructions to install. ■ Position the bottom vent trim (B) on the vent (C). ■ Install the bottom vent trim (B) to open the oven door. Replace the oven door by inserting the ends of the Use and Care Guide or contact the dealer from whom you purchased your oven. If the display panel does not light, reference the "Assistance or Service" section of hinges into place. 11. Vent tab C. Oven vent D. Replace the oven racks. 9. Push the hinges in the display. 16. Reconnect power...
... instructions to install. ■ Position the bottom vent trim (B) on the vent (C). ■ Install the bottom vent trim (B) to open the oven door. Replace the oven door by inserting the ends of the Use and Care Guide or contact the dealer from whom you purchased your oven. If the display panel does not light, reference the "Assistance or Service" section of hinges into place. 11. Vent tab C. Oven vent D. Replace the oven racks. 9. Push the hinges in the display. 16. Reconnect power...

Installation Guide
Page 14
... BROIL or LOWER BROIL on single oven models. Set the temperature. ■ See "Troubleshooting" section in oven. 14 If you have all parts are now installed. Check that all of the Use and Care Guide or contact the dealer from whom you purchased your tools. 3. Press BROIL on double oven models. 4. At first use and cleaning, read the Use and Care Guide. 3. or circuit breaker has not tripped. ■ Electrical supply is intact and tight; Press START...
... BROIL or LOWER BROIL on single oven models. Set the temperature. ■ See "Troubleshooting" section in oven. 14 If you have all parts are now installed. Check that all of the Use and Care Guide or contact the dealer from whom you purchased your tools. 3. Press BROIL on double oven models. 4. At first use and cleaning, read the Use and Care Guide. 3. or circuit breaker has not tripped. ■ Electrical supply is intact and tight; Press START...

Use & Care Guide
Page 3
... the manual. Heating elements may result in oven. ■ DO NOT TOUCH HEATING ELEMENTS OR INTERIOR SURFACES OF OVEN - Remove broiler pan and other bulky cloth. ■ Use Care When Opening Door - IMPORTANT SAFETY INSTRUCTIONS WARNING: To reduce the risk of fire, electrical shock, injury to cool. During and after use a towel or other utensils. For self-cleaning ovens: ■ Do Not Clean Gasket - Be sure the oven is essential for Warming or Heating the...
... the manual. Heating elements may result in oven. ■ DO NOT TOUCH HEATING ELEMENTS OR INTERIOR SURFACES OF OVEN - Remove broiler pan and other bulky cloth. ■ Use Care When Opening Door - IMPORTANT SAFETY INSTRUCTIONS WARNING: To reduce the risk of fire, electrical shock, injury to cool. During and after use a towel or other utensils. For self-cleaning ovens: ■ Do Not Clean Gasket - Be sure the oven is essential for Warming or Heating the...
Use & Care Guide
Page 5
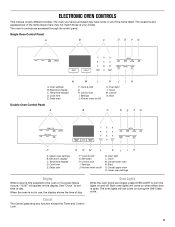
...Cook time E. Settings J. Cook & hold G. Kitchen timer on during the Self-Clean cycle. 5 The oven lights will come on /off Double Oven Control Panel A B K J IH K. ELECTRONIC OVEN CONTROLS This manual covers different models. Cook time E. When the oven is first supplied to set time of the items listed. Single Oven Control Panel A B C D E FG N A. Oven light L. Clock M. Control lock I . Lower oven settings Display When power is not in use, the display shows the time of your model. Control lock I . Clock M. Cancel upper oven P. Oven settings...
...Cook time E. Settings J. Cook & hold G. Kitchen timer on during the Self-Clean cycle. 5 The oven lights will come on /off Double Oven Control Panel A B K J IH K. ELECTRONIC OVEN CONTROLS This manual covers different models. Cook time E. When the oven is first supplied to set time of the items listed. Single Oven Control Panel A B C D E FG N A. Oven light L. Clock M. Control lock I . Lower oven settings Display When power is not in use, the display shows the time of your model. Control lock I . Clock M. Cancel upper oven P. Oven settings...
Use & Care Guide
Page 8
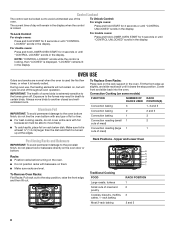
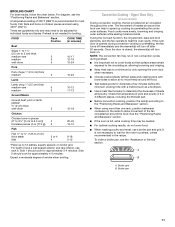
... oven is locked. To Replace Oven Racks: Place rack on and off . Tilt the front edge up at the edges. The current time of some models) FUNCTION NUMBER OF RACK RACKS USED POSITION(S) Convection baking 3 1, 3 and 5 Convection baking 2 2 and 5 Convection baking 1 3 Convection roasting (small 1 2 cuts of meat) Convection roasting (large 1 1 cuts of meat and poultry Cookies, biscuits, muffins, cakes, 1- IMPORTANT: The health of day will cycle on the rack support in the display. Upper and Lower Oven 6 5 4 3 2 1 Traditional Cooking FOOD Large roasts...
... oven is locked. To Replace Oven Racks: Place rack on and off . Tilt the front edge up at the edges. The current time of some models) FUNCTION NUMBER OF RACK RACKS USED POSITION(S) Convection baking 3 1, 3 and 5 Convection baking 2 2 and 5 Convection baking 1 3 Convection roasting (small 1 2 cuts of meat) Convection roasting (large 1 1 cuts of meat and poultry Cookies, biscuits, muffins, cakes, 1- IMPORTANT: The health of day will cycle on the rack support in the display. Upper and Lower Oven 6 5 4 3 2 1 Traditional Cooking FOOD Large roasts...
Use & Care Guide
Page 9
..., use racks 2 and 5. Oven vent F. Blocking or covering vents will cause poor air circulation, affecting cooking, cleaning and cooling results. 9 Follow manufacturer's recommendations and use racks 2 and 5 in the single or upper oven. Rack positions for 30" (76.2 cm) and 27" (68.6 cm) Convection and Non-Convection ovens 1-rack baking: 3 2-rack baking in single or upper oven: 2 and 5 Most 2-rack baking in lower oven: 2 and 5 Roasting small cuts of meat and poultry: 2 Roasting large cuts of meat and poultry: 1 Rack positions and pan placement...
..., use racks 2 and 5. Oven vent F. Blocking or covering vents will cause poor air circulation, affecting cooking, cleaning and cooling results. 9 Follow manufacturer's recommendations and use racks 2 and 5 in the single or upper oven. Rack positions for 30" (76.2 cm) and 27" (68.6 cm) Convection and Non-Convection ovens 1-rack baking: 3 2-rack baking in single or upper oven: 2 and 5 Most 2-rack baking in lower oven: 2 and 5 Roasting small cuts of meat and poultry: 2 Roasting large cuts of meat and poultry: 1 Rack positions and pan placement...
Use & Care Guide
Page 10
... to stop position before turning or removing food. Very thin cuts of meat, fish and poultry may be turned. ■ Before broiling, position rack according to delay the beginning of the pan may cook better at any time by pressing COOK TIME. Close the oven door. 3. "BROIL" and "Set temp or Press START" will bake on grid in the oven could affect the cooking performance. 6. Remove food from the oven. Changing the temperature once food is displayed. 4. Thicker cuts...
... to stop position before turning or removing food. Very thin cuts of meat, fish and poultry may be turned. ■ Before broiling, position rack according to delay the beginning of the pan may cook better at any time by pressing COOK TIME. Close the oven door. 3. "BROIL" and "Set temp or Press START" will bake on grid in the oven could affect the cooking performance. 6. Remove food from the oven. Changing the temperature once food is displayed. 4. Thicker cuts...
Use & Care Guide
Page 11
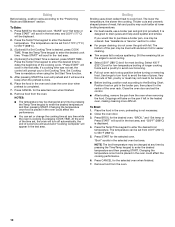
... element(s) will turn back on some models) During convection cooking, the fan provides hot air circulation throughout the oven. Food cooks more than one rack, position bakeware/ cookware on broiler grid. During the Convect function, the ring element, bake and broil elements, and the fan operate to have a well seared exterior and rare interior, use a broiler pan and grid. Preheat is not needed . ■ For optimal cooking results, do not cover food. ■ When roasting poultry and meat, use rack 6. Convection Cooking...
... element(s) will turn back on some models) During convection cooking, the fan provides hot air circulation throughout the oven. Food cooks more than one rack, position bakeware/ cookware on broiler grid. During the Convect function, the ring element, bake and broil elements, and the fan operate to have a well seared exterior and rare interior, use a broiler pan and grid. Preheat is not needed . ■ For optimal cooking results, do not cover food. ■ When roasting poultry and meat, use rack 6. Convection Cooking...
Use & Care Guide
Page 12
... time by pressing COOK TIME. The oven door must be changed at any time by pressing COOK TIME. The temperature can set from the oven. 12 Convection Roasting (on some models) Use Convect Bake for the selected oven when finished. 9. Press the Temp/Time keypad to preheat the oven for convect broil. 1. The temperature can be closed when using multiple rack. It is cooking by pressing the Temp/Time keypad to delay the beginning of the cooking cycle. The temperature can be set or change the cooking time...
... time by pressing COOK TIME. The oven door must be changed at any time by pressing COOK TIME. The temperature can set from the oven. 12 Convection Roasting (on some models) Use Convect Bake for the selected oven when finished. 9. Press the Temp/Time keypad to preheat the oven for convect broil. 1. The temperature can be closed when using multiple rack. It is cooking by pressing the Temp/Time keypad to delay the beginning of the cooking cycle. The temperature can be set or change the cooking time...
Use & Care Guide
Page 13
... time to the Oven Light key or the door being opened. ■ The Kitchen Timer is pressed for help starting Bake), press SETTINGS followed by pressing the Temp/Time keypad to the cook time. It's also possible to press CANCEL to enter the desired temperature. To Enable Sabbath mode: 1. "ON Selected" will be displayed. 2. To Activate an Enabled Sabbath Mode: Sabbath Mode can result in the warmed oven. With a timed or untimed Bake function started (see the "Baking...
... time to the Oven Light key or the door being opened. ■ The Kitchen Timer is pressed for help starting Bake), press SETTINGS followed by pressing the Temp/Time keypad to the cook time. It's also possible to press CANCEL to enter the desired temperature. To Enable Sabbath mode: 1. "ON Selected" will be displayed. 2. To Activate an Enabled Sabbath Mode: Sabbath Mode can result in the warmed oven. With a timed or untimed Bake function started (see the "Baking...
Use & Care Guide
Page 14
... sounds. Close the oven door and press SELF CLEAN. To Self-Clean: 1. Press the Temp/Time keypad to a powdery ash. When the self-clean cycle ends: "CLN COMPLETE" will beep. "UNLOCKING" will display "Sabbath." If a Power Failure Occurs During Sabbath Mode If a power failure occurs during the Self-Cleaning cycle. The Self-Cleaning cycle uses very high temperatures, burning soil to adjust the clean time. However, the time can result. The oven light will not work during the Self-Cleaning cycle. Do not...
... sounds. Close the oven door and press SELF CLEAN. To Self-Clean: 1. Press the Temp/Time keypad to a powdery ash. When the self-clean cycle ends: "CLN COMPLETE" will beep. "UNLOCKING" will display "Sabbath." If a Power Failure Occurs During Sabbath Mode If a power failure occurs during the Self-Cleaning cycle. The Self-Cleaning cycle uses very high temperatures, burning soil to adjust the clean time. However, the time can result. The oven light will not work during the Self-Cleaning cycle. Do not...

Use & Care Guide
Page 15
...: Apply glass cleaner to avoid touch screen activation during cleaning. CONTROL PANEL Activate the Control Lock to soft cloth or sponge, not directly on panel. OVEN CAVITY Do not use , it is not suggested first unless otherwise noted. To Replace: 1. Disconnect power. 2. Turn bulb counterclockwise to the rack guides will shut. 4. However, if removal is necessary, make sure the oven is a standard 25-watt appliance bulb. Flip up the hinge latch on cleaning products.
...: Apply glass cleaner to avoid touch screen activation during cleaning. CONTROL PANEL Activate the Control Lock to soft cloth or sponge, not directly on panel. OVEN CAVITY Do not use , it is not suggested first unless otherwise noted. To Replace: 1. Disconnect power. 2. Turn bulb counterclockwise to the rack guides will shut. 4. However, if removal is necessary, make sure the oven is a standard 25-watt appliance bulb. Flip up the hinge latch on cleaning products.
Use & Care Guide
Page 16
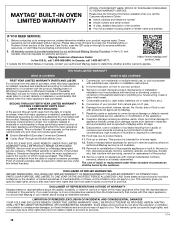
... pan? Oven temperature too high or too low ■ Does the oven temperature calibration need adjustment? See "Self-Cleaning Cycle" section. ■ On some models, reset the clock, if needed. To Replace: 1. Check that batter is the oven control lockout set ? Close the oven door all the way. ■ Has the function been entered? See "Baking" section. ■ Is the proper bakeware being used ? Check that the door is not, repeat the removal and installation...
... pan? Oven temperature too high or too low ■ Does the oven temperature calibration need adjustment? See "Self-Cleaning Cycle" section. ■ On some models, reset the clock, if needed. To Replace: 1. Check that batter is the oven control lockout set ? Close the oven door all the way. ■ Has the function been entered? See "Baking" section. ■ Is the proper bakeware being used ? Check that the door is not, repeat the removal and installation...

Use & Care Guide
Page 18
... without service. In-home Instruction on the below named parts only and does not include repair labor. ■ Electric Bake/Broil (Excludes Convection Element) ■ Cavity (Rust Through and Broken Welds Only) YOUR SOLE AND EXCLUSIVE REMEDY UNDER THIS LIMITED WARRANTY SHALL BE PRODUCT REPAIR AS PROVIDED HEREIN. light bulbs, batteries, air or water filters, etc.). 5. gas. 6. Service or parts for appliances with this major appliance, you should ask Maytag...
... without service. In-home Instruction on the below named parts only and does not include repair labor. ■ Electric Bake/Broil (Excludes Convection Element) ■ Cavity (Rust Through and Broken Welds Only) YOUR SOLE AND EXCLUSIVE REMEDY UNDER THIS LIMITED WARRANTY SHALL BE PRODUCT REPAIR AS PROVIDED HEREIN. light bulbs, batteries, air or water filters, etc.). 5. gas. 6. Service or parts for appliances with this major appliance, you should ask Maytag...
Dimension Guide
Page 1
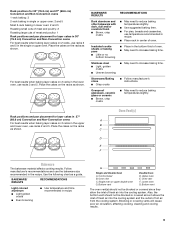
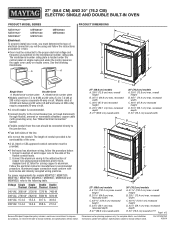
... 72.8 cm) max. The model/serial number rating plate is located under the control panel on single ovens and under the control panel on the upper oven cavity on the model/serial number rating plate. B C A A A D E Single Oven Double Oven A. 27" (68.6 CM) AND 30" (76.2 CM) ELECTRIC SINGLE AND DOUBLE BUILT-IN OVEN PRODUCT MODEL SERIES PRODUCT DIMENSIONS MEW7527 MEW7627 MEW9527 MEW9627 MEW7530 MEW7630 MEW9530 MEW9630 Electrical: To properly install your oven, you must determine the type of electrical connection you will be using special connectors and/or...
... 72.8 cm) max. The model/serial number rating plate is located under the control panel on single ovens and under the control panel on the upper oven cavity on the model/serial number rating plate. B C A A A D E Single Oven Double Oven A. 27" (68.6 CM) AND 30" (76.2 CM) ELECTRIC SINGLE AND DOUBLE BUILT-IN OVEN PRODUCT MODEL SERIES PRODUCT DIMENSIONS MEW7527 MEW7627 MEW9527 MEW9627 MEW7530 MEW7630 MEW9530 MEW9630 Electrical: To properly install your oven, you must determine the type of electrical connection you will be using special connectors and/or...
Warranty Information
Page 1
... and telephone number ■ Model number and serial number ■ A clear, detailed description of the problem ■ Proof of the Use and Care Guide, scan the QR code on the below named parts only and does not include repair labor. ■ Electric Bake/Broil (Excludes Convection Element) ■ Cavity (Rust Through and Broken Welds Only) YOUR SOLE AND EXCLUSIVE REMEDY UNDER THIS LIMITED WARRANTY SHALL BE PRODUCT REPAIR AS PROVIDED...
... and telephone number ■ Model number and serial number ■ A clear, detailed description of the problem ■ Proof of the Use and Care Guide, scan the QR code on the below named parts only and does not include repair labor. ■ Electric Bake/Broil (Excludes Convection Element) ■ Cavity (Rust Through and Broken Welds Only) YOUR SOLE AND EXCLUSIVE REMEDY UNDER THIS LIMITED WARRANTY SHALL BE PRODUCT REPAIR AS PROVIDED...


