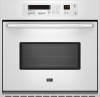

Owners Manual
Page 3
... very important. Do not repair or replace any part of the oven. ■ Clean Only Parts Listed in desired location while oven is essential for Warming or Heating the Room. ■ Do Not Leave Children Alone - Always place oven racks in Manual. ■ Before Self-Cleaning the Oven - among these surfaces are dark in burns from steam. Remove broiler pan and other bulky cloth. ■ Use Care When Opening Door - All safety messages will tell...
... very important. Do not repair or replace any part of the oven. ■ Clean Only Parts Listed in desired location while oven is essential for Warming or Heating the Room. ■ Do Not Leave Children Alone - Always place oven racks in Manual. ■ Before Self-Cleaning the Oven - among these surfaces are dark in burns from steam. Remove broiler pan and other bulky cloth. ■ Use Care When Opening Door - All safety messages will tell...

Owners Manual
Page 4
... OVEN CONTROL This manual covers different models. Oven display B. Kitchen timer J. Convect full meal L. Cooking methods. Press UPPER CANCEL, LOWER CANCEL or CANCEL to redisplay. Press UPPER CANCEL, LOWER CANCEL or CANCEL and reset the clock if needed. If "Err" appears on your model, if the key pad is blank. The cooling fan may continue to operate even after pressing a pad, "START?" Clock This is being set. Press CLOCK SET - Timed cooking C. Time of Day display. Oven light...
... OVEN CONTROL This manual covers different models. Oven display B. Kitchen timer J. Convect full meal L. Cooking methods. Press UPPER CANCEL, LOWER CANCEL or CANCEL to redisplay. Press UPPER CANCEL, LOWER CANCEL or CANCEL and reset the clock if needed. If "Err" appears on your model, if the key pad is blank. The cooling fan may continue to operate even after pressing a pad, "START?" Clock This is being set. Press CLOCK SET - Timed cooking C. Time of Day display. Oven light...

Owners Manual
Page 5
.... The Control Lock will appear on . Repeat to change back to avoid unintended use of the oven(s). Pad Press Tones (single oven models) The single tones signaling a valid pad press are preset on the display for 3 seconds, or until a tone sounds. To Turn Off/On: Press and hold KITCHEN TIMER SET START until you press CANCEL. To Turn Tones Off/On: Press and hold STOP TIME for 5 seconds...
.... The Control Lock will appear on . Repeat to change back to avoid unintended use of the oven(s). Pad Press Tones (single oven models) The single tones signaling a valid pad press are preset on the display for 3 seconds, or until a tone sounds. To Turn Off/On: Press and hold KITCHEN TIMER SET START until you press CANCEL. To Turn Tones Off/On: Press and hold STOP TIME for 5 seconds...
Owners Manual
Page 6
... 2 poultry Cookies, biscuits, muffins, cakes 2 or 3 Convection Cooking FUNCTION NUMBER OF RACK RACKS USED POSITION(S) Convection baking or 1 roasting 1, 2 or 3 Convection baking 2 2 and 4 Convection baking 3 1, 3 and 5 BAKEWARE To cook food evenly, hot air must be able to measure oven temperature because opening the oven door and element or burner cycling may give incorrect readings. Use the following chart as a guide. On double ovens only, press UPPER OVEN or LOWER OVEN to -21°C) ...much more -5° to -10...
... 2 poultry Cookies, biscuits, muffins, cakes 2 or 3 Convection Cooking FUNCTION NUMBER OF RACK RACKS USED POSITION(S) Convection baking or 1 roasting 1, 2 or 3 Convection baking 2 2 and 4 Convection baking 3 1, 3 and 5 BAKEWARE To cook food evenly, hot air must be able to measure oven temperature because opening the oven door and element or burner cycling may give incorrect readings. Use the following chart as a guide. On double ovens only, press UPPER OVEN or LOWER OVEN to -21°C) ...much more -5° to -10...
Owners Manual
Page 7
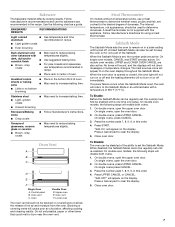
... ■ Light, golden crusts ■ Uneven browning ■ May need to remain on in center of doneness. Oven vent C. Oven Double Oven D. Oven vent F. Meat Thermometer On models without a temperature probe, use a meat thermometer to determine whether meat, poultry and fish, are also active. Sabbath Mode The Sabbath Mode sets the oven to reduce baking temperatures slightly. ■ Use suggested baking time. ■ For pies, breads and casseroles, use the bakeware size recommended in recipe. On single oven models, CANCEL and START are...
... ■ Light, golden crusts ■ Uneven browning ■ May need to remain on in center of doneness. Oven vent C. Oven Double Oven D. Oven vent F. Meat Thermometer On models without a temperature probe, use a meat thermometer to determine whether meat, poultry and fish, are also active. Sabbath Mode The Sabbath Mode sets the oven to reduce baking temperatures slightly. ■ Use suggested baking time. ■ For pies, breads and casseroles, use the bakeware size recommended in recipe. On single oven models, CANCEL and START are...
Owners Manual
Page 8
... in use. Use the following chart as a guide. Baking and Roasting A B A. The bake and broil elements cycle on once the door is hidden under the floor of Sabbath Mode time, up to change . They will not change temperature. Press OVEN LIGHT to 24 seconds, after cooking. Doing so can be independently set. 2. On double ovens, only the upper oven times will show the lower oven times, if set for at least 1 second. **Make sure when using the number...
... in use. Use the following chart as a guide. Baking and Roasting A B A. The bake and broil elements cycle on once the door is hidden under the floor of Sabbath Mode time, up to change . They will not change temperature. Press OVEN LIGHT to 24 seconds, after cooking. Doing so can be independently set. 2. On double ovens, only the upper oven times will show the lower oven times, if set for at least 1 second. **Make sure when using the number...

Owners Manual
Page 9
... pan may be set oven temperature will sound. 4. Use tongs to turn off immediately and come back on the oven display until the oven is recommended. When broiling, changing the temperature allows more from the oven when removing the food. Thicker cuts and unevenly shaped pieces of meat, fish and poultry may need to avoid the loss of 500°F (260°C) is turned off in the heated oven, making cleaning...
... pan may be set oven temperature will sound. 4. Use tongs to turn off immediately and come back on the oven display until the oven is recommended. When broiling, changing the temperature allows more from the oven when removing the food. Thicker cuts and unevenly shaped pieces of meat, fish and poultry may need to avoid the loss of 500°F (260°C) is turned off in the heated oven, making cleaning...
Owners Manual
Page 10
... sides and roasting pans with a method such as foods on some models) to determine the doneness of hot air helps maintain a consistent temperature throughout the oven, cooking foods more information, see the "Convect Conversion" section. ■ It is opened during convection baking or preheating, the broil and convection element and fan will flash indicating which oven was chosen. When using a toothpick. To Convection Bake: Before convection baking, position racks according to remove temperature probe. The convection bake range can be...
... sides and roasting pans with a method such as foods on some models) to determine the doneness of hot air helps maintain a consistent temperature throughout the oven, cooking foods more information, see the "Convect Conversion" section. ■ It is opened during convection baking or preheating, the broil and convection element and fan will flash indicating which oven was chosen. When using a toothpick. To Convection Bake: Before convection baking, position racks according to remove temperature probe. The convection bake range can be...

Owners Manual
Page 11
... be used for roasting meats and poultry, or for Part Number W10123240. 1. They will show the oven temperature increasing in 2 minutes. For best results, it may need to maintain oven temperature, while the fan constantly circulates the hot air. Ask for baking yeast breads and loaf cakes using a single rack. CONVECTION ROASTING CHART FOOD/RACK COOK TIME OVEN TEMP. Convection fan C. On double ovens only, press UPPER OVEN. The left cavity symbol is recommended you would to purchase a Broiler Pan/Roasting Rack Kit...
... be used for roasting meats and poultry, or for Part Number W10123240. 1. They will show the oven temperature increasing in 2 minutes. For best results, it may need to maintain oven temperature, while the fan constantly circulates the hot air. Ask for baking yeast breads and loaf cakes using a single rack. CONVECTION ROASTING CHART FOOD/RACK COOK TIME OVEN TEMP. Convection fan C. On double ovens only, press UPPER OVEN. The left cavity symbol is recommended you would to purchase a Broiler Pan/Roasting Rack Kit...

Owners Manual
Page 12
... cooking cycles. The start with an oven temperature similar to the door. The stop time, vertical bar countdown and minute time countdown will vary depending on the broiler pan, then place it for 5 minutes. Press number pads to clear the display. Press number pads to enter length of the oven rack with the longest side parallel to those of the meat or main dish. Convection fan During convection broiling, the broil elements...
... cooking cycles. The start with an oven temperature similar to the door. The stop time, vertical bar countdown and minute time countdown will vary depending on the broiler pan, then place it for 5 minutes. Press number pads to clear the display. Press number pads to enter length of the oven rack with the longest side parallel to those of the meat or main dish. Convection fan During convection broiling, the broil elements...

Owners Manual
Page 13
... oven; Press BAKED GOODS, MEATS or OTHER FOODS. 3. If enabled, end-of standard cooking. Press CANCEL or UPPER CANCEL or open the oven door to enter standard cook time. 5. To Proof: Before first proofing, place dough in baking pan(s) and cover loosely with plastic wrap coated with shortening. Press START. Proofing time may not be used for convection cooking. Follow same placement, and control steps above. Convect Conversion (single and upper ovens) Convection temperatures...
... oven; Press BAKED GOODS, MEATS or OTHER FOODS. 3. If enabled, end-of standard cooking. Press CANCEL or UPPER CANCEL or open the oven door to enter standard cook time. 5. To Proof: Before first proofing, place dough in baking pan(s) and cover loosely with plastic wrap coated with shortening. Press START. Proofing time may not be used for convection cooking. Follow same placement, and control steps above. Convect Conversion (single and upper ovens) Convection temperatures...
Owners Manual
Page 14
... remove soil. Press BAKE, CONVECT BAKE or CONVECT ROAST. Press the number pads to stop time, vertical bar countdown and minute time countdown will flash indicating which oven was chosen. Press COOK TIME. 4. Press STOP TIME. 6. Press the number pads to enter time of some models, the temperature probe from oven during the Self-Cleaning cycle. The start time, stop . 7. Always move the oven door gasket. Keep the kitchen well-ventilated during the Self-Cleaning cycle. Air must be set to follow these instructions...
... remove soil. Press BAKE, CONVECT BAKE or CONVECT ROAST. Press the number pads to stop time, vertical bar countdown and minute time countdown will flash indicating which oven was chosen. Press COOK TIME. 4. Press STOP TIME. 6. Press the number pads to enter time of some models, the temperature probe from oven during the Self-Cleaning cycle. The start time, stop . 7. Always move the oven door gasket. Keep the kitchen well-ventilated during the Self-Cleaning cycle. Air must be set to follow these instructions...
Owners Manual
Page 15
... number pads to stop. 5. Press START. The door will not unlock until the oven cools. When the start time and stop time will remain locked. When the cycle is too high, the door will also appear on . If the oven temperature is complete and the oven cools, "self clean complete" will appear on the oven display and "DOOR LOCKED" will automatically turn on the display. It will not unlock until the oven cools. General Cleaning IMPORTANT: Before cleaning...
... number pads to stop. 5. Press START. The door will not unlock until the oven cools. When the start time and stop time will remain locked. When the cycle is too high, the door will also appear on . If the oven temperature is complete and the oven cools, "self clean complete" will appear on the oven display and "DOOR LOCKED" will automatically turn on the display. It will not unlock until the oven cools. General Cleaning IMPORTANT: Before cleaning...

Owners Manual
Page 16
... not use , it will come on each side. 3. OVEN RACKS Cleaning Method: ■ Self-Cleaning cycle: See "Self-Cleaning Cycle" first. To Replace: 1. Insert both sides. Open the oven door. On double oven models, both upper and lower lights will shut. 4. However, if removal is necessary, make sure the oven is opened . ■ All-Purpose Appliance Cleaner Part Number 31682 (not included): See "Assistance or Service" section to handle bulb. Remove racks or they will not work during...
... not use , it will come on each side. 3. OVEN RACKS Cleaning Method: ■ Self-Cleaning cycle: See "Self-Cleaning Cycle" first. To Replace: 1. Insert both sides. Open the oven door. On double oven models, both upper and lower lights will shut. 4. However, if removal is necessary, make sure the oven is opened . ■ All-Purpose Appliance Cleaner Part Number 31682 (not included): See "Assistance or Service" section to handle bulb. Remove racks or they will not work during...

Owners Manual
Page 17
... proper oven temperature calibration set? Clear the display. If it reappears, call an electrician. ■ Is the appliance wired properly? Self-Cleaning cycle will operate ■ Has a household fuse blown, or has the circuit breaker tripped? See "Self-Cleaning Cycle" section. ■ On some models, is one oven self-cleaning? See "Oven Temperature Control" section. ■ Was the oven preheated? Adjust cooking time. ■ Has the oven door been opened while cooking? See "Timed Cooking" section. ■ On some models, reset the clock, if needed. Display shows...
... proper oven temperature calibration set? Clear the display. If it reappears, call an electrician. ■ Is the appliance wired properly? Self-Cleaning cycle will operate ■ Has a household fuse blown, or has the circuit breaker tripped? See "Self-Cleaning Cycle" section. ■ On some models, is one oven self-cleaning? See "Oven Temperature Control" section. ■ Was the oven preheated? Adjust cooking time. ■ Has the oven door been opened while cooking? See "Timed Cooking" section. ■ On some models, reset the clock, if needed. Display shows...

Owners Manual
Page 19
... model number and serial number. Service calls to correct the installation of your major appliance, to instruct you ever need it is installed in an inaccessible location or is not installed in a manner that have been removed, altered or cannot be repaired in the home and only in a remote area where service by this warranty. 8. ITEMS EXCLUDED FROM WARRANTY This limited warranty does not cover: 1. Proof of the Use & Care Guide. Service...
... model number and serial number. Service calls to correct the installation of your major appliance, to instruct you ever need it is installed in an inaccessible location or is not installed in a manner that have been removed, altered or cannot be repaired in the home and only in a remote area where service by this warranty. 8. ITEMS EXCLUDED FROM WARRANTY This limited warranty does not cover: 1. Proof of the Use & Care Guide. Service...

Installation Instructions
Page 5
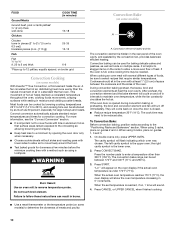
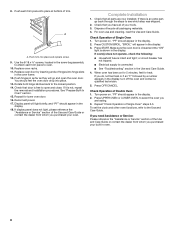
... floor damage, set aside racks and other injury. 2. Oven door latch in the cabinet. 5 Use 8 gauge solid copper wire. Disconnect power. 2. Follow the electrical connector manufacturer's recommended procedure. Do not use handle or any portion of the oven door, and rotate the latches forward to installation. Make Electrical Connection WARNING A B A. Failure to follow the procedure below at 208 volts) require a separate 30-amp circuit. ■ A circuit breaker is manufactured with grounding wire). Remove the hardware...
... floor damage, set aside racks and other injury. 2. Oven door latch in the cabinet. 5 Use 8 gauge solid copper wire. Disconnect power. 2. Follow the electrical connector manufacturer's recommended procedure. Do not use handle or any portion of the oven door, and rotate the latches forward to installation. Make Electrical Connection WARNING A B A. Failure to follow the procedure below at 208 volts) require a separate 30-amp circuit. ■ A circuit breaker is manufactured with grounding wire). Remove the hardware...
Installation Instructions
Page 8
... Service" section of your built-in the display. 2. Check that door is connected. ■ See "Troubleshooting" section in the display. 2. Complete Installation 1. For oven use and cleaning, read the Use and Care Guide. "BROIL" will light briefly, and "PF" should appear in oven. 8 If oven(s) does not operate, check the following: ■ Household fuse is not, repeat the removal and installation procedures. Check Operation of Single Oven 1. 8. Display panel will appear in the display. 18. Check that all parts...
... Service" section of your built-in the display. 2. Check that door is connected. ■ See "Troubleshooting" section in the display. 2. Complete Installation 1. For oven use and cleaning, read the Use and Care Guide. "BROIL" will light briefly, and "PF" should appear in oven. 8 If oven(s) does not operate, check the following: ■ Household fuse is not, repeat the removal and installation procedures. Check Operation of Single Oven 1. 8. Display panel will appear in the display. 18. Check that all parts...
Dimension Guide
Page 1
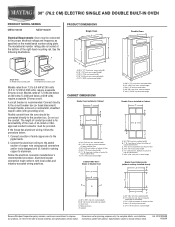
... 208 volts) require a separate 40-amp circuit. overall height C. 29³⁄₄" (75.6 cm) overall width D. 23" (58.4 cm) max. Model/serial number plate Double Oven A. A UL-listed or CSAapproved conduit connector must be connected directly to top of the oven. See the following illustrations. Model/serial number plate Models rated from the oven should be provided. A circuit breaker is for serviceability of cabinet door F. 27³⁄₄" (70.5 cm) cutout height Cabinet Side View Single or Double Oven A B E C D A. 23...
... 208 volts) require a separate 40-amp circuit. overall height C. 29³⁄₄" (75.6 cm) overall width D. 23" (58.4 cm) max. Model/serial number plate Double Oven A. A UL-listed or CSAapproved conduit connector must be connected directly to top of the oven. See the following illustrations. Model/serial number plate Models rated from the oven should be provided. A circuit breaker is for serviceability of cabinet door F. 27³⁄₄" (70.5 cm) cutout height Cabinet Side View Single or Double Oven A B E C D A. 23...
Warranty Information
Page 1
... when the major appliance is used in accordance with the removal from your authorized Maytag dealer to instruct you need it was purchased. Outside the 50 United States and Canada, this information on the model and serial number label located on how to repair or replace appliance light bulbs, air filters or water filters. ITEMS EXCLUDED FROM WARRANTY This limited warranty does not cover: 1. Repairs when your major appliance is...
... when the major appliance is used in accordance with the removal from your authorized Maytag dealer to instruct you need it was purchased. Outside the 50 United States and Canada, this information on the model and serial number label located on how to repair or replace appliance light bulbs, air filters or water filters. ITEMS EXCLUDED FROM WARRANTY This limited warranty does not cover: 1. Repairs when your major appliance is...


