
Owners Manual
Page 3
... Always read and obey all safety messages. WARNING You can kill or hurt you and others are dark in the manual. This is properly installed and grounded by a qualified technician. ■ Never Use the Oven for a good seal. Be sure the oven is the safety alert ...■ Use Care When Opening Door - All safety messages will tell you don't immediately follow basic precautions, including the following: ■ Proper Installation - These words mean: DANGER You can happen if the instructions are oven vent openings and surfaces near these openings, oven doors, and windows of...
... Always read and obey all safety messages. WARNING You can kill or hurt you and others are dark in the manual. This is properly installed and grounded by a qualified technician. ■ Never Use the Oven for a good seal. Be sure the oven is the safety alert ...■ Use Care When Opening Door - All safety messages will tell you don't immediately follow basic precautions, including the following: ■ Proper Installation - These words mean: DANGER You can happen if the instructions are oven vent openings and surfaces near these openings, oven doors, and windows of...

Owners Manual
Page 16
.... Disconnect power. 2. Oven Door For normal oven use oven cleaners. Flip up the hinge latch on when either door is not, repeat the removal and installation procedures. 16 Remove bulb from oven. OVEN CAVITY Do not use , it is opened . Lift the oven door while holding both upper and lower lights...
.... Disconnect power. 2. Oven Door For normal oven use oven cleaners. Flip up the hinge latch on when either door is not, repeat the removal and installation procedures. 16 Remove bulb from oven. OVEN CAVITY Do not use , it is opened . Lift the oven door while holding both upper and lower lights...

Owners Manual
Page 17
...some models, has a delay start Self-Clean cycle been set or turned on the bottom? When one oven self-cleaning? See the Installation Instructions. ■ Is the proper temperature set ? Double-check the recipe in the pan? TROUBLESHOOTING Try the solutions suggested here first ... one oven is self-cleaning, the other oven cannot be set ? See "Oven Temperature Control" section. ■ Was the oven preheated? See Installation Instructions. See "Electronic Oven Control" section. ■ Has a delay start been set correctly? Oven temperature too high or too low ■ ...
...some models, has a delay start Self-Clean cycle been set or turned on the bottom? When one oven self-cleaning? See the Installation Instructions. ■ Is the proper temperature set ? Double-check the recipe in the pan? TROUBLESHOOTING Try the solutions suggested here first ... one oven is self-cleaning, the other oven cannot be set ? See "Oven Temperature Control" section. ■ Was the oven preheated? See Installation Instructions. See "Electronic Oven Control" section. ■ Has a delay start been set correctly? Oven temperature too high or too low ■ ...

Owners Manual
Page 18
... the product warranty and provide after -warranty service, anywhere in the United States. In the U.S.A. To locate the Maytag® appliances designated service company in your area, you the cost of appliances. ■ Installation information. ■ Use and maintenance procedures. ■ Accessory and repair parts sales. ■ Specialized customer assistance (Spanish speaking...
... the product warranty and provide after -warranty service, anywhere in the United States. In the U.S.A. To locate the Maytag® appliances designated service company in your area, you the cost of appliances. ■ Installation information. ■ Use and maintenance procedures. ■ Accessory and repair parts sales. ■ Specialized customer assistance (Spanish speaking...

Owners Manual
Page 19
...to instructions attached to or furnished with published installation instructions. 11. Service must provide proof of Whirlpool Corporation or Whirlpool Canada LP (hereafter "Maytag") will need it is installed in an inaccessible location or is not installed in -warranty service. ITEMS EXCLUDED FROM ... easily determined. This major appliance is designed to correct the installation of the Use & Care Guide. Expenses for travel and transportation for in accordance with the product, Maytag brand of purchase or installation date for product service if your major appliance is void if...
...to instructions attached to or furnished with published installation instructions. 11. Service must provide proof of Whirlpool Corporation or Whirlpool Canada LP (hereafter "Maytag") will need it is installed in an inaccessible location or is not installed in -warranty service. ITEMS EXCLUDED FROM ... easily determined. This major appliance is designed to correct the installation of the Use & Care Guide. Expenses for travel and transportation for in accordance with the product, Maytag brand of purchase or installation date for product service if your major appliance is void if...

Installation Instructions
Page 2
...connectors Parts supplied ■ # 8-14 x 1" screws - See "Electrical Requirements." Given dimensions provide minimum clearance with oven. ■ Recessed installation area must be located in a wall cabinet. otherwise, the oven will not discolor, delaminate or sustain other damage. Refer to make sure that... surface must be located 3" (7.6 cm) maximum below the support surface when the oven is recommended that can happen if the instructions are installing the junction box on some models) ■ Two # 8-18 x ³⁄₈" screws - Floor must be killed or seriously...
...connectors Parts supplied ■ # 8-14 x 1" screws - See "Electrical Requirements." Given dimensions provide minimum clearance with oven. ■ Recessed installation area must be located in a wall cabinet. otherwise, the oven will not discolor, delaminate or sustain other damage. Refer to make sure that... surface must be located 3" (7.6 cm) maximum below the support surface when the oven is recommended that can happen if the instructions are installing the junction box on some models) ■ Two # 8-18 x ³⁄₈" screws - Floor must be killed or seriously...
Installation Instructions
Page 3
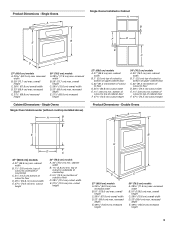
...cm) min. cutout height B E D C 27" (68.6 cm) models A. 25 64.3 cm) max. recessed width B. 51" (129.5 cm) max. Single Ovens A Single Ovens Installed in Cabinet A B B E D C 27" (68.6 cm) models A. 25 64.3 cm) max. cabinet width B. 1¹⁄₂" (3.8 cm) min. cabinet width B. 1¹... cm) min. overall height C. 29³⁄₄" (75.6 cm) overall width D. 23" (58.4 cm) max. Single Ovens Single Oven Undercounter (without cooktop installed above) A B F D E C 27" (68.6 cm) models A. 27" (68.6 cm) min. bottom of cabinet door F. 27³⁄₄" (...
...cm) min. cutout height B E D C 27" (68.6 cm) models A. 25 64.3 cm) max. recessed width B. 51" (129.5 cm) max. Single Ovens A Single Ovens Installed in Cabinet A B B E D C 27" (68.6 cm) models A. 25 64.3 cm) max. cabinet width B. 1¹⁄₂" (3.8 cm) min. cabinet width B. 1¹... cm) min. overall height C. 29³⁄₄" (75.6 cm) overall width D. 23" (58.4 cm) max. Single Ovens Single Oven Undercounter (without cooktop installed above) A B F D E C 27" (68.6 cm) models A. 27" (68.6 cm) min. bottom of cabinet door F. 27³⁄₄" (...

Installation Instructions
Page 4
...) recessed oven depth C. Check with local codes. A copy of the above code standards can be obtained from: Electrical Connection To properly install your oven, you must determine the type of electrical connection you are adequate and in Cabinet A B Cabinet Dimensions - See the following... illustrations. Model/serial number plate Double Oven A. Model/serial number plate 4 Double Ovens Installed in conformance with the National Electrical Code, ANSI/NFPA 70-latest edition or CSA Standards C22.1-94, Canadian Electrical Code, Part 1 ...
...) recessed oven depth C. Check with local codes. A copy of the above code standards can be obtained from: Electrical Connection To properly install your oven, you must determine the type of electrical connection you are adequate and in Cabinet A B Cabinet Dimensions - See the following... illustrations. Model/serial number plate Double Oven A. Model/serial number plate 4 Double Ovens Installed in conformance with the National Electrical Code, ANSI/NFPA 70-latest edition or CSA Standards C22.1-94, Canadian Electrical Code, Part 1 ...

Installation Instructions
Page 5
... in death, fire, or electrical shock. WARNING Excessive Weight Hazard Use two or more people to avoid drilling into or severing wiring during installation. 3. Remove the shipping materials and tape from inside the package containing literature. Side trims are in both hands to remove oven door(s).... from 7.3 to 9.6 kW at 240 volts (5.5 to 7.2 kW at 208 volts) require a separate 30-amp circuit. ■ A circuit breaker is installed in cabinet) are located on the right side of copper wire using special connectors and/or tools designed and UL listed for lifting. 3. Use 8 gauge...
... in death, fire, or electrical shock. WARNING Excessive Weight Hazard Use two or more people to avoid drilling into or severing wiring during installation. 3. Remove the shipping materials and tape from inside the package containing literature. Side trims are in both hands to remove oven door(s).... from 7.3 to 9.6 kW at 240 volts (5.5 to 7.2 kW at 208 volts) require a separate 30-amp circuit. ■ A circuit breaker is installed in cabinet) are located on the right side of copper wire using special connectors and/or tools designed and UL listed for lifting. 3. Use 8 gauge...
Installation Instructions
Page 6
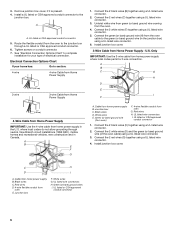
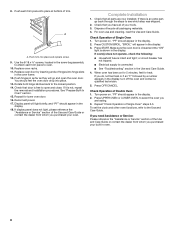
...listed or CSA approved conduit connector 5. Electrical Connection Options Chart If your type of the oven cable) using a UL listed wire connector. 4. Install junction box cover. Green (or bare) ground wires I . Connect the 2 red wires (C) together using a UL listed wire connector. 5.... Red wires D. 4-wire flexible conduit from oven G. Green (or bare) ground wire (from oven) F. 4-wire flexible conduit from oven E. Install a UL listed or CSA approved conduit connector to section: 4-wire 4-wire Cable from Home Power Supply 3-wire ½" (1.3 cm) 3-wire ...
...listed or CSA approved conduit connector 5. Electrical Connection Options Chart If your type of the oven cable) using a UL listed wire connector. 4. Install junction box cover. Green (or bare) ground wires I . Connect the 2 red wires (C) together using a UL listed wire connector. 5.... Red wires D. 4-wire flexible conduit from oven G. Green (or bare) ground wire (from oven) F. 4-wire flexible conduit from oven E. Install a UL listed or CSA approved conduit connector to section: 4-wire 4-wire Cable from Home Power Supply 3-wire ½" (1.3 cm) 3-wire ...

Installation Instructions
Page 7
... piece upward onto oven side rails. 7 Oven vent 7. Do not push against seal area of the vent, fasten vent securely to move and install oven. AB 2. On models with shipping feet, use a Phillips screwdriver to grip. Using 2 or more people to the oven. A. Insert ...of the oven. Shipping foot 3. Oven frame slot B. Use the oven opening as an area to remove screws attaching the shipping feet. 4. A A. Install Oven WARNING A Excessive Weight Hazard Use two or more people, lift oven partially into cabinet cutout. B Failure to push oven into cabinet cutout. 5....
... piece upward onto oven side rails. 7 Oven vent 7. Do not push against seal area of the vent, fasten vent securely to move and install oven. AB 2. On models with shipping feet, use a Phillips screwdriver to grip. Using 2 or more people to the oven. A. Insert ...of the oven. Shipping foot 3. Oven frame slot B. Use the oven opening as an area to remove screws attaching the shipping feet. 4. A A. Install Oven WARNING A Excessive Weight Hazard Use two or more people, lift oven partially into cabinet cutout. B Failure to push oven into cabinet cutout. 5....
Installation Instructions
Page 8
... piece into place. 13. Turn power on . To set the clock and other oven functions, refer to see which step was skipped. 2. Complete Installation 1. If you are now installed. Use the 8-18 x ³⁄₈" screws, located in the display. 2. "PF" should feel the oven door drop into place at bottom of...
... piece into place. 13. Turn power on . To set the clock and other oven functions, refer to see which step was skipped. 2. Complete Installation 1. If you are now installed. Use the 8-18 x ³⁄₈" screws, located in the display. 2. "PF" should feel the oven door drop into place at bottom of...

