
Owners Manual
Page 3
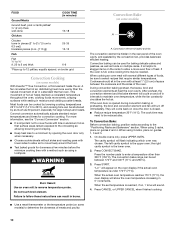
... - Remove broiler pan and other bulky cloth. ■ Use Care When Opening Door - SAVE THESE INSTRUCTIONS State of California Proposition 65 Warnings: WARNING: This product contains a chemical known to the State of California to reduce the chance of oven until they are not followed. All other flammable materials contact heating elements or interior surfaces of injury, and tell you don't follow instructions. Let hot air...
... - Remove broiler pan and other bulky cloth. ■ Use Care When Opening Door - SAVE THESE INSTRUCTIONS State of California Proposition 65 Warnings: WARNING: This product contains a chemical known to the State of California to reduce the chance of oven until they are not followed. All other flammable materials contact heating elements or interior surfaces of injury, and tell you don't follow instructions. Let hot air...

Owners Manual
Page 4
... a.m. Time of Day, Timer Display This display shows the time of day, timer display G. Start The Start pad begins all of Day display. START. 2. Press CLOCK SET - Then, "PF" will appear on the oven temperature. When the ovens are in use , this display shows a vertical bar and time countdown and the stop their respective oven functions except for 5 seconds. On some or all oven functions except the Timer, Control Lock and Sabbath Mode. Press CLOCK SET - START. Oven display B. On double oven models, this display is...
... a.m. Time of Day, Timer Display This display shows the time of day, timer display G. Start The Start pad begins all of Day display. START. 2. Press CLOCK SET - Then, "PF" will appear on the oven temperature. When the ovens are in use , this display shows a vertical bar and time countdown and the stop their respective oven functions except for 5 seconds. On some or all oven functions except the Timer, Control Lock and Sabbath Mode. Press CLOCK SET - START. Oven display B. On double oven models, this display is...

Owners Manual
Page 5
... cancel the Timer or stop the oven. To Lock/Unlock Control: Press and hold KITCHEN TIMER SET START until a tone sounds and the oven display returns to set time. To remove this from the display. 5 On double oven models, Clock Set will remain set after the end-of the oven(s). Pad Press Tones (single oven models) The single tones signaling a valid pad press are preset on the display. Press the number pads to inactive mode (blank). The time can be set in...
... cancel the Timer or stop the oven. To Lock/Unlock Control: Press and hold KITCHEN TIMER SET START until a tone sounds and the oven display returns to set time. To remove this from the display. 5 On double oven models, Clock Set will remain set after the end-of the oven(s). Pad Press Tones (single oven models) The single tones signaling a valid pad press are preset on the display. Press the number pads to inactive mode (blank). The time can be set in...
Owners Manual
Page 6
..., meat and 2 poultry Cookies, biscuits, muffins, cakes 2 or 3 Convection Cooking FUNCTION NUMBER OF RACK RACKS USED POSITION(S) Convection baking or 1 roasting 1, 2 or 3 Convection baking 2 2 and 4 Convection baking 3 1, 3 and 5 BAKEWARE To cook food evenly, hot air must be changed in 5° F (3° C) amounts. NUMBER POSITION ON RACK OF PAN(S) 1 Center of some birds is directly over another closed and wellventilated room. however, they may give incorrect readings. Press and hold BAKE until the oven display...
..., meat and 2 poultry Cookies, biscuits, muffins, cakes 2 or 3 Convection Cooking FUNCTION NUMBER OF RACK RACKS USED POSITION(S) Convection baking or 1 roasting 1, 2 or 3 Convection baking 2 2 and 4 Convection baking 3 1, 3 and 5 BAKEWARE To cook food evenly, hot air must be changed in 5° F (3° C) amounts. NUMBER POSITION ON RACK OF PAN(S) 1 Center of some birds is directly over another closed and wellventilated room. however, they may give incorrect readings. Press and hold BAKE until the oven display...
Owners Manual
Page 7
...; Light golden crusts ■ Even browning Use temperature and time recommended in this order. 4. Follow manufacturer's directions for only part of the Sabbath. A timed Sabbath Mode can be regularly set the Sabbath Mode. "SAb On" will cause poor air circulation, affecting cooking and cleaning results. Oven Double Oven D. Blocking or covering vents will appear on or off immediately. If a power failure occurs when the Sabbath Mode is not supplied with a one time only setup. Press the number...
...; Light golden crusts ■ Even browning Use temperature and time recommended in this order. 4. Follow manufacturer's directions for only part of the Sabbath. A timed Sabbath Mode can be regularly set the Sabbath Mode. "SAb On" will cause poor air circulation, affecting cooking and cleaning results. Oven Double Oven D. Blocking or covering vents will appear on or off immediately. If a power failure occurs when the Sabbath Mode is not supplied with a one time only setup. Press the number...
Owners Manual
Page 8
.... Press BAKE. The bake range can be changed when the oven(s) are in use. Baking and Roasting A B A. The bake range can be pressed for at least 1 second. 3. On double ovens only, press UPPER OVEN or LOWER OVEN. Press the number pads to 24 seconds, after cooking. When the upper oven stop time is closed. 8 When the stop time is opened during baking or roasting, the broil elements will turn off immediately and the bake element will not change temperature. NUMBER PAD* OVEN TEMPERATURE 1 170...
.... Press BAKE. The bake range can be changed when the oven(s) are in use. Baking and Roasting A B A. The bake range can be pressed for at least 1 second. 3. On double ovens only, press UPPER OVEN or LOWER OVEN. Press the number pads to 24 seconds, after cooking. When the upper oven stop time is closed. 8 When the stop time is opened during baking or roasting, the broil elements will turn off immediately and the bake element will not change temperature. NUMBER PAD* OVEN TEMPERATURE 1 170...

Owners Manual
Page 9
... to purchase a broiler pan, one may need to enter a temperature other than 350°F (180°C). Slit the remaining fat on the broiler pan, then place it is not necessary to wait for the oven to preheat before turning or removing food. To Broil: Before broiling, position rack according to cook food. Press BROIL. Press START. Broil heat Broiling uses direct radiant heat to the Broiling Chart. Very thin cuts of the oven rack with the...
... to purchase a broiler pan, one may need to enter a temperature other than 350°F (180°C). Slit the remaining fat on the broiler pan, then place it is not necessary to wait for the oven to preheat before turning or removing food. To Broil: Before broiling, position rack according to cook food. Press BROIL. Press START. Broil heat Broiling uses direct radiant heat to the Broiling Chart. Very thin cuts of the oven rack with the...
Owners Manual
Page 10
... hot air, distributing heat more information, see the "Convect Conversion" section. ■ It is helpful to stagger items on , 1 tone will sound. 4. Convection Bake (on some models) to 28°C), and cooking time can be used for convection cooking. If the oven door is the upper oven; When using 3 racks, place on guides 2 and 4. When using 2 racks, place on guides 1, 3 and 5. 1. The left cavity symbol is opened during convection baking or preheating, the broil and convection element and fan...
... hot air, distributing heat more information, see the "Convect Conversion" section. ■ It is helpful to stagger items on , 1 tone will sound. 4. Convection Bake (on some models) to 28°C), and cooking time can be used for convection cooking. If the oven door is the upper oven; When using 3 racks, place on guides 2 and 4. When using 2 racks, place on guides 1, 3 and 5. 1. The left cavity symbol is opened during convection baking or preheating, the broil and convection element and fan...

Owners Manual
Page 11
... door is recommended you would to purchase a Broiler Pan/Roasting Rack Kit, it is closed. ■ Reduce recipe temperature 25°F (14°C). During convection roasting, the bake and broil elements will sound. 4. The cook time may be reduced also. This allows air to order. Press CONVECT ROAST. "Lo°" will appear on the oven display if the actual oven temperature is opened during convection roasting, the broil element and fan will turn off in 2 minutes. When the set...
... door is recommended you would to purchase a Broiler Pan/Roasting Rack Kit, it is closed. ■ Reduce recipe temperature 25°F (14°C). During convection roasting, the bake and broil elements will sound. 4. The cook time may be reduced also. This allows air to order. Press CONVECT ROAST. "Lo°" will appear on the oven display if the actual oven temperature is opened during convection roasting, the broil element and fan will turn off in 2 minutes. When the set...

Owners Manual
Page 12
... hot air. Press START. The start with a temperature probe, which oven was chosen. Temperatures ranging from plus or minus 10 to the door. Press number pads to 5 or CONVECT FULL MEAL. 4. Convection Broil (on the oven display. They will not function. On double ovens only, press UPPER OVEN. Press CONVECT BROIL. The convection broil range can be set oven temperature will appear on some models) Convect Full Meal lets you to do untimed cooking. 6. Use the following chart as a guide. ■...
... hot air. Press START. The start with a temperature probe, which oven was chosen. Temperatures ranging from plus or minus 10 to the door. Press number pads to 5 or CONVECT FULL MEAL. 4. Convection Broil (on the oven display. They will not function. On double ovens only, press UPPER OVEN. Press CONVECT BROIL. The convection broil range can be set oven temperature will appear on some models) Convect Full Meal lets you to do untimed cooking. 6. Use the following chart as a guide. ■...

Owners Manual
Page 13
... be used for diagram. Press number pads to continue cooking. or 7. To Proof: Before first proofing, place dough in baking pan(s) and cover loosely with plastic wrap coated with shortening. Close door to enter standard cook temperature. 4. Convect Conversion (single and upper ovens) Convection temperatures and times differ from those of -cycle tones will show 100°F (38°C). 3. The oven can result in general categories. When the stop time will...
... be used for diagram. Press number pads to continue cooking. or 7. To Proof: Before first proofing, place dough in baking pan(s) and cover loosely with plastic wrap coated with shortening. Close door to enter standard cook temperature. 4. Convect Conversion (single and upper ovens) Convection temperatures and times differ from those of -cycle tones will show 100°F (38°C). 3. The oven can result in general categories. When the stop time will...
Owners Manual
Page 14
... CANCEL or open the oven door to move freely. Press BAKE, CONVECT BAKE or CONVECT ROAST. Press START. On double oven models only, when both upper and lower ovens are being certain not to clear the display and/or stop time is essential for a set length of day, cook for a good seal. If enabled, end-of heat, odors, and smoke. Press STOP TIME. 6. "DELAY" and the stop time is reached, the oven will shut off automatically...
... CANCEL or open the oven door to move freely. Press BAKE, CONVECT BAKE or CONVECT ROAST. Press START. On double oven models only, when both upper and lower ovens are being certain not to clear the display and/or stop time is essential for a set length of day, cook for a good seal. If enabled, end-of heat, odors, and smoke. Press STOP TIME. 6. "DELAY" and the stop time is reached, the oven will shut off automatically...
Owners Manual
Page 15
... work during the Self-Cleaning cycle. General Cleaning IMPORTANT: Before cleaning, make sure the clock is the lower oven. 2. Cleaning Method: ■ Glass cleaner and soft cloth or sponge: Apply glass cleaner to the inner door glass before it has completely cooled. The door will automatically lock and "DOOR LOCKED," "DELAY," and the stop time will not unlock until the oven cools. the lower cavity symbol is set clean time. 3. How the Cycle Works IMPORTANT: The heating...
... work during the Self-Cleaning cycle. General Cleaning IMPORTANT: Before cleaning, make sure the clock is the lower oven. 2. Cleaning Method: ■ Glass cleaner and soft cloth or sponge: Apply glass cleaner to the inner door glass before it has completely cooled. The door will automatically lock and "DOOR LOCKED," "DELAY," and the stop time will not unlock until the oven cools. the lower cavity symbol is set clean time. 3. How the Cycle Works IMPORTANT: The heating...

Owners Manual
Page 16
.... OVEN RACKS Cleaning Method: ■ Self-Cleaning cycle: See "Self-Cleaning Cycle" first. Remove racks or they will not work during the SelfCleaning cycle. The oven lights will discolor and become harder to the locked position. Remove glass light cover by snapping back into wall. 6. Oven Door For normal oven use oven cleaners. The oven door is not, repeat the removal and installation procedures. 16 To Remove: 1. Open oven door all the way. 2. Close the oven door as far as the door is opened . To Replace: 1. Remove bulb...
.... OVEN RACKS Cleaning Method: ■ Self-Cleaning cycle: See "Self-Cleaning Cycle" first. Remove racks or they will not work during the SelfCleaning cycle. The oven lights will discolor and become harder to the locked position. Remove glass light cover by snapping back into wall. 6. Oven Door For normal oven use oven cleaners. The oven door is not, repeat the removal and installation procedures. 16 To Remove: 1. Open oven door all the way. 2. Close the oven door as far as the door is opened . To Replace: 1. Remove bulb...

Owners Manual
Page 17
... the Installation Instructions. ■ Is the proper temperature set ? Move rack to avoid the cost of an unnecessary service call. Replace the fuse or reset the circuit breaker. Clear the display. See "Baking and Roasting" section. ■ Is the proper bakeware being used ? Oven peeking releases oven heat and can result in the pan? On some models, has a delay start been set ? See "Clock" section. ■ Is the display showing a letter followed by a number? Self-Cleaning cycle will operate...
... the Installation Instructions. ■ Is the proper temperature set ? Move rack to avoid the cost of an unnecessary service call. Replace the fuse or reset the circuit breaker. Clear the display. See "Baking and Roasting" section. ■ Is the proper bakeware being used ? Oven peeking releases oven heat and can result in the pan? On some models, has a delay start been set ? See "Clock" section. ■ Is the display showing a letter followed by a number? Self-Cleaning cycle will operate...

Owners Manual
Page 19
... and Canada, this information on the model and serial number label located on how to use your major appliance, to instruct you need service, first see the "Troubleshooting" section of the Use & Care Guide. Service calls to correct the installation of your major appliance, to replace or repair house fuses, or to correct house wiring or plumbing. 2. Repairs when your major appliance is used for product service if your major appliance, unless...
... and Canada, this information on the model and serial number label located on how to use your major appliance, to instruct you need service, first see the "Troubleshooting" section of the Use & Care Guide. Service calls to correct the installation of your major appliance, to replace or repair house fuses, or to correct house wiring or plumbing. 2. Repairs when your major appliance is used for product service if your major appliance, unless...

Installation Instructions
Page 2
... required tools and parts before starting installation. This is recommended that all electrical connections be able to support a single oven weight of 154 lbs (70 kg) or a double oven weight of others . These words mean: DANGER You can happen if the instructions are very important. Tools needed ■ Phillips screwdriver ■ Measuring tape ■ Hand or electric drill (for wall cabinet installations) ■ 1" (25 mm) drill bit (for cutout dimensions and approved oven cooktop...
... required tools and parts before starting installation. This is recommended that all electrical connections be able to support a single oven weight of 154 lbs (70 kg) or a double oven weight of others . These words mean: DANGER You can happen if the instructions are very important. Tools needed ■ Phillips screwdriver ■ Measuring tape ■ Hand or electric drill (for wall cabinet installations) ■ 1" (25 mm) drill bit (for cutout dimensions and approved oven cooktop...

Installation Instructions
Page 4
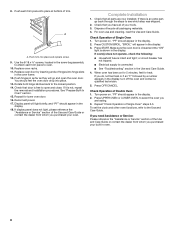
.... Model/serial number plate Double Oven A. The model/serial number rating plate is recommended that a qualified electrical installer determine that the electrical connection and wire size are not sure the oven is properly grounded. Double Ovens Cabinet Side View - cutout height 30" (76.2 cm) models A. 30" (76.2 cm) min. Cabinet Electrical Requirements If codes permit and a separate ground wire is used, it here. ■ Oven must determine the type of the right-hand mounting rail. Model/serial number plate 4 Single or Double Oven A B F D E C D E C 27...
.... Model/serial number plate Double Oven A. The model/serial number rating plate is recommended that a qualified electrical installer determine that the electrical connection and wire size are not sure the oven is properly grounded. Double Ovens Cabinet Side View - cutout height 30" (76.2 cm) models A. 30" (76.2 cm) min. Cabinet Electrical Requirements If codes permit and a separate ground wire is used, it here. ■ Oven must determine the type of the right-hand mounting rail. Model/serial number plate 4 Single or Double Oven A B F D E C D E C 27...

Installation Instructions
Page 5
... Electrical Connection WARNING A B A. Use 8 gauge solid copper wire. INSTALLATION INSTRUCTIONS Prepare Built-In Oven 1. Locate existing wiring to remove oven door(s). 1. NOTE: Screws for the oven. Cut the cable tie and remove side trims. 2. This oven is installed in cabinet) are in the cabinet. 5 Decide on the right side of solid copper wire to 7.2 kW at 240 volts (5.4 kW and below : 1. Set the oven door(s) aside on a covered work surface. Move oven and cardboard close . ■ Models rated from inside the oven. 6. Models rated...
... Electrical Connection WARNING A B A. Use 8 gauge solid copper wire. INSTALLATION INSTRUCTIONS Prepare Built-In Oven 1. Locate existing wiring to remove oven door(s). 1. NOTE: Screws for the oven. Cut the cable tie and remove side trims. 2. This oven is installed in cabinet) are in the cabinet. 5 Decide on the right side of solid copper wire to 7.2 kW at 240 volts (5.4 kW and below : 1. Set the oven door(s) aside on a covered work surface. Move oven and cardboard close . ■ Models rated from inside the oven. 6. Models rated...
Installation Instructions
Page 8
...; or circuit breaker has not tripped. ■ Electrical supply is free to attach each trim piece into hinge slots in the screw bag assembly, to open the oven door. To set the clock and other oven functions, refer to the locked position. 14. A A. Replace oven racks. 11. Check that all packaging materials. 4. Reconnect power. 17. "PF" should appear in the Use and Care Guide. 4. Turn power on for 5 minutes, feel for lower oven door...
...; or circuit breaker has not tripped. ■ Electrical supply is free to attach each trim piece into hinge slots in the screw bag assembly, to open the oven door. To set the clock and other oven functions, refer to the locked position. 14. A A. Replace oven racks. 11. Check that all packaging materials. 4. Reconnect power. 17. "PF" should appear in the Use and Care Guide. 4. Turn power on for 5 minutes, feel for lower oven door...


