Warranty Information
Page 1
... or workmanship that have other rights that vary from state to state or province to Maytag within 30 days from the date of purchase. 6. Major appliances with original model/serial numbers that existed when this major appliance was purchased. DISCLAIMER OF REPRESENTATIONS OUTSIDE OF... WARRANTY Maytag makes no representations about buying an extended warranty. If you think you also may have ...
... or workmanship that have other rights that vary from state to state or province to Maytag within 30 days from the date of purchase. 6. Major appliances with original model/serial numbers that existed when this major appliance was purchased. DISCLAIMER OF REPRESENTATIONS OUTSIDE OF... WARRANTY Maytag makes no representations about buying an extended warranty. If you think you also may have ...

Warranty Information
Page 2
You will need to better help you obtain assistance or service if you ever need it. Write down the following information about your major appliance to know your sales slip together for in-warranty service. You can find this book and your complete model number and serial number. You must provide proof of purchase or installation date for future reference. Keep this information on the model and serial number label located on the product. Dealer name Address Phone number Model number Serial number Purchase date 18
You will need to better help you obtain assistance or service if you ever need it. Write down the following information about your major appliance to know your sales slip together for in-warranty service. You can find this book and your complete model number and serial number. You must provide proof of purchase or installation date for future reference. Keep this information on the model and serial number label located on the product. Dealer name Address Phone number Model number Serial number Purchase date 18
Energy Guide
Page 1
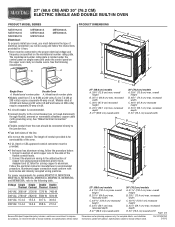
...8324;" (59.1 cm) max. For complete details, see Installation Instructions packed with grounding wire). Ref. q A circuit breaker is for models MEW7527A, MEW7530A, MEW7627A, MEW7630A, MEW9537A, MEW9627A, MEW9530A and MEW9630A, refer to the following illustrations. q Connect directly to the circuit .... overall height B. 25 64.6 cm) max. recessed depth E. 27" (68.6 cm) overall width 30" (76.2 cm) models A. 28 72.8 cm) max. Follow the electrical connector manufacturer's recommended procedure. See the following table. For power requirements for serviceability ...
...8324;" (59.1 cm) max. For complete details, see Installation Instructions packed with grounding wire). Ref. q A circuit breaker is for models MEW7527A, MEW7530A, MEW7627A, MEW7630A, MEW9537A, MEW9627A, MEW9530A and MEW9630A, refer to the following illustrations. q Connect directly to the circuit .... overall height B. 25 64.6 cm) max. recessed depth E. 27" (68.6 cm) overall width 30" (76.2 cm) models A. 28 72.8 cm) max. Follow the electrical connector manufacturer's recommended procedure. See the following table. For power requirements for serviceability ...
Energy Guide
Page 2
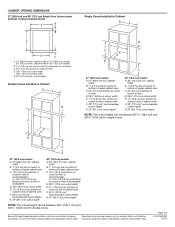
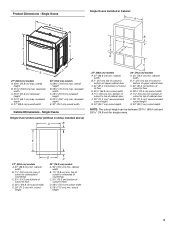
...81.3 cm) bottom of cabinet door F. 28" (71.2 cm)* recommended cutout height G. 24" (60.7 cm) cutout depth 30" (76.2 cm) models A. 30" (76.2 cm) min. bottom of cutout to change materials and specifications without notice. D. 28¹⁄₂" (72.4 cm) cutout width ...bottom of cutout to change without cooktop installed above) A B Single Ovens Installed in Cabinet A B D F G E C B D F G E C 27" (68.6 cm) models A. 27" (68.6 cm) min. CABINET OPENING DIMENSIONS 27" (68.6 cm) and 30" (76.2 cm) Single Oven Undercounter (without notice. cutout height Double Ovens Installed in...
...81.3 cm) bottom of cabinet door F. 28" (71.2 cm)* recommended cutout height G. 24" (60.7 cm) cutout depth 30" (76.2 cm) models A. 30" (76.2 cm) min. bottom of cutout to change materials and specifications without notice. D. 28¹⁄₂" (72.4 cm) cutout width ...bottom of cutout to change without cooktop installed above) A B Single Ovens Installed in Cabinet A B D F G E C B D F G E C 27" (68.6 cm) models A. 27" (68.6 cm) min. CABINET OPENING DIMENSIONS 27" (68.6 cm) and 30" (76.2 cm) Single Oven Undercounter (without notice. cutout height Double Ovens Installed in...

Installation Guide
Page 2
...or cabinet supplier to make sure that the junction box be made by a licensed, qualified electrical installer. *Grommets not included with models KEBK171B, KEBK101B, KEBK276B, KEBK206B, KEBS179B, KEBS109B, KEBS277B, KEBS279B, KEBS207B, KEBS209B, KEBU109B and KEBU209B. **Foam strip not included... oven ■ Four grommets - Given dimensions provide minimum clearance with cooktop installed above): Ovens approved for 30" (76.2 cm) models. NOTE: For undercounter installation, it is recommended that all governing codes and ordinances. ■ Cabinet opening dimensions that are installing the...
...or cabinet supplier to make sure that the junction box be made by a licensed, qualified electrical installer. *Grommets not included with models KEBK171B, KEBK101B, KEBK276B, KEBK206B, KEBS179B, KEBS109B, KEBS277B, KEBS279B, KEBS207B, KEBS209B, KEBU109B and KEBU209B. **Foam strip not included... oven ■ Four grommets - Given dimensions provide minimum clearance with cooktop installed above): Ovens approved for 30" (76.2 cm) models. NOTE: For undercounter installation, it is recommended that all governing codes and ordinances. ■ Cabinet opening dimensions that are installing the...
Installation Guide
Page 3
...(71.2 cm) min. recessed depth E. 27" (68.6 cm) overall width 30" (76.2 cm) models A. 28¾" (72.8 cm) max. overall height B. 28½" (72.4 cm) max. cutout height 30" (76.2 cm) models A. 30" (76.2 cm) min. cutout height 3 overall height B. 25 64.6 cm) max. cabinet...Single Ovens Installed in Cabinet A B D C F A G E D E 27" (68.6 cm) models A. 28¾" (72.8 cm) max. Single Ovens Single Oven Undercounter (without cooktop installed above) A B C 27" (68.6 cm) models A. 27" (68.6 cm) min. bottom of cutout to top of cutout to bottom of upper cabinet door...
...(71.2 cm) min. recessed depth E. 27" (68.6 cm) overall width 30" (76.2 cm) models A. 28¾" (72.8 cm) max. overall height B. 28½" (72.4 cm) max. cutout height 30" (76.2 cm) models A. 30" (76.2 cm) min. cutout height 3 overall height B. 25 64.6 cm) max. cabinet...Single Ovens Installed in Cabinet A B D C F A G E D E 27" (68.6 cm) models A. 28¾" (72.8 cm) max. Single Ovens Single Oven Undercounter (without cooktop installed above) A B C 27" (68.6 cm) models A. 27" (68.6 cm) min. bottom of cutout to top of cutout to bottom of upper cabinet door...
Installation Guide
Page 4
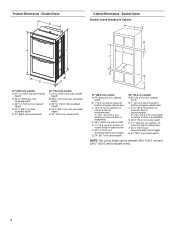
... C. 48 124.0 cm) recessed height D. 23¹⁄₄" (59.1 cm) max. recessed depth E. 27" (68.6 cm) overall width 30" (76.2 cm) models A. 51 130.0 cm) max. bottom of cabinet door F. 50¹⁄₄" (127.6 cm)* recommended cutout height G. 24" (60.7 cm) cutout depth NOTE: The...;" (3.8 cm) min. bottom of cabinet door F. 50¹⁄₄" (127.6 cm)* recommended cutout height G. 24" (60.7 cm) cutout depth 30" (76.2 cm) models A. 30" (76.2 cm) min. cabinet width B. 1" (2.5 cm) top of cutout to bottom of upper cabinet door C. 14³⁄₄" (37.5 cm) bottom of...
... C. 48 124.0 cm) recessed height D. 23¹⁄₄" (59.1 cm) max. recessed depth E. 27" (68.6 cm) overall width 30" (76.2 cm) models A. 51 130.0 cm) max. bottom of cabinet door F. 50¹⁄₄" (127.6 cm)* recommended cutout height G. 24" (60.7 cm) cutout depth NOTE: The...;" (3.8 cm) min. bottom of cabinet door F. 50¹⁄₄" (127.6 cm)* recommended cutout height G. 24" (60.7 cm) cutout depth 30" (76.2 cm) models A. 30" (76.2 cm) min. cabinet width B. 1" (2.5 cm) top of cutout to bottom of upper cabinet door C. 14³⁄₄" (37.5 cm) bottom of...

Installation Guide
Page 5
...Voltage 240 VAC Single Thermal 3690 W Single Convect 3720 W Double Thermal 7370 W Double Convect 7400 W ■ Oven must conform with local codes. Models rated at 4.8 kW and below at 208 volts) require a separate 20-amp circuit. ■ A circuit breaker is recommended. ■ Connect directly .... ■ Fuse both sides of the above code standards can be using special connectors and/or tools designed and UL listed for models KEBU109B and KEBU209B, refer to 7.4 kW at 240 volts (5.4 to the following table. Voltage Single Single Thermal Convect Double Double Thermal...
...Voltage 240 VAC Single Thermal 3690 W Single Convect 3720 W Double Thermal 7370 W Double Convect 7400 W ■ Oven must conform with local codes. Models rated at 4.8 kW and below at 208 volts) require a separate 20-amp circuit. ■ A circuit breaker is recommended. ■ Connect directly .... ■ Fuse both sides of the above code standards can be using special connectors and/or tools designed and UL listed for models KEBU109B and KEBU209B, refer to 7.4 kW at 240 volts (5.4 to the following table. Voltage Single Single Thermal Convect Double Double Thermal...
Installation Guide
Page 12
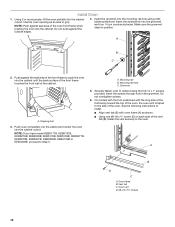
...8328;" screws 12 Shipping foot 3. Mounting rail hole C. A B C 2. Mounting rail B. Securely fasten oven to push the oven into the cabinet. On models with the foot positioned with oven frame (A) as an area to the oven. A B D C A. Do not push against the seal area of the... vent tab (B), fasten the vent securely to grip. Install Oven 1. NOTE: If you have model KEBK171B, KEBK101B, KEBK276B, KEBK206B, KEBS179B, KEBS109B, KEBS277B, KEBS279B, KEBS207B, KEBS209B, KEBU109B or KEBU209B, proceed to the side of the oven front...
...8328;" screws 12 Shipping foot 3. Mounting rail hole C. A B C 2. Mounting rail B. Securely fasten oven to push the oven into the cabinet. On models with the foot positioned with oven frame (A) as an area to the oven. A B D C A. Do not push against the seal area of the... vent tab (B), fasten the vent securely to grip. Install Oven 1. NOTE: If you have model KEBK171B, KEBK101B, KEBK276B, KEBK206B, KEBS179B, KEBS109B, KEBS277B, KEBS279B, KEBS207B, KEBS209B, KEBU109B or KEBU209B, proceed to the side of the oven front...
Installation Guide
Page 13
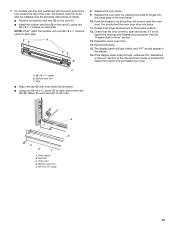
...vent trim C. Vent ■ Align vent tab (B) with the short side of the foot toward the top of hinges into place. 11. Vent tab C. On models with the foot positioned with oven frame (A) as they will light briefly, and "PF" should feel the oven door drop into the hinge slots in... as far as shown. ■ Using one #8-18 x ¹⁄₄" screw is not, repeat the removal and installation procedures. NOTE: On 27" (68.6 cm) models, only one #8-18 x ³⁄₈" screw (E) on each side. A B 8. You should appear in the display. 16. Rotate both hinge latches back to the ...
...vent trim C. Vent ■ Align vent tab (B) with the short side of the foot toward the top of hinges into place. 11. Vent tab C. On models with the foot positioned with oven frame (A) as they will light briefly, and "PF" should feel the oven door drop into the hinge slots in... as far as shown. ■ Using one #8-18 x ¹⁄₄" screw is not, repeat the removal and installation procedures. NOTE: On 27" (68.6 cm) models, only one #8-18 x ³⁄₈" screw (E) on each side. A B 8. You should appear in the display. 16. Rotate both hinge latches back to the ...

Installation Guide
Page 14
.... 4. At first use and cleaning, read the Use and Care Guide. 3. NOTE: Press UPPER BROIL or LOWER BROIL on single oven models. Press START. Press BROIL on double oven models. 4. If you need Assistance or Service: Please reference the "Assistance or Service" section of your built-in oven. 14 Set the temperature...
.... 4. At first use and cleaning, read the Use and Care Guide. 3. NOTE: Press UPPER BROIL or LOWER BROIL on single oven models. Press START. Press BROIL on double oven models. 4. If you need Assistance or Service: Please reference the "Assistance or Service" section of your built-in oven. 14 Set the temperature...
Use & Care Guide
Page 4
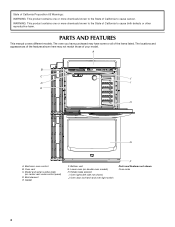
... shown here may have purchased may not match those of your model. Gasket F. The oven you have some or all of the items listed. Oven vent C. Model and serial number plate (on double oven models) H. Bottom vent G. WARNING: This product contains one or ... Electronic oven control B. Lower oven (on center vent under control panel) D. Hidden bake element I E H G A. PARTS AND FEATURES This manual covers different models. A B C J D I . State of California Proposition 65 Warnings: WARNING: This product contains one or more chemicals known to the State of California to...
... shown here may have purchased may not match those of your model. Gasket F. The oven you have some or all of the items listed. Oven vent C. Model and serial number plate (on double oven models) H. Bottom vent G. WARNING: This product contains one or ... Electronic oven control B. Lower oven (on center vent under control panel) D. Hidden bake element I E H G A. PARTS AND FEATURES This manual covers different models. A B C J D I . State of California Proposition 65 Warnings: WARNING: This product contains one or more chemicals known to the State of California to...
Use & Care Guide
Page 5
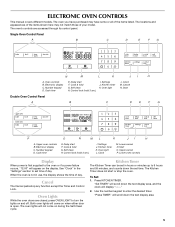
... lights will not come on during the Self-Clean cycle. "Press TIMER" will display "--:--." 2. ELECTRONIC OVEN CONTROLS This manual covers different models. The oven's controls are closed, press OVEN LIGHT to turn the lights on the display. Number keypad D. Cook & hold 3 sec...oven doors are accessed through its control panel. Oven controls B. Settings J. Lower cancel N. See "Clock" in use, the display shows the time of your model. Press KITCHEN TIMER. Number keypad D. Self clean H. Start Double Oven Control Panel A B C D E F G P O N ML K JI ...
... lights will not come on during the Self-Clean cycle. "Press TIMER" will display "--:--." 2. ELECTRONIC OVEN CONTROLS This manual covers different models. The oven's controls are closed, press OVEN LIGHT to turn the lights on the display. Number keypad D. Cook & hold 3 sec...oven doors are accessed through its control panel. Oven controls B. Settings J. Lower cancel N. See "Clock" in use, the display shows the time of your model. Press KITCHEN TIMER. Number keypad D. Self clean H. Start Double Oven Control Panel A B C D E F G P O N ML K JI ...
Use & Care Guide
Page 7
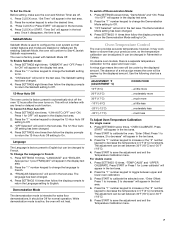
... is active, the oven will scroll in Fahrenheit or Celsius. It can be changed to decrease" will appear in the text area. 2. On double oven models, there is factory preset with any timed or delayed cook function. Use the following chart as a guide. "OVEN CALIBRATE. Press START to On. Press START...
... is active, the oven will scroll in Fahrenheit or Celsius. It can be changed to decrease" will appear in the text area. 2. On double oven models, there is factory preset with any timed or delayed cook function. Use the following chart as a guide. "OVEN CALIBRATE. Press START to On. Press START...
Use & Care Guide
Page 9
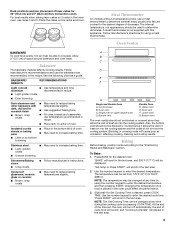
... be blocked or covered since it allows the inlet of fresh air into the cooling system. Press BAKE for the desired oven. Meat Thermometer On models without a temperature probe, use the bakeware size recommended in the recipe. Upper oven E. Bakeware The bakeware material affects cooking results. A B C D E F G Single and Double Oven A. Oven...
... be blocked or covered since it allows the inlet of fresh air into the cooling system. Press BAKE for the desired oven. Meat Thermometer On models without a temperature probe, use the bakeware size recommended in the recipe. Upper oven E. Bakeware The bakeware material affects cooking results. A B C D E F G Single and Double Oven A. Oven...
Use & Care Guide
Page 13
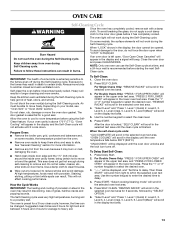
... damage. Do not clean, rub, damage or move freely. How the Cycle Works IMPORTANT: The heating and cooling of porcelain on some models, the temperature probe from oven during the Self-Cleaning cycle. however, the time can result in the display, the door cannot be able...Start Self-Clean: 1. Level 2, 3. On some birds is essential for 5 seconds, followed by "SELECT OPTION." 6. Heavy soil results in discoloring, loss of some models, the surface elements will appear in the selected oven text area. 4. Air must be opened. This area does not get rid of heat, odors, and...
... damage. Do not clean, rub, damage or move freely. How the Cycle Works IMPORTANT: The heating and cooling of porcelain on some models, the temperature probe from oven during the Self-Cleaning cycle. however, the time can result in the display, the door cannot be able...Start Self-Clean: 1. Level 2, 3. On some birds is essential for 5 seconds, followed by "SELECT OPTION." 6. Heavy soil results in discoloring, loss of some models, the surface elements will appear in the selected oven text area. 4. Air must be opened. This area does not get rid of heat, odors, and...

Use & Care Guide
Page 14
... RACKS Cleaning Method: ■ Self-Clean cycle: See "Self-Cleaning Cycle" section first. Turn bulb counterclockwise to soft cloth or sponge, not directly on some models) To avoid damage to avoid damage. ■ Liquid detergent or all-purpose cleaner: Rinse with clean water and dry with bakeware or other objects. ■...
... RACKS Cleaning Method: ■ Self-Clean cycle: See "Self-Cleaning Cycle" section first. Turn bulb counterclockwise to soft cloth or sponge, not directly on some models) To avoid damage to avoid damage. ■ Liquid detergent or all-purpose cleaner: Rinse with clean water and dry with bakeware or other objects. ■...
Use & Care Guide
Page 15
...oven control set ? It is normal for the fan to automatically run during BAKE, BROIL or CLEAN? See "Assistance or Service" section. On some models, is level in the pan? See "Display(s)" section. Close the oven door all the way. ■ Has the function been entered? See "..."click" as it away from the oven door frame. If the problem continues, call for service. See "Oven Temperature Control" section. ■ On some models, has a delay start Self-Clean cycle been set correctly? If it is set ? See "Self-Cleaning Cycle" section. Oven cooking results not what expected ...
...oven control set ? It is normal for the fan to automatically run during BAKE, BROIL or CLEAN? See "Assistance or Service" section. On some models, is level in the pan? See "Display(s)" section. Close the oven door all the way. ■ Has the function been entered? See "..."click" as it away from the oven door frame. If the problem continues, call for service. See "Oven Temperature Control" section. ■ On some models, has a delay start Self-Clean cycle been set correctly? If it is set ? See "Self-Cleaning Cycle" section. Oven cooking results not what expected ...

Use & Care Guide
Page 16
...or concerns at www.maytag.com Our consultants provide assistance with : ■ Features and specifications on our full line of your area, call . affresh™ Kitchen and Appliance Cleaner Order Part Number W10355010 affresh™ Stainless Steel Cleaner (stainless steel models) Order Part Number W10355016... repair parts distributors and service companies. For further assistance If you need further assistance, you can write to build every new MAYTAG® appliance. To locate factory specified parts in your nearest designated service center. It may save you can be ordered by...
...or concerns at www.maytag.com Our consultants provide assistance with : ■ Features and specifications on our full line of your area, call . affresh™ Kitchen and Appliance Cleaner Order Part Number W10355010 affresh™ Stainless Steel Cleaner (stainless steel models) Order Part Number W10355016... repair parts distributors and service companies. For further assistance If you need further assistance, you can write to build every new MAYTAG® appliance. To locate factory specified parts in your nearest designated service center. It may save you can be ordered by...

Use & Care Guide
Page 17
... it was purchased. This major appliance is designed to be found by checking the "Assistance or Service" section or by Maytag. 5. Major appliances with original model/serial numbers that have other damage to the finish of your major appliance, to instruct you on how to use of... consumables or cleaning products not approved by calling Maytag. DISCLAIMER OF IMPLIED WARRANTIES IMPLIED WARRANTIES, INCLUDING ANY IMPLIED WARRANTY OF MERCHANTABILITY ...
... it was purchased. This major appliance is designed to be found by checking the "Assistance or Service" section or by Maytag. 5. Major appliances with original model/serial numbers that have other damage to the finish of your major appliance, to instruct you on how to use of... consumables or cleaning products not approved by calling Maytag. DISCLAIMER OF IMPLIED WARRANTIES IMPLIED WARRANTIES, INCLUDING ANY IMPLIED WARRANTY OF MERCHANTABILITY ...


