
Owners Manual
Page 2
...or speech impaired) (Mon.-Fri., 8 am-8 pm Eastern Time) Internet: http://www.maytag.com In our continuing effort to improve the quality and performance of our cooking products, ... this guide. Read and follow all packing materials are vulnerable to a qualified servicer. Model Number Serial Number Date of Purchase If you do not let cooking grease or other ... severe personal injury or death. Children should not be properly installed and grounded by closing the oven door. To Prevent Fire or Smoke Damage • Be sure all instructions before servicing. Turn...
...or speech impaired) (Mon.-Fri., 8 am-8 pm Eastern Time) Internet: http://www.maytag.com In our continuing effort to improve the quality and performance of our cooking products, ... this guide. Read and follow all packing materials are vulnerable to a qualified servicer. Model Number Serial Number Date of Purchase If you do not let cooking grease or other ... severe personal injury or death. Children should not be properly installed and grounded by closing the oven door. To Prevent Fire or Smoke Damage • Be sure all instructions before servicing. Turn...

Owners Manual
Page 4
... Use care to birds. Safety Cleaning Safety • Turn off all controls and wait for Future Reference Self-Clean Oven CAUTION Before self-cleaning the oven, remove the oven racks, broiler pan, food and any kind in rooms where the fumes from the kitchen could reach. The door ...keep pet birds in the kitchen or in or around any part of potential exposures to the use oven cleaners or oven liners of any other utensils. Note: For microwave oven operation (select models) refer to such substances. Save These Instructions for appliance parts to prevent excessive smoke and flare-ups...
... Use care to birds. Safety Cleaning Safety • Turn off all controls and wait for Future Reference Self-Clean Oven CAUTION Before self-cleaning the oven, remove the oven racks, broiler pan, food and any kind in rooms where the fumes from the kitchen could reach. The door ...keep pet birds in the kitchen or in or around any part of potential exposures to the use oven cleaners or oven liners of any other utensils. Note: For microwave oven operation (select models) refer to such substances. Save These Instructions for appliance parts to prevent excessive smoke and flare-ups...

Owners Manual
Page 5
...12-hour format. press again to the previous display. Set the time of day, timer and oven functions. The display window on model.) A Bake B Broil C Convect Bake (select models) D Keep Warm E Convect Roast (select models) F Clean G CANCEL H Number Pads I J KL M N O The control panel is... set at a later time. Cancels all operations except Timer and Clock. Sets the Clock. If more than 30 seconds elapse...
...12-hour format. press again to the previous display. Set the time of day, timer and oven functions. The display window on model.) A Bake B Broil C Convect Bake (select models) D Keep Warm E Convect Roast (select models) F Clean G CANCEL H Number Pads I J KL M N O The control panel is... set at a later time. Cancels all operations except Timer and Clock. Sets the Clock. If more than 30 seconds elapse...
Owners Manual
Page 7
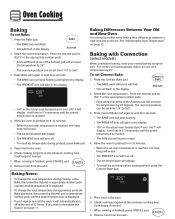
...is reached. • The FAN icon will rise in the oven. 6. Baking with Convection (select models) When convection baking, enter your normal baking temperature. The oven temperature can be set oven temperature by 25 degrees. Select the oven temperature. Press the Autoset pad for 350° F or the...flash. • 000 will automatically turn off at the minimum cooking time. It will start to 550°. 3. Oven Cooking Baking To set Convect Bake: 1. The control will increase the temperature by 25°. Place food in 5° increments until the desired ...
...is reached. • The FAN icon will rise in the oven. 6. Baking with Convection (select models) When convection baking, enter your normal baking temperature. The oven temperature can be set oven temperature by 25 degrees. Select the oven temperature. Press the Autoset pad for 350° F or the...flash. • 000 will automatically turn off at the minimum cooking time. It will start to 550°. 3. Oven Cooking Baking To set Convect Bake: 1. The control will increase the temperature by 25°. Place food in 5° increments until the desired ...

Owners Manual
Page 8
... can vary with different cuts of the set cooking time has elapsed, the oven light will flash in the oven. 7. Remove food from the oven. Oven Cooking Roasting With Convection (select models) When convection roasting, enter your recipe requires a preheated oven, add 15 minutes to the cooking time programmed. • Roasting times can be set from 170°...
... can vary with different cuts of the set cooking time has elapsed, the oven light will flash in the oven. 7. Remove food from the oven. Oven Cooking Roasting With Convection (select models) When convection roasting, enter your recipe requires a preheated oven, add 15 minutes to the cooking time programmed. • Roasting times can be set from 170°...

Owners Manual
Page 9
...1. In double wall oven models, press the Delay or Delay 1 (select models) pad once to program the upper oven or twice to heat immediately after the control has been set. Press Bake, Convect Bake or Convect Roast (select models). 6. After one hour in HOLD WARM: • The oven turns off automatically. ...) to flash. • The time will light in the display. • Time can be set from oven. Press Bake, Convect Bake or Convect Roast (select models) and select the oven temperature. Press the desired cycle pad again OR wait four seconds. • The desired cycle icon will remain...
...1. In double wall oven models, press the Delay or Delay 1 (select models) pad once to program the upper oven or twice to heat immediately after the control has been set. Press Bake, Convect Bake or Convect Roast (select models). 6. After one hour in HOLD WARM: • The oven turns off automatically. ...) to flash. • The time will light in the display. • Time can be set from oven. Press Bake, Convect Bake or Convect Roast (select models) and select the oven temperature. Press the desired cycle pad again OR wait four seconds. • The desired cycle icon will remain...
Owners Manual
Page 13
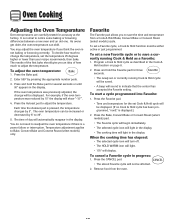
... temperature 25 degrees higher or lower than your recipe recommends, then bake. Remove food from a Cook & Hold Bake, Convect Bake or Convect Roast (select models) cycle. Enter 550° by 5°. For example, if the oven temperature was previously adjusted, the change the temperature, set or currently running Cook & Hold as described in progress...
... temperature 25 degrees higher or lower than your recipe recommends, then bake. Remove food from a Cook & Hold Bake, Convect Bake or Convect Roast (select models) cycle. Enter 550° by 5°. For example, if the oven temperature was previously adjusted, the change the temperature, set or currently running Cook & Hold as described in progress...

Owners Manual
Page 14
... and will sound every time the Oven Light pad is closed, press the Oven Light pad to the "stop position. 3. When the oven is selected. Do not block the vent opening for each oven. Oven Racks CAUTION • Do not attempt to circulate hot air in the oven. 2. Single and Double Convect Ovens - Lift up slightly; Lower front and...
... and will sound every time the Oven Light pad is closed, press the Oven Light pad to the "stop position. 3. When the oven is selected. Do not block the vent opening for each oven. Oven Racks CAUTION • Do not attempt to circulate hot air in the oven. 2. Single and Double Convect Ovens - Lift up slightly; Lower front and...

Owners Manual
Page 15
Rack Position #1: Large cuts of the rack is still available to hold a casserole dish. Three racks (convection cooking - Multiple Rack Cooking: Two racks: Use #2o and #4. The right side of meat and turkey, custard pie, dessert souffle. Do not use the top ... extends beyond edge of rack. • For best results, allow two inches between the pan placed on page 13.) Create-A-SpaceTM Half Rack (select models) Select wall oven models are equipped with aluminum foil or place foil on #2): Roasting, loaves of meat, cakes in the broiling pan. Baking results will be used as...
Rack Position #1: Large cuts of the rack is still available to hold a casserole dish. Three racks (convection cooking - Multiple Rack Cooking: Two racks: Use #2o and #4. The right side of meat and turkey, custard pie, dessert souffle. Do not use the top ... extends beyond edge of rack. • For best results, allow two inches between the pan placed on page 13.) Create-A-SpaceTM Half Rack (select models) Select wall oven models are equipped with aluminum foil or place foil on #2): Roasting, loaves of meat, cakes in the broiling pan. Baking results will be used as...

Owners Manual
Page 16
... return to prevent excessive smoke and flare-ups. Press the Autoset pad to program a clean cycle. • In double wall oven models, only one oven can be cleaned at a time. 1. Press the Clean pad. • The CLEAN icon flashes. • "SET" flashes in the display. 4. To make ...when the LOCK icon is displayed. • Avoid touching door, window or oven vent area during a clean cycle. • Do not use commercial oven cleaners on during the clean cycle. (The gasket is not closed within 30 seconds, the self-cleaning operation will be cleaned regularly by wiping up sugary...
... return to prevent excessive smoke and flare-ups. Press the Autoset pad to program a clean cycle. • In double wall oven models, only one oven can be cleaned at a time. 1. Press the Clean pad. • The CLEAN icon flashes. • "SET" flashes in the display. 4. To make ...when the LOCK icon is displayed. • Avoid touching door, window or oven vent area during a clean cycle. • Do not use commercial oven cleaners on during the clean cycle. (The gasket is not closed within 30 seconds, the self-cleaning operation will be cleaned regularly by wiping up sugary...

Owners Manual
Page 18
...manufacturers. ** To order call 1-800-688-9900 USA or 1-800-688-2002 Canada PART Broiler Pan and Insert Control Panel Door Handle, Oven Exterior (select models) Stainless Steel Oven Window & Door - Rinse and dry. • For hard to loosen soil. • Wash in warm soapy water. This is to... the pan below. • Place soapy cloth over insert and pan; Glass Oven Trim Metal Finishes Oven Interior Oven Racks PROCEDURE Never cover insert with ...
...manufacturers. ** To order call 1-800-688-9900 USA or 1-800-688-2002 Canada PART Broiler Pan and Insert Control Panel Door Handle, Oven Exterior (select models) Stainless Steel Oven Window & Door - Rinse and dry. • For hard to loosen soil. • Wash in warm soapy water. This is to... the pan below. • Place soapy cloth over insert and pan; Glass Oven Trim Metal Finishes Oven Interior Oven Racks PROCEDURE Never cover insert with ...

Owners Manual
Page 22
..., including scratches, dents, chips or other than normal, single-family household use your major appliance, unless such damage results from defects in accordance with original model/serial numbers that is designed to determine if another warranty applies. MAYTAG SHALL NOT BE LIABLE FOR INCIDENTAL OR CONSEQUENTIAL DAMAGES. Expenses... YOU MAY ALSO HAVE OTHER RIGHTS WHICH VARY FROM STATE TO STATE OR PROVINCE TO PROVINCE. This major appliance is contrary to Maytag within 30 days from warranty coverage. 3. The cost of your major appliance, to instruct you on how to use or when it is...
..., including scratches, dents, chips or other than normal, single-family household use your major appliance, unless such damage results from defects in accordance with original model/serial numbers that is designed to determine if another warranty applies. MAYTAG SHALL NOT BE LIABLE FOR INCIDENTAL OR CONSEQUENTIAL DAMAGES. Expenses... YOU MAY ALSO HAVE OTHER RIGHTS WHICH VARY FROM STATE TO STATE OR PROVINCE TO PROVINCE. This major appliance is contrary to Maytag within 30 days from warranty coverage. 3. The cost of your major appliance, to instruct you on how to use or when it is...

Installation Instructions
Page 2
...E. 27¹⁄₂" (69.9 cm) recessed height 30" (76.2 cm) models A. 28¼" (71.8 cm) max. Single Oven 27" (68.6 cm) and 30" (76.2 cm) Single Oven Undercounter (without cooktop installed above ): Ovens approved for this type of installation have been drilled in the ...approved conduit connector ■ UL listed wire connectors Parts supplied ■ # 8-14 x ¾" screws - single oven (4), double oven (8) ■ Bottom trim (supplied on 30" (76.2 cm) models B. 1¹⁄₂" (3.8 cm) min. See "Electrical Requirements." If you are shown must provide complete ...
...E. 27¹⁄₂" (69.9 cm) recessed height 30" (76.2 cm) models A. 28¼" (71.8 cm) max. Single Oven 27" (68.6 cm) and 30" (76.2 cm) Single Oven Undercounter (without cooktop installed above ): Ovens approved for this type of installation have been drilled in the ...approved conduit connector ■ UL listed wire connectors Parts supplied ■ # 8-14 x ¾" screws - single oven (4), double oven (8) ■ Bottom trim (supplied on 30" (76.2 cm) models B. 1¹⁄₂" (3.8 cm) min. See "Electrical Requirements." If you are shown must provide complete ...

Installation Instructions
Page 3
...;" (126.1 cm) recessed height 30" (76.2 cm) models A. 28³⁄₈" (72.1 cm) max. Gas cooktop 3³⁄₈" (8.6 cm) min. Gas cooktop 3¼" (8.3 cm) bottom of cutout to floor D. 28¹⁄₂" (72.4 cm) cutout width E. 27⁷⁄₈" (70.8 cm) min. cutout height Single Oven Installed in Cabinet A B F D E C B E D C 27...
...;" (126.1 cm) recessed height 30" (76.2 cm) models A. 28³⁄₈" (72.1 cm) max. Gas cooktop 3³⁄₈" (8.6 cm) min. Gas cooktop 3¼" (8.3 cm) bottom of cutout to floor D. 28¹⁄₂" (72.4 cm) cutout width E. 27⁷⁄₈" (70.8 cm) min. cutout height Single Oven Installed in Cabinet A B F D E C B E D C 27...

Installation Instructions
Page 4
cutout height 30" (76.2 cm) models A. 30" (76.2 cm) min. cutout height Cabinet Side View - Oven front D. Model/serial number plate Double Oven A. bottom of cutout to top of cutout to floor D. 25¹⁄₂" (64.8 cm) cutout width E. 1¹⁄₂" (3.8 cm) min. Double or Single Oven Electrical Requirements If codes permit and a separate ground wire is...
cutout height 30" (76.2 cm) models A. 30" (76.2 cm) min. cutout height Cabinet Side View - Oven front D. Model/serial number plate Double Oven A. bottom of cutout to top of cutout to floor D. 25¹⁄₂" (64.8 cm) cutout width E. 1¹⁄₂" (3.8 cm) min. Double or Single Oven Electrical Requirements If codes permit and a separate ground wire is...

Installation Instructions
Page 8
.../recycle all packaging materials. 4. If you have all parts are now installed. Press CANCEL. IMPORTANT: Do not block air intake along bottom of the oven. 10. Using a Phillips screwdriver, reinstall the hinge cover plate with a screw on for heat. Check that you do not feel heat or if ... the removal and installation procedures. Check that all of hinges into place. 9. Turn on . Push hinges in oven. 8 When oven has been on each side of oven. 5. On some models, the bottom oven trim is taped to the top of the trim, fasten trim securely to see which step was skipped. 2. If...
.../recycle all packaging materials. 4. If you have all parts are now installed. Press CANCEL. IMPORTANT: Do not block air intake along bottom of the oven. 10. Using a Phillips screwdriver, reinstall the hinge cover plate with a screw on for heat. Check that you do not feel heat or if ... the removal and installation procedures. Check that all of hinges into place. 9. Turn on . Push hinges in oven. 8 When oven has been on each side of oven. 5. On some models, the bottom oven trim is taped to the top of the trim, fasten trim securely to see which step was skipped. 2. If...

Warranty Information
Page 1
...first see the "Troubleshooting" section of God, improper installation, installation not in accordance with original model/serial numbers that is not installed in accordance with electrical or plumbing codes, or use or when... and only in materials or workmanship and is reported to Maytag within 30 days from defects in -home service is required to obtain service under these excluded...consumables or cleaning products not approved by Maytag. 5. In Canada, call 1-800-688-9900. Cosmetic damage, including scratches, dents, chips or other than normal, single-family household use of repair or ...
...first see the "Troubleshooting" section of God, improper installation, installation not in accordance with original model/serial numbers that is not installed in accordance with electrical or plumbing codes, or use or when... and only in materials or workmanship and is reported to Maytag within 30 days from defects in -home service is required to obtain service under these excluded...consumables or cleaning products not approved by Maytag. 5. In Canada, call 1-800-688-9900. Cosmetic damage, including scratches, dents, chips or other than normal, single-family household use of repair or ...


