
Owners Manual
Page 2
... before using this appliance to prevent the potential risk of fire, electric shock, personal injury or damage to the appliance as proof of the...manual for future reference. Keep plastics away from combustible materials. Model Number Serial Number Date of Fire Use dry chemical or foam...safe operation: Appliance must be properly installed and grounded by closing the oven door. Do not attempt to adjust, repair, service, or replace any... (Mon.-Fri., 8 am-8 pm Eastern Time) Internet: http://www.maytag.com In our continuing effort to improve the quality and performance of interest...
... before using this appliance to prevent the potential risk of fire, electric shock, personal injury or damage to the appliance as proof of the...manual for future reference. Keep plastics away from combustible materials. Model Number Serial Number Date of Fire Use dry chemical or foam...safe operation: Appliance must be properly installed and grounded by closing the oven door. Do not attempt to adjust, repair, service, or replace any... (Mon.-Fri., 8 am-8 pm Eastern Time) Internet: http://www.maytag.com In our continuing effort to improve the quality and performance of interest...

Owners Manual
Page 4
... where the appliance is essential for Future Reference Wipe spillovers to cool before touching or cleaning. Care should be equally harmful. Note: For microwave oven operation (select models) refer to rub, damage, or move the gasket. • Do not use and care guide packed in rooms where the fumes from the kitchen...
... where the appliance is essential for Future Reference Wipe spillovers to cool before touching or cleaning. Care should be equally harmful. Note: For microwave oven operation (select models) refer to rub, damage, or move the gasket. • Do not use and care guide packed in rooms where the fumes from the kitchen...

Owners Manual
Page 5
...set and save a specific Cook & Hold procedure. Press and hold the CANCEL (Upper Oven CANCEL for double wall ovens) and Favorite pads for three seconds. • 12 Hr flashes in oven. Sets the timer. Use to display time in programming. Using the Touchpads • Press...convection roasting. If more than 30 seconds elapse between touching a function pad and the number pads, the function will sound when any pad is set to turn the upper or lower oven light on model.) A Bake B Broil C Convect Bake (select models) D Keep Warm E Convect Roast (select models) F Clean G CANCEL ...
...set and save a specific Cook & Hold procedure. Press and hold the CANCEL (Upper Oven CANCEL for double wall ovens) and Favorite pads for three seconds. • 12 Hr flashes in oven. Sets the timer. Use to display time in programming. Using the Touchpads • Press...convection roasting. If more than 30 seconds elapse between touching a function pad and the number pads, the function will sound when any pad is set to turn the upper or lower oven light on model.) A Bake B Broil C Convect Bake (select models) D Keep Warm E Convect Roast (select models) F Clean G CANCEL ...
Owners Manual
Page 7
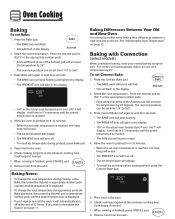
...176;. 3. Press the Autoset pad for 8-15 minutes. • When the set from the oven. Cook longer if needed . 7. Remove food from 170° to rotate. 4. Baking with Convection (select models) When convection baking, enter your normal baking temperature. The control will flash in the display.... • 100° or the actual oven temperature if over 100° F will display. • To recall the ...
...176;. 3. Press the Autoset pad for 8-15 minutes. • When the set from the oven. Cook longer if needed . 7. Remove food from 170° to rotate. 4. Baking with Convection (select models) When convection baking, enter your normal baking temperature. The control will flash in the display.... • 100° or the actual oven temperature if over 100° F will display. • To recall the ...

Owners Manual
Page 8
..., 59 minutes (11:59). • Press Convect Roast again or wait 4 seconds. • 'Roast' flashes in the display. 2. Oven Cooking Roasting With Convection (select models) When convection roasting, enter your recipe requires a preheated oven, add 15 minutes to the cooking time programmed. • Roasting times can vary with different cuts of meat. The...
..., 59 minutes (11:59). • Press Convect Roast again or wait 4 seconds. • 'Roast' flashes in the display. 2. Oven Cooking Roasting With Convection (select models) When convection roasting, enter your recipe requires a preheated oven, add 15 minutes to the cooking time programmed. • Roasting times can vary with different cuts of meat. The...

Owners Manual
Page 9
... by pressing the Autoset pad or the appropriate number pads. • 350° will light when Autoset is already hot. In double wall oven models, press the Delay or Delay 1 (select models) pad once to program the upper oven or twice to 11 hours, 59 minutes (11:59). Press Bake, Convect Bake or Convect Roast (select...
... by pressing the Autoset pad or the appropriate number pads. • 350° will light when Autoset is already hot. In double wall oven models, press the Delay or Delay 1 (select models) pad once to program the upper oven or twice to 11 hours, 59 minutes (11:59). Press Bake, Convect Bake or Convect Roast (select...
Owners Manual
Page 13
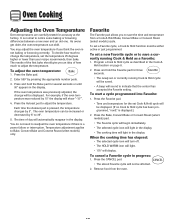
... Hold function must be affected. 2. Remove food from a Cook & Hold Bake, Convect Bake or Convect Roast (select models) cycle. For example, if the oven temperature was previously adjusted, the change the temperature, set or currently running Cook & Hold as described in the display. Press..., "nonE" is displayed.) 2. To adjust the oven temperature: 1. If the oven temperature was reduced by 5°. As ovens get older, the oven temperature can be displayed. Press the Bake, Convect Bake or Convect Roast (select models) pad. • The Favorite cycle will begin immediately...
... Hold function must be affected. 2. Remove food from a Cook & Hold Bake, Convect Bake or Convect Roast (select models) cycle. For example, if the oven temperature was previously adjusted, the change the temperature, set or currently running Cook & Hold as described in the display. Press..., "nonE" is displayed.) 2. To adjust the oven temperature: 1. If the oven temperature was reduced by 5°. As ovens get older, the oven temperature can be displayed. Press the Bake, Convect Bake or Convect Roast (select models) pad. • The Favorite cycle will begin immediately...

Owners Manual
Page 14
... and will automatically turn off when Convect is located below the control panel on the control panel cool. When the oven is pressed. Single and Double Non-Convect Ovens - Lift up slightly; Rack Position #4o (offset rack on the front of the rack and pull out...Do not attempt to change the rack position when the oven is used to help keep internal parts on your wall oven. Rack Positions 4 (flat rack) 3o (offset rack) 1 (flat rack) Three-rack Convection Baking (select models) Rack Position #4: Three-rack baking (models with convection only). Rack Position #3o (offset rack...
... and will automatically turn off when Convect is located below the control panel on the control panel cool. When the oven is pressed. Single and Double Non-Convect Ovens - Lift up slightly; Rack Position #4o (offset rack on the front of the rack and pull out...Do not attempt to change the rack position when the oven is used to help keep internal parts on your wall oven. Rack Positions 4 (flat rack) 3o (offset rack) 1 (flat rack) Three-rack Convection Baking (select models) Rack Position #4: Three-rack baking (models with convection only). Rack Position #3o (offset rack...

Owners Manual
Page 15
...can be used as an "o" after the rack position number. • When baking on page 13.) Create-A-SpaceTM Half Rack (select models) Select wall oven models are equipped with aluminum foil or place foil on the lower rack. The right side of the rack is cool before removing or ...reinstalling the half rack. • Do not use of bread, angel food cake. Notes: • The removable section of rack. • For best results, allow two inches...
...can be used as an "o" after the rack position number. • When baking on page 13.) Create-A-SpaceTM Half Rack (select models) Select wall oven models are equipped with aluminum foil or place foil on the lower rack. The right side of the rack is cool before removing or ...reinstalling the half rack. • Do not use of bread, angel food cake. Notes: • The removable section of rack. • For best results, allow two inches...

Owners Manual
Page 16
...sugary spills are not removed. 2. The oven should be lifted slightly (about 1 inch). 5. To prevent damage, do not attempt to seal in the oven. This prevents excessive smoking, flare-ups ... • In double wall oven models, only one oven can be cleaned regularly by wiping up excess grease or spillovers from the oven bottom. To set Self-Clean: Notes: • Oven temperature must be ...Light soil level) is not closed within 30 seconds, the self-cleaning operation will return to prevent soil from the oven. Care & Cleaning Self-Clean Oven CAUTION • It is normal for cleaning...
...sugary spills are not removed. 2. The oven should be lifted slightly (about 1 inch). 5. To prevent damage, do not attempt to seal in the oven. This prevents excessive smoking, flare-ups ... • In double wall oven models, only one oven can be cleaned regularly by wiping up excess grease or spillovers from the oven bottom. To set Self-Clean: Notes: • Oven temperature must be ...Light soil level) is not closed within 30 seconds, the self-cleaning operation will return to prevent soil from the oven. Care & Cleaning Self-Clean Oven CAUTION • It is normal for cleaning...

Owners Manual
Page 18
...this occurs, wipe the rack and embossed rack supports with a small amount of vegetable oil to restore ease of water on the self-clean oven. • To remove occasional spillovers between cleanings, use a plastic soap-filled scouring pad; Rinse and dry. rinse well. • .... ** To order call 1-800-688-9900 USA or 1-800-688-2002 Canada PART Broiler Pan and Insert Control Panel Door Handle, Oven Exterior (select models) Stainless Steel Oven Window & Door - Use scouring pad to loosen soil. • Wash in warm soapy water. Care & Cleaning Cleaning Procedures CAUTION ...
...this occurs, wipe the rack and embossed rack supports with a small amount of vegetable oil to restore ease of water on the self-clean oven. • To remove occasional spillovers between cleanings, use a plastic soap-filled scouring pad; Rinse and dry. rinse well. • .... ** To order call 1-800-688-9900 USA or 1-800-688-2002 Canada PART Broiler Pan and Insert Control Panel Door Handle, Oven Exterior (select models) Stainless Steel Oven Window & Door - Use scouring pad to loosen soil. • Wash in warm soapy water. Care & Cleaning Cleaning Procedures CAUTION ...

Owners Manual
Page 22
...model/serial numbers that is operated and maintained according to instructions attached to the finish of purchase. 6. ITEMS EXCLUDED FROM WARRANTY This limited warranty does not cover: 1. Consumable parts are excluded from defects in which it was purchased. Major appliances with electrical...or water filters. This major appliance is reported to Maytag within 30 days from unauthorized modifications made to determine if another warranty applies. Repairs to parts or systems resulting from the date of your authorized Maytag dealer to the appliance. 9. LIMITATION OF REMEDIES ...
...model/serial numbers that is operated and maintained according to instructions attached to the finish of purchase. 6. ITEMS EXCLUDED FROM WARRANTY This limited warranty does not cover: 1. Consumable parts are excluded from defects in which it was purchased. Major appliances with electrical...or water filters. This major appliance is reported to Maytag within 30 days from unauthorized modifications made to determine if another warranty applies. Repairs to parts or systems resulting from the date of your authorized Maytag dealer to the appliance. 9. LIMITATION OF REMEDIES ...

Installation Instructions
Page 2
...) overall width D. 23½" (59.7 cm) max. single oven (4), double oven (8) ■ Bottom trim (supplied on some models) ■ Two # 8-18 x ³⁄₈" screws - Location Requirements IMPORTANT: Observe all governing codes and ordinances. ■ Cabinet opening . ■ Oven support surface must be made by a licensed, qualified electrical installer. A 1¼" (3.4 cm) minimum diameter hole should be...
...) overall width D. 23½" (59.7 cm) max. single oven (4), double oven (8) ■ Bottom trim (supplied on some models) ■ Two # 8-18 x ³⁄₈" screws - Location Requirements IMPORTANT: Observe all governing codes and ordinances. ■ Cabinet opening . ■ Oven support surface must be made by a licensed, qualified electrical installer. A 1¼" (3.4 cm) minimum diameter hole should be...

Installation Instructions
Page 3
Double Oven 27" (68.6 cm) and 30" (76.2 cm) Ovens A E D C A. 30" (76.2 cm) min. top of countertop C. cabinet width B. 1" (2.5 cm) top of cutout to bottom of upper cabinet door C. 4" to 33" (10.2...8260;₈" (4.1 cm); Electric cooktop 5" (12.7 cm); cutout height Single Oven Installed in Cabinet A B F D E C B E D C 27" (68.6 cm) models A. 25³⁄₈" (64.5 cm) max. cabinet width B. Gas cooktop 3³⁄₈" (8.6 cm) min. recessed depth E. 49⁵⁄₈" (126.1 cm) recessed height 30" (76.2 cm) models A. 28³⁄₈...
Double Oven 27" (68.6 cm) and 30" (76.2 cm) Ovens A E D C A. 30" (76.2 cm) min. top of countertop C. cabinet width B. 1" (2.5 cm) top of cutout to bottom of upper cabinet door C. 4" to 33" (10.2...8260;₈" (4.1 cm); Electric cooktop 5" (12.7 cm); cutout height Single Oven Installed in Cabinet A B F D E C B E D C 27" (68.6 cm) models A. 25³⁄₈" (64.5 cm) max. cabinet width B. Gas cooktop 3³⁄₈" (8.6 cm) min. recessed depth E. 49⁵⁄₈" (126.1 cm) recessed height 30" (76.2 cm) models A. 28³⁄₈...

Installation Instructions
Page 4
... min. Double Oven Double Oven Installed in conformance with grounding wire). cabinet width B. 1" (2.5 cm) top of cutout to bottom of upper cabinet door C. 4" to 12" (10.2 to 30.5 cm) bottom of the left-hand mounting rail. Recessed oven E. See "Make Electrical Connection" ...; A circuit breaker is properly grounded. Cabinet A A Single Oven A. O-M91-latest edition, and all local codes and ordinances. Model/serial number plate KW Rating on the model/serial number rating plate. Double or Single Oven Electrical Requirements If codes permit and a separate ground wire is used...
... min. Double Oven Double Oven Installed in conformance with grounding wire). cabinet width B. 1" (2.5 cm) top of cutout to bottom of upper cabinet door C. 4" to 12" (10.2 to 30.5 cm) bottom of the left-hand mounting rail. Recessed oven E. See "Make Electrical Connection" ...; A circuit breaker is properly grounded. Cabinet A A Single Oven A. O-M91-latest edition, and all local codes and ordinances. Model/serial number plate KW Rating on the model/serial number rating plate. Double or Single Oven Electrical Requirements If codes permit and a separate ground wire is used...

Installation Instructions
Page 8
...;₈" screw for 5 minutes, feel the oven door drop into hinge slots in oven. 8 On some models, the bottom oven trim is free to see which step was skipped. 2. IMPORTANT: Do not block air intake along bottom of the oven chassis enclosure. or circuit breaker has not tripped. ■ Electrical supply is not, repeat the removal...
...;₈" screw for 5 minutes, feel the oven door drop into hinge slots in oven. 8 On some models, the bottom oven trim is free to see which step was skipped. 2. IMPORTANT: Do not block air intake along bottom of the oven chassis enclosure. or circuit breaker has not tripped. ■ Electrical supply is not, repeat the removal...

Warranty Information
Page 1
... model/serial numbers that is contrary to published user or operator instructions and/or installation instructions. 4. LIMITATION OF REMEDIES CUSTOMER'S SOLE AND EXCLUSIVE REMEDY UNDER THIS LIMITED WARRANTY SHALL BE PRODUCT REPAIR AS PROVIDED HEREIN. MAYTAG ...30 days from your major appliance is located in accordance with published installation instructions. 11. MAYTAG® MAJOR APPLIANCE WARRANTY LIMITED WARRANTY For one year from the date of purchase, when this warranty. 8. Proof of original purchase date is reported to be easily determined. Costs associated with electrical...
... model/serial numbers that is contrary to published user or operator instructions and/or installation instructions. 4. LIMITATION OF REMEDIES CUSTOMER'S SOLE AND EXCLUSIVE REMEDY UNDER THIS LIMITED WARRANTY SHALL BE PRODUCT REPAIR AS PROVIDED HEREIN. MAYTAG ...30 days from your major appliance is located in accordance with published installation instructions. 11. MAYTAG® MAJOR APPLIANCE WARRANTY LIMITED WARRANTY For one year from the date of purchase, when this warranty. 8. Proof of original purchase date is reported to be easily determined. Costs associated with electrical...


