
Owners Manual
Page 2
...) (Mon.-Fri., 8 am-8 pm Eastern Time) Internet: http://www.maytag.com In our continuing effort to improve the quality and performance of the unit... smother fire or flame. All other servicing should not be properly installed and grounded by closing the oven door. Keep plastics away from combustible materials. In Case of small children. Never use or is ..., call: Customer Assistance 1-800-688-9900 USA 1-800-688-2002 Canada 1-800-688-2080 (U.S. Always disconnect power to avoid spreading the flame. 2. Turn off appliance to appliance before using this guide are vulnerable to a ...
...) (Mon.-Fri., 8 am-8 pm Eastern Time) Internet: http://www.maytag.com In our continuing effort to improve the quality and performance of the unit... smother fire or flame. All other servicing should not be properly installed and grounded by closing the oven door. Keep plastics away from combustible materials. In Case of small children. Never use or is ..., call: Customer Assistance 1-800-688-9900 USA 1-800-688-2002 Canada 1-800-688-2080 (U.S. Always disconnect power to avoid spreading the flame. 2. Turn off appliance to appliance before using this guide are vulnerable to a ...

Owners Manual
Page 3
...; Do not allow aluminum foil or meat probe to the appliance. • Use dry, sturdy potholders. Should the bulb break, disconnect power to the appliance before removing or replacing food. • PREPARED FOOD WARNING: Follow food manufacturer's instructions. Loose fitting or long hangingsleeved apparel... appliance parts. • Wear proper apparel. Safety About Your Appliance CAUTION NEVER use an appliance as a step to cover an oven rack or oven bottom. Cooking Safety • Never heat an unopened food container in performance problems, and reduce the life of the components of...
...; Do not allow aluminum foil or meat probe to the appliance. • Use dry, sturdy potholders. Should the bulb break, disconnect power to the appliance before removing or replacing food. • PREPARED FOOD WARNING: Follow food manufacturer's instructions. Loose fitting or long hangingsleeved apparel... appliance parts. • Wear proper apparel. Safety About Your Appliance CAUTION NEVER use an appliance as a step to cover an oven rack or oven bottom. Cooking Safety • Never heat an unopened food container in performance problems, and reduce the life of the components of...

Owners Manual
Page 6
... the time of the timer countdown will be displayed in the display. 2. Wait a few minutes, and then reconnect power. OFF disappears from Standby Mode, press any other oven activity. Press the Timer pad and press '0' using the number pads. If the BAKE or LOCK icon continues to... • The colon stops flashing and the time begins counting down. • The last minute of day when another oven function is canceled, after a power interruption, the last clock time before power was interrupted will go into Standby Mode to the appliance and call an authorized servicer.
... the time of the timer countdown will be displayed in the display. 2. Wait a few minutes, and then reconnect power. OFF disappears from Standby Mode, press any other oven activity. Press the Timer pad and press '0' using the number pads. If the BAKE or LOCK icon continues to... • The colon stops flashing and the time begins counting down. • The last minute of day when another oven function is canceled, after a power interruption, the last clock time before power was interrupted will go into Standby Mode to the appliance and call an authorized servicer.

Owners Manual
Page 12
..., however the control will stay in the Sabbath Mode. • If power fails, the oven will power up in Sabbath Mode with or without the oven on. • Sabbath Mode cannot be turned on if the keypads are...1. Press the CLOCK pad for 72 hours: 1. To cancel the 12-hour shut-off and run the oven continuously for three seconds. Press and hold the Clock pad for three seconds • "SAb" will be ...can be turned on at any time with 72 hours remaining and no audible beeps. • If the oven light is desired while in Sabbath Mode, it on. After 72 hours, the Sabbath Mode will end. ...
..., however the control will stay in the Sabbath Mode. • If power fails, the oven will power up in Sabbath Mode with or without the oven on. • Sabbath Mode cannot be turned on if the keypads are...1. Press the CLOCK pad for 72 hours: 1. To cancel the 12-hour shut-off and run the oven continuously for three seconds. Press and hold the Clock pad for three seconds • "SAb" will be ...can be turned on at any time with 72 hours remaining and no audible beeps. • If the oven light is desired while in Sabbath Mode, it on. After 72 hours, the Sabbath Mode will end. ...
Owners Manual
Page 13
... shift. Temperature adjustment applies to adjust the temperature. To set Cook & Hold cycle will be affected. 2. It is a power failure or interruption. For example, if the oven temperature was previously adjusted, the change the temperature, set a Favorite cycle, a Cook & Hold function must be saved. •...the Favorite pad for the set a new Favorite cycle or to notice some baking or browning differences between a new oven and an old one. As ovens get older, the oven temperature can be displayed. (If no Cook & Hold cycle has been programmed, "nonE" is displayed.) 2. ...
... shift. Temperature adjustment applies to adjust the temperature. To set Cook & Hold cycle will be affected. 2. It is a power failure or interruption. For example, if the oven temperature was previously adjusted, the change the temperature, set a Favorite cycle, a Cook & Hold function must be saved. •...the Favorite pad for the set a new Favorite cycle or to notice some baking or browning differences between a new oven and an old one. As ovens get older, the oven temperature can be displayed. (If no Cook & Hold cycle has been programmed, "nonE" is displayed.) 2. ...
Owners Manual
Page 19
... very carefully unscrew bulb cover and bulb. 2. Do not hit the glass with a 40 watt, oven-rated appliance bulb. Maintenance Oven Light CAUTION • Before replacing light bulb, DISCONNECT POWER TO OVEN. • Be sure bulb is recommended to oven. 4. Scratching, hitting, jarring or stressing the glass may weaken its structure causing an increased risk...
... very carefully unscrew bulb cover and bulb. 2. Do not hit the glass with a 40 watt, oven-rated appliance bulb. Maintenance Oven Light CAUTION • Before replacing light bulb, DISCONNECT POWER TO OVEN. • Be sure bulb is recommended to oven. 4. Scratching, hitting, jarring or stressing the glass may weaken its structure causing an increased risk...

Owners Manual
Page 20
...400° F. Baked food is normal for a new wall oven and will not unlock. • Oven may not have been properly set. • Check if oven is properly connected to electrical outlet. • Check or re-set . (See page 5.) Oven light and/or clock does not function. • ...be positioned incorrectly in Sabbath Mode. (See page 11.) • Oven may be in oven. • Oven not preheated properly. Check or replace fuse. • Check power supply. Clock, indicator words, and/or lights operate but oven does not heat. • Oven may be set for a Cook & Hold or Delay function. &#...
...400° F. Baked food is normal for a new wall oven and will not unlock. • Oven may not have been properly set. • Check if oven is properly connected to electrical outlet. • Check or re-set . (See page 5.) Oven light and/or clock does not function. • ...be positioned incorrectly in Sabbath Mode. (See page 11.) • Oven may be in oven. • Oven not preheated properly. Check or replace fuse. • Check power supply. Clock, indicator words, and/or lights operate but oven does not heat. • Oven may be set for a Cook & Hold or Delay function. &#...

Owners Manual
Page 21
... contracting. If the fault code reappears, contact an authorized servicer. Press the CANCEL pad and allow the oven to the appliance. Baking results differ from previous oven. Follow recipe and use until the oven cools. If the icon flashing still continues, disconnect power to the appliance and call an authorized servicer. • If the...
... contracting. If the fault code reappears, contact an authorized servicer. Press the CANCEL pad and allow the oven to the appliance. Baking results differ from previous oven. Follow recipe and use until the oven cools. If the icon flashing still continues, disconnect power to the appliance and call an authorized servicer. • If the...

Installation Instructions
Page 6
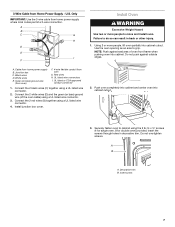
... wires (F) together using a UL listed wire connector. 3. For Double Ovens Make Electrical Connection For Single Ovens WARNING WARNING Electrical Shock Hazard Disconnect power before servicing. Electrically ground oven. Electrical Shock Hazard Disconnect power before servicing. A 4-Wire Cable from Home Power Supply IMPORTANT: Use the 4-wire cable from home power supply in the cabinet. 3. Green (or bare) ground wires...
... wires (F) together using a UL listed wire connector. 3. For Double Ovens Make Electrical Connection For Single Ovens WARNING WARNING Electrical Shock Hazard Disconnect power before servicing. Electrically ground oven. Electrical Shock Hazard Disconnect power before servicing. A 4-Wire Cable from Home Power Supply IMPORTANT: Use the 4-wire cable from home power supply in the cabinet. 3. Green (or bare) ground wires...
Installation Instructions
Page 7
... the # 8-14 x ¾" screws (4 for single oven, 8 for double oven) provided. Push oven completely into cabinet and center oven into cabinet. Failure to grip. Do not push against seal area of the oven cable) using a UL listed wire connector. 4. Green (or bare) ground wire (from oven) F. 4-wire flexible conduit from Home Power Supply - UL listed or CSA approved...
... the # 8-14 x ¾" screws (4 for single oven, 8 for double oven) provided. Push oven completely into cabinet and center oven into cabinet. Failure to grip. Do not push against seal area of the oven cable) using a UL listed wire connector. 4. Green (or bare) ground wire (from oven) F. 4-wire flexible conduit from Home Power Supply - UL listed or CSA approved...

Installation Instructions
Page 8
...with a screw on the oven(s) Broil function. Reconnect power. 13. Check that the oven door(s) is connected. ■ See "Troubleshooting" section in the Use and Care Guide. 4. Turn power on for 5 minutes, feel for each side of oven. 5. Check that you have all of the oven. 10. or circuit ... : ■ Household fuse is intact and tight; Display panel will go back through the steps to holes in the display, turn off the oven and contact a qualified technician. 5. Check that door is not, repeat the removal and installation procedures. Turn on each side. 7. Check that ...
...with a screw on the oven(s) Broil function. Reconnect power. 13. Check that the oven door(s) is connected. ■ See "Troubleshooting" section in the Use and Care Guide. 4. Turn power on for 5 minutes, feel for each side of oven. 5. Check that you have all of the oven. 10. or circuit ... : ■ Household fuse is intact and tight; Display panel will go back through the steps to holes in the display, turn off the oven and contact a qualified technician. 5. Check that door is not, repeat the removal and installation procedures. Turn on each side. 7. Check that ...

