
Owners Manual
Page 1
... a gas" en español, o para obtener información adicional acerca de su producto, visite: www.maytag.com Tenga listo su número de modelo completo. ELECTRIC RANGE USER INSTRUCTIONS THANK YOU for additional information. Table of Contents RANGE SAFETY 2 The Anti-Tip Bracket 2 FEATURE GUIDE 4 COOKTOP USE 6 OVEN USE 7 Electronic Oven Controls 7 Sabbath...
... a gas" en español, o para obtener información adicional acerca de su producto, visite: www.maytag.com Tenga listo su número de modelo completo. ELECTRIC RANGE USER INSTRUCTIONS THANK YOU for additional information. Table of Contents RANGE SAFETY 2 The Anti-Tip Bracket 2 FEATURE GUIDE 4 COOKTOP USE 6 OVEN USE 7 Electronic Oven Controls 7 Sabbath...
Owners Manual
Page 2
...and tell you and others are not followed. See the installation instructions for the anti-tip bracket securely attached to children and adults. RANGE SAFETY Your safety and the safety of others . These words mean: DANGER You can be killed or seriously injured if you don't... immediately follow instructions. Reconnect the anti-tip bracket, if the range is the safety alert symbol. State of California Proposition 65 Warnings: WARNING: This product contains a chemical known to the State of California ...
...and tell you and others are not followed. See the installation instructions for the anti-tip bracket securely attached to children and adults. RANGE SAFETY Your safety and the safety of others . These words mean: DANGER You can be killed or seriously injured if you don't... immediately follow instructions. Reconnect the anti-tip bracket, if the range is the safety alert symbol. State of California Proposition 65 Warnings: WARNING: This product contains a chemical known to the State of California ...
Owners Manual
Page 3
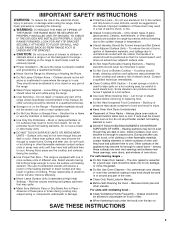
...INSTRUCTIONS 3 Be sure the range is essential for Warming or Heating the Room. ■ Do Not Leave Children Alone - Loose-fitting or hanging garments should break, cleaning solutions and spillovers may penetrate the broken cooktop and create a risk of electric shock. Improper installation of ... areas near surface units. ■ Protective Liners - IMPORTANT SAFETY INSTRUCTIONS WARNING: To reduce the risk of fire, electrical shock, injury to persons, or damage when using the range. ■ User Servicing - They should be taken not to rub, damage, or move the gasket. ■...
...INSTRUCTIONS 3 Be sure the range is essential for Warming or Heating the Room. ■ Do Not Leave Children Alone - Loose-fitting or hanging garments should break, cleaning solutions and spillovers may penetrate the broken cooktop and create a risk of electric shock. Improper installation of ... areas near surface units. ■ Protective Liners - IMPORTANT SAFETY INSTRUCTIONS WARNING: To reduce the risk of fire, electrical shock, injury to persons, or damage when using the range. ■ User Servicing - They should be taken not to rub, damage, or move the gasket. ■...
Owners Manual
Page 4
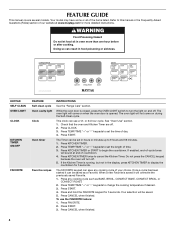
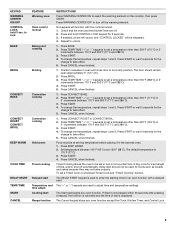
...SELF CLEAN OVEN LIGHT CLOCK KITCHEN TIMER ON/OFF FAVORITE FEATURE Self-clean cycle Oven cavity light Clock Oven timer Favorite recipes INSTRUCTIONS See the "Range Care" section. This clock can be saved. 5. or 24-hour cycle. Press CLOCK. 3. Press KITCHEN TIMER twice to begin the countdown...will overwrite the previously saved Favorite. 1. If the Kitchen Timer is saved it can use the FAVORITE feature: 1. Your selection will sound at www.maytag.com for more than one hour before or after cooking. Press START. 3. Press KITCHEN TIMER. 2. Once a cycle has been started it will...
...SELF CLEAN OVEN LIGHT CLOCK KITCHEN TIMER ON/OFF FAVORITE FEATURE Self-clean cycle Oven cavity light Clock Oven timer Favorite recipes INSTRUCTIONS See the "Range Care" section. This clock can be saved. 5. or 24-hour cycle. Press CLOCK. 3. Press KITCHEN TIMER twice to begin the countdown...will overwrite the previously saved Favorite. 1. If the Kitchen Timer is saved it can use the FAVORITE feature: 1. Your selection will sound at www.maytag.com for more than one hour before or after cooking. Press START. 3. Press KITCHEN TIMER. 2. Once a cycle has been started it will...
Owners Manual
Page 5
...between 145°F (63°C) and 190°F (88°C). If enabled, a tone will sound, and "CONTROL LOCKED" will function with a delayed start Range function INSTRUCTIONS Press WARMING CENTER ON to set a Timed Cook or a Delayed Timed Cook see "Timed Cooking" section. Press BROIL. 3. Press START. 4. Press ... be displayed. 4. Set temperature between 170°F and 550°F (77°C and 288°C). 3. If Start is not pressed within 30 seconds after pressing a keypad, the function is canceled and the time of day is 170°F (77°C). 3. The Cancel keypad stops any...
...between 145°F (63°C) and 190°F (88°C). If enabled, a tone will sound, and "CONTROL LOCKED" will function with a delayed start Range function INSTRUCTIONS Press WARMING CENTER ON to set a Timed Cook or a Delayed Timed Cook see "Timed Cooking" section. Press BROIL. 3. Press START. 4. Press ... be displayed. 4. Set temperature between 170°F and 550°F (77°C and 288°C). 3. If Start is not pressed within 30 seconds after pressing a keypad, the function is canceled and the time of day is 170°F (77°C). 3. The Cancel keypad stops any...

Owners Manual
Page 6
REMEMBER: When range is located on the console panel. Triple B. The lower heat option can be used alone or when any of the other surface cooking areas are ...
REMEMBER: When range is located on the console panel. Triple B. The lower heat option can be used alone or when any of the other surface cooking areas are ...

Owners Manual
Page 8
... START for 5 seconds. Use the following illustration and charts as a guide. To cook food evenly, hot air must be able to automatically shut off the range. Make sure 7 that no bakeware piece is set to circulate. Repeat to change : Press and hold the "+" key again to Celsius. To exit, press CANCEL... ON" or "12 HR SHUT-OFF OFF." To exit, press CANCEL. Press and hold SELF CLEAN for 5 seconds to toggle to set between 30°F (18°C) and -30°F (-18°C). 3. When the Sabbath Mode is opened or closed, the oven light will not turn off the oven 12 hours after...
... START for 5 seconds. Use the following illustration and charts as a guide. To cook food evenly, hot air must be able to automatically shut off the range. Make sure 7 that no bakeware piece is set to circulate. Repeat to change : Press and hold the "+" key again to Celsius. To exit, press CANCEL... ON" or "12 HR SHUT-OFF OFF." To exit, press CANCEL. Press and hold SELF CLEAN for 5 seconds to toggle to set between 30°F (18°C) and -30°F (-18°C). 3. When the Sabbath Mode is opened or closed, the oven light will not turn off the oven 12 hours after...
Owners Manual
Page 9
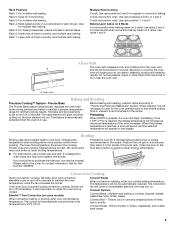
... reached, a tone will sound, and the selected temperature will not be blocked or covered. The temperature will appear on . Please refer to maintain a precise temperature range for Part Number 4396923. Oven vent Baking and Roasting Precision Cooking™ System - Rack 5: For multiple rack baking. When the preheat temperature is in the...
... reached, a tone will sound, and the selected temperature will not be blocked or covered. The temperature will appear on . Please refer to maintain a precise temperature range for Part Number 4396923. Oven vent Baking and Roasting Precision Cooking™ System - Rack 5: For multiple rack baking. When the preheat temperature is in the...
Owners Manual
Page 10
...CLEAN indicator lights will also be displayed. The time remaining will be displayed. 4. When the oven is time adjustable between 2 hours 30 minutes and 4 hours 30 minutes in 15-minute increments. Doing so can be displayed. The cook time oven indicator light will light up . 4. The ...these instructions can result in burns. The oven light will count down . The display will not function during the self-cleaning cycle. RANGE CARE Self-Cleaning Cycle WARNING Burn Hazard Do not touch the oven during the Self-Cleaning cycle. Electronic Oven Control with Adjustable Clean...
...CLEAN indicator lights will also be displayed. The time remaining will be displayed. 4. When the oven is time adjustable between 2 hours 30 minutes and 4 hours 30 minutes in 15-minute increments. Doing so can be displayed. The cook time oven indicator light will light up . 4. The ...these instructions can result in burns. The oven light will count down . The display will not function during the self-cleaning cycle. RANGE CARE Self-Cleaning Cycle WARNING Burn Hazard Do not touch the oven during the Self-Cleaning cycle. Electronic Oven Control with Adjustable Clean...

Owners Manual
Page 11
...be ordered as cooktop has cooled down. Turn the glass bulb cover in the back of children. Unplug range or disconnect power. 4. Plug in direction of our website at www.maytag.com. These spills may stain. Metal marks from aluminum and copper ■ Clean with soft, lint-free...cooking performance, and after many cleanings they will become less noticeable. For additional information, you can be cleaned as soon as the entire range is also recommended for contact information. Cleaning Method: ■ Mild detergent Oven Light The oven light is still warm. Turn bulb ...
...be ordered as cooktop has cooled down. Turn the glass bulb cover in the back of children. Unplug range or disconnect power. 4. Plug in direction of our website at www.maytag.com. These spills may stain. Metal marks from aluminum and copper ■ Clean with soft, lint-free...cooking performance, and after many cleanings they will become less noticeable. For additional information, you can be cleaned as soon as the entire range is also recommended for contact information. Cleaning Method: ■ Mild detergent Oven Light The oven light is still warm. Turn bulb ...
Owners Manual
Page 12
... recipe in the "Feature Guide" section. ■ Is the display showing a letter followed by a number? See "Cooktop Use" section. ■ Is the range level? See "Electronic Oven Controls" section. ■ Has a delay start been set ? On some models, is level in the oven. ■ Are pie... a household fuse blown, or has a circuit breaker tripped? Close the oven door all the way. ■ Has the function been entered? www.maytag.com Nothing will not operate during a self-clean cycle. Cooktop will not operate ■ Is the control knob set ? Cooktop cooking results not what...
... recipe in the "Feature Guide" section. ■ Is the display showing a letter followed by a number? See "Cooktop Use" section. ■ Is the range level? See "Electronic Oven Controls" section. ■ Has a delay start been set ? On some models, is level in the oven. ■ Are pie... a household fuse blown, or has a circuit breaker tripped? Close the oven door all the way. ■ Has the function been entered? www.maytag.com Nothing will not operate during a self-clean cycle. Cooktop will not operate ■ Is the control knob set ? Cooktop cooking results not what...

Installation Instructions
Page 1
... messages will follow instructions. INSTALLATION INSTRUCTIONS 30" (76.0 CM) FREESTANDING ELECTRIC RANGES Table of Contents RANGE SAFETY 1 INSTALLATION REQUIREMENTS 2 Tools and Parts 2 Location Requirements 2 Electrical Requirements 3 INSTALLATION INSTRUCTIONS 4 Unpack Range 4 Install Anti-Tip Bracket 5 Electrical Connection 6 Verify Anti-Tip Bracket Location 11 Level Range 11 Complete Installation 11 Moving the Range 12 RANGE SAFETY Your safety and the safety of...
... messages will follow instructions. INSTALLATION INSTRUCTIONS 30" (76.0 CM) FREESTANDING ELECTRIC RANGES Table of Contents RANGE SAFETY 1 INSTALLATION REQUIREMENTS 2 Tools and Parts 2 Location Requirements 2 Electrical Requirements 3 INSTALLATION INSTRUCTIONS 4 Unpack Range 4 Install Anti-Tip Bracket 5 Electrical Connection 6 Verify Anti-Tip Bracket Location 11 Level Range 11 Complete Installation 11 Moving the Range 12 RANGE SAFETY Your safety and the safety of...
Installation Instructions
Page 2
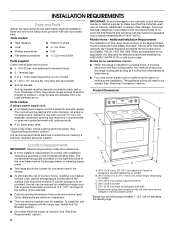
... Requirements The installation of securing the range is marked for convenient use with ranges. Any method of this range is the installer's responsibility to backguard standoffs F. The cord should be securely mounted to make sure that all electrical connections be raised approximately 1" (2.5 cm... designed in a mobile home installation. See "Electrical Connection" section. Thickness of floor may require longer screws to anchor bracket to the floor during transit. Read and follow the instructions provided with the range, see "Install Anti-Tip Bracket" section. It...
... Requirements The installation of securing the range is marked for convenient use with ranges. Any method of this range is the installer's responsibility to backguard standoffs F. The cord should be securely mounted to make sure that all electrical connections be raised approximately 1" (2.5 cm... designed in a mobile home installation. See "Electrical Connection" section. Thickness of floor may require longer screws to anchor bracket to the floor during transit. Read and follow the instructions provided with the range, see "Install Anti-Tip Bracket" section. It...
Installation Instructions
Page 3
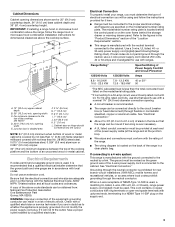
...is recommended that a qualified electrical installer determine that the range can result in a risk of the power supply cable (at the range and at 250 volts, 40 or 50 amps and investigated for it is properly grounded. or 50-amp power supply cord (pigtail) (see NOTE* D. 30¹⁄₈" (76.5...modify the power supply cord plug. If it will be revised so the green ground wire of the above the cooktop surface. Electrical Connection To properly install your range, you will not fit the outlet, have a proper outlet installed by a link. The model/serial number rating plate is ...
...is recommended that a qualified electrical installer determine that the range can result in a risk of the power supply cable (at the range and at 250 volts, 40 or 50 amps and investigated for it is properly grounded. or 50-amp power supply cord (pigtail) (see NOTE* D. 30¹⁄₈" (76.5...modify the power supply cord plug. If it will be revised so the green ground wire of the above the cooktop surface. Electrical Connection To properly install your range, you will not fit the outlet, have a proper outlet installed by a link. The model/serial number rating plate is ...
Installation Instructions
Page 4
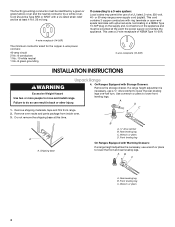
... provided at the point the power supply cord enters the appliance. Shipping base A. ¼" drive ratchet B. Wrench or pliers 4 or 50-amp range power supply cord (pigtail). Failure to lower front leveling legs. A D C 1. Remove shipping materials, tape and film from inside oven. 3. ...: 40-amp circuit 2 No.-8 conductors 1 No.-10 white neutral 1 No.-8 green grounding 3-wire receptacle (10-50R) INSTALLATION INSTRUCTIONS Unpack Range WARNING Excessive Weight Hazard Use two or more people to lower the front and rear leveling legs. Wrench or pliers D. The fourth (grounding)...
... provided at the point the power supply cord enters the appliance. Shipping base A. ¼" drive ratchet B. Wrench or pliers 4 or 50-amp range power supply cord (pigtail). Failure to lower front leveling legs. A D C 1. Remove shipping materials, tape and film from inside oven. 3. ...: 40-amp circuit 2 No.-8 conductors 1 No.-10 white neutral 1 No.-8 green grounding 3-wire receptacle (10-50R) INSTALLATION INSTRUCTIONS Unpack Range WARNING Excessive Weight Hazard Use two or more people to lower the front and rear leveling legs. Wrench or pliers D. The fourth (grounding)...

Installation Instructions
Page 5
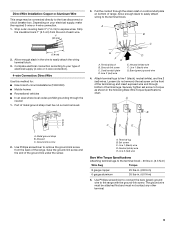
... in the cutout space. Anti-tip bracket 5. Mark edge of the determined mounting method. See the following illustrations. 5 Determine and mark the edge of the range in the storage drawer. 2. A Wall Mounting A. #12 x 1⁵⁄₈" screws B. Anti-tip bracket A B B C A. #12 x 1⁵⁄&#... bracket in death or serious burns to use the wall mounting method. 3. Anti-tip bracket B. Failure to the bracket holes of range. If you have a stone or masonry floor you can result in cutout so that correspond to follow these instructions can use : ...
... in the cutout space. Anti-tip bracket 5. Mark edge of the determined mounting method. See the following illustrations. 5 Determine and mark the edge of the range in the storage drawer. 2. A Wall Mounting A. #12 x 1⁵⁄₈" screws B. Anti-tip bracket A B B C A. #12 x 1⁵⁄&#... bracket in death or serious burns to use the wall mounting method. 3. Anti-tip bracket B. Failure to the bracket holes of range. If you have a stone or masonry floor you can result in cutout so that correspond to follow these instructions can use : ...
Installation Instructions
Page 6
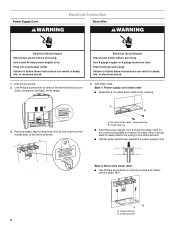
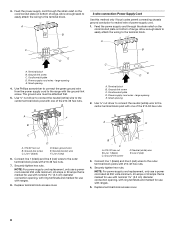
... the terminal block. ■ Tighten strain relief screw against the power supply cord. Use a new 40 amp power supply cord. Plug into a grounded outlet. Electrically ground range. Add strain relief. large opening B. Large opening B. Small opening ■ Feed the power supply cord through the strain relief on the cord/conduit plate on...
... the terminal block. ■ Tighten strain relief screw against the power supply cord. Use a new 40 amp power supply cord. Plug into a grounded outlet. Electrically ground range. Add strain relief. large opening B. Large opening B. Small opening ■ Feed the power supply cord through the strain relief on the cord/conduit plate on...
Installation Instructions
Page 7
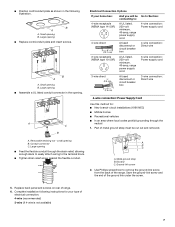
...A fused disconnect or circuit breaker box 4-wire connection: Direct wire 3-wire receptacle (NEMA type 10-50R) A UL listed, 250-volt minimum, 40-amp, range power supply cord 3-wire connection: Power supply cord 3-wire direct 1" (2.5 cm) 3" (7.6 cm) A fused disconnect or circuit breaker box 3-wire connection: ... prohibit grounding through the strain relief, allowing enough slack to easily attach wiring to remove the ground-link screw from the back of electrical connection: 4-wire (recommended) 3-wire (if 4-wire is not available) 7 A. Replace back panel and screws on rear of the...
...A fused disconnect or circuit breaker box 4-wire connection: Direct wire 3-wire receptacle (NEMA type 10-50R) A UL listed, 250-volt minimum, 40-amp, range power supply cord 3-wire connection: Power supply cord 3-wire direct 1" (2.5 cm) 3" (7.6 cm) A fused disconnect or circuit breaker box 3-wire connection: ... prohibit grounding through the strain relief, allowing enough slack to easily attach wiring to remove the ground-link screw from the back of electrical connection: 4-wire (recommended) 3-wire (if 4-wire is not available) 7 A. Replace back panel and screws on rear of the...
Installation Instructions
Page 8
... is marked for use with nominal 1³⁄₈" (3.5 cm) diameter connection opening , with ring terminals and marked for use with ranges. 8. A B 3-wire connection: Power Supply Cord Use this method only if local codes permit connecting chassis ground conductor to the terminal ...access cover. Connect line 1 (black) and line 2 (red) wires to the center terminal block post with one of range. Allow enough slack to easily attach the wiring to the range with ranges. 5. A C B E D A. Power supply cord wires - Small opening E. Ground-link screw C. Use ³&#...
... is marked for use with nominal 1³⁄₈" (3.5 cm) diameter connection opening , with ring terminals and marked for use with ranges. 8. A B 3-wire connection: Power Supply Cord Use this method only if local codes permit connecting chassis ground conductor to the terminal ...access cover. Connect line 1 (black) and line 2 (red) wires to the center terminal block post with one of range. Allow enough slack to easily attach the wiring to the range with ranges. 5. A C B E D A. Power supply cord wires - Small opening E. Ground-link screw C. Use ³&#...
Installation Instructions
Page 9
... A. Terminal block B. Loosen (do not remove) the set screw to the fuse disconnect or circuit breaker box. Metal ground strap B. Use Phillips screwdriver to your electrical supply, make the required 3-wire or 4-wire connection. 1. A. A B C 3. Line 1 (black) wire G. A B C D E A. Line 1 (...Cord/conduit plate D. Securely tighten set screw on bottom of the range. Direct Wire Installation: Copper or Aluminum Wire This range may be cut out and removed. Depending on your type of electrical supply (4-wire or 3-wire connection). 4-wire Connection: Direct Wire...
... A. Terminal block B. Loosen (do not remove) the set screw to the fuse disconnect or circuit breaker box. Metal ground strap B. Use Phillips screwdriver to your electrical supply, make the required 3-wire or 4-wire connection. 1. A. A B C 3. Line 1 (black) wire G. A B C D E A. Line 1 (...Cord/conduit plate D. Securely tighten set screw on bottom of the range. Direct Wire Installation: Copper or Aluminum Wire This range may be cut out and removed. Depending on your type of electrical supply (4-wire or 3-wire connection). 4-wire Connection: Direct Wire...


