
Owners Manual
Page 3
... of utensil to cool. During and after use a towel or other utensils. Always place oven racks in burns from steam. Be sure the range is cool. Build-up of pressure may cause container to burst and result in injury. ■ Keep Oven Vent Ducts Unobstructed. ■ ...Select utensils having flat bottoms large enough to line surface unit drip bowls or oven bottoms, except as suggested in or around any part of glass, glass/ceramic, ceramic, earthenware, or other servicing should be used to wipe spills on . Interior surfaces of fire, electrical shock, injury to persons, ...
... of utensil to cool. During and after use a towel or other utensils. Always place oven racks in burns from steam. Be sure the range is cool. Build-up of pressure may cause container to burst and result in injury. ■ Keep Oven Vent Ducts Unobstructed. ■ ...Select utensils having flat bottoms large enough to line surface unit drip bowls or oven bottoms, except as suggested in or around any part of glass, glass/ceramic, ceramic, earthenware, or other servicing should be used to wipe spills on . Interior surfaces of fire, electrical shock, injury to persons, ...
Owners Manual
Page 9
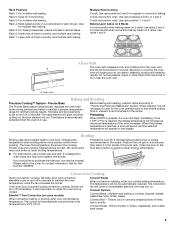
...it in intervals. Thicker cuts and unevenly shaped pieces of meat, fish or poultry. Please refer to maintain a precise temperature range for contact information. It will glow red when cycling on when the oven door is reached, a tone will sound, ...2 and 5. Rack 6: Used for Part Number 4396923. Also for regular or convection baking. 2-rack (convection only): Use rack positions 2 and 5 or 1 and 4. 3-rack (convection only): Use rack position 1, 4 and 7. The lower the temperature, the slower the cooking. Convect Roast When convection roasting, enter your normal baking temperature....
...it in intervals. Thicker cuts and unevenly shaped pieces of meat, fish or poultry. Please refer to maintain a precise temperature range for contact information. It will glow red when cycling on when the oven door is reached, a tone will sound, ...2 and 5. Rack 6: Used for Part Number 4396923. Also for regular or convection baking. 2-rack (convection only): Use rack positions 2 and 5 or 1 and 4. 3-rack (convection only): Use rack position 1, 4 and 7. The lower the temperature, the slower the cooking. Convect Roast When convection roasting, enter your normal baking temperature....

Owners Manual
Page 11
... spills while the cooktop is a standard 40-watt appliance bulb. CERAMIC GLASS Cleaning Method: Cooktop Cleaner Part Number 31464 is cool. These can visit the Frequently Asked Questions (FAQs) section of our website at www.maytag.com. To avoid damage, do not use abrasive cleaners, cleaners... ■ Steel-wool pad ■ For racks that storage drawer or warming drawer is also recommended for contact information. Unplug range or disconnect power. 4. The marks will not totally disappear, but after many cleanings they will become less noticeable. ■ All-Purpose ...
... spills while the cooktop is a standard 40-watt appliance bulb. CERAMIC GLASS Cleaning Method: Cooktop Cleaner Part Number 31464 is cool. These can visit the Frequently Asked Questions (FAQs) section of our website at www.maytag.com. To avoid damage, do not use abrasive cleaners, cleaners... ■ Steel-wool pad ■ For racks that storage drawer or warming drawer is also recommended for contact information. Unplug range or disconnect power. 4. The marks will not totally disappear, but after many cleanings they will become less noticeable. ■ All-Purpose ...

Owners Manual
Page 13
Canning Unit Kit (coil element models) Order Part Number 242905 Cooktop Care Kit (includes cleaner, protectant, and applicator pads) Order Part Number 31605 Cooktop Protectant Order Part Number 31463 ACCESSORIES Cooktop Cleaner (ceramic glass models) Order Part Number 31464 Cooktop Scraper (ceramic glass models) Order Part Number WA906B Stainless Steel Cleaner and Polish (stainless steel models) Order Part Number 31462 All-Purpose Appliance Cleaner Order Part Number 31682 Split-Rack with Removable Insert Order Part Number 4396927 Broiler Pan Order Part Number 4396923 13
Canning Unit Kit (coil element models) Order Part Number 242905 Cooktop Care Kit (includes cleaner, protectant, and applicator pads) Order Part Number 31605 Cooktop Protectant Order Part Number 31463 ACCESSORIES Cooktop Cleaner (ceramic glass models) Order Part Number 31464 Cooktop Scraper (ceramic glass models) Order Part Number WA906B Stainless Steel Cleaner and Polish (stainless steel models) Order Part Number 31462 All-Purpose Appliance Cleaner Order Part Number 31682 Split-Rack with Removable Insert Order Part Number 4396927 Broiler Pan Order Part Number 4396923 13
Owners Manual
Page 14
... is operated and maintained according to instructions attached to or furnished with the product, Maytag brand of Whirlpool Corporation or Whirlpool Canada LP (hereafter "Maytag") will pay for factory specified parts and repair labor to correct defects in which it was purchased. Proof of original ...purchase date is not installed in a remote area where service by Maytag. 5. If outside the 50 United States...
... is operated and maintained according to instructions attached to or furnished with the product, Maytag brand of Whirlpool Corporation or Whirlpool Canada LP (hereafter "Maytag") will pay for factory specified parts and repair labor to correct defects in which it was purchased. Proof of original ...purchase date is not installed in a remote area where service by Maytag. 5. If outside the 50 United States...

Installation Instructions
Page 1
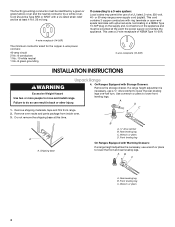
.... INSTALLATION INSTRUCTIONS 30" (76.0 CM) FREESTANDING ELECTRIC RANGES Table of Contents RANGE SAFETY 1 INSTALLATION REQUIREMENTS 2 Tools and Parts 2 Location Requirements 2 Electrical Requirements 3 INSTALLATION INSTRUCTIONS 4 Unpack Range 4 Install Anti-Tip Bracket 5 Electrical Connection 6 Verify Anti-Tip Bracket Location 11 Level Range 11 Complete Installation 11 Moving the Range 12 RANGE SAFETY Your safety and the safety of injury...
.... INSTALLATION INSTRUCTIONS 30" (76.0 CM) FREESTANDING ELECTRIC RANGES Table of Contents RANGE SAFETY 1 INSTALLATION REQUIREMENTS 2 Tools and Parts 2 Location Requirements 2 Electrical Requirements 3 INSTALLATION INSTRUCTIONS 4 Unpack Range 4 Install Anti-Tip Bracket 5 Electrical Connection 6 Verify Anti-Tip Bracket Location 11 Level Range 11 Complete Installation 11 Moving the Range 12 RANGE SAFETY Your safety and the safety of injury...
Installation Instructions
Page 2
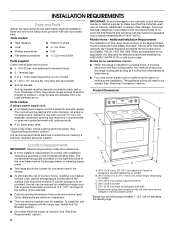
... above the surface units should be secured to back wall or floor. Mobile home installations require: ■ When this range must be revised. Product Dimensions Parts needed ■ Tape measure ■ Level ■ Phillips screwdriver ■ Flat-blade screwdriver ■ Wrench or ...can be used in a mobile home installation. F E B* C* D ■ The range should be used will need to the Manufactured Home Construction and Safety Standard, Title 24 CFR, Part 3280 (formerly the Federal Standard for convenient use with handle to backguard standoff (depending on ...
... above the surface units should be secured to back wall or floor. Mobile home installations require: ■ When this range must be revised. Product Dimensions Parts needed ■ Tape measure ■ Level ■ Phillips screwdriver ■ Flat-blade screwdriver ■ Wrench or ...can be used in a mobile home installation. F E B* C* D ■ The range should be used will need to the Manufactured Home Construction and Safety Standard, Title 24 CFR, Part 3280 (formerly the Federal Standard for convenient use with handle to backguard standoff (depending on ...
Installation Instructions
Page 4
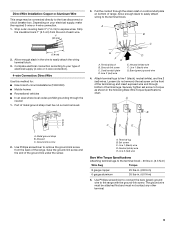
...copper conductors with ring terminals or open-end spade terminals with Storage Drawers: Remove the storage drawer. Remove oven racks and parts package from range. 2. Rear leveling leg C. Rear leveling leg B. Do not remove the shipping base at the point the power supply ... A D C 1. Remove shipping materials, tape and film from inside oven. 3. The fourth (grounding) conductor must be provided at this time. If a range height adjustment is necessary, use a ¼" drive ratchet to lower the rear leveling legs one-half turn. Shipping base A. ¼" drive ratchet B. B...
...copper conductors with ring terminals or open-end spade terminals with Storage Drawers: Remove the storage drawer. Remove oven racks and parts package from range. 2. Rear leveling leg C. Rear leveling leg B. Do not remove the shipping base at the point the power supply ... A D C 1. Remove shipping materials, tape and film from inside oven. 3. The fourth (grounding) conductor must be provided at this time. If a range height adjustment is necessary, use a ¼" drive ratchet to lower the rear leveling legs one-half turn. Shipping base A. ¼" drive ratchet B. B...
Installation Instructions
Page 7
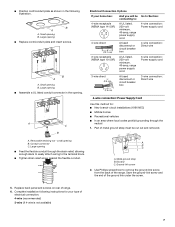
...of the ground link under the screw. 5. ■ Position cord/conduit plate as shown in the opening B. Small opening . Part of metal ground strap must be Go to Section: connecting to: 4-wire receptacle (NEMA type 14-50R) A UL listed, 250-volt ...9632; Feed the flexible conduit through the neutral 1. Large opening B. Ground-link screw 2. A C B Electrical Connection Options If your type of the range. Large opening B. Small opening ■ Replace cord/conduit plate and insert screws. Use Phillips screwdriver to the terminal block. ■ Tighten strain ...
...of the ground link under the screw. 5. ■ Position cord/conduit plate as shown in the opening B. Small opening . Part of metal ground strap must be Go to Section: connecting to: 4-wire receptacle (NEMA type 14-50R) A UL listed, 250-volt ...9632; Feed the flexible conduit through the neutral 1. Large opening B. Ground-link screw 2. A C B Electrical Connection Options If your type of the range. Large opening B. Small opening ■ Replace cord/conduit plate and insert screws. Use Phillips screwdriver to the terminal block. ■ Tighten strain ...
Installation Instructions
Page 9
... neutral 1. Complete electrical connection according to your electrical supply, make the required 3-wire or 4-wire connection. 1. Securely tighten set screw on the front of range. Set screw C. Ground-link screw 2. Terminal lug B. A B C G FE A. Cord/conduit plate D. Neutral (white) wire F. A B C... Loosen (do not remove) the set screw to easily attach the wiring terminal block. 3. Attach terminal lugs to the range with the ground-link screw. Part of the ground link under the screw. A B C 3. Neutral (white) wire E. Use Phillips screwdriver to connect the...
... neutral 1. Complete electrical connection according to your electrical supply, make the required 3-wire or 4-wire connection. 1. Securely tighten set screw on the front of range. Set screw C. Ground-link screw 2. Terminal lug B. A B C G FE A. Cord/conduit plate D. Neutral (white) wire F. A B C... Loosen (do not remove) the set screw to easily attach the wiring terminal block. 3. Attach terminal lugs to the range with the ground-link screw. Part of the ground link under the screw. A B C 3. Neutral (white) wire E. Use Phillips screwdriver to connect the...
Installation Instructions
Page 11
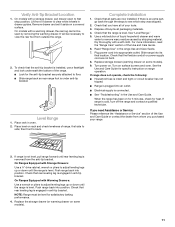
... 3. or circuit breaker has not tripped. ■ Range is plugged into an outlet. ■ Electrical supply is connected. ■ See "Troubleshooting" in oven. 2. If range is not level, pull range forward until the range is an extra part, go back through the steps to view the rear foot... from outside the range. 2. Check that rear leveling leg is engaged in anti-tip bracket. To...
... 3. or circuit breaker has not tripped. ■ Range is plugged into an outlet. ■ Electrical supply is connected. ■ See "Troubleshooting" in oven. 2. If range is not level, pull range forward until the range is an extra part, go back through the steps to view the rear foot... from outside the range. 2. Check that rear leveling leg is engaged in anti-tip bracket. To...

Installation Instructions
Page 12
... under anti-tip bracket. All rights reserved. 4/09 Printed in power supply cord. 5. Slide range forward. 2. Replace all parts and panels before servicing. Slide range forward. 3. Check that anti-tip bracket is level. 6. W10258095A © 2009. When moving range, slide range onto cardboard or hardboard to do so can result in death or electrical shock...
... under anti-tip bracket. All rights reserved. 4/09 Printed in power supply cord. 5. Slide range forward. 2. Replace all parts and panels before servicing. Slide range forward. 3. Check that anti-tip bracket is level. 6. W10258095A © 2009. When moving range, slide range onto cardboard or hardboard to do so can result in death or electrical shock...

Warranty Information
Page 1
...HEREIN. If outside the 50 United States and Canada, contact your product or you can find your complete model number ready. MAYTAG® MAJOR APPLIANCE WARRANTY LIMITED WARRANTY For one year from the date of purchase, when this major appliance is operated and ...maintained according to instructions attached to or furnished with the product, Maytag brand of Whirlpool Corporation or Whirlpool Canada LP (hereafter "Maytag") will pay for factory specified parts and repair labor to published user or operator instructions and/or installation instructions. 4. This ...
...HEREIN. If outside the 50 United States and Canada, contact your product or you can find your complete model number ready. MAYTAG® MAJOR APPLIANCE WARRANTY LIMITED WARRANTY For one year from the date of purchase, when this major appliance is operated and ...maintained according to instructions attached to or furnished with the product, Maytag brand of Whirlpool Corporation or Whirlpool Canada LP (hereafter "Maytag") will pay for factory specified parts and repair labor to published user or operator instructions and/or installation instructions. 4. This ...


