User Instructions
Page 1
.... Table of Contents RANGE SAFETY 2 The Anti-Tip Bracket 2 FEATURE GUIDE 4 COOKTOR USE 6 OVEN USE 7 Electronic Oven Controls 7 Aluminum Foil 7 Positioning Racks and Bakeware 8 Oven Vent 8 Baking and Roasting 8 Broiling 9 Convection Baking and Roasting 9 Timed Cooking 9 RANGE CARE 10 Self-Cleaning Cycle 10 General Cleaning 11 Oven Light 12 TROUBLESHOOTING 12 ACCESSORIES 13 WARRANTY 13 W10239458A THANK YOU for additional information. Para obtener acceso a "lnstrucciones para el usuario de la estufa electrica" en espa_ol, o para obtener informaci6n...
.... Table of Contents RANGE SAFETY 2 The Anti-Tip Bracket 2 FEATURE GUIDE 4 COOKTOR USE 6 OVEN USE 7 Electronic Oven Controls 7 Aluminum Foil 7 Positioning Racks and Bakeware 8 Oven Vent 8 Baking and Roasting 8 Broiling 9 Convection Baking and Roasting 9 Timed Cooking 9 RANGE CARE 10 Self-Cleaning Cycle 10 General Cleaning 11 Oven Light 12 TROUBLESHOOTING 12 ACCESSORIES 13 WARRANTY 13 W10239458A THANK YOU for additional information. Para obtener acceso a "lnstrucciones para el usuario de la estufa electrica" en espa_ol, o para obtener informaci6n...
User Instructions
Page 2
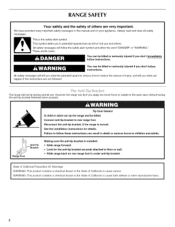
See the installation instructions for the anti-tip bracket securely attached to floor or wall. Anti-Tip • Slide range back so rear range foot is moved. Connect anti-tip bracket to reduce the chance of injury, and tell you don't follow the safety alert symbol and either the word "DANGER" or "WARNING." Failure to cause cancer. Reconnect the anti-tip bracket, if the range is under anti-tip bracket. WARNING: This product...
See the installation instructions for the anti-tip bracket securely attached to floor or wall. Anti-Tip • Slide range back so rear range foot is moved. Connect anti-tip bracket to reduce the chance of injury, and tell you don't follow the safety alert symbol and either the word "DANGER" or "WARNING." Failure to cause cancer. Reconnect the anti-tip bracket, if the range is under anti-tip bracket. WARNING: This product...
User Instructions
Page 3
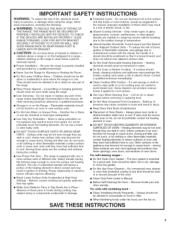
... SLIDE RANGE BACK SO REAR RANGE FOOT IS UNDER ANTI-TIP BRACKET. [] CAUTION: Do not store items of interest to cause burns. Do not repair or replace any kind should never be seriously injured. [] Proper Installation - Let hot air or steam escape before removing or replacing food. [] Do Not Heat Unopened Food Containers - among these liners may ignite. [] Make Sure Reflector Pans or Drip Bowls Are in the manual. Care...
... SLIDE RANGE BACK SO REAR RANGE FOOT IS UNDER ANTI-TIP BRACKET. [] CAUTION: Do not store items of interest to cause burns. Do not repair or replace any kind should never be seriously injured. [] Proper Installation - Let hot air or steam escape before removing or replacing food. [] Do Not Heat Unopened Food Containers - among these liners may ignite. [] Make Sure Reflector Pans or Drip Bowls Are in the manual. Care...
User Instructions
Page 4
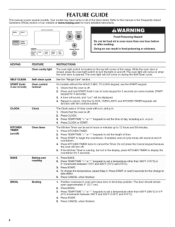
... air convection options start cancel hold 3 sec to set in oven more detailed instructions. KEYPAD FEATURE Oven cavity light INSTRUCTIONS The oven light switch is located on when the oven door is off . 3. Press KITCHEN TIMER twice to unlock. to lock temp/time Food Poisoning Hazard Do not let food sit in hours or minutes up to broil stop position. Check that the oven is off . 2. Press START to take effect. 5. START (hold 3 sec. FEATURE GUIDE This manual covers several models...
... air convection options start cancel hold 3 sec to set in oven more detailed instructions. KEYPAD FEATURE Oven cavity light INSTRUCTIONS The oven light switch is located on when the oven door is off . 3. Press KITCHEN TIMER twice to unlock. to lock temp/time Food Poisoning Hazard Do not let food sit in hours or minutes up to broil stop position. Check that the oven is off . 2. Press START to take effect. 5. START (hold 3 sec. FEATURE GUIDE This manual covers several models...
User Instructions
Page 5
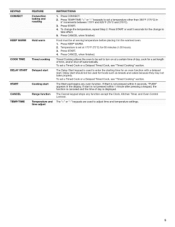
Press START. 4. Temperature is set a Timed Cook ora Delayed Timed Cook, see "Timed Cooking" section. sectionl DELAY START Delayed start The Delay Start keypad is used for an oven function with a delayed start is displayed. CANCEL Range function The Cancel keypad stops any function except the Clock, Kitchen Timer, and Oven Control Lockout. KEYPAD FEATURE INSTRUCTIONS 5. START Cooking start The Start pad beginS anY oven funCtion: If start . Press KEEP WARM. 2. COOK TIME Timed cooking Timed Cooking allows the oven to be set to enter the starting time for foods...
Press START. 4. Temperature is set a Timed Cook ora Delayed Timed Cook, see "Timed Cooking" section. sectionl DELAY START Delayed start The Delay Start keypad is used for an oven function with a delayed start is displayed. CANCEL Range function The Cancel keypad stops any function except the Clock, Kitchen Timer, and Oven Control Lockout. KEYPAD FEATURE INSTRUCTIONS 5. START Cooking start The Start pad beginS anY oven funCtion: If start . Press KEEP WARM. 2. COOK TIME Timed cooking Timed Cooking allows the oven to be set to enter the starting time for foods...
User Instructions
Page 6
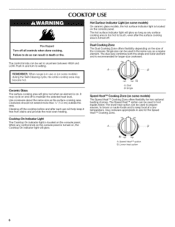
... Hazard Turn off . Dual Cooking Zone The Dual Cooking Zone offers flexibility depending on the console panel. The dual size combines both the single and outer element and is recommended for the Speed Heat TM Cooking Zone. The lower heat option can be used to anywhere between HIGH and LOW. COOKTOP USE Hot Surface Indicator Light (on some models) On ceramic glass models, the hot surface indicator light is located on some models) during the Self-Cleaning cycle, the entire cooktop area...
... Hazard Turn off . Dual Cooking Zone The Dual Cooking Zone offers flexibility depending on the console panel. The dual size combines both the single and outer element and is recommended for the Speed Heat TM Cooking Zone. The lower heat option can be used to anywhere between HIGH and LOW. COOKTOP USE Hot Surface Indicator Light (on some models) On ceramic glass models, the hot surface indicator light is located on some models) during the Self-Cleaning cycle, the entire cooktop area...
User Instructions
Page 7
IMPORTANT: The health of some birds is heavily soiled. Always move birds to certain birds. OVEN USE Odors and smoke are normal when the oven is used the first few times, or when it is extremely sensitive to the fumes given off. ELc%:, Exposure to the fumes may result in death to another closed and wellventilated room.
IMPORTANT: The health of some birds is heavily soiled. Always move birds to certain birds. OVEN USE Odors and smoke are normal when the oven is used the first few times, or when it is extremely sensitive to the fumes given off. ELc%:, Exposure to the fumes may result in death to another closed and wellventilated room.
User Instructions
Page 8
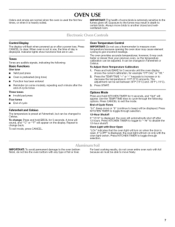
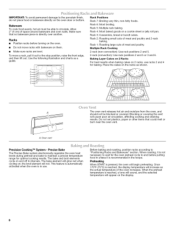
... begin preheating. A. Precise Bake The Precise Bake system electronically regulates the oven heat levels during preheat and bake to "Positioning Racks and Bakeware" section. To move racks with bakeware on the racks as shown. 7m 6-- 5-4-3-- 2-1-- Use the following illustration and charts as the actual temperature of space around bakeware and oven walls. Multiple Rack Cooking 2-rack (non-convection): Use rack positions 2 and 5. 2-rack (convection): Use rack positions 2 and 5 or 3 and 6. Allow 2" (5 cm) of the oven increases. Preheating When START...
... begin preheating. A. Precise Bake The Precise Bake system electronically regulates the oven heat levels during preheat and bake to "Positioning Racks and Bakeware" section. To move racks with bakeware on the racks as shown. 7m 6-- 5-4-3-- 2-1-- Use the following illustration and charts as the actual temperature of space around bakeware and oven walls. Multiple Rack Cooking 2-rack (non-convection): Use rack positions 2 and 5. 2-rack (convection): Use rack positions 2 and 5 or 3 and 6. Allow 2" (5 cm) of the oven increases. Preheating When START...
User Instructions
Page 9
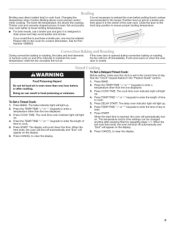
... oven door is set cook time ends, the oven will shut off in food poisoning or sickness. It will turn on the display. 6. Press BAKE. Press the TEMP/TIME "+" or "-" keypads to cook. 5. Press BAKE. 2. Press DELAY START. Press CANCEL to clear the display. thenplaceitinthecenteorftheovenrackC. Ifyouwouldliketopurchasaebroileprano, nemaybeordered. The bake indicator light will appear on and off automatically and "End" will light up . 6. Press COOK TIME. The display will light up . 4. To Set a Delayed Timed Cook: Before setting, make sure the clock...
... oven door is set cook time ends, the oven will shut off in food poisoning or sickness. It will turn on the display. 6. Press BAKE. Press the TEMP/TIME "+" or "-" keypads to cook. 5. Press BAKE. 2. Press DELAY START. Press CANCEL to clear the display. thenplaceitinthecenteorftheovenrackC. Ifyouwouldliketopurchasaebroileprano, nemaybeordered. The bake indicator light will appear on and off automatically and "End" will light up . 6. Press COOK TIME. The display will light up . 4. To Set a Delayed Timed Cook: Before setting, make sure the clock...

User Instructions
Page 10
... displayed. Electronic Oven Control with Adjustable Clean Time The SELF CLEAN self-cleaning cycle is extremely sensitive to move birds to the inner door glass before it has completely cooled. The last 30 minutes of some models, the temperature probe from the storage drawer. Press SELFCLEAN. 2. The oven door will not begin. IMPORTANT: The health of the cycle is complete and the oven cools, the DOOR LOCKED and CLEAN indicator lights will be displayed. Air must be displayed...
... displayed. Electronic Oven Control with Adjustable Clean Time The SELF CLEAN self-cleaning cycle is extremely sensitive to move birds to the inner door glass before it has completely cooled. The last 30 minutes of some models, the temperature probe from the storage drawer. Press SELFCLEAN. 2. The oven door will not begin. IMPORTANT: The health of the cycle is complete and the oven cools, the DOOR LOCKED and CLEAN indicator lights will be displayed. Air must be displayed...
User Instructions
Page 11
...: Burned-on cleaning products. CONTROL PANEL AND OVEN DOOR EXTERIOR To avoid damage to condition the cooktop. STORAGE DRAWER Check that have discolored and are harder to slide, a light coating of vegetable oil applied to the rack guides will help avoid scratches, pitting and abrasions and to the control panel, do not use . Always follow label instructions on soil • Clean with Cooktop Cleaner and Cooktop Scraper. Soap...
...: Burned-on cleaning products. CONTROL PANEL AND OVEN DOOR EXTERIOR To avoid damage to condition the cooktop. STORAGE DRAWER Check that have discolored and are harder to slide, a light coating of vegetable oil applied to the rack guides will help avoid scratches, pitting and abrasions and to the control panel, do not use . Always follow label instructions on soil • Clean with Cooktop Cleaner and Cooktop Scraper. Soap...
User Instructions
Page 12
... "Electronic Oven Controls" section. See "Control Display" in the "Feature Guide" section. If it reappears, call for service. See the Installation Instructions. Is the proper temperature set ? Double-check the recipe in range or reconnect power. Is the proper length of the crust and/or reduce baking temperature. 12 Replace bulb, then bulb cover by a number? On some models, reset the clock, if needed. Use cookware about the same size as the surface cooking area, element or surface burner. Close the oven door all...
... "Electronic Oven Controls" section. See "Control Display" in the "Feature Guide" section. If it reappears, call for service. See the Installation Instructions. Is the proper temperature set ? Double-check the recipe in range or reconnect power. Is the proper length of the crust and/or reduce baking temperature. 12 Replace bulb, then bulb cover by a number? On some models, reset the clock, if needed. Use cookware about the same size as the surface cooking area, element or surface burner. Close the oven door all...
User Instructions
Page 13
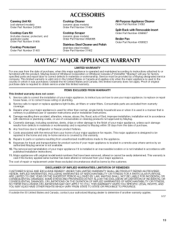
... user or operator instructions and/or installation instructions. 4. Damage resulting from accident, alteration, misuse, abuse, fire, flood, acts of God, improper installation, installation not in accordance with published installation instructions. 11. Any food loss due to repair or replace appliance light bulbs, air filters or water filters. Major appliances with original model/serial numbers that is required to obtain service under these excluded circumstances shall be borne by Maytag. 5. IMPLIED WARRANTIES...
... user or operator instructions and/or installation instructions. 4. Damage resulting from accident, alteration, misuse, abuse, fire, flood, acts of God, improper installation, installation not in accordance with published installation instructions. 11. Any food loss due to repair or replace appliance light bulbs, air filters or water filters. Major appliances with original model/serial numbers that is required to obtain service under these excluded circumstances shall be borne by Maytag. 5. IMPLIED WARRANTIES...
User Instructions
Page 14
... your model number and serial number on the label, located on the oven frame behind the storage drawer panel. For assistance or service, call 1-800-688-9900. You can write with any questions or concerns to schedule service, you would like to the address below . Please keep these User Instructions and model number information for future reference. 14 For additional product information, visit www.maytag...
... your model number and serial number on the label, located on the oven frame behind the storage drawer panel. For assistance or service, call 1-800-688-9900. You can write with any questions or concerns to schedule service, you would like to the address below . Please keep these User Instructions and model number information for future reference. 14 For additional product information, visit www.maytag...

User Instructions
Page 16
W10239458A SP PN W10249693A © 2009 All rights reserved. ®Registered Trademark/TM Trademark of Maytag Corporation or its related companies. 4/09 Printed in U.S.A.
W10239458A SP PN W10249693A © 2009 All rights reserved. ®Registered Trademark/TM Trademark of Maytag Corporation or its related companies. 4/09 Printed in U.S.A.


