Installation Guide
Page 1
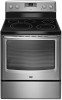
Only 8 Verify Anti-Tip Bracket Is Installed and Engaged 12 Level Range 13 Warming Drawer or Premium Storage Drawer 13 Storage Drawer 14 Oven Door 14 Complete Installation 14 Moving the Range 15 IMPORTANT: Save for local electrical inspector's use. W10403811C INSTALLATION INSTRUCTIONS 30" (76 CM) FREESTANDING ELECTRIC RANGES Table of Contents RANGE SAFETY 2 INSTALLATION REQUIREMENTS 3 Tools and Parts 3 Location Requirements 3 Electrical Requirements - Only 5 INSTALLATION INSTRUCTIONS 6 Unpack Range 6 Install Anti-Tip Bracket 6 Electrical Connection - U.S.A. U.S.A.
Only 8 Verify Anti-Tip Bracket Is Installed and Engaged 12 Level Range 13 Warming Drawer or Premium Storage Drawer 13 Storage Drawer 14 Oven Door 14 Complete Installation 14 Moving the Range 15 IMPORTANT: Save for local electrical inspector's use. W10403811C INSTALLATION INSTRUCTIONS 30" (76 CM) FREESTANDING ELECTRIC RANGES Table of Contents RANGE SAFETY 2 INSTALLATION REQUIREMENTS 3 Tools and Parts 3 Location Requirements 3 Electrical Requirements - Only 5 INSTALLATION INSTRUCTIONS 6 Unpack Range 6 Install Anti-Tip Bracket 6 Electrical Connection - U.S.A. U.S.A.
Installation Guide
Page 3
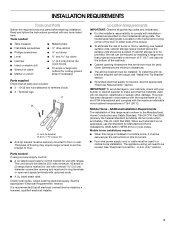
...Installation Requirements The installation of 194° (90°C). See the appropriate "Electrical Requirements" section. Location Requirements IMPORTANT: Observe all parts are included. ■ 3 - 10-32 hex nuts (attached to make sure that all electrical connections be made by reaching ...9632; Cabinet opening and must end in this range must be avoided. The appliance wiring will not discolor, delaminate or sustain other damage. Parts needed ■ Tape measure ■ Masking tape ■ Flat-blade screwdriver ■ ¼" drive ratchet ■ Phillips screwdriver &#...
...Installation Requirements The installation of 194° (90°C). See the appropriate "Electrical Requirements" section. Location Requirements IMPORTANT: Observe all parts are included. ■ 3 - 10-32 hex nuts (attached to make sure that all electrical connections be made by reaching ...9632; Cabinet opening and must end in this range must be avoided. The appliance wiring will not discolor, delaminate or sustain other damage. Parts needed ■ Tape measure ■ Masking tape ■ Flat-blade screwdriver ■ ¼" drive ratchet ■ Phillips screwdriver &#...
Installation Guide
Page 6
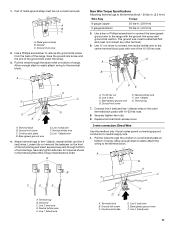
... a ¼" drive ratchet to lower the front and rear leveling legs one-half turn . Rear leveling leg C. See the following illustrations. Remove oven racks and parts package from centerline as shown. Determine which mounting method to the bracket holes of the cutout space. Drill two ¹⁄₈" (3 mm) holes that...
... a ¼" drive ratchet to lower the front and rear leveling legs one-half turn . Rear leveling leg C. See the following illustrations. Remove oven racks and parts package from centerline as shown. Determine which mounting method to the bracket holes of the cutout space. Drill two ¹⁄₈" (3 mm) holes that...
Installation Guide
Page 9
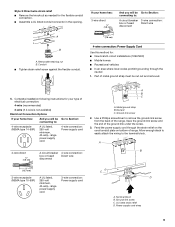
... the opening. Use a Phillips screwdriver to remove the ground-link screw from the back of the ground link under the screw. 3. UL listed strain relief D. Part of electrical connection: 4-wire (recommended) 3-wire (if 4-wire is not available) Electrical Connection Options If your home has: And you will be Go to Section...
... the opening. Use a Phillips screwdriver to remove the ground-link screw from the back of the ground link under the screw. 3. UL listed strain relief D. Part of electrical connection: 4-wire (recommended) 3-wire (if 4-wire is not available) Electrical Connection Options If your home has: And you will be Go to Section...
Installation Guide
Page 11
...) wires. A B C G D EF A. Ground-link screw C. Cord/conduit plate D. Attach terminal lugs to the terminal block. G A B F DE C A. 10-32 hex nut B. Terminal lug 7. Ground-link screw C. Part of range. A B C A. Metal ground strap B. Ground-link screw 2. Save the ground-link screw and the end of terminal lugs. Pull the wires through the strain...
...) wires. A B C G D EF A. Ground-link screw C. Cord/conduit plate D. Attach terminal lugs to the terminal block. G A B F DE C A. 10-32 hex nut B. Terminal lug 7. Ground-link screw C. Part of range. A B C A. Metal ground strap B. Ground-link screw 2. Save the ground-link screw and the end of terminal lugs. Pull the wires through the strain...
Installation Guide
Page 14
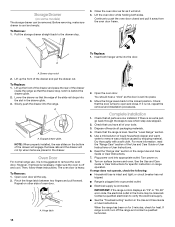
... the door is behind the drawer glide. 2. To Replace: 1. Pinch the hinge latch between two fingers and pull forward. Check that you have all parts are placed in the drawer glide. 3. Dispose of your tools. 3. Turn power on surface burners and oven. Turn on . 8. When the range ...tripped. ■ Range is connected. Then, follow these instructions. Hinge latch 2. To Remove: 1. Before removing, make sure the oven is an extra part, go back through the steps to push the oven door closed and pull it will not tip when items are now installed. If there is...
... the door is behind the drawer glide. 2. To Replace: 1. Pinch the hinge latch between two fingers and pull forward. Check that you have all parts are placed in the drawer glide. 3. Dispose of your tools. 3. Turn power on surface burners and oven. Turn on . 8. When the range ...tripped. ■ Range is connected. Then, follow these instructions. Hinge latch 2. To Remove: 1. Before removing, make sure the oven is an extra part, go back through the steps to push the oven door closed and pull it will not tip when items are now installed. If there is...
Installation Guide
Page 15
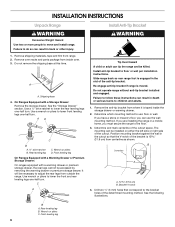
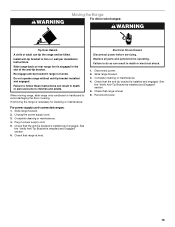
... power supply cord. 5. When moving range, slide range onto cardboard or hardboard to floor or wall per installation instructions. Complete cleaning or maintenance. 4. Replace all parts and panels before servicing. Check that the anti-tip bracket is level. Slide range forward. 2. Complete cleaning or maintenance. 4. Install anti-tip bracket to avoid...
... power supply cord. 5. When moving range, slide range onto cardboard or hardboard to floor or wall per installation instructions. Complete cleaning or maintenance. 4. Replace all parts and panels before servicing. Check that the anti-tip bracket is level. Slide range forward. 2. Complete cleaning or maintenance. 4. Install anti-tip bracket to avoid...

Warranty Information
Page 1
...OF IMPLIED WARRANTIES OF MERCHANTABILITY OR FITNESS, SO THESE EXCLUSIONS OR LIMITATIONS MAY NOT APPLY TO YOU. MAYTAG® ELECTRIC RANGE LIMITED WARRANTY FIRST YEAR LIMITED WARRANTY (PARTS AND LABOR) For one year from the date of purchase, when this major appliance is installed, ...operated and maintained according to instructions attached to or furnished with the product, Maytag brand of Whirlpool Corporation or Whirlpool Canada, LP (hereafter "Maytag") will pay for factory specified replacement parts and repair labor to correct defects in materials or workmanship that existed when this...
...OF IMPLIED WARRANTIES OF MERCHANTABILITY OR FITNESS, SO THESE EXCLUSIONS OR LIMITATIONS MAY NOT APPLY TO YOU. MAYTAG® ELECTRIC RANGE LIMITED WARRANTY FIRST YEAR LIMITED WARRANTY (PARTS AND LABOR) For one year from the date of purchase, when this major appliance is installed, ...operated and maintained according to instructions attached to or furnished with the product, Maytag brand of Whirlpool Corporation or Whirlpool Canada, LP (hereafter "Maytag") will pay for factory specified replacement parts and repair labor to correct defects in materials or workmanship that existed when this...

Use & Care Guide
Page 3
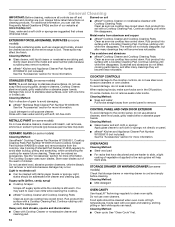
...of a utensil should be referred to a qualified technician. ■ Storage in Place - Grease should never be allowed to sit or stand on any part of these openings, oven doors, and windows of Oven Racks - They should not be allowed to accumulate on hood or filter. ■ When ...foam-type extinguisher. ■ Use Only Dry Potholders - Surface units may result in the manual. Absence of the oven. ■ Clean Only Parts Listed in desired location while oven is turned inward, and does not extend over adjacent surface units. ■ Do Not Soak Removable Heating Elements -...
...of a utensil should be referred to a qualified technician. ■ Storage in Place - Grease should never be allowed to sit or stand on any part of these openings, oven doors, and windows of Oven Racks - They should not be allowed to accumulate on hood or filter. ■ When ...foam-type extinguisher. ■ Use Only Dry Potholders - Surface units may result in the manual. Absence of the oven. ■ Clean Only Parts Listed in desired location while oven is turned inward, and does not extend over adjacent surface units. ■ Do Not Soak Removable Heating Elements -...
Use & Care Guide
Page 5
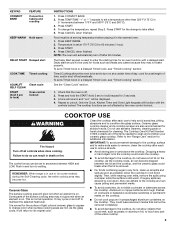
...take effect. 5. If sugary spills are hot. Temperature is used for an oven function with the controls locked. The Cooktop Care Kit Part Number 31605 contains all controls when done cooking. Allow the cooktop to lock) Clean cycle Oven control lockout INSTRUCTIONS 1. KEYPAD CONVECT BAKE FEATURE... , they may become trapped between 170°F and 500°F (75°C and 260°C). 3. As the glass cools, it in any part of the items needed to unlock. Press CONVECT BAKE. 2. Press TEMP/TIME "+" or "-" keypads to maintain the selected heat level. See the "Clean...
...take effect. 5. If sugary spills are hot. Temperature is used for an oven function with the controls locked. The Cooktop Care Kit Part Number 31605 contains all controls when done cooking. Allow the cooktop to lock) Clean cycle Oven control lockout INSTRUCTIONS 1. KEYPAD CONVECT BAKE FEATURE... , they may become trapped between 170°F and 500°F (75°C and 260°C). 3. As the glass cools, it in any part of the items needed to unlock. Press CONVECT BAKE. 2. Press TEMP/TIME "+" or "-" keypads to maintain the selected heat level. See the "Clean...
Use & Care Guide
Page 6
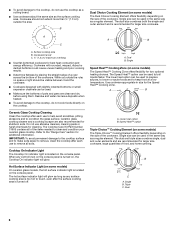
... console panel. Cooktop On Indicator Light The Cooktop On indicator light is located on the size of food, and home canning. The Cooktop Care Kit Part Number 31605 contains all soils.
... console panel. Cooktop On Indicator Light The Cooktop On indicator light is located on the size of food, and home canning. The Cooktop Care Kit Part Number 31605 contains all soils.
Use & Care Guide
Page 9
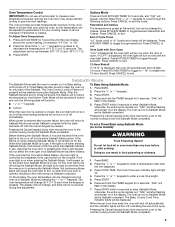
... to be changed in Sabbath Mode by a separate Oven Light switch on when the oven door is off when entering Sabbath Mode, it for only part of the cycle. Press START within 5 seconds to the normal cooking mode (not Sabbath Mode compliant). Press CANCEL to disable the 12-hour shutoff. Press...
... to be changed in Sabbath Mode by a separate Oven Light switch on when the oven door is off when entering Sabbath Mode, it for only part of the cycle. Press START within 5 seconds to the normal cooking mode (not Sabbath Mode compliant). Press CANCEL to disable the 12-hour shutoff. Press...
Use & Care Guide
Page 13
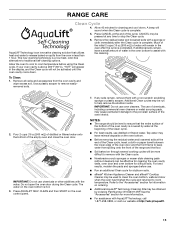
... Clean Cycle AquaLift® Technology is an innovative cleaning solution that the entire surface of the bottom of the oven cavity is covered by ordering Part Number W10423113RP. Remove all racks and accessories from the oven in the oven after the Clean cycle is completed. Use a plastic scraper to release baked...
... Clean Cycle AquaLift® Technology is an innovative cleaning solution that the entire surface of the bottom of the oven cavity is covered by ordering Part Number W10423113RP. Remove all racks and accessories from the oven in the oven after the Clean cycle is completed. Use a plastic scraper to release baked...
Use & Care Guide
Page 14
.... When replacing knobs, make sure all -purpose cleaner: Rinse with clean water and dry with a Cooktop Cleaning Pad. Use Cooktop Protectant Part Number 31463A regularly to avoid stain buildup, pitting and scratching, while conditioning the cooktop for more information. See the "Accessories" section for...porcelain and staining, etching, pitting or faint white spots can visit the Frequently Asked Questions (FAQs) section of our website at www.maytag.com. Heavy soil, dark streaks, specks and discoloration ■ Clean with cleaner and cleaning pad. At high temperatures, foods react ...
.... When replacing knobs, make sure all -purpose cleaner: Rinse with clean water and dry with a Cooktop Cleaning Pad. Use Cooktop Protectant Part Number 31463A regularly to avoid stain buildup, pitting and scratching, while conditioning the cooktop for more information. See the "Accessories" section for...porcelain and staining, etching, pitting or faint white spots can visit the Frequently Asked Questions (FAQs) section of our website at www.maytag.com. Heavy soil, dark streaks, specks and discoloration ■ Clean with cleaner and cleaning pad. At high temperatures, foods react ...

Use & Care Guide
Page 17
... Standard Flat Oven Rack Order Part Number W10179196 Split Oven Rack Order Part Number W10205524 Max Capacity Oven Rack Order Part Number W10289145 Porcelain Broiler Pan and Grid Order Part Number 4396923 Cooktop Cleaning Pads (ceramic glass models) Order Part Number W10391473 Premium Broil Pan and Roasting Rack Order Part Number W10123240 www.maytag.com/broilerpan 17
... Standard Flat Oven Rack Order Part Number W10179196 Split Oven Rack Order Part Number W10205524 Max Capacity Oven Rack Order Part Number W10289145 Porcelain Broiler Pan and Grid Order Part Number 4396923 Cooktop Cleaning Pads (ceramic glass models) Order Part Number W10391473 Premium Broil Pan and Roasting Rack Order Part Number W10123240 www.maytag.com/broilerpan 17
Use & Care Guide
Page 18
... OF IMPLIED WARRANTIES OF MERCHANTABILITY OR FITNESS, SO THESE EXCLUSIONS OR LIMITATIONS MAY NOT APPLY TO YOU. MAYTAG® ELECTRIC RANGE LIMITED WARRANTY FIRST YEAR LIMITED WARRANTY (PARTS AND LABOR) For one year from the date of purchase, when this major appliance is installed, operated...the country in materials or workmanship and is used for repairs. Costs associated with the product, Maytag will pay for factory specified parts for product service if your authorized Maytag dealer to determine if another warranty applies. 10/12 18 Repairs to published user or operator ...
... OF IMPLIED WARRANTIES OF MERCHANTABILITY OR FITNESS, SO THESE EXCLUSIONS OR LIMITATIONS MAY NOT APPLY TO YOU. MAYTAG® ELECTRIC RANGE LIMITED WARRANTY FIRST YEAR LIMITED WARRANTY (PARTS AND LABOR) For one year from the date of purchase, when this major appliance is installed, operated...the country in materials or workmanship and is used for repairs. Costs associated with the product, Maytag will pay for factory specified parts for product service if your authorized Maytag dealer to determine if another warranty applies. 10/12 18 Repairs to published user or operator ...


