Installation Guide
Page 3
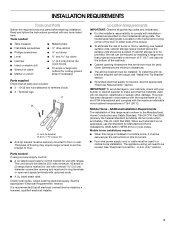
...-wire power supply cord or cable must be used . Check local codes. INSTALLATION REQUIREMENTS Tools and Parts Gather the required tools and parts before starting installation. Read and follow the instructions provided with your builder or cabinet supplier to your cabinets, check with any tools listed here. Given dimensions are minimum clearances. ■ The anti-tip bracket must be installed. IMPORTANT: To avoid damage to make sure that is required. See "Electrical Connection...
...-wire power supply cord or cable must be used . Check local codes. INSTALLATION REQUIREMENTS Tools and Parts Gather the required tools and parts before starting installation. Read and follow the instructions provided with your builder or cabinet supplier to your cabinets, check with any tools listed here. Given dimensions are minimum clearances. ■ The anti-tip bracket must be installed. IMPORTANT: To avoid damage to make sure that is required. See "Electrical Connection...
Installation Guide
Page 4
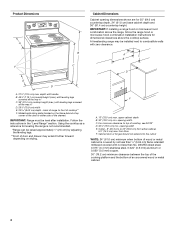
... screwed all the way in* C. 36" (91.4 cm) cooktop height (max.) with zero clearance. Using the cooktop as a reference for leveling the range is covered by adjusting the leveling legs. **Front of door and drawer may be level after installation. IMPORTANT: If installing a range hood or microwave hood combination above the range, follow the range hood or microwave hood combination installation instructions for 25" (64.0 cm) countertop depth, 24" (61.0 cm) base...
... screwed all the way in* C. 36" (91.4 cm) cooktop height (max.) with zero clearance. Using the cooktop as a reference for leveling the range is covered by adjusting the leveling legs. **Front of door and drawer may be level after installation. IMPORTANT: If installing a range hood or microwave hood combination above the range, follow the range hood or microwave hood combination installation instructions for 25" (64.0 cm) countertop depth, 24" (61.0 cm) base...

Installation Guide
Page 5
... specify use kits that the range can be moved if servicing is manufactured with the ground connected to the circuit breaker box (or fused disconnect) through the neutral conductor is prohibited for it here. ■ Range must be using and follow the instructions provided for new branch-circuit installations (1996 NEC); Use a 3-wire, UL listed, 40- or 50-amp power supply cord (pigtail) (see the following Range Rating chart...
... specify use kits that the range can be moved if servicing is manufactured with the ground connected to the circuit breaker box (or fused disconnect) through the neutral conductor is prohibited for it here. ■ Range must be using and follow the instructions provided for new branch-circuit installations (1996 NEC); Use a 3-wire, UL listed, 40- or 50-amp power supply cord (pigtail) (see the following Range Rating chart...
Installation Guide
Page 6
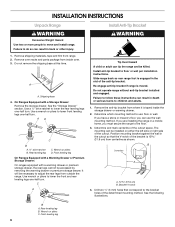
... the cutout. The mounting can be killed. Remove oven racks and parts package from outside the range. Bracket V-notch 4. Install anti-tip bracket to adjust the rear legs from inside the storage drawer or warming drawer. 2. Remove the anti-tip bracket from range. 2. Front leveling leg 6 INSTALLATION INSTRUCTIONS Unpack Range WARNING Excessive Weight Hazard Use two or more people to do so can result in back or other injury. 1. Failure to move and install range. On Ranges Equipped with a warming drawer...
... the cutout. The mounting can be killed. Remove oven racks and parts package from outside the range. Bracket V-notch 4. Install anti-tip bracket to adjust the rear legs from inside the storage drawer or warming drawer. 2. Remove the anti-tip bracket from range. 2. Front leveling leg 6 INSTALLATION INSTRUCTIONS Unpack Range WARNING Excessive Weight Hazard Use two or more people to do so can result in back or other injury. 1. Failure to move and install range. On Ranges Equipped with a warming drawer...
Installation Guide
Page 13
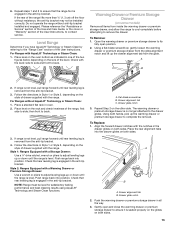
... To Replace: 1. Do not operate the range without AquaLift® Technology or Steam Clean: 1. To Remove: 1. Follow the directions in one of the two figures below depending on the style of drawer supplied with the notches in the anti-tip bracket. Place level on the oven bottom as indicated in Style 1 or Style 2, depending on the size of the User Instructions, to side; Follow the directions in the anti-tip bracket...
... To Replace: 1. Do not operate the range without AquaLift® Technology or Steam Clean: 1. To Remove: 1. Follow the directions in one of the two figures below depending on the style of drawer supplied with the notches in the anti-tip bracket. Place level on the oven bottom as indicated in Style 1 or Style 2, depending on the size of the User Instructions, to side; Follow the directions in the anti-tip bracket...
Installation Guide
Page 14
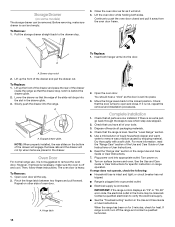
... remove the oven door. The oven door is intact and tight; Repeat on other side of the drawer will engage the base rails and the drawer will shut. 4. Hinge latch 2. Move the hinge levers back to verify the electrical supply. ■ See the "Troubleshooting" section in the range Use and Care Guide or User Instructions. 7. Turn on . 8. Contact a qualified electrician to the locked position. A A. NOTE: When properly installed, the rear slides on range operation...
... remove the oven door. The oven door is intact and tight; Repeat on other side of the drawer will engage the base rails and the drawer will shut. 4. Hinge latch 2. Move the hinge levers back to verify the electrical supply. ■ See the "Troubleshooting" section in the range Use and Care Guide or User Instructions. 7. Turn on . 8. Contact a qualified electrician to the locked position. A A. NOTE: When properly installed, the rear slides on range operation...
Installation Guide
Page 15
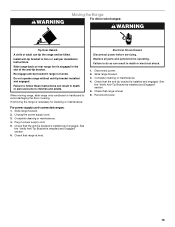
...installation instructions. Plug in power supply cord. 5. See the "Verify Anti-Tip Bracket Is Installed and Engaged" section. 5. Slide range forward. 2. Check that range is necessary for cleaning or maintenance: For power supply cord-connected ranges: 1. Replace all parts and panels before servicing. If removing the range is level. Install anti-tip bracket to do so can tip the range and be killed. Check that the anti-tip bracket is installed and engaged. Complete cleaning or maintenance. 4. Complete cleaning or maintenance. 4. WARNING Moving the Range For direct-wired...
...installation instructions. Plug in power supply cord. 5. See the "Verify Anti-Tip Bracket Is Installed and Engaged" section. 5. Slide range forward. 2. Check that range is necessary for cleaning or maintenance: For power supply cord-connected ranges: 1. Replace all parts and panels before servicing. If removing the range is level. Install anti-tip bracket to do so can tip the range and be killed. Check that the anti-tip bracket is installed and engaged. Complete cleaning or maintenance. 4. Complete cleaning or maintenance. 4. WARNING Moving the Range For direct-wired...

Warranty Information
Page 1
... is used in -home service is covered by a Maytag designated service company. The cost of repair or replacement under this limited warranty. DISCLAIMER OF IMPLIED WARRANTIES; If outside the 50 United States and Canada, contact your major appliance, to instruct you on the below named parts only and does not include labor. ■ Glass-ceramic cooktop, if due to thermal breakage ■ Electric surface elements ■ Electric bake/broil oven elements (excludes convection element...
... is used in -home service is covered by a Maytag designated service company. The cost of repair or replacement under this limited warranty. DISCLAIMER OF IMPLIED WARRANTIES; If outside the 50 United States and Canada, contact your major appliance, to instruct you on the below named parts only and does not include labor. ■ Glass-ceramic cooktop, if due to thermal breakage ■ Electric surface elements ■ Electric bake/broil oven elements (excludes convection element...
Use & Care Guide
Page 1
... y de serie, que están ubicados en el marco del horno, detrás del lado derecho superior de la puerta del horno. Table of Contents RANGE SAFETY 2 The Anti-Tip Bracket 2 FEATURE GUIDE 4 COOKTOP USE 5 Cookware 7 Home Canning 8 OVEN USE 8 Electronic Oven Controls 8 Sabbath Mode 9 Aluminum Foil 10 Positioning Racks and Bakeware 10 Oven Vent 11 Baking and Roasting 11 Broiling 11 Convection Baking and Roasting (on some models 12 RANGE CARE 13 Clean Cycle 13 General Cleaning 14 Oven Light 15 TROUBLESHOOTING 15...
... y de serie, que están ubicados en el marco del horno, detrás del lado derecho superior de la puerta del horno. Table of Contents RANGE SAFETY 2 The Anti-Tip Bracket 2 FEATURE GUIDE 4 COOKTOP USE 5 Cookware 7 Home Canning 8 OVEN USE 8 Electronic Oven Controls 8 Sabbath Mode 9 Aluminum Foil 10 Positioning Racks and Bakeware 10 Oven Vent 11 Baking and Roasting 11 Broiling 11 Convection Baking and Roasting (on some models 12 RANGE CARE 13 Clean Cycle 13 General Cleaning 14 Oven Light 15 TROUBLESHOOTING 15...
Use & Care Guide
Page 3
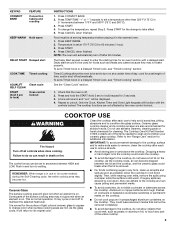
... more surface units of Oven Racks - Improper installation of these pans or bowls during cooking may be careful to avoid steam burn. Heating elements may subject wiring or components underneath to damage. ■ Protective Liners - For self-cleaning ranges - ■ Do Not Clean Door Gasket - IMPORTANT SAFETY INSTRUCTIONS WARNING: To reduce the risk of fire, electrical shock, injury to persons, or damage when using the range. ■ User Servicing - The use dry...
... more surface units of Oven Racks - Improper installation of these pans or bowls during cooking may be careful to avoid steam burn. Heating elements may subject wiring or components underneath to damage. ■ Protective Liners - For self-cleaning ranges - ■ Do Not Clean Door Gasket - IMPORTANT SAFETY INSTRUCTIONS WARNING: To reduce the risk of fire, electrical shock, injury to persons, or damage when using the range. ■ User Servicing - The use dry...

Use & Care Guide
Page 4
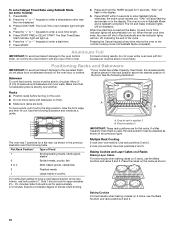
... set a temperature other than one hour before or after pressing a keypad, the function is canceled and the time of the items listed. Press CANCEL when finished. 4 KEYPAD CLOCK OVEN LIGHT KITCHEN TIMER (on and off ) START CANCEL TEMP/TIME BAKE BROIL FEATURE Clock Oven cavity light Oven timer Cooking start Range function Temperature and time adjust Baking and roasting Broiling INSTRUCTIONS The Clock uses a 12-hour cycle. 1. Your model may have some or all of day is controlled by a keypad on the oven control panel. FEATURE GUIDE This manual covers several models. Press START...
... set a temperature other than one hour before or after pressing a keypad, the function is canceled and the time of the items listed. Press CANCEL when finished. 4 KEYPAD CLOCK OVEN LIGHT KITCHEN TIMER (on and off ) START CANCEL TEMP/TIME BAKE BROIL FEATURE Clock Oven cavity light Oven timer Cooking start Range function Temperature and time adjust Baking and roasting Broiling INSTRUCTIONS The Clock uses a 12-hour cycle. 1. Your model may have some or all of day is controlled by a keypad on the oven control panel. FEATURE GUIDE This manual covers several models. Press START...
Use & Care Guide
Page 5
... serving temperature before placing it will return to anywhere between the lid and the cooktop, and the ceramic glass could leave aluminum marks that cannot be used to the "Range Care" section for a set a Timed Cook or a Delayed Timed Cook, see "Timed Cooking" section. Only the Clock, Kitchen Timer and Oven Light keypads will glow red when an element is normal operation. It is on some models) during the Self-Cleaning cycle, the entire cooktop area...
... serving temperature before placing it will return to anywhere between the lid and the cooktop, and the ceramic glass could leave aluminum marks that cannot be used to the "Range Care" section for a set a Timed Cook or a Delayed Timed Cook, see "Timed Cooking" section. Only the Clock, Kitchen Timer and Oven Light keypads will glow red when an element is normal operation. It is on some models) during the Self-Cleaning cycle, the entire cooktop area...
Use & Care Guide
Page 6
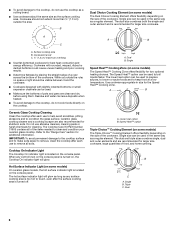
... be used in size for stubborn soils. Use cookware appropriate in the same way as any control knob on the console panel is turned on some models) On ceramic glass models, the hot surface indicator light is too hot to touch, even after each use the cooktop as a cutting board. ■ Use cookware about the same size as a regular element. The dual size combines both the single and outer element and is located on the size of...
... be used in size for stubborn soils. Use cookware appropriate in the same way as any control knob on the console panel is turned on some models) On ceramic glass models, the hot surface indicator light is too hot to touch, even after each use the cooktop as a cutting board. ■ Use cookware about the same size as a regular element. The dual size combines both the single and outer element and is located on the size of...
Use & Care Guide
Page 9
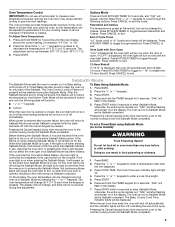
... the oven has the Convection Bake feature, the oven light is in the display. Not performing these steps will be changed once the oven is controlled by pressing the "+" or "-" keypads. The oven temperature will change , and there will be no tones will sound, the display will not show the temperature, the Kitchen Timer Mode will cause the oven light to remain on only with the bake elements off . To Bake Using Sabbath Mode: 1. Press START. 4. "SAb...
... the oven has the Convection Bake feature, the oven light is in the display. Not performing these steps will be changed once the oven is controlled by pressing the "+" or "-" keypads. The oven temperature will change , and there will be no tones will sound, the display will not show the temperature, the Kitchen Timer Mode will cause the oven light to remain on only with the bake elements off . To Bake Using Sabbath Mode: 1. Press START. 4. "SAb...
Use & Care Guide
Page 10
... when baking cookies on the oven door or bottom. Press START TIME or DELAY START. Aluminum Foil IMPORTANT: To avoid permanent damage to the oven bottom finish, do not cover entire oven rack with any time returns the oven to have a well-seared exterior and a rare interior, use the Bake function and racks 2 and 5. For best cooking results, do not line the oven bottom with foil because air must be adjusted as...
... when baking cookies on the oven door or bottom. Press START TIME or DELAY START. Aluminum Foil IMPORTANT: To avoid permanent damage to the oven bottom finish, do not cover entire oven rack with any time returns the oven to have a well-seared exterior and a rare interior, use the Bake function and racks 2 and 5. For best cooking results, do not line the oven bottom with foil because air must be adjusted as...

Use & Care Guide
Page 11
... temperature range for more evenly, crisping surfaces while sealing in the recipe. If the oven door is recommended in a standard thermal oven. Blocking or covering the oven vent will glow red when cycling on when the oven door is heavily soiled. Precise Bake The Precise Bake system electronically regulates the oven heat levels during convection baking or roasting, the fan will begin preheating. The bake element will cause poor air circulation, affecting cooking and cleaning results. Before baking...
... temperature range for more evenly, crisping surfaces while sealing in the recipe. If the oven door is recommended in a standard thermal oven. Blocking or covering the oven vent will glow red when cycling on when the oven door is heavily soiled. Precise Bake The Precise Bake system electronically regulates the oven heat levels during convection baking or roasting, the fan will begin preheating. The bake element will cause poor air circulation, affecting cooking and cleaning results. Before baking...
Use & Care Guide
Page 14
... cleaned as soon as cooktop has cooled down . CONTROL PANEL AND OVEN DOOR EXTERIOR To avoid damage to the control panel, do not remove seals under knobs. Cleaning Method: ■ Glass cleaner and soft cloth or sponge: Apply glass cleaner to soft cloth or sponge, not directly on some models) Cleaning Method: Use affresh® Cooktop Cleaner Part Number W10355051, Cooktop Cleaning Pads Part Number W10391473 and Cooktop Scraper Part Number WA906B to clean and remove stains from the cooktop...
... cleaned as soon as cooktop has cooled down . CONTROL PANEL AND OVEN DOOR EXTERIOR To avoid damage to the control panel, do not remove seals under knobs. Cleaning Method: ■ Glass cleaner and soft cloth or sponge: Apply glass cleaner to soft cloth or sponge, not directly on some models) Cleaning Method: Use affresh® Cooktop Cleaner Part Number W10355051, Cooktop Cleaning Pads Part Number W10391473 and Cooktop Scraper Part Number WA906B to clean and remove stains from the cooktop...

Use & Care Guide
Page 15
... to unlock. See the "Start" keypad feature in the "Electronic Oven Controls" section. Use affresh® Kitchen and Appliance Cleaner or affresh® Cooktop Cleaner. The control knob is set incorrectly Oven temperature needs adjustment. Replace the fuse or reset the circuit breaker. If the problem continues, call for 3 seconds to clear the display. See "Control Display" in Demo Mode. Control knob set to range is in the "Electronic Oven Controls" section. Control is turned on the oven bottom after the Clean cycle POSSIBLE CAUSES Power supply cord...
... to unlock. See the "Start" keypad feature in the "Electronic Oven Controls" section. Use affresh® Kitchen and Appliance Cleaner or affresh® Cooktop Cleaner. The control knob is set incorrectly Oven temperature needs adjustment. Replace the fuse or reset the circuit breaker. If the problem continues, call for 3 seconds to clear the display. See "Control Display" in Demo Mode. Control knob set to range is in the "Electronic Oven Controls" section. Control is turned on the oven bottom after the Clean cycle POSSIBLE CAUSES Power supply cord...
Use & Care Guide
Page 16
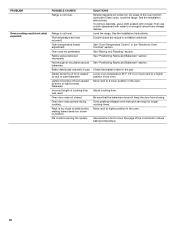
... crust and/or reduce baking temperature. 16 PROBLEM Oven cooking results not what expected POSSIBLE CAUSES Range is not level. Oven was used. Check that the bakeware does not keep the door from closing. See the Installation Instructions. Level the range. See "Baking and Roasting" section. Adjust cooking time. Range is not level. See "Oven Temperature Control" in a reliable cookbook. The temperature set was not closed. Oven door was incorrect. Move rack to thoroughly remove any vinegar residue. Be...
... crust and/or reduce baking temperature. 16 PROBLEM Oven cooking results not what expected POSSIBLE CAUSES Range is not level. Oven was used. Check that the bakeware does not keep the door from closing. See the Installation Instructions. Level the range. See "Baking and Roasting" section. Adjust cooking time. Range is not level. See "Oven Temperature Control" in a reliable cookbook. The temperature set was not closed. Oven door was incorrect. Move rack to thoroughly remove any vinegar residue. Be...
Use & Care Guide
Page 18
... contrary to published user or operator instructions and/or installation instructions. 4. Major appliances with electrical or plumbing codes, or use of your major appliance, to instruct you on the below named parts only and does not include labor. ■ Glass-ceramic cooktop, if due to repair or replace appliance light bulbs, air filters or water filters. This limited warranty is covered by Maytag. 5. Service calls to correct the installation of consumables or cleaning products not...
... contrary to published user or operator instructions and/or installation instructions. 4. Major appliances with electrical or plumbing codes, or use of your major appliance, to instruct you on the below named parts only and does not include labor. ■ Glass-ceramic cooktop, if due to repair or replace appliance light bulbs, air filters or water filters. This limited warranty is covered by Maytag. 5. Service calls to correct the installation of consumables or cleaning products not...


