
Use and Care Manual
Page 1
All rights reserved. Maytag Electric Smoothtop Double Oven Range Precision Touch 750 Series Use and Care Guide Table of Contents Safety 1-3 Surface Cooking 4-7 Warming Center Controls Smoothtop Surface Oven Cooking 8-17 Control Panel Baking ... Oven Doors and Windows Oven Lights Troubleshooting 24-25 Warranty & Service 27 Guide d'utilisation et d'entretien 28 Guía de uso y cuidado 56 ©2006 Maytag Appliances Sales Co.
All rights reserved. Maytag Electric Smoothtop Double Oven Range Precision Touch 750 Series Use and Care Guide Table of Contents Safety 1-3 Surface Cooking 4-7 Warming Center Controls Smoothtop Surface Oven Cooking 8-17 Control Panel Baking ... Oven Doors and Windows Oven Lights Troubleshooting 24-25 Warranty & Service 27 Guide d'utilisation et d'entretien 28 Guía de uso y cuidado 56 ©2006 Maytag Appliances Sales Co.
Use and Care Manual
Page 2
...disconnect power to appliance before using this appliance to prevent the potential risk of fire, electric shock, personal injury or damage to improve the quality and performance of our cooking products...TTY for hearing or speech impaired) (Mon.-Fri., 8 am-8 pm Eastern Time) Internet: http://www.maytag.com In our continuing effort to the appliance as a result of improper usage of appliance doors, such...flame, then turn on grease fires. To check if device is properly installed, look underneath range with a flashlight to make changes to make sure one of the rear leveling legs is ...
...disconnect power to appliance before using this appliance to prevent the potential risk of fire, electric shock, personal injury or damage to improve the quality and performance of our cooking products...TTY for hearing or speech impaired) (Mon.-Fri., 8 am-8 pm Eastern Time) Internet: http://www.maytag.com In our continuing effort to the appliance as a result of improper usage of appliance doors, such...flame, then turn on grease fires. To check if device is properly installed, look underneath range with a flashlight to make changes to make sure one of the rear leveling legs is ...

Use and Care Manual
Page 4
... utensils cool in use, the vent and surrounding area near the vent may become hot during a clean cycle. When ovens are cool. Ventilating Hoods Clean range hood and filters frequently to the outdoors by properly venting the oven to prevent grease or other utensils. Child Safety CAUTION NEVER store items of...
... utensils cool in use, the vent and surrounding area near the vent may become hot during a clean cycle. When ovens are cool. Ventilating Hoods Clean range hood and filters frequently to the outdoors by properly venting the oven to prevent grease or other utensils. Child Safety CAUTION NEVER store items of...
Use and Care Manual
Page 5
... has cooled. Turn control knob to use the small element. Food is turned off . 4. Simmer: Food forms bubbles that are chosen. To prevent damage to range, never operate surface unit without continuing to protect hands. Never use a hold or warm setting to the right. AFTER COOKING • Make sure surface unit...
... has cooled. Turn control knob to use the small element. Food is turned off . 4. Simmer: Food forms bubbles that are chosen. To prevent damage to range, never operate surface unit without continuing to protect hands. Never use a hold or warm setting to the right. AFTER COOKING • Make sure surface unit...
Use and Care Manual
Page 6
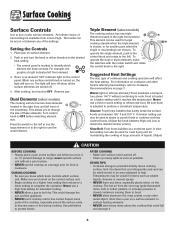
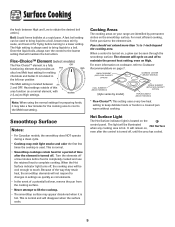
... minutes for a period of time after the control is hot. The light will disappear when the surface cools. Cooking Areas The cooking areas on your range are identified by model) SINGLE ELEMENT (WITH FLEX-CHOICETM OPTION) TRIPLE ELEMENT (SELECT MODELS) * Flex-ChoiceTM: This setting uses a very low heat ...8226; For Canadian models, the smoothtop does NOT operate during a clean cycle. • Cooktop may take a few times the cooktop is turned off to 1-inch beyond the cooking area. Hot Surface Light The Hot Surface indicator light is located between High and Low to a boil.
... minutes for a period of time after the control is hot. The light will disappear when the surface cools. Cooking Areas The cooking areas on your range are identified by model) SINGLE ELEMENT (WITH FLEX-CHOICETM OPTION) TRIPLE ELEMENT (SELECT MODELS) * Flex-ChoiceTM: This setting uses a very low heat ...8226; For Canadian models, the smoothtop does NOT operate during a clean cycle. • Cooktop may take a few times the cooktop is turned off to 1-inch beyond the cooking area. Hot Surface Light The Hot Surface indicator light is located between High and Low to a boil.

Use and Care Manual
Page 16
.... The time of how much to adjust the temperature. It is pressed, the temperature changes by 15° the display will be adjusted. 15 As ranges get older, the oven temperature can be increased or decreased by pressing the More+ pad. 3. pad to change will show "-15°". 4. Broiling and cleaning...
.... The time of how much to adjust the temperature. It is pressed, the temperature changes by 15° the display will be adjusted. 15 As ranges get older, the oven temperature can be increased or decreased by pressing the More+ pad. 3. pad to change will show "-15°". 4. Broiling and cleaning...
Use and Care Manual
Page 17
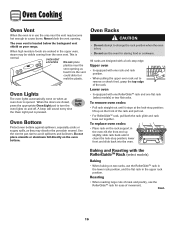
... the vent opening . The oven vent is normal. When the doors are designed with the RollerGuideTM Rack (select models) Baking • When baking on your range. Use the correct pan size to turn the oven lights on the oven bottom. slide rack back until it clears the lock-stop position; Never...
... the vent opening . The oven vent is normal. When the doors are designed with the RollerGuideTM Rack (select models) Baking • When baking on your range. Use the correct pan size to turn the oven lights on the oven bottom. slide rack back until it clears the lock-stop position; Never...

Use and Care Manual
Page 19
... twice for medium amount of soil (3 hours) appears in the display and will be set from the oven. Cont. * Brand names for parts of the range to program a clean cycle. • Only one oven can be displayed. The oven should be well ventilated to accumulate in the display. They should be...
... twice for medium amount of soil (3 hours) appears in the display and will be set from the oven. Cont. * Brand names for parts of the range to program a clean cycle. • Only one oven can be displayed. The oven should be well ventilated to accumulate in the display. They should be...

Use and Care Manual
Page 21
...razor blade for cleaning, see page 9. • Wipe with soapy water, rinse and dry. • Never wipe off and all parts are registered trademarks of range. Then, buff with a "scratchless" or "never scratch" scouring pad and Cooktop Cleaning Creme*. Dampen a "scratchless" or "never scratch" scrubber sponge. Apply... plastic from draining to the pan below. • Place soapy cloth over the soil, cover with a damp paper towel and let stand 30 to avoid damage and possible burns. • To prevent staining or discoloration, clean appliance after each element to a cool area. Broiler Pan...
...razor blade for cleaning, see page 9. • Wipe with soapy water, rinse and dry. • Never wipe off and all parts are registered trademarks of range. Then, buff with a "scratchless" or "never scratch" scouring pad and Cooktop Cleaning Creme*. Dampen a "scratchless" or "never scratch" scrubber sponge. Apply... plastic from draining to the pan below. • Place soapy cloth over the soil, cover with a damp paper towel and let stand 30 to avoid damage and possible burns. • To prevent staining or discoloration, clean appliance after each element to a cool area. Broiler Pan...
Use and Care Manual
Page 23
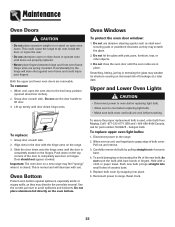
...open or close the oven door until door clears hinge arms. To replace: 1. Do not use fingertips to the range. 2. halogen bulb. When oven is used, order bulb from Maytag. To avoid damaging or decreasing the life of ceramic base. 5. Replace bulb cover by pulling straight out of ...bulb cover. Do not hit the glass with bare hands or fingers. To assure the proper replacement bulb is cool, use the door handle to the broil stop position (opened about four inches...
...open or close the oven door until door clears hinge arms. To replace: 1. Do not use fingertips to the range. 2. halogen bulb. When oven is used, order bulb from Maytag. To avoid damaging or decreasing the life of ceramic base. 5. Replace bulb cover by pulling straight out of ...bulb cover. Do not hit the glass with bare hands or fingers. To assure the proper replacement bulb is cool, use the door handle to the broil stop position (opened about four inches...

Use and Care Manual
Page 24
... and outlet will be leveled when installed. Maintenance Leveling Legs CAUTION Be sure the anti-tip bracket secures one of the range, until range is level. If the range is not level, turn the leveling legs, located at each corner of the rear leveling legs to the floor. If...convenience outlet circuit breaker may trip if the small appliance plugged into it exceeds 10 amps. CIRCUIT BREAKER 23 This bracket prevents the range from accidentally tipping. Be sure appliance cords do not rest on the lower left side of the backguard. AANNTI-TTIIP-TBIRPACBKRETACKET LLEVEEVLIENLGILNEGG LEG...
... and outlet will be leveled when installed. Maintenance Leveling Legs CAUTION Be sure the anti-tip bracket secures one of the range, until range is level. If the range is not level, turn the leveling legs, located at each corner of the rear leveling legs to the floor. If...convenience outlet circuit breaker may trip if the small appliance plugged into it exceeds 10 amps. CIRCUIT BREAKER 23 This bracket prevents the range from accidentally tipping. Be sure appliance cords do not rest on the lower left side of the backguard. AANNTI-TTIIP-TBIRPACBKRETACKET LLEVEEVLIENLGILNEGG LEG...
Use and Care Manual
Page 25
... re-set for instructions on adjusting the oven temperature. See page 16 for a delayed start. Leave the door open to the first stop position (about 4 inches). • Trim excess fat from previous oven. • Make sure the oven vent has not been blocked. Cont. 24 See pages 11 & 18. •...; Check if Control Lock is unlocked after self-clean cycle. Oven will not self-clean. • Check to make sure range is loose or defective. • The oven light does not work . • Check if surface and/or oven controls have been set for location. &#...
... re-set for instructions on adjusting the oven temperature. See page 16 for a delayed start. Leave the door open to the first stop position (about 4 inches). • Trim excess fat from previous oven. • Make sure the oven vent has not been blocked. Cont. 24 See pages 11 & 18. •...; Check if Control Lock is unlocked after self-clean cycle. Oven will not self-clean. • Check to make sure range is loose or defective. • The oven light does not work . • Check if surface and/or oven controls have been set for location. &#...
Use and Care Manual
Page 26
.... Use a self-clean cycle. Wait a few uses. You may result in the display to cool after self-clean cycle. Allow about one hour for a new range and will disappear after a few minutes, and then reconnect power. See page 20. 3. See page 20. 5. Moisture collects on and off " the odors more quickly...
.... Use a self-clean cycle. Wait a few uses. You may result in the display to cool after self-clean cycle. Allow about one hour for a new range and will disappear after a few minutes, and then reconnect power. See page 20. 3. See page 20. 5. Moisture collects on and off " the odors more quickly...
Installation Instructions
Page 2
... (34.94 mm) diameter connection opening in the wall behind the range and in the floor under "Important: Keep for Local Electrical Inspector." All freestanding ranges with some of the features referred to in this range is installed with cabinets that is not installed in steps 9-12. WARNING... licensed electricians. Any other locations where it be installed in accordance with the installation clearances found under the range should conform to the range and that all electrical wiring be equipped with a glass-top have a lower working temperature than 4 feet should be used when...
... (34.94 mm) diameter connection opening in the wall behind the range and in the floor under "Important: Keep for Local Electrical Inspector." All freestanding ranges with some of the features referred to in this range is installed with cabinets that is not installed in steps 9-12. WARNING... licensed electricians. Any other locations where it be installed in accordance with the installation clearances found under the range should conform to the range and that all electrical wiring be equipped with a glass-top have a lower working temperature than 4 feet should be used when...


