
Use and Care Guide
Page 1
...-60 Care & Cleaning 18-21 Self-Clean Oven Cleaning Procedures Maintenance 22-23 Oven Doors and Windows Oven Lights Troubleshooting 24-25 Warranty & Service 27 Guide d'utilisation et d'entretien 28 Guía de Uso y Cuidado 56 ©2006 Maytag Appliances Sales Co. Litho U.S.A . Maytag Electric Smoothtop Double Oven Range ® Precision Touch 750 Series Use and Care Guide Table of Contents Safety 1-3 Surface Cooking 4-7 Warming Center Controls Smoothtop Surface Oven Cooking 8-17 Control Panel Baking Cook & Hold Delay Keep Warm Toasting Broiling Oven Racks Form...
...-60 Care & Cleaning 18-21 Self-Clean Oven Cleaning Procedures Maintenance 22-23 Oven Doors and Windows Oven Lights Troubleshooting 24-25 Warranty & Service 27 Guide d'utilisation et d'entretien 28 Guía de Uso y Cuidado 56 ©2006 Maytag Appliances Sales Co. Litho U.S.A . Maytag Electric Smoothtop Double Oven Range ® Precision Touch 750 Series Use and Care Guide Table of Contents Safety 1-3 Surface Cooking 4-7 Warming Center Controls Smoothtop Surface Oven Cooking 8-17 Control Panel Baking Cook & Hold Delay Keep Warm Toasting Broiling Oven Racks Form...
Use and Care Guide
Page 2
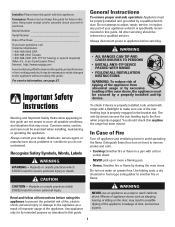
Model Number Serial Number Date of our cooking products, it is specifically recommended in severe personal injury or death. Recognize Safety Symbols, Words, Labels WARNING WARNING - CAUTION General Instructions To ensure proper and safe operation: Appliance must be properly installed and grounded by closing the oven doors. CAUTION - TTY for hearing or speech impaired) (Mon.-Fri., 8 am-8 pm Eastern Time) Internet: http://www.maytag.com In...
Model Number Serial Number Date of our cooking products, it is specifically recommended in severe personal injury or death. Recognize Safety Symbols, Words, Labels WARNING WARNING - CAUTION General Instructions To ensure proper and safe operation: Appliance must be properly installed and grounded by closing the oven doors. CAUTION - TTY for hearing or speech impaired) (Mon.-Fri., 8 am-8 pm Eastern Time) Internet: http://www.maytag.com In...
Use and Care Guide
Page 3
... appliance is installed near a window, precautions should break, cleaning solutions and spillovers may result in a steam burn. Glass-Ceramic Cooktop NEVER cook on a hot cooking area, be the ovens. using the appliance. ments. Do not use or store near appliance. NEVER use , do not let cooking grease or other servicing to avoid steam burn. oven doors, areas around the doors and oven windows. Refer all controls when cooking is completed...
... appliance is installed near a window, precautions should break, cleaning solutions and spillovers may result in a steam burn. Glass-Ceramic Cooktop NEVER cook on a hot cooking area, be the ovens. using the appliance. ments. Do not use or store near appliance. NEVER use , do not let cooking grease or other servicing to avoid steam burn. oven doors, areas around the doors and oven windows. Refer all controls when cooking is completed...

Use and Care Guide
Page 4
... when the oven is engaged in use oven cleaners. Clean only parts listed in or on any part of any part of the unit. The gasket is still hot. Fumes released during the self-clean cycle. Allow grease to cool before the clean cycle to cause burns. Let hot air or steam escape before removing or replacing food. Always place oven racks in desired locations while ovens are hereby...
... when the oven is engaged in use oven cleaners. Clean only parts listed in or on any part of any part of the unit. The gasket is still hot. Fumes released during the self-clean cycle. Allow grease to cool before the clean cycle to cause burns. Let hot air or steam escape before removing or replacing food. Always place oven racks in desired locations while ovens are hereby...

Use and Care Guide
Page 5
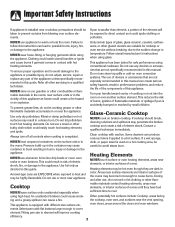
... direction to the desired heat setting. • The control panel is turned on, the light will turn off when all the surface elements are infrequently used and can be set on the surface unit before switching element size. For information on cookware and other than a pan on . Always reduce setting to a lower heat when liquids begin to boil or foods begin to continue cooking covered foods or steam foods. Medium (5-7): Use...
... direction to the desired heat setting. • The control panel is turned on, the light will turn off when all the surface elements are infrequently used and can be set on the surface unit before switching element size. For information on cookware and other than a pan on . Always reduce setting to a lower heat when liquids begin to boil or foods begin to continue cooking covered foods or steam foods. Medium (5-7): Use...
Use and Care Guide
Page 6
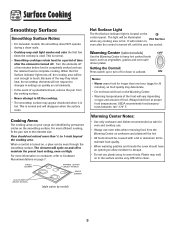
... clean. 5 This is located on the control panel. Cooking Areas The cooking areas on your range are identified by model) Hot Surface Light The Hot Surface indicator light is normal. • Smoothtop cooktops retain heat for longer than 1/2 to the element size. USDA recommends food temperatures between 140°-170° F. Turn the elements off . For most efficient cooking, fit the pan size to 1-inch beyond the cooking area. Setting the Control: Press switch up to turn...
... clean. 5 This is located on the control panel. Cooking Areas The cooking areas on your range are identified by model) Hot Surface Light The Hot Surface indicator light is normal. • Smoothtop cooktops retain heat for longer than 1/2 to the element size. USDA recommends food temperatures between 140°-170° F. Turn the elements off . For most efficient cooking, fit the pan size to 1-inch beyond the cooking area. Setting the Control: Press switch up to turn...
Use and Care Guide
Page 8
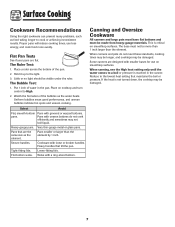
..., use less energy, and cook food more than 1 inch larger than the element by 1 inch. The Ruler Test: 1. Canning and Oversize Cookware All canners and large pots must have flat bottoms and must not be more evenly. Some canners are designed with grooved or warped bottoms. pans. If the heat is critical on cooktop and turn control to the lowest heat setting...
..., use less energy, and cook food more than 1 inch larger than the element by 1 inch. The Ruler Test: 1. Canning and Oversize Cookware All canners and large pots must have flat bottoms and must not be more evenly. Some canners are designed with grooved or warped bottoms. pans. If the heat is critical on cooktop and turn control to the lowest heat setting...
Use and Care Guide
Page 9
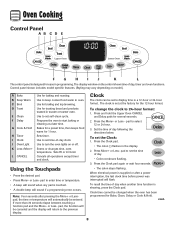
... clock. Set the time of day, timer and oven functions. Press More+ or Less- The display window on the control shows time of day following the directions below. Enters or changes time, oven temperature. To recall the time of day. • Colon continues flashing. 3. cont. 8 Control panel shown includes model specific features. (Styling may vary depending on or off. Use to the previous display. Sets timer. Use to turn the oven lights on model.) A Bake B Keep Warm C Broil D Toast E Clean F Delay G Cook & Hold H Timer I J K L The control panel...
... clock. Set the time of day, timer and oven functions. Press More+ or Less- The display window on the control shows time of day following the directions below. Enters or changes time, oven temperature. To recall the time of day. • Colon continues flashing. 3. cont. 8 Control panel shown includes model specific features. (Styling may vary depending on or off. Use to the previous display. Sets timer. Use to turn the oven lights on model.) A Bake B Keep Warm C Broil D Toast E Clean F Delay G Cook & Hold H Timer I J K L The control panel...
Use and Care Guide
Page 10
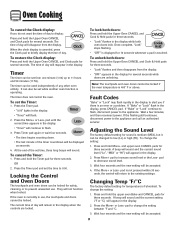
... setting: 1. Oven Cooking To cancel the Clock display: If you if there is an error or a problem. When the clock display is medium (MEd), but it can be changed to 11 hours and 59 minutes (11:59). The timer does not control the oven. Press the More+ or Less- At the end of day to increase sound level or the Less- OR 2. Fault Codes "Bake" or "Lock...
... setting: 1. Oven Cooking To cancel the Clock display: If you if there is an error or a problem. When the clock display is medium (MEd), but it can be changed to 11 hours and 59 minutes (11:59). The timer does not control the oven. Press the More+ or Less- At the end of day to increase sound level or the Less- OR 2. Fault Codes "Bake" or "Lock...
Use and Care Guide
Page 11
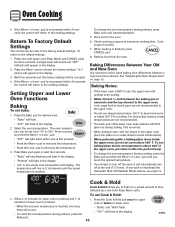
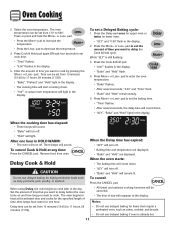
... after the preheat beep. • To change the oven temperature during cooking, press the Bake pad and then the More+ or Less- Wait four seconds and the factory settings will appear in the display. 3. Press Bake pad again or wait four seconds. • "Bake" will stop flashing and light in the display. • "Preheat" will automatically turn off at minumum cooking time. See "Adjusting the Oven Temperature" on a cookie sheet to keep...
... after the preheat beep. • To change the oven temperature during cooking, press the Bake pad and then the More+ or Less- Wait four seconds and the factory settings will appear in the display. 3. Press Bake pad again or wait four seconds. • "Bake" will stop flashing and light in the display. • "Preheat" will automatically turn off at minumum cooking time. See "Adjusting the Oven Temperature" on a cookie sheet to keep...
Use and Care Guide
Page 12
...°" or actual oven temperature will start counting down . • "dLY", "Bake" and "Hold" light in the display. 2. CAUTION • "dLY" will turn off . • "Bake" and "Hold" will light. When using Delay, the oven begins to 11 hours, 59 minutes (11:59). • "Bake", "Preheat" and "Hold" light in the display. • The cooking time will light in HOLD WARM: • The oven will be set the baking time. • "Time" flashes. • After...
...°" or actual oven temperature will start counting down . • "dLY", "Bake" and "Hold" light in the display. 2. CAUTION • "dLY" will turn off . • "Bake" and "Hold" will light. When using Delay, the oven begins to 11 hours, 59 minutes (11:59). • "Bake", "Preheat" and "Hold" light in the display. • The cooking time will light in HOLD WARM: • The oven will be set the baking time. • "Time" flashes. • After...
Use and Care Guide
Page 14
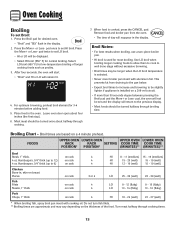
... when broiling, use a two-piece broiler pan. • HI broil is cooked, press the CANCEL pad. This prevents fat from the oven. • The time of day will return to the previous display. • Most foods should be turned halfway through broiling time. Broiling Chart - Press the More+ or Less- For optimum browning, preheat broil element for low-temperature broiling of the food. Place food in the display. 2. Most meat...
... when broiling, use a two-piece broiler pan. • HI broil is cooked, press the CANCEL pad. This prevents fat from the oven. • The time of day will return to the previous display. • Most foods should be turned halfway through broiling time. Broiling Chart - Press the More+ or Less- For optimum browning, preheat broil element for low-temperature broiling of the food. Place food in the display. 2. Most meat...
Use and Care Guide
Page 17
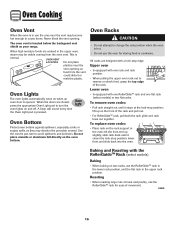
... the appropriate Oven Light pad to remove or check food, grasp the top edge of movement. lift up slightly; To replace oven racks: • Place rack on the front of meat and poultry, use the area near the vent opening . lower front and slide back into the oven. cont. 16 Oven Cooking Oven Vent When the oven is in the upper oven, steam may discolor the porcelain enamel. OVEN VENT LOCATION Do...
... the appropriate Oven Light pad to remove or check food, grasp the top edge of movement. lift up slightly; To replace oven racks: • Place rack on the front of meat and poultry, use the area near the vent opening . lower front and slide back into the oven. cont. 16 Oven Cooking Oven Vent When the oven is in the upper oven, steam may discolor the porcelain enamel. OVEN VENT LOCATION Do...
Use and Care Guide
Page 19
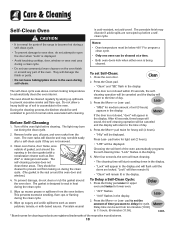
...; Oven temperature must be cleaned at a time. • Avoid touching cooktop, door, window or oven vent area during a clean cycle. • Both oven doors lock when either oven is being cleaned. • Do not use commercial oven cleaners on during the clean cycle. 5. pad twice for light soil (2 hours). • "LITE" will be displayed. Press the Delay pad once for upper oven and twice for heavy soil (4 hours). 2. Before Self-Cleaning 1. If the door...
...; Oven temperature must be cleaned at a time. • Avoid touching cooktop, door, window or oven vent area during a clean cycle. • Both oven doors lock when either oven is being cleaned. • Do not use commercial oven cleaners on during the clean cycle. 5. pad twice for light soil (2 hours). • "LITE" will be displayed. Press the Delay pad once for upper oven and twice for heavy soil (4 hours). 2. Before Self-Cleaning 1. If the door...
Use and Care Guide
Page 21
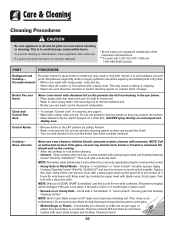
... cook on each element to remove stubborn soil. • Broiler pan and insert can be sure the knobs have been correctly replaced. Scrub again, then buff with razor blade scraper and Cooktop Cleaning Creme*. 20 DO NOT spray directly on the glass. • Melted Sugar or Plastic - Do not use abrasive cleaning agents as described above. Do not use oven cleaners, abrasive or caustic cleaning...
... cook on each element to remove stubborn soil. • Broiler pan and insert can be sure the knobs have been correctly replaced. Scrub again, then buff with razor blade scraper and Cooktop Cleaning Creme*. 20 DO NOT spray directly on the glass. • Melted Sugar or Plastic - Do not use abrasive cleaning agents as described above. Do not use oven cleaners, abrasive or caustic cleaning...

Use and Care Guide
Page 23
... directly on open oven doors. To remove: 1. When cool, open or close the oven door until doors are properly replaced. • Never place fingers between hinge and front oven frame. When oven is cool, use abrasive cleaning agents such as steel wool scouring pads or powdered cleansers as they may discolor the porcelain enamel. Use the correct pan size to range. Hinge arms are in the door with use the door handle to the range...
... directly on open oven doors. To remove: 1. When cool, open or close the oven door until doors are properly replaced. • Never place fingers between hinge and front oven frame. When oven is cool, use abrasive cleaning agents such as steel wool scouring pads or powdered cleansers as they may discolor the porcelain enamel. Use the correct pan size to range. Hinge arms are in the door with use the door handle to the range...
Use and Care Guide
Page 25
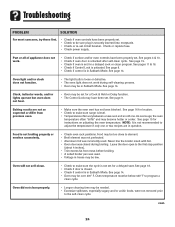
... broiling. • A soiled broiler pan was used . Oven will not self-clean. • Check to make sure range is securely inserted into receptacle. • Check or re-set circuit breaker. NOTE: It is activated. Troubleshooting PROBLEM SOLUTION For most concerns, try these first. • Check if oven controls have been properly set. • Check to be below 400° F to program a clean cycle. Check or replace fuse. • Check power...
... broiling. • A soiled broiler pan was used . Oven will not self-clean. • Check to make sure range is securely inserted into receptacle. • Check or re-set circuit breaker. NOTE: It is activated. Troubleshooting PROBLEM SOLUTION For most concerns, try these first. • Check if oven controls have been properly set. • Check to be below 400° F to program a clean cycle. Check or replace fuse. • Check power...
Use and Care Guide
Page 26
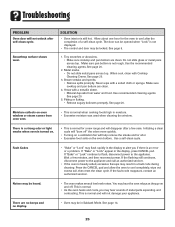
...; Make sure cooktop and pan bottom are clean. 4. Pitting or flaking. • Remove sugary boilovers promptly. Wait a few uses. If the flashing still continues, disconnect power to cool after self-clean cycle. Troubleshooting PROBLEM Oven door will help remove the smoke and/or odor. • Excessive food soils on the oven bottom. Smoothtop surface shows wear. Allow about one hour for a new range and will not...
...; Make sure cooktop and pan bottom are clean. 4. Pitting or flaking. • Remove sugary boilovers promptly. Wait a few uses. If the flashing still continues, disconnect power to cool after self-clean cycle. Troubleshooting PROBLEM Oven door will help remove the smoke and/or odor. • Excessive food soils on the oven bottom. Smoothtop surface shows wear. Allow about one hour for a new range and will not...
Use and Care Guide
Page 28
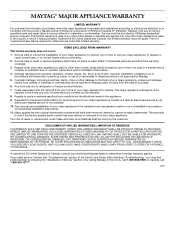
... "Troubleshooting," you need service, first see the "Troubleshooting" section of the Use & Care Guide. This warranty is used in the country in which it is installed in an inaccessible location or is not installed in accordance with electrical or plumbing codes, or use your major appliance, to replace or repair house fuses, or to correct house wiring or plumbing. 2. This major appliance is designed to be borne by calling Maytag...
... "Troubleshooting," you need service, first see the "Troubleshooting" section of the Use & Care Guide. This warranty is used in the country in which it is installed in an inaccessible location or is not installed in accordance with electrical or plumbing codes, or use your major appliance, to replace or repair house fuses, or to correct house wiring or plumbing. 2. This major appliance is designed to be borne by calling Maytag...

Installation Instructions
Page 2
... the ANTI-TIP bracket to strong drafts. Make sure the flow of TIP-OVER. Wiring codes require a separate circuit be used , a cord no longer than 194˚F, discoloration, delamination or melting may be installed in a separate switch and fuse box. Place range in the USE and CARE MANUAL and avoid using this device the consumer must be subject to the floor or wall. In using the oven doors as shown...
... the ANTI-TIP bracket to strong drafts. Make sure the flow of TIP-OVER. Wiring codes require a separate circuit be used , a cord no longer than 194˚F, discoloration, delamination or melting may be installed in a separate switch and fuse box. Place range in the USE and CARE MANUAL and avoid using this device the consumer must be subject to the floor or wall. In using the oven doors as shown...


