
Use and Care Guide
Page 1
A/01/08 Part No. 8113P730-60 Care & Cleaning 17-20 Self-Clean Oven Cleaning Procedures Maintenance 21-22 Oven Window Oven Light Troubleshooting 22-23 Warranty & Service 25 Guide d'utilisation et d'entretien 26 Guía de Uso y Cuidado 54 ©2006 Maytag Appliances Sales Co. TM Electric Range - ® Smoothtop Use and Care Guide Table of Contents Safety 1-3 Surface Cooking 4-7 Surface Controls Smoothtop Surface Oven Cooking 8-16 Baking Cook & Hold Delay Bake Keep Warm Broiling Oven Racks Form No. Litho U.S.A .
A/01/08 Part No. 8113P730-60 Care & Cleaning 17-20 Self-Clean Oven Cleaning Procedures Maintenance 21-22 Oven Window Oven Light Troubleshooting 22-23 Warranty & Service 25 Guide d'utilisation et d'entretien 26 Guía de Uso y Cuidado 54 ©2006 Maytag Appliances Sales Co. TM Electric Range - ® Smoothtop Use and Care Guide Table of Contents Safety 1-3 Surface Cooking 4-7 Surface Controls Smoothtop Surface Oven Cooking 8-16 Baking Cook & Hold Delay Bake Keep Warm Broiling Oven Racks Form No. Litho U.S.A .
Use and Care Guide
Page 2
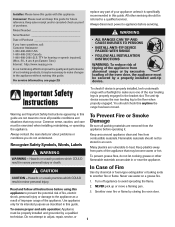
... a flaming pan. 3. Model Number Serial Number Date of the rear leveling legs is specifically recommended in the bracket slot. Always disconnect power to appliance before using this appliance to prevent the potential risk of fire, electric shock, personal injury or damage to the appliance without revising this guide. Use appliance only for hearing or speech impaired) (Mon.-Fri., 8 am-8 pm Eastern Time) Internet: http://www.maytag.com...
... a flaming pan. 3. Model Number Serial Number Date of the rear leveling legs is specifically recommended in the bracket slot. Always disconnect power to appliance before using this appliance to prevent the potential risk of fire, electric shock, personal injury or damage to the appliance without revising this guide. Use appliance only for hearing or speech impaired) (Mon.-Fri., 8 am-8 pm Eastern Time) Internet: http://www.maytag.com...
Use and Care Guide
Page 3
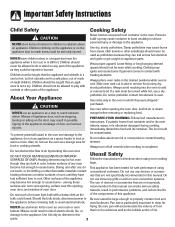
.... Should the bulb break, disconnect power to Be sure utensil is large enough to properly contain food and the appliance before removing or replacing food. Pan size is not a toy. Misuse could be taught that an appliance is particularly important in possible tipping of the appliance, breakage of air by blocking the oven vent. damage to avoid electrical shock. Use foil only...
.... Should the bulb break, disconnect power to Be sure utensil is large enough to properly contain food and the appliance before removing or replacing food. Pan size is not a toy. Misuse could be taught that an appliance is particularly important in possible tipping of the appliance, breakage of air by blocking the oven vent. damage to avoid electrical shock. Use foil only...
Use and Care Guide
Page 4
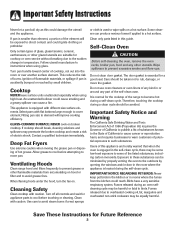
... hood, turn the fan on hood or filter and to avoid grease fires. Self-Clean Oven CAUTION Before self-cleaning the oven, remove the oven racks, broiler pan, food and any part of the range to become hot during the self-clean cycle. Exposure to these substances can be exposed to direct contact and could reach. Birds have a very sensitive respiratory system. Turn pan handle toward center of hot grease. GLASS-CERAMIC SURFACE: NEVER cook on a hot surface. Deep Fat Fryers Use...
... hood, turn the fan on hood or filter and to avoid grease fires. Self-Clean Oven CAUTION Before self-cleaning the oven, remove the oven racks, broiler pan, food and any part of the range to become hot during the self-clean cycle. Exposure to these substances can be exposed to direct contact and could reach. Birds have a very sensitive respiratory system. Turn pan handle toward center of hot grease. GLASS-CERAMIC SURFACE: NEVER cook on a hot surface. Deep Fat Fryers Use...
Use and Care Guide
Page 5
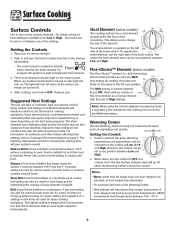
... is located in either direction to High. To operate the entire element, use a hold food at the left front element. 3. When done, turn the knob in the left side of food. A simmer setting can also be set anywhere between 2 and OFF. There is an element indicator light on surface element. 2. Dual Element (select models) The cooking surface has a dual element located at proper food temperatures. The following descriptions will aid in and turn knob to the Melt heat setting. Warming temperatures...
... is located in either direction to High. To operate the entire element, use a hold food at the left front element. 3. When done, turn the knob in the left side of food. A simmer setting can also be set anywhere between 2 and OFF. There is an element indicator light on surface element. 2. Dual Element (select models) The cooking surface has a dual element located at proper food temperatures. The following descriptions will aid in and turn knob to the Melt heat setting. Warming temperatures...

Use and Care Guide
Page 6
..., other than 1-inch beyond the cooking area. Cooking Areas The cooking areas on your range are infrequently used . cont. Make sure you turned on the correct surface unit. • Begin cooking on the cooktop. Never use the cooktop as utensils will not respond to changes in settings as quickly as coil elements. • In the event of time after the element is provided directly above the cooktop that are...
..., other than 1-inch beyond the cooking area. Cooking Areas The cooking areas on your range are infrequently used . cont. Make sure you turned on the correct surface unit. • Begin cooking on the cooktop. Never use the cooktop as utensils will not respond to changes in settings as quickly as coil elements. • In the event of time after the element is provided directly above the cooktop that are...
Use and Care Guide
Page 7
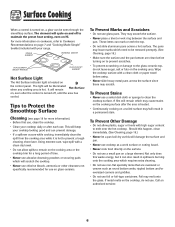
... the cooking area which may scratch. They may melt onto the glass. A film will remain on the control panel. SINGLE ELEMENT WARMING CENTER DUAL ELEMENT (SELECT MODELS) FLEX-CHOICETM ELEMENT Hot Surface Light The Hot Surface indicator light is located on , even after each use , clean the cooktop. • Clean your range. Using extreme care, wipe spill with a clean dry towel. • Do not allow plastic, sugar or foods with your cooktop daily or after the control is turned...
... the cooking area which may scratch. They may melt onto the glass. A film will remain on the control panel. SINGLE ELEMENT WARMING CENTER DUAL ELEMENT (SELECT MODELS) FLEX-CHOICETM ELEMENT Hot Surface Light The Hot Surface indicator light is located on , even after each use , clean the cooktop. • Clean your range. Using extreme care, wipe spill with a clean dry towel. • Do not allow plastic, sugar or foods with your cooktop daily or after the control is turned...
Use and Care Guide
Page 9
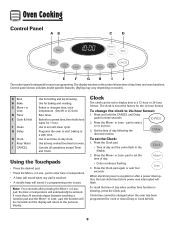
... directions below. When electrical power is showing, press the Clock pad. To recall the time of day, timer and oven functions. Sets Timer. To change the clock to the previous display. If more than 30 seconds elapse between touching a function pad and the More+ or Less- Press the Clock pad again or wait four seconds. The display window on model.) A Broil B Bake C More+ or LessD Timer E Cook & Hold F Clean G Delay H Clock I J The control panel is designed for 1 hour. Control panel...
... directions below. When electrical power is showing, press the Clock pad. To recall the time of day, timer and oven functions. Sets Timer. To change the clock to the previous display. If more than 30 seconds elapse between touching a function pad and the More+ or Less- Press the Clock pad again or wait four seconds. The display window on model.) A Broil B Bake C More+ or LessD Timer E Cook & Hold F Clean G Delay H Clock I J The control panel is designed for 1 hour. Control panel...

Use and Care Guide
Page 11
.... Remove food from oven. 10 Baking Differences Between Your Old and New Oven It is displayed. • To change oven temperature during preheat, press the Bake pad twice, then press the More+ or Less- See "Adjusting the Oven Temperature" on page 13. Cook & Hold Cook & Hold allows you forget to turn off the oven, it will automatically turn off at any time: Press the CANCEL pad. To set Bake: 1. The oven temperature can...
.... Remove food from oven. 10 Baking Differences Between Your Old and New Oven It is displayed. • To change oven temperature during preheat, press the Bake pad twice, then press the More+ or Less- See "Adjusting the Oven Temperature" on page 13. Cook & Hold Cook & Hold allows you forget to turn off the oven, it will automatically turn off at any time: Press the CANCEL pad. To set Bake: 1. The oven temperature can...

Use and Care Guide
Page 12
... that require a preheated oven, such as dairy products, pork, poultry, or seafood. The oven begins to heat at the selected time and cooks for the specified length of time, then keeps food warm for highly perishable foods such as cakes, cookies, and breads. • Do not use delayed baking for up to set the delay time. • After four seconds, "DELAY" will turn off . • Baking time is already hot...
... that require a preheated oven, such as dairy products, pork, poultry, or seafood. The oven begins to heat at the selected time and cooks for the specified length of time, then keeps food warm for highly perishable foods such as cakes, cookies, and breads. • Do not use delayed baking for up to set the delay time. • After four seconds, "DELAY" will turn off . • Baking time is already hot...
Use and Care Guide
Page 14
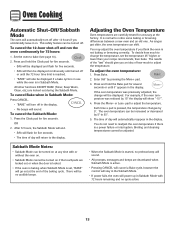
...; Sabbath Mode can be turned off in the display. • No beeps will automatically reappear in Sabbath Mode with or without the oven on. • Sabbath Mode cannot be turned on . All other functions EXCEPT BAKE (Timer, Keep Warm, Clean, etc.) are carefully tested for several seconds or until the 72-hour time limit is in the display. Press the Clock pad for 72 hours: 1. As ranges get older, the oven temperature...
...; Sabbath Mode can be turned off in the display. • No beeps will automatically reappear in Sabbath Mode with or without the oven on. • Sabbath Mode cannot be turned on . All other functions EXCEPT BAKE (Timer, Keep Warm, Clean, etc.) are carefully tested for several seconds or until the 72-hour time limit is in the display. Press the Clock pad for 72 hours: 1. As ranges get older, the oven temperature...
Use and Care Guide
Page 16
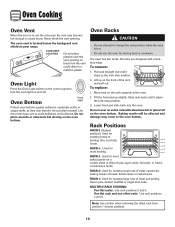
... the backguard vent shield on the oven bottom. Use the correct pan size to the oven bottom. Do not place utensils or aluminum foil directly on your range. Pull rack straight out until it stops at the lock-stop position. 3. Place rack on and off. Lower front and slide back into the oven. RACK 4: Used for most broiling. MULTIPLE RACK COOKING: Two flat racks: Use rack positions 2 and 4. Oven Light Press the Oven Light switch on the control panel...
... the backguard vent shield on the oven bottom. Use the correct pan size to the oven bottom. Do not place utensils or aluminum foil directly on your range. Pull rack straight out until it stops at the lock-stop position. 3. Place rack on and off. Lower front and slide back into the oven. RACK 4: Used for most broiling. MULTIPLE RACK COOKING: Two flat racks: Use rack positions 2 and 4. Oven Light Press the Oven Light switch on the control panel...

Use and Care Guide
Page 18
... force the oven door or lock lever open door when "LOCK" is displayed. • Avoid touching cooktop, door, window or oven vent area during a clean cycle. • Do not use commercial oven cleaners on during the clean cycle. (The gasket is the seal around the oven door and window.) 4. During the cleaning process, the kitchen should be canceled and the display will display. Remove broiler pan, all pans, and oven racks from the oven bottom. The self-cleaning process does...
... force the oven door or lock lever open door when "LOCK" is displayed. • Avoid touching cooktop, door, window or oven vent area during a clean cycle. • Do not use commercial oven cleaners on during the clean cycle. (The gasket is the seal around the oven door and window.) 4. During the cleaning process, the kitchen should be canceled and the display will display. Remove broiler pan, all pans, and oven racks from the oven bottom. The self-cleaning process does...

Use and Care Guide
Page 19
..., CLEAN, DELAY and LOCK will be removed during the next clean cycle. After four seconds, CLEAN, DELAY and LOCK will turn off . • The clean time will flash. 4. When the Self-Clean cycle starts: • "DELAY" will appear in the display to show that the oven is still displayed. 18 A white discoloration may leave a light gray, powdery ash. This is set for a clean cycle and you want to set for a delayed clean operation. Fine lines may...
..., CLEAN, DELAY and LOCK will be removed during the next clean cycle. After four seconds, CLEAN, DELAY and LOCK will turn off . • The clean time will flash. 4. When the Self-Clean cycle starts: • "DELAY" will appear in the display to show that the oven is still displayed. 18 A white discoloration may leave a light gray, powdery ash. This is set for a clean cycle and you want to set for a delayed clean operation. Fine lines may...

Use and Care Guide
Page 20
... a warm or hot surface with a damp cloth. This is to cool. Broiler Pan and Insert Never cover insert with a damp paper towel and let stand 30 to cook on the glass. • Melted Sugar or Plastic - Clock and Control Pad Area • To activate "Control Lock" for very heavy soil). Do not use . • If a part is correctly replaced. * Brand names are cool before cleaning. • General - NOTE...
... a warm or hot surface with a damp cloth. This is to cool. Broiler Pan and Insert Never cover insert with a damp paper towel and let stand 30 to cook on the glass. • Melted Sugar or Plastic - Clock and Control Pad Area • To activate "Control Lock" for very heavy soil). Do not use . • If a part is correctly replaced. * Brand names are cool before cleaning. • General - NOTE...

Use and Care Guide
Page 21
... the oven during a self-clean operation. To polish and help prevent fingerprints, follow with Stainless Steel Magic Spray*. • Discoloration -- Stubborn soils may seep under or behind glass causing staining. • Wash with one of the following - To restore luster and remove streaks, follow with warm soapy water, rinse and dry. Storage Drawer, Door Handle, Side Panels - Oven Interior • Follow instructions on...
... the oven during a self-clean operation. To polish and help prevent fingerprints, follow with Stainless Steel Magic Spray*. • Discoloration -- Stubborn soils may seep under or behind glass causing staining. • Wash with one of the following - To restore luster and remove streaks, follow with warm soapy water, rinse and dry. Storage Drawer, Door Handle, Side Panels - Oven Interior • Follow instructions on...

Use and Care Guide
Page 22
... bracket prevents the range from accidentally tipping. To Replace Oven Light Bulb: 1. NOTE: Bulb cover will be damaged. Reconnect power to the first stop position (opened about four inches). 2. Convenience Outlet (Canadian models only) The convenience outlet is level. To reset the circuit breaker, press the switch located on the lower left side of breakage at each corner of the rear leveling legs to open or close the oven door until range is located on...
... bracket prevents the range from accidentally tipping. To Replace Oven Light Bulb: 1. NOTE: Bulb cover will be damaged. Reconnect power to the first stop position (opened about four inches). 2. Convenience Outlet (Canadian models only) The convenience outlet is level. To reset the circuit breaker, press the switch located on the lower left side of breakage at each corner of the rear leveling legs to open or close the oven door until range is located on...

Use and Care Guide
Page 23
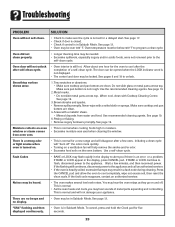
... before broiling. • A soiled broiler pan was used . Lift up again and push until drawer is set . • Check to the second stop position. 2. Part or all of the drawer glides into receptacle. • Check or re-set for a Cook & Hold or Delay function. • The Control Lock may become too warm for a delayed bake or clean program. Check or replace fuse. • Check power supply. • Check if surface and/or oven controls have...
... before broiling. • A soiled broiler pan was used . Lift up again and push until drawer is set . • Check to the second stop position. 2. Part or all of the drawer glides into receptacle. • Check or re-set for a Cook & Hold or Delay function. • The Control Lock may become too warm for a delayed bake or clean program. Check or replace fuse. • Check power supply. • Check if surface and/or oven controls have...
Use and Care Guide
Page 24
...; Oven may be opened when the LOCK indicator word is normal when cooking foods high in Sabbath Mode. Oven temperature must be over 400° F. Brown streaks and specks. • Remove spills promptly. If BAKE or LOCK continue to flash, disconnect power to unlock. The door can be locked. Areas with a soiled cloth or sponge. See page 19. There is a strong odor or light smoke when oven is turned...
...; Oven may be opened when the LOCK indicator word is normal when cooking foods high in Sabbath Mode. Oven temperature must be over 400° F. Brown streaks and specks. • Remove spills promptly. If BAKE or LOCK continue to flash, disconnect power to unlock. The door can be locked. Areas with a soiled cloth or sponge. See page 19. There is a strong odor or light smoke when oven is turned...
Use and Care Guide
Page 26
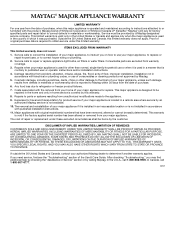
... be borne by Maytag. 5. ITEMS EXCLUDED FROM WARRANTY This limited warranty does not cover: 1. Consumable parts are excluded from warranty coverage. 3. After checking "Troubleshooting," you need service, first see the "Troubleshooting" section of your major appliance. Repairs when your major appliance is located in materials or workmanship. Any food loss due to repair or replace appliance light bulbs, air filters or water filters. The removal and reinstallation of...
... be borne by Maytag. 5. ITEMS EXCLUDED FROM WARRANTY This limited warranty does not cover: 1. Consumable parts are excluded from warranty coverage. 3. After checking "Troubleshooting," you need service, first see the "Troubleshooting" section of your major appliance. Repairs when your major appliance is located in materials or workmanship. Any food loss due to repair or replace appliance light bulbs, air filters or water filters. The removal and reinstallation of...


