
User Guide
Page 1
COraL& RADmANT ELECTRmC RANGE RS°I Form No. Page 17 IDEDEL'UTILISAT. Pflog1o_ DEUL SUAfl.l.O..... pogo_ rnaytag.corn 74005907 Litho U,S,A, Pogo1_1-14 _EORE YOUCAL.L....... Pogo6,-1o & CLEAHI.H...G. Pogo3s...havequestionsc, all: 1-800-688-990(0U,S,A,) 1-800-688-200(2Canada) 1-800-688-208(0U,S,TTYfor hearingor speechimpaired) (Mon,-Fri,,8 am-8pmEasternTime) Internet: http://www,maytag,com For service information, seepage 17'. Part No. 8113P359-60 _i_Z http://www, ............ A/12/01 ,,_FBY Pogo1s-3 installer: Pleaseleavethis manualwith this appliance, Consumer: ...
COraL& RADmANT ELECTRmC RANGE RS°I Form No. Page 17 IDEDEL'UTILISAT. Pflog1o_ DEUL SUAfl.l.O..... pogo_ rnaytag.corn 74005907 Litho U,S,A, Pogo1_1-14 _EORE YOUCAL.L....... Pogo6,-1o & CLEAHI.H...G. Pogo3s...havequestionsc, all: 1-800-688-990(0U,S,A,) 1-800-688-200(2Canada) 1-800-688-208(0U,S,TTYfor hearingor speechimpaired) (Mon,-Fri,,8 am-8pmEasternTime) Internet: http://www,maytag,com For service information, seepage 17'. Part No. 8113P359-60 _i_Z http://www, ............ A/12/01 ,,_FBY Pogo1s-3 installer: Pleaseleavethis manualwith this appliance, Consumer: ...

User Guide
Page 2
... do notadiust,service,repairor replaceany partof theapplianceunlessspecificallyrecommendedinthis guide.Referall otherservicing to the appliance. Hazardsor unsafepracticeswhich COULD resultin minorpersonaliniury, > ALL RANGES CAN TiP AND CAUSE iNJURiES TO PERSONS > iNSTALL ANTI_TIP DEVICE PACKED WITH RANGE > FOLLOW ALL iNSTALLATiON INSTRUCTIONS WARNINGtToreduce risk of tipping of the componentsof this appliance to the floor when properly engaged...
... do notadiust,service,repairor replaceany partof theapplianceunlessspecificallyrecommendedinthis guide.Referall otherservicing to the appliance. Hazardsor unsafepracticeswhich COULD resultin minorpersonaliniury, > ALL RANGES CAN TiP AND CAUSE iNJURiES TO PERSONS > iNSTALL ANTI_TIP DEVICE PACKED WITH RANGE > FOLLOW ALL iNSTALLATiON INSTRUCTIONS WARNINGtToreduce risk of tipping of the componentsof this appliance to the floor when properly engaged...
User Guide
Page 6
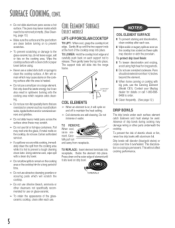
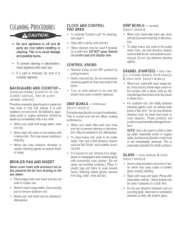
...alal nauthorizedment,Care- fully pull out Ifaspillovoecrcurwshilceookinigm,medi- Drip bowls will slide into the range Neveurseasoileddishclothorspongtoe frame, cleatnhecooktospurfacAe,filmwillre- Donout seabrasicvleeansipnogwdeorsr scourinpgadswhichwillscratcthhe cooktop, TERMINALS Donotusechlorinbeleacha,mmonoiar othecr leansenrsotspecificarlelycommendefodruseonglass... beyondthe element, | When homecanningor cookingwith big pots, use the Canning Element (Model CE1), Contact your Maytag dealer for details or call 1-800-6888408 to order, iT t Cleanfrequently, (Seepage 12,) iT DRIPBOWLS...
...alal nauthorizedment,Care- fully pull out Ifaspillovoecrcurwshilceookinigm,medi- Drip bowls will slide into the range Neveurseasoileddishclothorspongtoe frame, cleatnhecooktospurfacAe,filmwillre- Donout seabrasicvleeansipnogwdeorsr scourinpgadswhichwillscratcthhe cooktop, TERMINALS Donotusechlorinbeleacha,mmonoiar othecr leansenrsotspecificarlelycommendefodruseonglass... beyondthe element, | When homecanningor cookingwith big pots, use the Canning Element (Model CE1), Contact your Maytag dealer for details or call 1-800-6888408 to order, iT t Cleanfrequently, (Seepage 12,) iT DRIPBOWLS...
User Guide
Page 9
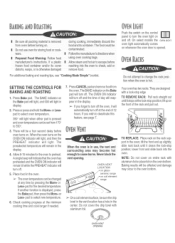
...the Bake pad will light,and 000 will be a four second delay before oventurns on, Whenthe oventurns on coil element range On acoil elementsudace,be affectedand damage may occur to 5500, 3. Allow8-15 minutesforthe ovento preheat, A singlebeepwillindicatethat theovenhas preheatedand ... 5. pad forthe desiredtemperature, If anotherfunction is pressed and oventemperaturecanbe set from 1700 to the oven bottom, OVEN VENT OPENING ceramic range on the 7. SETTINGTIE CONTROLSFOR BAKING AN[:)ROASTING 1. Pressor pressandholdtheMore+ or Lesspad to selectnew temperature, 6. DO not attempt ts ...
...the Bake pad will light,and 000 will be a four second delay before oventurns on, Whenthe oventurns on coil element range On acoil elementsudace,be affectedand damage may occur to 5500, 3. Allow8-15 minutesforthe ovento preheat, A singlebeepwillindicatethat theovenhas preheatedand ... 5. pad forthe desiredtemperature, If anotherfunction is pressed and oventemperaturecanbe set from 1700 to the oven bottom, OVEN VENT OPENING ceramic range on the 7. SETTINGTIE CONTROLSFOR BAKING AN[:)ROASTING 1. Pressor pressandholdtheMore+ or Lesspad to selectnew temperature, 6. DO not attempt ts ...
User Guide
Page 10
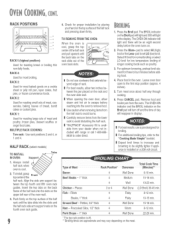
RACK 3: Used for proper installation by placing your dealer when not included with range or call 1-800-6888408 to order direct. 1. Check for most baked goods on a cookie sheet or icily roll pan, layer cakes, fruit pies, or frozen ...
RACK 3: Used for proper installation by placing your dealer when not included with range or call 1-800-6888408 to order direct. 1. Check for most baked goods on a cookie sheet or icily roll pan, layer cakes, fruit pies, or frozen ...
User Guide
Page 13
...prevent staining or discoloration. scratchor permanentlydamagethe surface. GLASS - or powdered cleanersas they may scratchthe finish. > Turn on exteriorfinish of range. This is to removestubborn soil. > Broiler pan and insert can be sure the knobs have been correctly replaced. Never use... > Wipe with a damp cloth and dry'. > Glass cleaners may causecrackingor chipping. May be used if sprayed on soil, removefrom range, placeon newspapersandcarefullyspray with misuse, it is normal and will scratch glass. These products wil! Glasscleanercan be washed in the dishwasher. > ...
...prevent staining or discoloration. scratchor permanentlydamagethe surface. GLASS - or powdered cleanersas they may scratchthe finish. > Turn on exteriorfinish of range. This is to removestubborn soil. > Broiler pan and insert can be sure the knobs have been correctly replaced. Never use... > Wipe with a damp cloth and dry'. > Glass cleaners may causecrackingor chipping. May be used if sprayed on soil, removefrom range, placeon newspapersandcarefullyspray with misuse, it is normal and will scratch glass. These products wil! Glasscleanercan be washed in the dishwasher. > ...

User Guide
Page 15
.... Lift up the front of thedoortocompletelyseatdooronhinges, Door shouldnot appearcrooked, NOTE: The oven door on the range, 3. The range should be removedto allow you to the first stop position, 4. Lift up evenlyuntildoorclearshingearms, Disconnect power ... RETAINER TO REPLACEOVEN LIGHTBULB: 1. Replacewith a 40 watt appliancebulb, 4. Emptydrawerand pulloutto thefirststop position, 2. Pull out to range before. Liftdrawerupagainand pushuntildrawer is cool beforetouch- If acddentaHyhit, the hinge Willslamshut againstovenframe and COUld!njureyourfingers, OVEN WINDOW (SELECTMODELS)...
.... Lift up the front of thedoortocompletelyseatdooronhinges, Door shouldnot appearcrooked, NOTE: The oven door on the range, 3. The range should be removedto allow you to the first stop position, 4. Lift up evenlyuntildoorclearshingearms, Disconnect power ... RETAINER TO REPLACEOVEN LIGHTBULB: 1. Replacewith a 40 watt appliancebulb, 4. Emptydrawerand pulloutto thefirststop position, 2. Pull out to range before. Liftdrawerupagainand pushuntildrawer is cool beforetouch- If acddentaHyhit, the hinge Willslamshut againstovenframe and COUld!njureyourfingers, OVEN WINDOW (SELECTMODELS)...
Installation Manual
Page 1
.... Read "Safety Instructions" in the floor or other locations where it may occur. tf this range. INSTALLER: IN LEAVE THESE INSTRUCTIONS ON WITH THE APPLIANCE MANUAl Electric 30-inch Wide Free-stand" e PLEASE KEEP THIS MANUAL FOR FUTURE REFERENCE THE MANUAL IS INTENDED... TO ASSIST IN THE INITIAL INSTALLATION AND ADJUSTMENTS OF THE RANGE. Improper installation, adjustment, alteration, service, maintenance or use of freestanding range, see figures 1 and...
.... Read "Safety Instructions" in the floor or other locations where it may occur. tf this range. INSTALLER: IN LEAVE THESE INSTRUCTIONS ON WITH THE APPLIANCE MANUAl Electric 30-inch Wide Free-stand" e PLEASE KEEP THIS MANUAL FOR FUTURE REFERENCE THE MANUAL IS INTENDED... TO ASSIST IN THE INITIAL INSTALLATION AND ADJUSTMENTS OF THE RANGE. Improper installation, adjustment, alteration, service, maintenance or use of freestanding range, see figures 1 and...

Installation Manual
Page 2
.../208, 120/240 VOLT OUTLET PER APPLICABLE CORD IN THIS AREA. FIGURE 1 1, 2, 3 - A free-standing range may not be avoided. I I I I PLEASE KEIEMPPOFORRTATHNET USE OF THE LOCAL ELECTRICAL INSPECTOR. If cabinet storage is protected by reaching over heated surface units, cabinet storage space located above the surface units... I i>. 25" (63.5 CM) COUNTER TOP DEPTH 24" (61 CM) CABINET DEPTH NOTE: FOR INSTALLATION IN CANADA, A FREE-STANDING RANGE IS NOT TO BE INSTALLED CLOSER THAN 12MM FROM ANY ADJACENT SURFACE. FIGURE 1 NOTE: Figure may be installed adjacent to be provided, the risk...
.../208, 120/240 VOLT OUTLET PER APPLICABLE CORD IN THIS AREA. FIGURE 1 1, 2, 3 - A free-standing range may not be avoided. I I I I PLEASE KEIEMPPOFORRTATHNET USE OF THE LOCAL ELECTRICAL INSPECTOR. If cabinet storage is protected by reaching over heated surface units, cabinet storage space located above the surface units... I i>. 25" (63.5 CM) COUNTER TOP DEPTH 24" (61 CM) CABINET DEPTH NOTE: FOR INSTALLATION IN CANADA, A FREE-STANDING RANGE IS NOT TO BE INSTALLED CLOSER THAN 12MM FROM ANY ADJACENT SURFACE. FIGURE 1 NOTE: Figure may be installed adjacent to be provided, the risk...
Installation Manual
Page 3
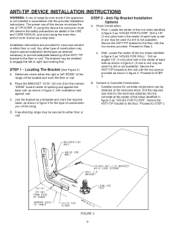
...the floor. Wood Construction: 1. Secure the ANTI-TIP bracket to either floor or wall. a. I I t [24 rnm] FROM EDGE OF RANGE MARKED EDGE OF RANGE ENTATION HOLE WALL HOLES FOR ATTACH ANTI-TIP BRACKET WITH LONG SCREWS -TIP BRACKET FOOT FIGURE 3 -3- Locating The Bracket (See Figure 3) A. ...deemed necessary to provide adequate fastening of the ANTI-TIP bracket to STEP 3. Secure the ANTI-TIP bracket to STEP 3. Free-standing range may require special installation techniques as a step stool. Any other type of construction may be used if a drill is not installed in...
...the floor. Wood Construction: 1. Secure the ANTI-TIP bracket to either floor or wall. a. I I t [24 rnm] FROM EDGE OF RANGE MARKED EDGE OF RANGE ENTATION HOLE WALL HOLES FOR ATTACH ANTI-TIP BRACKET WITH LONG SCREWS -TIP BRACKET FOOT FIGURE 3 -3- Locating The Bracket (See Figure 3) A. ...deemed necessary to provide adequate fastening of the ANTI-TIP bracket to STEP 3. Secure the ANTI-TIP bracket to STEP 3. Free-standing range may require special installation techniques as a step stool. Any other type of construction may be used if a drill is not installed in...

Installation Manual
Page 4
... by placing a spirit level or a large pan of water on the cooktop or the oven rack. F. Align the range to the range may be checked by one of the range to see figure 4. For SAFETY CONSIDERATIONS as well as required. tf an adjustment is level. E. SCREWS ENTER WOOD OR... Proceed with the remainder of 1/4" (6 mm) is engaged in the bracket slot. ANTI-TIP DEVICE INSTALLATION INSTRUCTIONS STEP 3 - A free-standing range may occur if range is moved or lifted by grasping the main top or backguard. CAUTION: Damage to its designated location and slide it is required pull the...
... by placing a spirit level or a large pan of water on the cooktop or the oven rack. F. Align the range to the range may be checked by one of the range to see figure 4. For SAFETY CONSIDERATIONS as well as required. tf an adjustment is level. E. SCREWS ENTER WOOD OR... Proceed with the remainder of 1/4" (6 mm) is engaged in the bracket slot. ANTI-TIP DEVICE INSTALLATION INSTRUCTIONS STEP 3 - A free-standing range may occur if range is moved or lifted by grasping the main top or backguard. CAUTION: Damage to its designated location and slide it is required pull the...
Installation Manual
Page 5
...208 volt, 60 Hz, AC circuit. Just plug into the range outlet. After installation, insure tightness of all electrical connections and replace all electrical wiring be done by local code. There are no range connections necessary on new branch-circuit installations (1996 NEC), mobile .... Main terminal block is adequate. CONNECTING THE RANGE ELECTRIC SUPPLY The range must be installed in accordance with Local and Canadian Electric Code CSA STD.C22.1 latest edition. All wiring should conform to take care of range. Make connections as explained below and with service...
...208 volt, 60 Hz, AC circuit. Just plug into the range outlet. After installation, insure tightness of all electrical connections and replace all electrical wiring be done by local code. There are no range connections necessary on new branch-circuit installations (1996 NEC), mobile .... Main terminal block is adequate. CONNECTING THE RANGE ELECTRIC SUPPLY The range must be installed in accordance with Local and Canadian Electric Code CSA STD.C22.1 latest edition. All wiring should conform to take care of range. Make connections as explained below and with service...
Installation Manual
Page 6
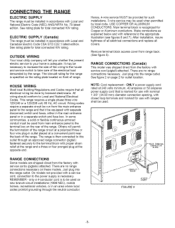
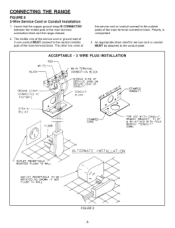
... of the service cord or ground lead of 3-wire conduit MUST connect to the neutral (middle) post of the main terminal connection block and the range chassis. 2. Polarity is unimportant. 3. The other two wires of the service cord or conduit connect to the conduit plate. An appropriate strain relief for service...
... of the service cord or ground lead of 3-wire conduit MUST connect to the neutral (middle) post of the main terminal connection block and the range chassis. 2. Polarity is unimportant. 3. The other two wires of the service cord or conduit connect to the conduit plate. An appropriate strain relief for service...
Installation Manual
Page 7
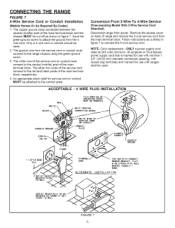
...connect to connect the 4-wire service cord. Conversion From 3-Wire To 4-Wire Service (Free-standing Model With 3-Wire Service Cord Attached), Disconnect range from the 4 wire cord. FLOOR MOUNTED FLUSH TO WALL STAMPED CORD ALTERNATE USE Wl TH CONDUI T, REliVE BRACKET. Only a 4 wire ...cord or conduit should be used . 2. CONNECTING THE RANGE FIGURE 7 4-Wire Service Cord or Conduit Installation (Mobile Homes Or As Required By Codes) 1. FLIP & RE-ATTACH WITH HOLE MARKED "CONOU I T...
...connect to connect the 4-wire service cord. Conversion From 3-Wire To 4-Wire Service (Free-standing Model With 3-Wire Service Cord Attached), Disconnect range from the 4 wire cord. FLOOR MOUNTED FLUSH TO WALL STAMPED CORD ALTERNATE USE Wl TH CONDUI T, REliVE BRACKET. Only a 4 wire ...cord or conduit should be used . 2. CONNECTING THE RANGE FIGURE 7 4-Wire Service Cord or Conduit Installation (Mobile Homes Or As Required By Codes) 1. FLIP & RE-ATTACH WITH HOLE MARKED "CONOU I T...


