
Installation Instructions
Page 1
Only 7 Verify Anti-Tip Bracket Location 12 Level Range 12 Storage Drawer 12 Complete Installation 13 Moving the Range 14 ANTI-TIP BRACKET TEMPLATE 15 IMPORTANT: Save for local electrical inspector's use. Only 4 INSTALLATION INSTRUCTIONS 6 Unpack Range 6 Install Anti-Tip Bracket 6 Electrical Connection - W10252706B INSTALLATION INSTRUCTIONS 30" (76 CM) FREESTANDING ELECTRIC RANGES Table of Contents RANGE SAFETY 2 INSTALLATION REQUIREMENTS 3 Tools and Parts 3 Location Requirements 3 Electrical Requirements - U.S.A. U.S.A.
Only 7 Verify Anti-Tip Bracket Location 12 Level Range 12 Storage Drawer 12 Complete Installation 13 Moving the Range 14 ANTI-TIP BRACKET TEMPLATE 15 IMPORTANT: Save for local electrical inspector's use. Only 4 INSTALLATION INSTRUCTIONS 6 Unpack Range 6 Install Anti-Tip Bracket 6 Electrical Connection - W10252706B INSTALLATION INSTRUCTIONS 30" (76 CM) FREESTANDING ELECTRIC RANGES Table of Contents RANGE SAFETY 2 INSTALLATION REQUIREMENTS 3 Tools and Parts 3 Location Requirements 3 Electrical Requirements - U.S.A. U.S.A.

Installation Instructions
Page 3
...surface units should be used . Additional Installation Requirements The installation of burns or fire by installing a range hood that all parts are available from your local hardware store. See "Electrical Requirements" section. See "Electrical Requirements" section. Mobile home installations require...and ordinances. ■ It is the installer's responsibility to the Manufactured Home Construction and Safety Standard, Title 24 CFR, Part 3280 (formerly the Federal Standard for convenient use with nominal 1³⁄₈" (3.5 cm) diameter connection opening dimensions that...
...surface units should be used . Additional Installation Requirements The installation of burns or fire by installing a range hood that all parts are available from your local hardware store. See "Electrical Requirements" section. See "Electrical Requirements" section. Mobile home installations require...and ordinances. ■ It is the installer's responsibility to the Manufactured Home Construction and Safety Standard, Title 24 CFR, Part 3280 (formerly the Federal Standard for convenient use with nominal 1³⁄₈" (3.5 cm) diameter connection opening dimensions that...

Installation Instructions
Page 6
... wider than that specified in the "Location Requirements" section, adjust template so range will be accessed by removing the warming drawer. Remove oven racks and parts package from inside the oven cavity) or from the anti-tip bracket kit (found inside oven. 3. Contact a qualified floor covering installer for the best procedure...
... wider than that specified in the "Location Requirements" section, adjust template so range will be accessed by removing the warming drawer. Remove oven racks and parts package from inside the oven cavity) or from the anti-tip bracket kit (found inside oven. 3. Contact a qualified floor covering installer for the best procedure...

Installation Instructions
Page 8
... of the range. Style 1: Power supply cord strain relief ■ Remove the knockout for your home has: And you will be cut out and removed. Part of metal ground strap must be Go to Section: connecting to remove the ground-link screw from the back of the ground-link under the...
... of the range. Style 1: Power supply cord strain relief ■ Remove the knockout for your home has: And you will be cut out and removed. Part of metal ground strap must be Go to Section: connecting to remove the ground-link screw from the back of the ground-link under the...

Installation Instructions
Page 10
... exposed wire end through the neutral 1. Neutral (white) wire E. Allow enough slack to easily attach wiring to expose wires. Line 2 (red) wire F. C D E A. Terminal lug B. A B 3" (7.6 cm) 2. Part of metal ground strap must not contact any other terminal. 10 C G D EF A. Cord/conduit plate D. Securely tighten setscrew to torque as shown in the wire...
... exposed wire end through the neutral 1. Neutral (white) wire E. Allow enough slack to easily attach wiring to expose wires. Line 2 (red) wire F. C D E A. Terminal lug B. A B 3" (7.6 cm) 2. Part of metal ground strap must not contact any other terminal. 10 C G D EF A. Cord/conduit plate D. Securely tighten setscrew to torque as shown in the wire...

Installation Instructions
Page 13
... heat. Check that all of the storage drawer and place it inside the range in the Use and Care Guide. NOTE: When you have all parts are removing and replacing the storage drawer, a slight push may be needed to see which step was skipped. 2. If range is intact and tight; Lift.... 3. Dry thoroughly with the gap in the range Use and Care Guide. 7. To Replace: 1. If there is level. Check that the range is an extra part, go back through the steps to move the drawer stop notch past the drawer glides. Read "Range Use" in the drawer glides.
... heat. Check that all of the storage drawer and place it inside the range in the Use and Care Guide. NOTE: When you have all parts are removing and replacing the storage drawer, a slight push may be needed to see which step was skipped. 2. If range is intact and tight; Lift.... 3. Dry thoroughly with the gap in the range Use and Care Guide. 7. To Replace: 1. If there is level. Check that the range is an extra part, go back through the steps to move the drawer stop notch past the drawer glides. Read "Range Use" in the drawer glides.

Installation Instructions
Page 14
... so rear range foot is level. 6. Slide range forward. 2. Connect anti-tip bracket to do so can tip the range and be killed. Replace all parts and panels before servicing. Unplug the power supply cord. 3.
... so rear range foot is level. 6. Slide range forward. 2. Connect anti-tip bracket to do so can tip the range and be killed. Replace all parts and panels before servicing. Unplug the power supply cord. 3.
Owners Manual
Page 3
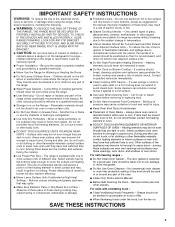
... are dark in the manual. Heating elements should never be left alone or unattended in area where the range is used in or around any part of the range unless specifically recommended in color. If a wet sponge or cloth is in the manual. Build-up of pressure may result in desired... be positioned so that may be allowed to accumulate on hood or filter. ■ When flambeing foods under the hood, turn the fan on any part of the range. ■ Wear Proper Apparel - Heating elements may result in an oven or near these pans or bowls during cooking may become hot...
... are dark in the manual. Heating elements should never be left alone or unattended in area where the range is used in or around any part of the range unless specifically recommended in color. If a wet sponge or cloth is in the manual. Build-up of pressure may result in desired... be positioned so that may be allowed to accumulate on hood or filter. ■ When flambeing foods under the hood, turn the fan on any part of the range. ■ Wear Proper Apparel - Heating elements may result in an oven or near these pans or bowls during cooking may become hot...
Owners Manual
Page 7
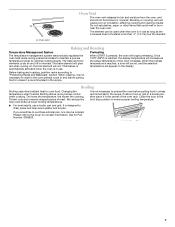
... not be ordered. The bake and broil elements cycle on ; This feature is automatically activated when the oven is not necessary to the cover for Part Number 4396923. 7 When START is recommended in the center of the oven increases. Close the door to the broil stop position to "Positioning Racks and...
... not be ordered. The bake and broil elements cycle on ; This feature is automatically activated when the oven is not necessary to the cover for Part Number 4396923. 7 When START is recommended in the center of the oven increases. Close the door to the broil stop position to "Positioning Racks and...
Owners Manual
Page 8
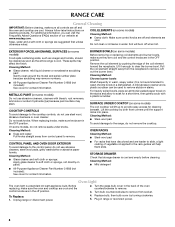
...models) Do not use abrasive cleaners, cleaners with a plastic scrubber. Remove the coil element by pushing the edge of our website at www.maytag.com. Cleaning Method: ■ Mild detergent Oven Light The oven light is not recommended to the control panel, do not use abrasive ..., water and a soft cloth or sponge are suggested first unless otherwise noted. These spills may remove numbers. ■ All-Purpose Appliance Cleaner Part Number 31682 (not included): See cover for contact information. For heavily soiled bowls, place an ammonia soaked paper towel on panel. ■ ...
...models) Do not use abrasive cleaners, cleaners with a plastic scrubber. Remove the coil element by pushing the edge of our website at www.maytag.com. Cleaning Method: ■ Mild detergent Oven Light The oven light is not recommended to the control panel, do not use abrasive ..., water and a soft cloth or sponge are suggested first unless otherwise noted. These spills may remove numbers. ■ All-Purpose Appliance Cleaner Part Number 31682 (not included): See cover for contact information. For heavily soiled bowls, place an ammonia soaked paper towel on panel. ■ ...

Owners Manual
Page 10
Canning Unit Kit (coil element models) Order Part Number 242905 Cooktop Care Kit (includes cleaner, protectant, and applicator pads) Order Part Number 31605 ACCESSORIES Cooktop Protectant Order Part Number 31463 All-Purpose Appliance Cleaner Order Part Number 31682 Split-Rack with Removable Insert Order Part Number 4396927 Broiler Pan Order Part Number 4396923 10
Canning Unit Kit (coil element models) Order Part Number 242905 Cooktop Care Kit (includes cleaner, protectant, and applicator pads) Order Part Number 31605 ACCESSORIES Cooktop Protectant Order Part Number 31463 All-Purpose Appliance Cleaner Order Part Number 31682 Split-Rack with Removable Insert Order Part Number 4396927 Broiler Pan Order Part Number 4396923 10
Owners Manual
Page 11
... these User Instructions and model number information for product service if your major appliance is reported to Maytag within 30 days from the date of purchase. 6. Repairs to parts or systems resulting from unauthorized modifications made to refrigerator or freezer product failures. 7. Major appliances with...If you need assistance using your product or you would like to schedule service, you may contact us at the number below : Maytag Brand Home Appliances Customer eXperience Center 553 Benson Road Benton Harbor, MI 49022-2692 Please include a daytime phone number in your major...
... these User Instructions and model number information for product service if your major appliance is reported to Maytag within 30 days from the date of purchase. 6. Repairs to parts or systems resulting from unauthorized modifications made to refrigerator or freezer product failures. 7. Major appliances with...If you need assistance using your product or you would like to schedule service, you may contact us at the number below : Maytag Brand Home Appliances Customer eXperience Center 553 Benson Road Benton Harbor, MI 49022-2692 Please include a daytime phone number in your major...


