
Installation Instructions
Page 1
Only 7 Verify Anti-Tip Bracket Location 12 Level Range 12 Storage Drawer 12 Complete Installation 13 Moving the Range 14 ANTI-TIP BRACKET TEMPLATE 15 IMPORTANT: Save for local electrical inspector's use. U.S.A. Only 4 INSTALLATION INSTRUCTIONS 6 Unpack Range 6 Install Anti-Tip Bracket 6 Electrical Connection - W10252706B INSTALLATION INSTRUCTIONS 30" (76 CM) FREESTANDING ELECTRIC RANGES Table of Contents RANGE SAFETY 2 INSTALLATION REQUIREMENTS 3 Tools and Parts 3 Location Requirements 3 Electrical Requirements - U.S.A.
Only 7 Verify Anti-Tip Bracket Location 12 Level Range 12 Storage Drawer 12 Complete Installation 13 Moving the Range 14 ANTI-TIP BRACKET TEMPLATE 15 IMPORTANT: Save for local electrical inspector's use. U.S.A. Only 4 INSTALLATION INSTRUCTIONS 6 Unpack Range 6 Install Anti-Tip Bracket 6 Electrical Connection - W10252706B INSTALLATION INSTRUCTIONS 30" (76 CM) FREESTANDING ELECTRIC RANGES Table of Contents RANGE SAFETY 2 INSTALLATION REQUIREMENTS 3 Tools and Parts 3 Location Requirements 3 Electrical Requirements - U.S.A.

Installation Instructions
Page 2
...or "WARNING." Failure to follow these instructions can tip the range and be killed or seriously injured if...instructions. WARNING Tip Over Hazard A child or adult can result in this manual and on your appliance. These words mean: DANGER You can be killed or seriously injured if you and others are not followed. Connect anti-tip bracket to reduce the chance of others . Reconnect the anti-tip bracket, if the range... is the safety alert symbol. RANGE SAFETY...
...or "WARNING." Failure to follow these instructions can tip the range and be killed or seriously injured if...instructions. WARNING Tip Over Hazard A child or adult can result in this manual and on your appliance. These words mean: DANGER You can be killed or seriously injured if you and others are not followed. Connect anti-tip bracket to reduce the chance of others . Reconnect the anti-tip bracket, if the range... is the safety alert symbol. RANGE SAFETY...

Installation Instructions
Page 3
... reaching over heated surface units, cabinet storage space located above . ■ Four-wire power supply cord or cable must be reduced by a licensed, qualified electrical installer. Read and follow the instructions provided with the maximum allowable wood cabinet temperatures of UL and CSA International and complies with any tools listed here. Anti-tip bracket B. Mobile Home - Mobile home installations require: ■ When this range must be used in accordance...
... reaching over heated surface units, cabinet storage space located above . ■ Four-wire power supply cord or cable must be reduced by a licensed, qualified electrical installer. Read and follow the instructions provided with the maximum allowable wood cabinet temperatures of UL and CSA International and complies with any tools listed here. Anti-tip bracket B. Mobile Home - Mobile home installations require: ■ When this range must be used in accordance...

Installation Instructions
Page 4
... ground wire is used, it will not fit the outlet, have a proper outlet installed by adjusting the leveling legs. For minimum clearance to 22" (55.9 cm) from floor F 2.2 cm) min. Outlet - 8" (20.3 cm) to top of an uncovered wood or metal cabinet. Do not modify the power supply cord plug. Model/serial rating plate (located on the left side frame behind storage drawer panel) *Range can...
... ground wire is used, it will not fit the outlet, have a proper outlet installed by adjusting the leveling legs. For minimum clearance to 22" (55.9 cm) from floor F 2.2 cm) min. Outlet - 8" (20.3 cm) to top of an uncovered wood or metal cabinet. Do not modify the power supply cord plug. Model/serial rating plate (located on the left side frame behind storage drawer panel) *Range can...

Installation Instructions
Page 5
..., use a 4-wire power supply cord rated at the junction box). ■ Wire sizes and connections must conform with the rating of the range. ■ The wiring diagram is connected to the cabinet. This cord contains 3 copper conductors with ring terminals or open -end spade terminals with a nominal 1³⁄₈" (34.9 mm) diameter connection opening. ■ A circuit breaker is less than the total connected load listed on the model/serial rating plate. **If connecting to...
..., use a 4-wire power supply cord rated at the junction box). ■ Wire sizes and connections must conform with the rating of the range. ■ The wiring diagram is connected to the cabinet. This cord contains 3 copper conductors with ring terminals or open -end spade terminals with a nominal 1³⁄₈" (34.9 mm) diameter connection opening. ■ A circuit breaker is less than the total connected load listed on the model/serial rating plate. **If connecting to...

Installation Instructions
Page 6
... not remove the shipping base at this manual. 2. Tape template into place. 4. Connect anti-tip bracket to lower front leveling legs one-half turn . Before moving range, slide range onto shipping base, cardboard or hardboard. 1. Wrench or pliers D. See the "Storage Drawer" section. Use a wrench or pliers to rear range foot. Rear leveling leg C. Shipping base 4. It will be accessed by removing the warming drawer. Remove oven racks and parts package from range. 2. INSTALLATION INSTRUCTIONS Unpack Range WARNING...
... not remove the shipping base at this manual. 2. Tape template into place. 4. Connect anti-tip bracket to lower front leveling legs one-half turn . Before moving range, slide range onto shipping base, cardboard or hardboard. 1. Wrench or pliers D. See the "Storage Drawer" section. Use a wrench or pliers to rear range foot. Rear leveling leg C. Shipping base 4. It will be accessed by removing the warming drawer. Remove oven racks and parts package from range. 2. INSTALLATION INSTRUCTIONS Unpack Range WARNING...

Installation Instructions
Page 7
.... 6. Plug into holes with a hammer. Failure to follow these instructions can result in death, fire, or electrical shock. 1. Remove template from floor. Use a new 40 amp power supply cord. Use 8 gauge copper or 6 gauge aluminum wire. Align anti-tip bracket holes with screws provided. Depending on the back of the range. Longer screws are available from range. 3. Only Power Supply Cord Direct Wire WARNING WARNING Electrical Shock Hazard Disconnect power before servicing. Pull cover...
.... 6. Plug into holes with a hammer. Failure to follow these instructions can result in death, fire, or electrical shock. 1. Remove template from floor. Use a new 40 amp power supply cord. Use 8 gauge copper or 6 gauge aluminum wire. Align anti-tip bracket holes with screws provided. Depending on the back of the range. Longer screws are available from range. 3. Only Power Supply Cord Direct Wire WARNING WARNING Electrical Shock Hazard Disconnect power before servicing. Pull cover...

Installation Instructions
Page 8
.... 3-wire direct ³⁄₈" (1.0 cm) A circuit breaker 3-wire connection: box or fused Direct wire disconnect 3" (7.6 cm) 4-wire connection: Power Supply Cord Use this method for the power supply cord. ■ Assemble a UL listed strain relief in the opening . Part of metal ground strap must be Go to Section: connecting to remove the ground-link screw from the back of the range. Style 1: Power supply cord strain relief ■ Remove the knockout for : ■ New branch-circuit installations...
.... 3-wire direct ³⁄₈" (1.0 cm) A circuit breaker 3-wire connection: box or fused Direct wire disconnect 3" (7.6 cm) 4-wire connection: Power Supply Cord Use this method for the power supply cord. ■ Assemble a UL listed strain relief in the opening . Part of metal ground strap must be Go to Section: connecting to remove the ground-link screw from the back of the range. Style 1: Power supply cord strain relief ■ Remove the knockout for : ■ New branch-circuit installations...

Installation Instructions
Page 10
... end of range. Line 1 (black) wire Bare Wire Torque Specifications Attaching terminal lugs to line 1 (black), neutral (white), and line 2 (red) wires. Depending on the front of the terminal lug and insert exposed wire end through the neutral 1. Strip the insulation back ³⁄₈" (1.0 cm) from the back of electrical supply (4-wire or 3-wire connection). 4-wire Connection: Direct Wire Use this method for: ■ New branch-circuit installations (1996...
... end of range. Line 1 (black) wire Bare Wire Torque Specifications Attaching terminal lugs to line 1 (black), neutral (white), and line 2 (red) wires. Depending on the front of the terminal lug and insert exposed wire end through the neutral 1. Strip the insulation back ³⁄₈" (1.0 cm) from the back of electrical supply (4-wire or 3-wire connection). 4-wire Connection: Direct Wire Use this method for: ■ New branch-circuit installations (1996...

Installation Instructions
Page 12
...; Slide range back so rear range foot is removed from the anti-tip bracket. Replace the storage drawer (on the storage drawer until the range is engaged in anti-tip bracket. view from outside the range. It will be level for removal. Insert a flat-blade screwdriver through the opening in oven. 2. Place rack in the side of the storage drawer, placing the screwdriver tip on rack and check levelness of the storage drawer. 6. If range is not level, pull range...
...; Slide range back so rear range foot is removed from the anti-tip bracket. Replace the storage drawer (on the storage drawer until the range is engaged in anti-tip bracket. view from outside the range. It will be level for removal. Insert a flat-blade screwdriver through the opening in oven. 2. Place rack in the side of the storage drawer, placing the screwdriver tip on rack and check levelness of the storage drawer. 6. If range is not level, pull range...

Installation Instructions
Page 13
... "Range Use" in the Use and Care Guide. Slowly push the storage drawer into an outlet. ■ Electrical supply is fully engaged on range operation. Check that all packaging materials. 4. Turn power on surface burners and oven. Turn on . 8. When the range has been on for 5 minutes, check for specific instruction on both sides, slide the drawer back into appropriate outlet. Lift up the back of liquid household cleaner and warm water...
... "Range Use" in the Use and Care Guide. Slowly push the storage drawer into an outlet. ■ Electrical supply is fully engaged on range operation. Check that all packaging materials. 4. Turn power on surface burners and oven. Turn on . 8. When the range has been on for 5 minutes, check for specific instruction on both sides, slide the drawer back into appropriate outlet. Lift up the back of liquid household cleaner and warm water...

Installation Instructions
Page 14
...Slide range back so rear range foot is level. 6. Electrical Shock Hazard Disconnect power before operating. Reconnect power. 6. Reconnect the anti-tip bracket, if the range is under anti-tip bracket. 5. Disconnect power. 2. Check that anti-tip bracket is installed: ■ Look for cleaning or maintenance: For power supply cord-connected ranges: 1. If removing the range is level. 14 Complete cleaning or maintenance. 4. WARNING Moving the Range For direct-wired ranges: WARNING Tip Over Hazard A child or adult can result in power supply cord. 5. Connect anti-tip bracket...
...Slide range back so rear range foot is level. 6. Electrical Shock Hazard Disconnect power before operating. Reconnect power. 6. Reconnect the anti-tip bracket, if the range is under anti-tip bracket. 5. Disconnect power. 2. Check that anti-tip bracket is installed: ■ Look for cleaning or maintenance: For power supply cord-connected ranges: 1. If removing the range is level. 14 Complete cleaning or maintenance. 4. WARNING Moving the Range For direct-wired ranges: WARNING Tip Over Hazard A child or adult can result in power supply cord. 5. Connect anti-tip bracket...
Owners Manual
Page 3
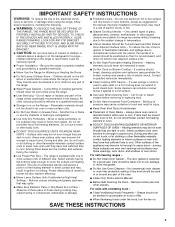
... to cover the surface unit heating element. Other surfaces of glass, glass/ceramic, ceramic, earthenware, or other servicing should not be stored in an oven or near surface units may ignite. ■ Make Sure Reflector Pans or Drip Bowls Are in or on the range to persons, or damage when using the range. ■ User Servicing - For self-cleaning ranges - ■ Do Not Clean Door Gasket - Remove broiler pan and other flammable materials contact heating elements or interior surfaces of electric shock...
... to cover the surface unit heating element. Other surfaces of glass, glass/ceramic, ceramic, earthenware, or other servicing should not be stored in an oven or near surface units may ignite. ■ Make Sure Reflector Pans or Drip Bowls Are in or on the range to persons, or damage when using the range. ■ User Servicing - For self-cleaning ranges - ■ Do Not Clean Door Gasket - Remove broiler pan and other flammable materials contact heating elements or interior surfaces of electric shock...
Owners Manual
Page 4
... function with the controls locked. To change to 12 hours and 59 minutes. 1. The oven light will sound at www.maytag.com for 5 seconds. 1. On models without the TO LOCK HOLD 3 SEC keypad, use the START keypad. 1. Repeat to begin the countdown. Press TEMP/TIME "+" or "-" arrow pads to set in hours or minutes up to take effect. 5. Press KITCHEN TIMER. 2. Press TEMP/TIME "+" or "-" arrow pads to set a temperature...
... function with the controls locked. To change to 12 hours and 59 minutes. 1. The oven light will sound at www.maytag.com for 5 seconds. 1. On models without the TO LOCK HOLD 3 SEC keypad, use the START keypad. 1. Repeat to begin the countdown. Press TEMP/TIME "+" or "-" arrow pads to set in hours or minutes up to take effect. 5. Press KITCHEN TIMER. 2. Press TEMP/TIME "+" or "-" arrow pads to set a temperature...
Owners Manual
Page 5
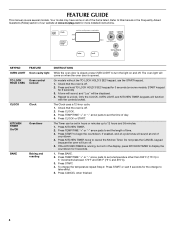
... oven and close door to Celsius. Press BROIL. 3. Always move birds to change : Press and hold BROIL for optimal cooking results. Indicator lights show functions that are used the first few times, or when it can be level for 5 seconds. To change back. Repeat to another closed and wellventilated room. IMPORTANT: The health of day is in use . Electronic Oven Controls Control Display The display will glow. KEYPAD BROIL START CANCEL TEMP/TIME FEATURE Broiling Cooking start Range function Temperature and time adjust INSTRUCTIONS 1. COOKTOP USE...
... oven and close door to Celsius. Press BROIL. 3. Always move birds to change : Press and hold BROIL for optimal cooking results. Indicator lights show functions that are used the first few times, or when it can be level for 5 seconds. To change back. Repeat to another closed and wellventilated room. IMPORTANT: The health of day is in use . Electronic Oven Controls Control Display The display will glow. KEYPAD BROIL START CANCEL TEMP/TIME FEATURE Broiling Cooking start Range function Temperature and time adjust INSTRUCTIONS 1. COOKTOP USE...

Owners Manual
Page 6
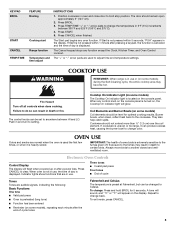
... out. Broiling chicken pieces. To move racks with the oven light switch. The oven provides accurate temperatures; The adjustment can be displayed. Press START. If "LOFF" is displayed, the oven will appear. Bakeware To cook food evenly, hot air must be able to the oven bottom finish, do not place food or bakeware directly on them. 2-rack: Use rack positions 2 and 4. ■ Make sure racks are level. Rack 4: Use for baking. Rack 1: Roasting large cuts of space...
... out. Broiling chicken pieces. To move racks with the oven light switch. The oven provides accurate temperatures; The adjustment can be displayed. Press START. If "LOFF" is displayed, the oven will appear. Bakeware To cook food evenly, hot air must be able to the oven bottom finish, do not place food or bakeware directly on them. 2-rack: Use rack positions 2 and 4. ■ Make sure racks are level. Rack 4: Use for baking. Rack 1: Roasting large cuts of space...
Owners Manual
Page 7
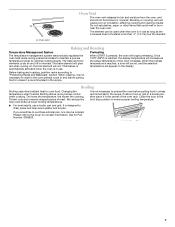
... the oven vent. Baking and Roasting Temperature Management System Preheating The temperature management system electronically regulates the oven heat levels during preheat and bake to maintain a precise temperature range for Part Number 4396923. 7 When roasting, it is not necessary to preheat the oven before putting food in unless it in use. Changing the temperature when Custom Broiling allows more than ¹⁄₂" (1.3 cm) over the element. The lower the temperature, the slower the cooking. Close the door...
... the oven vent. Baking and Roasting Temperature Management System Preheating The temperature management system electronically regulates the oven heat levels during preheat and bake to maintain a precise temperature range for Part Number 4396923. 7 When roasting, it is not necessary to preheat the oven before putting food in unless it in use. Changing the temperature when Custom Broiling allows more than ¹⁄₂" (1.3 cm) over the element. The lower the temperature, the slower the cooking. Close the door...
Owners Manual
Page 8
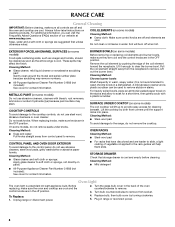
... harder to slide, a light coating of the oven counterclockwise to the cooktop controls, do not use abrasive cleaners, steel-wool pads, gritty washcloths or abrasive paper towels. Always follow label instructions on panel. ■ All-Purpose Appliance Cleaner Part Number 31682 (not included): See cover for cleaning beneath. COIL ELEMENTS (on some models) Cleaning Method: ■ Damp cloth: Make sure control knobs are off and elements are in...
... harder to slide, a light coating of the oven counterclockwise to the cooktop controls, do not use abrasive cleaners, steel-wool pads, gritty washcloths or abrasive paper towels. Always follow label instructions on panel. ■ All-Purpose Appliance Cleaner Part Number 31682 (not included): See cover for cleaning beneath. COIL ELEMENTS (on some models) Cleaning Method: ■ Damp cloth: Make sure control knobs are off and elements are in...
Owners Manual
Page 9
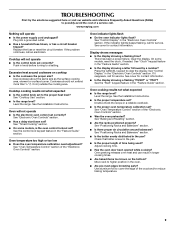
... same size as the surface cooking area, element or surface burner. Level the range. On some models, is level in the "Electronic Oven Controls" section. See cover for service. Double-check the recipe in the pan? If the indicator light(s) keeps flashing, call an electrician. See "Cooktop Use" section. ■ Is the range level? Display shows messages ■ Is the display showing a flashing time? Push in the "Feature Guide" section. See the control lock keypad feature in knob before turning to a setting. See "Clock" keypad feature...
... same size as the surface cooking area, element or surface burner. Level the range. On some models, is level in the "Electronic Oven Controls" section. See cover for service. Double-check the recipe in the pan? If the indicator light(s) keeps flashing, call an electrician. See "Cooktop Use" section. ■ Is the range level? Display shows messages ■ Is the display showing a flashing time? Push in the "Feature Guide" section. See the control lock keypad feature in knob before turning to a setting. See "Clock" keypad feature...
Owners Manual
Page 11
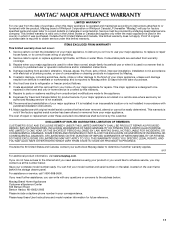
... oven frame behind the storage drawer panel. Have your model number and serial number on the label, located on how to use or when it was purchased. Proof of consumables or cleaning products not approved by Maytag. 5. Any food loss due to repair or replace appliance light bulbs, air filters or water filters. For assistance or service, call 1-800-688-9900. The cost of your major appliance, to instruct...
... oven frame behind the storage drawer panel. Have your model number and serial number on the label, located on how to use or when it was purchased. Proof of consumables or cleaning products not approved by Maytag. 5. Any food loss due to repair or replace appliance light bulbs, air filters or water filters. For assistance or service, call 1-800-688-9900. The cost of your major appliance, to instruct...


