Use and Care Guide
Page 1
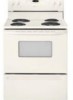
Electric Range - Lithe U.S.A. Coil Ta Safety 1-3 Surface Cooking ControHs CoiHHements 4-5 Oven Cooking 6-14 Manual Cleon Oven Controls CHock Baking Timer BroiUing Manual Cleon Oven Knob Control Baking BroiHing Semf=CmeanOven Controms CHock Thief Bakhg Keep Warm Cook & HoHd BroiHing DeHay Oven Racks Form No. C/10/04 Pat1 No. 8113P465 60 Care & Cleaning 15-18 Self-CUeanOven Cleaning Procedures Maintenance 19-20 Oven Window Oven Light Troubleshooting 21-22 Warranty & Service 23 Guide d'utilisation et d'entretien 28 Guia de Use y Cuidado 50 ¢...
Electric Range - Lithe U.S.A. Coil Ta Safety 1-3 Surface Cooking ControHs CoiHHements 4-5 Oven Cooking 6-14 Manual Cleon Oven Controls CHock Baking Timer BroiUing Manual Cleon Oven Knob Control Baking BroiHing Semf=CmeanOven Controms CHock Thief Bakhg Keep Warm Cook & HoHd BroiHing DeHay Oven Racks Form No. C/10/04 Pat1 No. 8113P465 60 Care & Cleaning 15-18 Self-CUeanOven Cleaning Procedures Maintenance 19-20 Oven Window Oven Light Troubleshooting 21-22 Warranty & Service 23 Guide d'utilisation et d'entretien 28 Guia de Use y Cuidado 50 ¢...
Use and Care Guide
Page 2
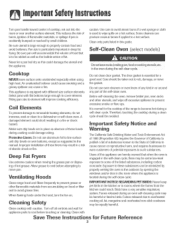
... fire or flame. injury. Always contact the manufacturer about problems or conditions you have questions, carl: Maytag Customer Assistance 1-800-688-9900 USA 1-800-688-2002 Canada 1-800-688-2080 ( U.S. installer: Pleaseleave this manual with a flashlight to cover all possible conditions and situations that may become warm or hot. Do not attempt to adjust, repair, service, or replace any paRR of Fire Use dry...
... fire or flame. injury. Always contact the manufacturer about problems or conditions you have questions, carl: Maytag Customer Assistance 1-800-688-9900 USA 1-800-688-2002 Canada 1-800-688-2080 ( U.S. installer: Pleaseleave this manual with a flashlight to cover all possible conditions and situations that may become warm or hot. Do not attempt to adjust, repair, service, or replace any paRR of Fire Use dry...
Use and Care Guide
Page 3
... children alone or unsupervised near this guide. guide. 2 Follow utensil manufacturer's instructions when using dry, sturdy potholders. Children should never be used as they could result in this opening the oven door, Let hot air or steam escape before removing bulb to avoid electrical shock exposed to direct contact and could break. Always turn off aft controls when cooking is in use a dry potholder` Do not let potholder...
... children alone or unsupervised near this guide. guide. 2 Follow utensil manufacturer's instructions when using dry, sturdy potholders. Children should never be used as they could result in this opening the oven door, Let hot air or steam escape before removing bulb to avoid electrical shock exposed to direct contact and could break. Always turn off aft controls when cooking is in use a dry potholder` Do not let potholder...
Use and Care Guide
Page 4
... fryingB. CleanonlypaRRlisstedinthisguide. A damaged element could damage wiring. Do not clean door gasket. Ventimating Hoods Users of this appliance are in a risk of the range to cover element. Exposure to these substances can cause a fire. When flaming foods under the hood, turn the fan on hood or filter and to move the gasket. Fumes released during cooking could short resulting in the self-dean cycle, there may...
... fryingB. CleanonlypaRRlisstedinthisguide. A damaged element could damage wiring. Do not clean door gasket. Ventimating Hoods Users of this appliance are in a risk of the range to cover element. Exposure to these substances can cause a fire. When flaming foods under the hood, turn the fan on hood or filter and to move the gasket. Fumes released during cooking could short resulting in the self-dean cycle, there may...
Use and Care Guide
Page 5
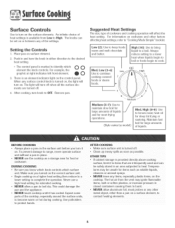
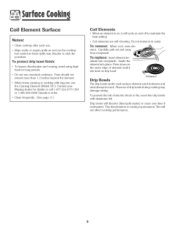
... extended cooking. meat probes or any surface control knob is an element indicator light on . o NEVER use a high heat setting for large amounts of liquids and for deep fat frying or sauteing. Expect some parts of cookware and cooking operation will affect the heat setting. Use potholders to High. OTHER TIPS If cabine_ storage msprovided directly above cooking surface limit it to items that are turned off when ail the surface elements are infrequently used...
... extended cooking. meat probes or any surface control knob is an element indicator light on . o NEVER use a high heat setting for large amounts of liquids and for deep fat frying or sauteing. Expect some parts of cookware and cooking operation will affect the heat setting. Use potholders to High. OTHER TIPS If cabine_ storage msprovided directly above cooking surface limit it to items that are turned off when ail the surface elements are infrequently used...
Use and Care Guide
Page 6
... 1-800-888-8408 Canada to maintain the heat setting. ° Coil dements are self-cleaning. To remove: When cool, raise elemenL Carefully pull out and away from receptacle. To replace: Insert dement terminals into place. Absence of electric shock or fire, never line drip bowls with big pots, use oversized cookware. Do not immerse in water. This wiii not affect cooking performance. 5
... 1-800-888-8408 Canada to maintain the heat setting. ° Coil dements are self-cleaning. To remove: When cool, raise elemenL Carefully pull out and away from receptacle. To replace: Insert dement terminals into place. Absence of electric shock or fire, never line drip bowls with big pots, use oversized cookware. Do not immerse in water. This wiii not affect cooking performance. 5
Use and Care Guide
Page 8
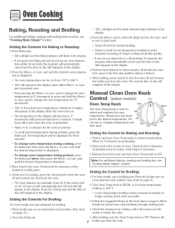
... . Setting the Controls For Broiling: For best results, use a broiling pan. Meat should be displayed for lower temperature broiling, to OFF.Remove the broiler pan from 170° to turn Oven Temp knob to OFF. Preheat broil element for preheating. 2. Press the Cancel pad and the time of day will reappear in the display. Allow 10-15 minutes for three minutes. Broil with the oven door open to a higher temperature and then back. 250 350 , To recall preset temperature...
... . Setting the Controls For Broiling: For best results, use a broiling pan. Meat should be displayed for lower temperature broiling, to OFF.Remove the broiler pan from 170° to turn Oven Temp knob to OFF. Preheat broil element for preheating. 2. Press the Cancel pad and the time of day will reappear in the display. Allow 10-15 minutes for three minutes. Broil with the oven door open to a higher temperature and then back. 250 350 , To recall preset temperature...
Use and Care Guide
Page 9
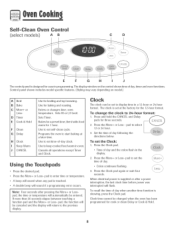
...-hour format. To set self-clean cycle. Controi panei shown inciudes modei specific features. (Styiing may vary depending on the controi shows time of -day clock. The clock can be entered. Self-Clean Oven Control (select models) A B C D Th]e Less- ............ G H 1 J The controi panei is set to keep cooked food warm in a 12-hour or 2a-hour format. CANCEL Use for broiling and top browning. Enters or changes time, oven temperature. Press the More...
...-hour format. To set self-clean cycle. Controi panei shown inciudes modei specific features. (Styiing may vary depending on the controi shows time of -day clock. The clock can be entered. Self-Clean Oven Control (select models) A B C D Th]e Less- ............ G H 1 J The controi panei is set to keep cooked food warm in a 12-hour or 2a-hour format. CANCEL Use for broiling and top browning. Enters or changes time, oven temperature. Press the More...
Use and Care Guide
Page 11
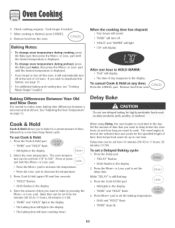
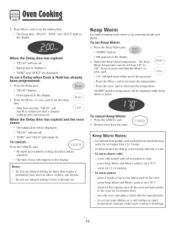
...:10} to bake by a one . Cook & Hold Cook & Hold dhows you wish to notice some baking time differences between a new oven and an oid one -hour Keep Warm cyclic. TO set the baking temperature, . 00:00 and "HOLD" flash, . If you forget to increase the temperature, 2, Press the More+ or Less- Remove food from 170° to delay before the oven turns on page 12...
...:10} to bake by a one . Cook & Hold Cook & Hold dhows you wish to notice some baking time differences between a new oven and an oid one -hour Keep Warm cyclic. TO set the baking temperature, . 00:00 and "HOLD" flash, . If you forget to increase the temperature, 2, Press the More+ or Less- Remove food from 170° to delay before the oven turns on page 12...
Use and Care Guide
Page 12
... Warm temperature. do not set . Press or press and hold the More+ or Less- Press the CANCEL pad. 2. pad to set the delay time. Do not use delayed baking for five minutes, turn off the oven and leave plates in oven. - Remove food from 145° to set 170° F. - press Keep Warm and More+ pads to set 170° F. - @ 5. pad to set the baking time. , The Delay time, "DELAY", "BAKE" and "HOLD" light...
... Warm temperature. do not set . Press or press and hold the More+ or Less- Press the CANCEL pad. 2. pad to set the delay time. Do not use delayed baking for five minutes, turn off the oven and leave plates in oven. - Remove food from 145° to set 170° F. - press Keep Warm and More+ pads to set 170° F. - @ 5. pad to set the baking time. , The Delay time, "DELAY", "BAKE" and "HOLD" light...
Use and Care Guide
Page 13
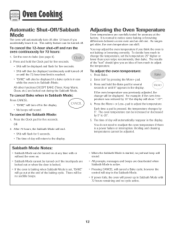
... Sabbath Mode is started, no preheat beep will automatically reappear in use while the oven is set the temperature 25° higher or lower than your recipe recommends, then bake. Set the oven to adjust the temperature= To adjust the oven temperature: 1= Press Bake. 2. It is pressed, the temperature changes by 5° to 35°= 5= The time of how much to change will power up in Sabbath Mode with or without the oven on. ° Sabbath Mode...
... Sabbath Mode is started, no preheat beep will automatically reappear in use while the oven is set the temperature 25° higher or lower than your recipe recommends, then bake. Set the oven to adjust the temperature= To adjust the oven temperature: 1= Press Bake. 2. It is pressed, the temperature changes by 5° to 35°= 5= The time of how much to change will power up in Sabbath Mode with or without the oven on. ° Sabbath Mode...
Use and Care Guide
Page 15
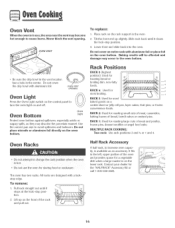
... drip bow[ in the vent location has a hole in the center. Slide rack back until it dears the lock-stop position. 2, Lift up slightly. Lower front and slide back into the oven. Do not cover an entire rack with a lockstop edge. Never block the vent opening. Do not cover the drip bow[ with aluminum foiL OVEN VENT OPENING Oven Light Press the Oven Light switch on the control parle[ to cause burns. To replace...
... drip bow[ in the vent location has a hole in the center. Slide rack back until it dears the lock-stop position. 2, Lift up slightly. Lower front and slide back into the oven. Do not cover an entire rack with a lockstop edge. Never block the vent opening. Do not cover the drip bow[ with aluminum foiL OVEN VENT OPENING Oven Light Press the Oven Light switch on the control parle[ to cause burns. To replace...
Use and Care Guide
Page 16
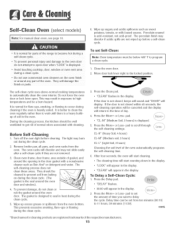
... through the self-cleaning settings. The oven racks wiii discolor and may burn 2. The self-cleaning process does not clean these areas. The gasket is designed to wait until there is the seal around any part of the oven automatically programs the self-cleaning time. 6. Te Delay a Self-Omean Cycle: 1. The self-clean cycle uses above-normal cooking temperatures to 11 hours, 59 minutes (11:59}. Remove broiler pan, all pans, and oven racks from ten...
... through the self-cleaning settings. The oven racks wiii discolor and may burn 2. The self-cleaning process does not clean these areas. The gasket is designed to wait until there is the seal around any part of the oven automatically programs the self-cleaning time. 6. Te Delay a Self-Omean Cycle: 1. The self-clean cycle uses above-normal cooking temperatures to 11 hours, 59 minutes (11:59}. Remove broiler pan, all pans, and oven racks from ten...

Use and Care Guide
Page 17
... of the self-clean cycle, "LOCK" will be opened . Sounds As the oven heats, you want to show that the oven is still displayed. 16 After Self-Cleaning About one hour after wiping, that the oven is heavily soiled or if a broiler pan was not long enough. Fine lines may also occur if the oven is set for a delayed clean operation. pad to the door, do not slide smoothly after cleaning if...
... of the self-clean cycle, "LOCK" will be opened . Sounds As the oven heats, you want to show that the oven is still displayed. 16 After Self-Cleaning About one hour after wiping, that the oven is heavily soiled or if a broiler pan was not long enough. Fine lines may also occur if the oven is set for a delayed clean operation. pad to the door, do not slide smoothly after cleaning if...
Use and Care Guide
Page 18
..., remove from range, place on each use, t !1:a part is removed, be cleaned in hot sudsy water, then use , rinse and dry to be sure the knobs have been correctly replaced. Use scouring pad to remove stubborn soil , Broiler pan and insert can be washed in the dishwasher. ° To clean heavy soil, soak in dishwasher. ° To activate "Control Lock" for cleaning, see page 9. ° Wipe with commercial oven...
..., remove from range, place on each use, t !1:a part is removed, be cleaned in hot sudsy water, then use , rinse and dry to be sure the knobs have been correctly replaced. Use scouring pad to remove stubborn soil , Broiler pan and insert can be washed in the dishwasher. ° To clean heavy soil, soak in dishwasher. ° To activate "Control Lock" for cleaning, see page 9. ° Wipe with commercial oven...

Use and Care Guide
Page 19
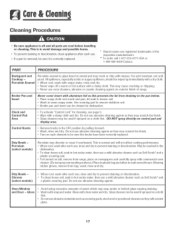
... Spray_, , Discoloration -- PART Oven mnterior PROCEDURE Self-Clean: , Follow hstructions on page 19.) Oven Racks , Clean with soapy water. , Remove stubborn soil with cleansing powder or soap-filled scouring pad. To make cleaning easier, remove the oven door, if desired. (See Maintenance section on page 15-18 to wipe up , it may not slide smoothly if left in the oven during a self-clean operation. Daily Cleaning/LigM Soil...
... Spray_, , Discoloration -- PART Oven mnterior PROCEDURE Self-Clean: , Follow hstructions on page 19.) Oven Racks , Clean with soapy water. , Remove stubborn soil with cleansing powder or soap-filled scouring pad. To make cleaning easier, remove the oven door, if desired. (See Maintenance section on page 15-18 to wipe up , it may not slide smoothly if left in the oven during a self-clean operation. Daily Cleaning/LigM Soil...
Use and Care Guide
Page 20
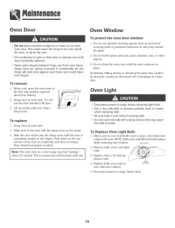
... seat door on an open the oven door to the first stop position (opened about four inches}. 2. To Replace Oven Light Bulb: 1. When oven is properly replaced. Replace with wire retainer. 5. RETAINER cure with a @-watt appliance bulb. 4. the hinge will slam shut against oven frame and could cause the range to lift door. 3. Oven Window To protect the oven door window: 1. i Disconnect p0wei to range. BULSOOVER 2. Replace bulb cover and se- Reconnect power to range before replacing l!ght bu!b. Oven Door...
... seat door on an open the oven door to the first stop position (opened about four inches}. 2. To Replace Oven Light Bulb: 1. When oven is properly replaced. Replace with wire retainer. 5. RETAINER cure with a @-watt appliance bulb. 4. the hinge will slam shut against oven frame and could cause the range to lift door. 3. Oven Window To protect the oven door window: 1. i Disconnect p0wei to range. BULSOOVER 2. Replace bulb cover and se- Reconnect power to range before replacing l!ght bu!b. Oven Door...

Use and Care Guide
Page 22
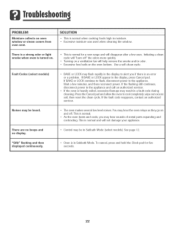
... broiling. Oven temperature must be locked. NOTE: It is still hot. Part or atomof appmiance does not work. ° Check if surface and/or oven controb have been properiy set for a delayed start. See page 16. ° Check if oven is in question. ° See "Cooking Made Simple" booklet for a ddayed cook or clean program. Baking resumts are in Sabbath Mode. See page 12. ° Oven may be set . Oven door will not unlock...
... broiling. Oven temperature must be locked. NOTE: It is still hot. Part or atomof appmiance does not work. ° Check if surface and/or oven controb have been properiy set for a delayed start. See page 16. ° Check if oven is in question. ° See "Cooking Made Simple" booklet for a ddayed cook or clean program. Baking resumts are in Sabbath Mode. See page 12. ° Oven may be set . Oven door will not unlock...
Use and Care Guide
Page 23
... sounds of metal parts expanding and contracting. Moisture collects on and off " the odors more quickly. ° Turning on a ventilation fan will help remove the smoke and/or odor. ° Excessive food soils on . , This is normal for five seconds. 22 Use a self-clean cycle. If BAKE or LOCK appear in Sabbath Mode. If BAKE or LOCK continue to flash, disconnect power to alert...
... sounds of metal parts expanding and contracting. Moisture collects on and off " the odors more quickly. ° Turning on a ventilation fan will help remove the smoke and/or odor. ° Excessive food soils on . , This is normal for five seconds. 22 Use a self-clean cycle. If BAKE or LOCK appear in Sabbath Mode. If BAKE or LOCK continue to flash, disconnect power to alert...
Use and Care Guide
Page 24
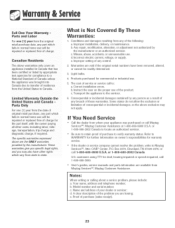
... 1. Misuse, abuse, accidents, or unreasonable use wHUbe repaired or repBced free of consequential or incidental damages, so the above warranties only cover an appliance installed in Canada that has been certified or listed by me manutacturef: These wa#antles give you specific legal tights. Light bulbs. 4. b. or 1-800-688-2002 Canada to locate an authorized servicer. ® Be sure to retain proof...
... 1. Misuse, abuse, accidents, or unreasonable use wHUbe repaired or repBced free of consequential or incidental damages, so the above warranties only cover an appliance installed in Canada that has been certified or listed by me manutacturef: These wa#antles give you specific legal tights. Light bulbs. 4. b. or 1-800-688-2002 Canada to locate an authorized servicer. ® Be sure to retain proof...


