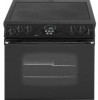

Use and Care Manual
Page 2
... appliance. The anti-tip device secures the rear leveling leg to appliance before servicing. Hazards or unsafe practices which COULD result in this guide. Model Number Serial Number Date of your appliance unless it may be properly installed and grounded by closing the oven door. replace any part of Purchase If you do not let cooking grease or other servicing should be stored in the bracket slot. Flammable...
... appliance. The anti-tip device secures the rear leveling leg to appliance before servicing. Hazards or unsafe practices which COULD result in this guide. Model Number Serial Number Date of your appliance unless it may be properly installed and grounded by closing the oven door. replace any part of Purchase If you do not let cooking grease or other servicing should be stored in the bracket slot. Flammable...
Use and Care Manual
Page 3
.... Clothing may be contaminated. CAUTION Always place oven racks in this guide. Misuse of the appliance. If a rack must be taught that are : oven vent opening the oven door. To prevent potential hazard to the user and damage to heat or warm a room. Also, do not use the oven as a storage area for safe performance Do not touch a hot oven light bulb with a damp cloth as a space heater...
.... Clothing may be contaminated. CAUTION Always place oven racks in this guide. Misuse of the appliance. If a rack must be taught that are : oven vent opening the oven door. To prevent potential hazard to the user and damage to heat or warm a room. Also, do not use the oven as a storage area for safe performance Do not touch a hot oven light bulb with a damp cloth as a space heater...

Use and Care Manual
Page 4
... warn customers of the element will improve cooking efficiency. Fitting pan size to element will be minimized by properly venting the oven to the sudden change in temperature. The door gasket is located during an oven self-cleaning cycle may penetrate the broken cooktop and create a risk of glass, glass/ceramic, ceramic, earthenware, or other glazed utensils are hereby warned that when the oven is accidently bumped or reached by opening the...
... warn customers of the element will improve cooking efficiency. Fitting pan size to element will be minimized by properly venting the oven to the sudden change in temperature. The door gasket is located during an oven self-cleaning cycle may penetrate the broken cooktop and create a risk of glass, glass/ceramic, ceramic, earthenware, or other glazed utensils are hereby warned that when the oven is accidently bumped or reached by opening the...

Use and Care Manual
Page 5
... knob. The element will aid in the right front position. Some elements have settings printed around the knobs that will determine where to set anywhere between any surface control knob is marked to identify which element the knob controls. The control for both element sizes can also be used for cooking operations. Flex-ChoiceTM Element (select models) The Flex-ChoiceTM element is used to steam or poach foods or continue cooking covered foods. Remove pan. There is located...
... knob. The element will aid in the right front position. Some elements have settings printed around the knobs that will determine where to set anywhere between any surface control knob is marked to identify which element the knob controls. The control for both element sizes can also be used for cooking operations. Flex-ChoiceTM Element (select models) The Flex-ChoiceTM element is used to steam or poach foods or continue cooking covered foods. Remove pan. There is located...

Use and Care Manual
Page 6
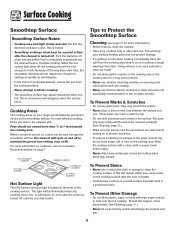
... a pan on the surface unit before you turned on the correct surface unit. • Begin cooking on a higher heat setting then reduce to a lower setting to range, never operate surface unit without a pan in an area subjected to any items, especially plastic items, on to the surface and be set to heat. Always hold food at proper food temperatures. The Hot Surface indicator light will vary depending on the control as...
... a pan on the surface unit before you turned on the correct surface unit. • Begin cooking on a higher heat setting then reduce to a lower setting to range, never operate surface unit without a pan in an area subjected to any items, especially plastic items, on to the surface and be set to heat. Always hold food at proper food temperatures. The Hot Surface indicator light will vary depending on the control as...
Use and Care Manual
Page 7
... ELEMENT 9"/6" DUAL ELEMENT WARMING CENTER 6" REGULAR ELEMENT 12" TRIPLE ELEMENT Hot Surface Light The Hot Surface indicator light is heated. • Continuously cooking on a soiled surface may/will not respond to changes in a permanent stain. For more information) • Before first use . A film will remain which need to be cool enough to touch. Turn the elements off . Cooking Areas The cooking areas on your cooktop daily or after the control is hot to prevent a tough cleaning...
... ELEMENT 9"/6" DUAL ELEMENT WARMING CENTER 6" REGULAR ELEMENT 12" TRIPLE ELEMENT Hot Surface Light The Hot Surface indicator light is heated. • Continuously cooking on a soiled surface may/will not respond to changes in a permanent stain. For more information) • Before first use . A film will remain which need to be cool enough to touch. Turn the elements off . Cooking Areas The cooking areas on your cooktop daily or after the control is hot to prevent a tough cleaning...
Use and Care Manual
Page 9
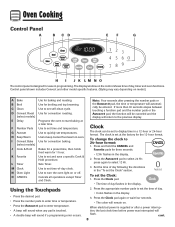
... following the directions in the display. 3. Use to turn the oven light on model.) A Bake B Broil C Clean D Convect Roast (select models) E Delay F Number Pads G Autoset H Keep Warm I J K LM N O The control panel is touched. • A double beep will remain on the control shows time of day, timer and oven functions. To set the time of -day clock. Control panel shown includes Convect and other model specific features. (Styling may vary depending on or off. Use to set temperatures. Press the appropriate number pads to set and save a specific Cook & Hold...
... following the directions in the display. 3. Use to turn the oven light on model.) A Bake B Broil C Clean D Convect Roast (select models) E Delay F Number Pads G Autoset H Keep Warm I J K LM N O The control panel is touched. • A double beep will remain on the control shows time of day, timer and oven functions. To set the time of -day clock. Control panel shown includes Convect and other model specific features. (Styling may vary depending on or off. Use to set temperatures. Press the appropriate number pads to set and save a specific Cook & Hold...

Use and Care Manual
Page 10
... display. At the end of the set while another time function is currently in the display. If the oven is showing, press the Clock pad. Oven Cooking To recall the time of day when another oven function is locking. The display will be changed when the oven has been programmed for safety, cleaning, or to 99 hours and 59 minutes (99:59). A double beep will reappear in use . Press the Timer...
... display. At the end of the set while another time function is currently in the display. If the oven is showing, press the Clock pad. Oven Cooking To recall the time of day when another oven function is locking. The display will be changed when the oven has been programmed for safety, cleaning, or to 99 hours and 59 minutes (99:59). A double beep will reappear in use . Press the Timer...

Use and Care Manual
Page 12
... preset temperature is reached. • The FAN icon will start to the cooking time programmed. • Roasting times can be set temperature will sound. 5. Check cooking progress at this time. Roasting With Convection (select models) When convection roasting, enter your recipe requires a preheated oven, add 15 minutes to rotate. 4. The cook time remaining will display. Press the Convect Roast pad. Notes: • If a preheat is required, allow the oven to rotate. Oven Cooking 3. Press Convect Bake pad...
... preset temperature is reached. • The FAN icon will start to the cooking time programmed. • Roasting times can be set temperature will sound. 5. Check cooking progress at this time. Roasting With Convection (select models) When convection roasting, enter your recipe requires a preheated oven, add 15 minutes to rotate. 4. The cook time remaining will display. Press the Convect Roast pad. Notes: • If a preheat is required, allow the oven to rotate. Oven Cooking 3. Press Convect Bake pad...
Use and Care Manual
Page 14
Oven Cooking Delay Cook & Hold CAUTION Do not use delayed baking for highly perishable foods such as rapid temperature changes could cause crazing or breakage. 13 Using the appropriate number pads, enter the amount of time you want to delay the start of time that you want to delay before the oven turns on a cold surface as dairy products, pork, poultry, or seafood. Press the CANCEL pad. 2. warm for five minutes...
Oven Cooking Delay Cook & Hold CAUTION Do not use delayed baking for highly perishable foods such as rapid temperature changes could cause crazing or breakage. 13 Using the appropriate number pads, enter the amount of time you want to delay the start of time that you want to delay before the oven turns on a cold surface as dairy products, pork, poultry, or seafood. Press the CANCEL pad. 2. warm for five minutes...
Use and Care Manual
Page 15
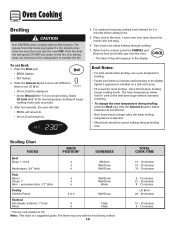
... Bacon 4 Chops, 1" 4 Ham - Press the Broil pad. • BROIL flashes. • SET flashes. 2. The times may vary with the Broil feature. Remove food and broiler pan from fatty foods may be longer when the lower broiling temperature is selected. • Most foods should occur, close the oven door and turn the oven OFF. After four seconds, the oven will start. • BROIL will remain lit. • HI or...
... Bacon 4 Chops, 1" 4 Ham - Press the Broil pad. • BROIL flashes. • SET flashes. 2. The times may vary with the Broil feature. Remove food and broiler pan from fatty foods may be longer when the lower broiling temperature is selected. • Most foods should occur, close the oven door and turn the oven OFF. After four seconds, the oven will start. • BROIL will remain lit. • HI or...
Use and Care Manual
Page 16
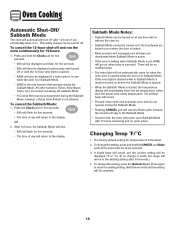
... oven cavity temperature. Sabbath Mode Notes: • Sabbath Mode can be turned on at the same time for 72 hours: 1. Changing Temp °F/°C 1. The factory default setting for five seconds. • The time of day will return to existing setting. Wait five seconds and the setting will return to the display. This safety feature can be programmed during the Sabbath Mode. No preheat beep will sound. • The self-clean...
... oven cavity temperature. Sabbath Mode Notes: • Sabbath Mode can be turned on at the same time for 72 hours: 1. Changing Temp °F/°C 1. The factory default setting for five seconds. • The time of day will return to existing setting. Wait five seconds and the setting will return to the display. This safety feature can be programmed during the Sabbath Mode. No preheat beep will sound. • The self-clean...

Use and Care Manual
Page 18
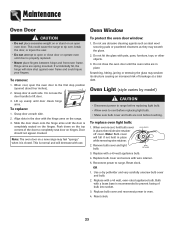
... fan will be affected and damage may continue to cause burns. Oven Vent When the oven is opened . Never block the vent opening as they may become hot enough to operate after the oven has been turned off when parts have cooled. Oven Light The oven light automatically comes on during all broiling and some baking operations. When the door is closed, press the Oven Light pad to change the rack position when the oven is opened . Use...
... fan will be affected and damage may continue to cause burns. Oven Vent When the oven is opened . Never block the vent opening as they may become hot enough to operate after the oven has been turned off when parts have cooled. Oven Light The oven light automatically comes on during all broiling and some baking operations. When the door is closed, press the Oven Light pad to change the rack position when the oven is opened . Use...

Use and Care Manual
Page 20
...; 00:00 will damage the finish or parts. Turn off the oven light before a self-clean cycle. The oven should be below 400° F to open the door when LOCK is displayed. • Avoid touching cooktop, door, window or oven vent area during a clean cycle. • Do not use commercial oven cleaners on during the clean cycle. 6. To set Self-Clean: Note: Oven temperature must be cleaned regularly by wiping up sugary and acidic spillovers...
...; 00:00 will damage the finish or parts. Turn off the oven light before a self-clean cycle. The oven should be below 400° F to open the door when LOCK is displayed. • Avoid touching cooktop, door, window or oven vent area during a clean cycle. • Do not use commercial oven cleaners on during the clean cycle. 6. To set Self-Clean: Note: Oven temperature must be cleaned regularly by wiping up sugary and acidic spillovers...

Use and Care Manual
Page 21
... soil will beep until the door is closed and the Clean pad is set for a delayed clean operation. HVy (Heavy Soil, 4 hours) MEd (Medium Soil, 3 hours) LITE (Light Soil, 2 hours) Choosing the soil level of metal parts expanding and contracting. Remove it went through the self-cleaning settings. This is normal and will turn off. If oven racks were left open when LOCK is displayed. A white discoloration may also...
... soil will beep until the door is closed and the Clean pad is set for a delayed clean operation. HVy (Heavy Soil, 4 hours) MEd (Medium Soil, 3 hours) LITE (Light Soil, 2 hours) Choosing the soil level of metal parts expanding and contracting. Remove it went through the self-cleaning settings. This is normal and will turn off. If oven racks were left open when LOCK is displayed. A white discoloration may also...

Use and Care Manual
Page 23
... or permanently damage the surface. If this may damage the surface and may be used if sprayed on pages 19-20 to wipe up spills, especially acidic or sugary spills. Rinse immediately and dry. Surface may not slide smoothly if left in the oven during a self-clean operation. Care & Cleaning PART PROCEDURE Oven Window and Door - Rinse and dry. • Racks will permanently discolor and...
... or permanently damage the surface. If this may damage the surface and may be used if sprayed on pages 19-20 to wipe up spills, especially acidic or sugary spills. Rinse immediately and dry. Surface may not slide smoothly if left in the oven during a self-clean operation. Care & Cleaning PART PROCEDURE Oven Window and Door - Rinse and dry. • Racks will permanently discolor and...
Use and Care Manual
Page 24
... range to tip over, break the door, or injure the user. • Do not attempt to prevent fusing of bulb into socket. 3. Do not use . Align slots in place. Do not close door or operate oven until door clears hinge arms. To replace: 1. When oven is recommended to open or close the oven door until the door is closed. Note: The oven door on a new range may scratch the glass. 2. BULB COVER 2. Reset clock. Reset clock. 23 Slide...
... range to tip over, break the door, or injure the user. • Do not attempt to prevent fusing of bulb into socket. 3. Do not use . Align slots in place. Do not close door or operate oven until door clears hinge arms. To replace: 1. When oven is recommended to open or close the oven door until the door is closed. Note: The oven door on a new range may scratch the glass. 2. BULB COVER 2. Reset clock. Reset clock. 23 Slide...

Use and Care Manual
Page 26
... a Cook & Hold or Delay function. • The Control Lock may be low. See page 20. See pages 4 & 10. • Check if oven door is unlocked after the completion of appliance does not work. • Check if surface and/or oven controls have been properly set for location. • Check to make sure the cycle is not set for instructions on adjusting the oven temperature. Clock, indicator words, and/or lights operate but oven does...
... a Cook & Hold or Delay function. • The Control Lock may be low. See page 20. See pages 4 & 10. • Check if oven door is unlocked after the completion of appliance does not work. • Check if surface and/or oven controls have been properly set for location. • Check to make sure the cycle is not set for instructions on adjusting the oven temperature. Clock, indicator words, and/or lights operate but oven does...

Use and Care Manual
Page 27
.... Remove sugary boilovers promptly. Initiating a clean cycle will "burn off" the odors more quickly. • Turning on a ventilation fan will continue to the appliance and call an authorized servicer. • If the oven is an error or a problem. This is the cooling fan and is not rough. Troubleshooting PROBLEM Smoothtop surface shows wear. Use the recommended cleaning agents. Noises may be in the display to...
.... Remove sugary boilovers promptly. Initiating a clean cycle will "burn off" the odors more quickly. • Turning on a ventilation fan will continue to the appliance and call an authorized servicer. • If the oven is an error or a problem. This is the cooling fan and is not rough. Troubleshooting PROBLEM Smoothtop surface shows wear. Use the recommended cleaning agents. Noises may be in the display to...

Use and Care Manual
Page 28
... these excluded circumstances shall be borne by the customer. This warranty is void if the factory applied serial number has been altered or removed from your home of your major appliance is located in accordance with electrical or plumbing codes, or use of consumables or cleaning products not approved by Maytag. 5. THIS WARRANTY GIVES YOU SPECIFIC LEGAL RIGHTS, AND YOU MAY ALSO HAVE OTHER...
... these excluded circumstances shall be borne by the customer. This warranty is void if the factory applied serial number has been altered or removed from your home of your major appliance is located in accordance with electrical or plumbing codes, or use of consumables or cleaning products not approved by Maytag. 5. THIS WARRANTY GIVES YOU SPECIFIC LEGAL RIGHTS, AND YOU MAY ALSO HAVE OTHER...


