

Use and Care Guide
Page 4
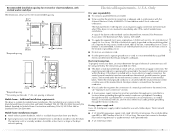
...116.8 cm) or 51.5" (130.8 cm), respectively. Pedestal Height Color Part Number 10" (25.4 cm) White MHP1000SQ 10" (25.4 cm) Black MHP1000SB 15.5" (39.4 cm) White MHP1500SQ 15.5" (39.4 cm) Black MHP1500SB 15.5" (39.4 cm) Paci c Blue MHP1500SK 15.5" (39... or hex-head socket wrench (for adjusting dryer feet) Wire stripper (direct wire installations) Caulking gun and compound (for this dryer. Ask for venting requirements. The pedestal will need to purchase a Stack Kit. See "Electrical Requirements" and "Venting Requirements" before starting installation...
...116.8 cm) or 51.5" (130.8 cm), respectively. Pedestal Height Color Part Number 10" (25.4 cm) White MHP1000SQ 10" (25.4 cm) Black MHP1000SB 15.5" (39.4 cm) White MHP1500SQ 15.5" (39.4 cm) Black MHP1500SB 15.5" (39.4 cm) Paci c Blue MHP1500SK 15.5" (39... or hex-head socket wrench (for adjusting dryer feet) Wire stripper (direct wire installations) Caulking gun and compound (for this dryer. Ask for venting requirements. The pedestal will need to purchase a Stack Kit. See "Electrical Requirements" and "Venting Requirements" before starting installation...
Use and Care Guide
Page 7
... 6"* (15.2 cm) 72" (182.9 cm) 5 14 cm) 1" (2.5 cm) 27" (68.6 cm) 1" (2.5 cm) *Required spacing **For venting out the side, 1" (2.5 cm) spacing is allowed. The opening (such as the dryer exhaust opening. A time-delay fuse or circuit breaker is adequate and in ring terminals or spade... conductor (white wire) within the dryer. Electrical Requirements - When the neutral ground conductor is secured under the neutral terminal (center or white wire) of the terminal block. Electrical Connection To properly install your dryer, you must determine the type of electrical connection you...
... 6"* (15.2 cm) 72" (182.9 cm) 5 14 cm) 1" (2.5 cm) 27" (68.6 cm) 1" (2.5 cm) *Required spacing **For venting out the side, 1" (2.5 cm) spacing is allowed. The opening (such as the dryer exhaust opening. A time-delay fuse or circuit breaker is adequate and in ring terminals or spade... conductor (white wire) within the dryer. Electrical Requirements - When the neutral ground conductor is secured under the neutral terminal (center or white wire) of the terminal block. Electrical Connection To properly install your dryer, you must determine the type of electrical connection you...

Use and Care Guide
Page 8
... current-carrying wires must be identified by providing a path of least resistance for electric current. The plug must be grounded. WARNING: Improper connection of electric shock. In the event of electric shock by a white cover. The ground wire (ground conductor) may be : ■ Flexible armored... supply cord with ring or spade terminals and UL listed strain relief. GROUNDING INSTRUCTIONS ■ For a grounded, cord-connected dryer: This dryer must be run with the circuit conductors and connected to the equipment-grounding terminal or lead on the power supply cord: if...
... current-carrying wires must be identified by providing a path of least resistance for electric current. The plug must be grounded. WARNING: Improper connection of electric shock. In the event of electric shock by a white cover. The ground wire (ground conductor) may be : ■ Flexible armored... supply cord with ring or spade terminals and UL listed strain relief. GROUNDING INSTRUCTIONS ■ For a grounded, cord-connected dryer: This dryer must be run with the circuit conductors and connected to the equipment-grounding terminal or lead on the power supply cord: if...

Use and Care Guide
Page 10
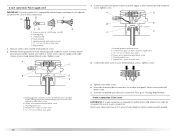
... center wire) to center terminal (silver). Connect neutral wire (white or center wire) to center terminal (silver). Failure to do so can result in death, fire, or electrical shock. Remove the hold the two clamp sections together. Strain relief tab ...gold). Disconnect power. 2. C A. Terminal block cover and hold in place. down screw and terminal block cover. A A. Disconnect power before making electrical connections. External ground conductor screw C. Style 1: Power supply cord strain relief ■ Remove the screws from a ³⁄₄" (1.9 cm)...
... center wire) to center terminal (silver). Connect neutral wire (white or center wire) to center terminal (silver). Failure to do so can result in death, fire, or electrical shock. Remove the hold the two clamp sections together. Strain relief tab ...gold). Disconnect power. 2. C A. Terminal block cover and hold in place. down screw and terminal block cover. A A. Disconnect power before making electrical connections. External ground conductor screw C. Style 1: Power supply cord strain relief ■ Remove the screws from a ³⁄₄" (1.9 cm)...
Use and Care Guide
Page 12
... power supply cord under center, silver-colored terminal block screw. Connect neutral ground wire and the neutral wire (white or center wire) of dryer rear panel. Center silver-colored terminal block screw E. Dotted line shows position of NEUTRAL ground wire before being... completed your electrical connection. Remove center silver-colored terminal block screw. 2. Ground wire (green or bare) of power supply cord C 1.9 cm) UL listed strain relief D. B D E A. Center silver-colored terminal block screw C. You have 5 ft (1.52 m) of extra length so dryer can be moved...
... power supply cord under center, silver-colored terminal block screw. Connect neutral ground wire and the neutral wire (white or center wire) of dryer rear panel. Center silver-colored terminal block screw E. Dotted line shows position of NEUTRAL ground wire before being... completed your electrical connection. Remove center silver-colored terminal block screw. 2. Ground wire (green or bare) of power supply cord C 1.9 cm) UL listed strain relief D. B D E A. Center silver-colored terminal block screw C. You have 5 ft (1.52 m) of extra length so dryer can be moved...
Use and Care Guide
Page 13
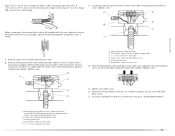
... Squeeze hooked ends together. Tighten screws. 5. Tighten strain relief screw. Secure cover with hold- You have completed your electrical connection. Now go to the terminal block, place the hooked end of the wire under the screw of the other ...white or center wire) 4. A D E (12.75c"m) B F When connecting to "Venting Requirements." Place the hooked ends of the terminal block (hook facing right), squeeze hooked end together and tighten screw, as shown. Center silver-colored terminal block screw C. Strip insulation back 1" (2.5 cm). Shape ends of wires into slot of dryer...
... Squeeze hooked ends together. Tighten screws. 5. Tighten strain relief screw. Secure cover with hold- You have completed your electrical connection. Now go to the terminal block, place the hooked end of the wire under the screw of the other ...white or center wire) 4. A D E (12.75c"m) B F When connecting to "Venting Requirements." Place the hooked ends of the terminal block (hook facing right), squeeze hooked end together and tighten screw, as shown. Center silver-colored terminal block screw C. Strip insulation back 1" (2.5 cm). Shape ends of wires into slot of dryer...

Use and Care Guide
Page 14
...screw. Secure cover with outer covering. Direct wire cable must have completed your electrical connection. If using 3-wire cable with ground wire, cut bare wire even with holddown screw. 6. Shape ends of wires into slot of dryer rear panel. Center silver-colored terminal block screw D. C A B D...ft (1.52 m) of the terminal block (hook facing right), squeeze hooked end together and tighten screw, as shown. Connect neutral wire (white or center wire) of power supply cord to the center, silvercolored terminal screw of cable. Now go to "Venting Requirements." 3-wire ...
...screw. Secure cover with outer covering. Direct wire cable must have completed your electrical connection. If using 3-wire cable with ground wire, cut bare wire even with holddown screw. 6. Shape ends of wires into slot of dryer rear panel. Center silver-colored terminal block screw D. C A B D...ft (1.52 m) of the terminal block (hook facing right), squeeze hooked end together and tighten screw, as shown. Connect neutral wire (white or center wire) of power supply cord to the center, silvercolored terminal screw of cable. Now go to "Venting Requirements." 3-wire ...

Use and Care Guide
Page 15
... hooked ends of the other wires to an adequate ground. 6. You have completed your electrical connection. A. Center silver-colored terminal block screw C. Place the hooked end of the neutral wire (white or center wire) of direct wire cable under the center screw of power supply cord/...screws. 4. down screw. 15 Tighten strain relief screw. 5. Insert tab of terminal block cover into slot of dryer rear panel. Insert tab of terminal block cover into slot of dryer rear panel. Tighten screw. Tighten screws. 4. Secure cover with hold- Now go to neutral wire. 1. External ...
... hooked ends of the other wires to an adequate ground. 6. You have completed your electrical connection. A. Center silver-colored terminal block screw C. Place the hooked end of the neutral wire (white or center wire) of direct wire cable under the center screw of power supply cord/...screws. 4. down screw. 15 Tighten strain relief screw. 5. Insert tab of terminal block cover into slot of dryer rear panel. Insert tab of terminal block cover into slot of dryer rear panel. Tighten screw. Tighten screws. 4. Secure cover with hold- Now go to neutral wire. 1. External ...
Use and Care Guide
Page 17
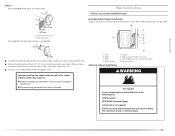
...the dryer from the rear of the following kits: 279818 (white) W10186596 (midnight grey) Contact your exhaust installation type A 4" (10.2 cm) 4" (10.2 cm) A. Elbow C. Clamps F. Exhaust hood must be at least 12" (30.5 cm) from entering the home. Improper venting can result in death, fire, electrical shock,... or bushes, snow line, etc.). B Plan Vent System Choose your local dealer. Do not use an exhaust hood with one of the dryer. Failure to follow these instructions can cause moisture and lint to collect indoors, which may be in : Moisture damage to woodwork, furniture, ...
...the dryer from the rear of the following kits: 279818 (white) W10186596 (midnight grey) Contact your exhaust installation type A 4" (10.2 cm) 4" (10.2 cm) A. Elbow C. Clamps F. Exhaust hood must be at least 12" (30.5 cm) from entering the home. Improper venting can result in death, fire, electrical shock,... or bushes, snow line, etc.). B Plan Vent System Choose your local dealer. Do not use an exhaust hood with one of the dryer. Failure to follow these instructions can cause moisture and lint to collect indoors, which may be in : Moisture damage to woodwork, furniture, ...


