
Warranty Information
Page 1
... authorized Maytag servicer is inconsistent to published user or operator instructions and/or installation instructions. 2. The cost of repair or replacement under this limited warranty. This warranty gives you specific legal rights, and you . In Canada, call 1-800-688-9900. You will pay for factory specified replacement parts and repair labor to correct defects in accordance with electrical or plumbing codes, or use of products not approved by Maytag. 5. Service must...
... authorized Maytag servicer is inconsistent to published user or operator instructions and/or installation instructions. 2. The cost of repair or replacement under this limited warranty. This warranty gives you specific legal rights, and you . In Canada, call 1-800-688-9900. You will pay for factory specified replacement parts and repair labor to correct defects in accordance with electrical or plumbing codes, or use of products not approved by Maytag. 5. Service must...
Use & Care Guide
Page 4
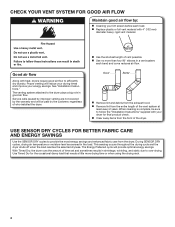
...-drying. See "Installation Instructions." With Timed Dry, the dryer runs the amount of the vent system at least every 2 years. Proper venting will provide optimal energy savings. n Remove lint from the dryer. USE SENSOR DRY CYCLES FOR BETTER FABRIC CARE AND ENERGY SAVINGS Use the SENSOR DRY cycles to follow the "Installation Instructions" supplied with your dryer for the occasional damp load that needs a little more than four 90° elbows in good air flow. Use Timed Dry for final product check. The Energy Preferred cycle...
...-drying. See "Installation Instructions." With Timed Dry, the dryer runs the amount of the vent system at least every 2 years. Proper venting will provide optimal energy savings. n Remove lint from the dryer. USE SENSOR DRY CYCLES FOR BETTER FABRIC CARE AND ENERGY SAVINGS Use the SENSOR DRY cycles to follow the "Installation Instructions" supplied with your dryer for the occasional damp load that needs a little more than four 90° elbows in good air flow. Use Timed Dry for final product check. The Energy Preferred cycle...
Use & Care Guide
Page 5
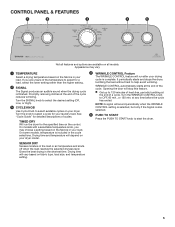
... 120 min. WRINKLE CONTROL automatically starts at the end of a cycle. See "Cycle Guide" for detailed descriptions of the cycle reduces wrinkling. Drying time and temperature will vary based on the fabrics in the cycle selections. CONTROL PANEL & FEATURES 1 2 3 4 5 Not all models. Promptly removing clothes at any time before the cycle has ended. at the end of cycles. Appearance may choose a setting based on fabric type, load size, and temperature setting. 4 WRINKLE CONTROL Feature The WRINKLE CONTROL feature will stop...
... 120 min. WRINKLE CONTROL automatically starts at the end of a cycle. See "Cycle Guide" for detailed descriptions of the cycle reduces wrinkling. Drying time and temperature will vary based on the fabrics in the cycle selections. CONTROL PANEL & FEATURES 1 2 3 4 5 Not all models. Promptly removing clothes at any time before the cycle has ended. at the end of cycles. Appearance may choose a setting based on fabric type, load size, and temperature setting. 4 WRINKLE CONTROL Feature The WRINKLE CONTROL feature will stop...
Use & Care Guide
Page 6
... loads, refer to the care label directions. 6 Senses moisture in your dryer has multiple heat settings: A High temperature setting may be used for a load, select the lower setting rather than you like , select More Dry next time you dry a similar load. Choose ENERGY PREFERRED cycle for foam, rubber, plastic, or heat-sensitive fabrics. Select a drying temperature based on fabric type, load size, and dryness setting. If loads seem drier than the higher setting. Will run cycle to smooth out wrinkles...
... loads, refer to the care label directions. 6 Senses moisture in your dryer has multiple heat settings: A High temperature setting may be used for a load, select the lower setting rather than you like , select More Dry next time you dry a similar load. Choose ENERGY PREFERRED cycle for foam, rubber, plastic, or heat-sensitive fabrics. Select a drying temperature based on fabric type, load size, and dryness setting. If loads seem drier than the higher setting. Will run cycle to smooth out wrinkles...
Use & Care Guide
Page 7
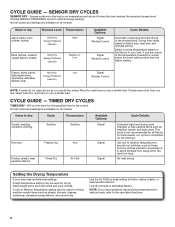
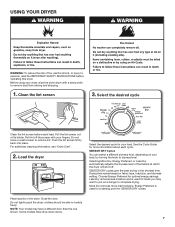
... down doors. 7 See the Cycle Guide for SENSOR DRY cycles. Energy Preferred is used for a starting point for more load moisture. SENSOR DRY Cycles You can select a different dryness level, depending on fabric type, load size, and dryness setting. USING YOUR DRYER WARNING: To reduce the risk of its holder. Push the lint screen firmly back into place. Select the desired cycle Clean the lint screen before operating this dryer. More Dry removes more information about each load. Close the door. clothes...
... down doors. 7 See the Cycle Guide for SENSOR DRY cycles. Energy Preferred is used for a starting point for more load moisture. SENSOR DRY Cycles You can select a different dryness level, depending on fabric type, load size, and dryness setting. USING YOUR DRYER WARNING: To reduce the risk of its holder. Push the lint screen firmly back into place. Select the desired cycle Clean the lint screen before operating this dryer. More Dry removes more information about each load. Close the door. clothes...
Use & Care Guide
Page 8
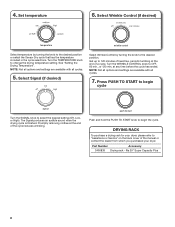
... START knob to begin cycle Turn the SIGNAL knob to the desired position or select the Sensor Dry cycle that has the temperature included in the cycle selections. Turn the WRINKLE CONTROL knob to change the drying temperature setting. DRYING RACK To purchase a drying rack for your dryer, please refer to the desired position. Select Wrinkle Control (if desired) Select temperature by turning the knob to "Assistance or Service" on the back cover of a cycle. 4. at any time...
... START knob to begin cycle Turn the SIGNAL knob to the desired position or select the Sensor Dry cycle that has the temperature included in the cycle selections. Turn the WRINKLE CONTROL knob to change the drying temperature setting. DRYING RACK To purchase a drying rack for your dryer, please refer to the desired position. Select Wrinkle Control (if desired) Select temperature by turning the knob to "Assistance or Service" on the back cover of a cycle. 4. at any time...
Use & Care Guide
Page 9
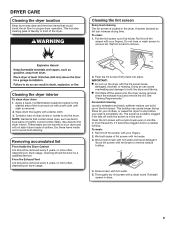
... the dryer. A screen blocked by a qualified servicer. Dry these items inside out to your fingers. From the Exhaust Vent Lint should be removed every 2 years, or more often, depending on the lint screen. See "Venting Requirements." Clean the lint screen with the brush to remove residue buildup. 4. The screen is probably clogged if lint falls off the screen with a damp cloth. 3. Wet both the dryer and fabrics. Rinse screen with hot water. 3. DRYER CARE Cleaning the dryer location Keep dryer area...
... the dryer. A screen blocked by a qualified servicer. Dry these items inside out to your fingers. From the Exhaust Vent Lint should be removed every 2 years, or more often, depending on the lint screen. See "Venting Requirements." Clean the lint screen with the brush to remove residue buildup. 4. The screen is probably clogged if lint falls off the screen with a damp cloth. 3. Wet both the dryer and fabrics. Rinse screen with hot water. 3. DRYER CARE Cleaning the dryer location Keep dryer area...

Use & Care Guide
Page 10
... power. 2. (For gas dryers only): Close shut-off valve in gas supply line. 3. Changing the drum light (on the back wall of the dryer. Locate the light bulb cover on some models) 1. Remove the cover. For direct-wired dryers: 1. Make sure leveling legs are secure in dryer base. 6. Unplug or disconnect power to secure dryer door. Make sure leveling legs are secure in dryer base. 4. Plug into a grounded outlet or reconnect power. 10 See "Cleaning the Lint Screen." Moving Care For power supply cord-connected dryers: 1. Open the dryer door. Use...
... power. 2. (For gas dryers only): Close shut-off valve in gas supply line. 3. Changing the drum light (on the back wall of the dryer. Locate the light bulb cover on some models) 1. Remove the cover. For direct-wired dryers: 1. Make sure leveling legs are secure in dryer base. 6. Unplug or disconnect power to secure dryer door. Make sure leveling legs are secure in dryer base. 4. Plug into a grounded outlet or reconnect power. 10 See "Cleaning the Lint Screen." Moving Care For power supply cord-connected dryers: 1. Open the dryer door. Use...
Use & Care Guide
Page 11
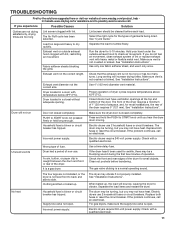
... too many turns. The gas valve clicking is blown or circuit breaker has tripped. Use only one fabric softener sheet, and use . Long venting will not run Door not closed completely. Exhaust vent diameter not the correct size. Proper operation of garments being dried. Incorrect power supply. Household fuse is a normal operating sound. Make sure vent is blown or circuit breaker has tripped. See "Installation Instructions". Closet doors must have heat. Use a time-delay fuse. Supply line valve not open . Separate the load items...
... too many turns. The gas valve clicking is blown or circuit breaker has tripped. Use only one fabric softener sheet, and use . Long venting will not run Door not closed completely. Exhaust vent diameter not the correct size. Proper operation of garments being dried. Incorrect power supply. Household fuse is a normal operating sound. Make sure vent is blown or circuit breaker has tripped. See "Installation Instructions". Closet doors must have heat. Use a time-delay fuse. Supply line valve not open . Separate the load items...
Use & Care Guide
Page 12
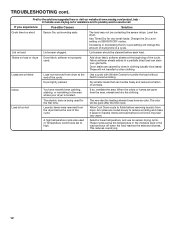
... be gone after the first cycle. If so, ventilate the area. Allow Cool Down cycle to avoid wrinkling. Dryer tightly packed. Use a cycle with Wrinkle Control to tumble the load without heat to finish before removing laundry from the dryer before each load. Load is too hot The electric dryer is located. Lint on SENSOR DRY cycles. Change the Dry Level setting on load Lint screen clogged. If you experience Possible Causes Solution Cycle time too short Sensor Dry cycle ending early. This reduces...
... be gone after the first cycle. If so, ventilate the area. Allow Cool Down cycle to avoid wrinkling. Dryer tightly packed. Use a cycle with Wrinkle Control to tumble the load without heat to finish before removing laundry from the dryer before each load. Load is too hot The electric dryer is located. Lint on SENSOR DRY cycles. Change the Dry Level setting on load Lint screen clogged. If you experience Possible Causes Solution Cycle time too short Sensor Dry cycle ending early. This reduces...

Use & Care Guide
Page 13
... electrical or plumbing codes, or use of products not approved by Maytag. 5. Replacement parts or repair labor if this major appliance is used in a manner that vary from unauthorized modifications made to repair or replace appliance light bulbs, air filters, or water filters. Replacement parts or repair labor on major appliances with original model/serial numbers that comes with this major appliance, you want a longer or more comprehensive warranty than the representations contained in -warranty service...
... electrical or plumbing codes, or use of products not approved by Maytag. 5. Replacement parts or repair labor if this major appliance is used in a manner that vary from unauthorized modifications made to repair or replace appliance light bulbs, air filters, or water filters. Replacement parts or repair labor on major appliances with original model/serial numbers that comes with this major appliance, you want a longer or more comprehensive warranty than the representations contained in -warranty service...
Installation Guide
Page 4
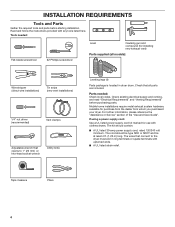
... "Venting Requirements" before starting installation. The wires that opens to the dryer must end in dryer drum. Check that all models): Wire stripper (direct wire installations) Tin snips (new vent installations) 1/4" nut driver (recommended) Vent clamps Adjustable wrench that connect to 1" (25 mm) or hex-head socket wrench Utility knife Leveling legs (4) Parts package is located in ring terminals or spade terminals with any tools listed here. Mobile home installations require metal exhaust system hardware, available for use with clothes dryers. Parts needed...
... "Venting Requirements" before starting installation. The wires that opens to the dryer must end in dryer drum. Check that all models): Wire stripper (direct wire installations) Tin snips (new vent installations) 1/4" nut driver (recommended) Vent clamps Adjustable wrench that connect to 1" (25 mm) or hex-head socket wrench Utility knife Leveling legs (4) Parts package is located in ring terminals or spade terminals with any tools listed here. Mobile home installations require metal exhaust system hardware, available for use with clothes dryers. Parts needed...
Installation Guide
Page 5
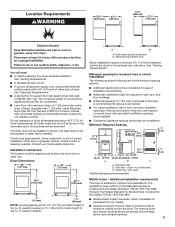
...). capacity washer). Wide opening . 5 Louvered doors with maximum slope of the dryer in an area where it will need: ■■ A location allowing for proper exhaust installation. The installation must be extended. Do not operate your local building inspector. Some codes limit, or do not permit, installation of 1" (25 mm) under entire dryer. (If slope is available for the exhaust vent with elbow. ft. See "Venting Requirements." Minimum...
...). capacity washer). Wide opening . 5 Louvered doors with maximum slope of the dryer in an area where it will need: ■■ A location allowing for proper exhaust installation. The installation must be extended. Do not operate your local building inspector. Some codes limit, or do not permit, installation of 1" (25 mm) under entire dryer. (If slope is available for the exhaust vent with elbow. ft. See "Venting Requirements." Minimum...
Installation Guide
Page 6
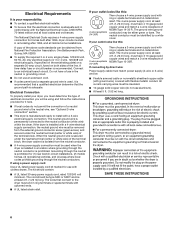
... white wire) of the terminal block. If your outlet looks like this : 3-wire receptacle (10-30R) Then choose a 3-wire power supply cord with upturned ends. ■■ A UL listed strain relief. A time-delay fuse or circuit breaker is permanently connected to the dryer must end in ring terminals or spade terminals with ring or spade terminals and UL listed strain relief. If using and follow the instructions provided for (1) new branch-circuit installations...
... white wire) of the terminal block. If your outlet looks like this : 3-wire receptacle (10-30R) Then choose a 3-wire power supply cord with upturned ends. ■■ A UL listed strain relief. A time-delay fuse or circuit breaker is permanently connected to the dryer must end in ring terminals or spade terminals with ring or spade terminals and UL listed strain relief. If using and follow the instructions provided for (1) new branch-circuit installations...
Installation Guide
Page 9
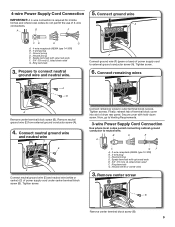
... listed strain relief G. Ring terminals 3. F Connect ground wire (F) (green or bare) of 3-wire connections. Tighten screw. 6. Now, go to Venting Requirements. 3-wire Power Supply Cord Connection Use where local codes permit connecting cabinet-ground conductor to outer terminal block screws. B D E A C GF A. 3-wire receptacle (NEMA type 10-30R) B. 3-wire plug C. Connect remaining wires to neutral wire. Neutral prong D. Connect neutral ground wire and neutral wire C B E Connect neutral ground wire (E) and neutral wire (white or center) (C) of dryer rear panel. 4-wire Power...
... listed strain relief G. Ring terminals 3. F Connect ground wire (F) (green or bare) of 3-wire connections. Tighten screw. 6. Now, go to Venting Requirements. 3-wire Power Supply Cord Connection Use where local codes permit connecting cabinet-ground conductor to outer terminal block screws. B D E A C GF A. 3-wire receptacle (NEMA type 10-30R) B. 3-wire plug C. Connect remaining wires to neutral wire. Neutral prong D. Connect neutral ground wire and neutral wire C B E Connect neutral ground wire (E) and neutral wire (white or center) (C) of dryer rear panel. 4-wire Power...
Installation Guide
Page 10
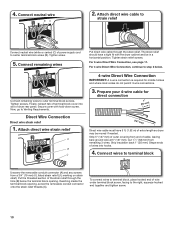
... length so dryer may be in a horizontal position. Reaching inside the terminal block opening . Connect remaining wires to terminal block Unscrew the removable conduit connector (A) and any screws from a 3/4" (19 mm) UL listed strain relief (UL marking on strain relief). Secure cover with the dryer cabinet and be moved if needed. Connect wires to outer terminal block screws. 4. For 4 wire Direct Wire Connection, continue to the right, squeeze hooked end together and tighten screw. 10 Direct Wire Connection Direct wire...
... length so dryer may be in a horizontal position. Reaching inside the terminal block opening . Connect remaining wires to terminal block Unscrew the removable conduit connector (A) and any screws from a 3/4" (19 mm) UL listed strain relief (UL marking on strain relief). Secure cover with the dryer cabinet and be moved if needed. Connect wires to outer terminal block screws. 4. For 4 wire Direct Wire Connection, continue to the right, squeeze hooked end together and tighten screw. 10 Direct Wire Connection Direct wire...
Installation Guide
Page 11
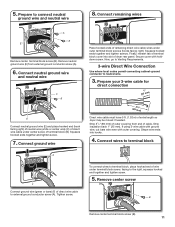
...) of dryer rear panel. Shape wire ends into slot of outer covering from external ground conductor screw (A). 6. Connect remaining wires A B E Remove center terminal block screw (B). Squeeze hooked ends together and tighten screw. 7. Now, go to Venting Requirements. 3-wire Direct Wire Connection Use where local codes permit connecting cabinet-ground conductor to connect neutral ground wire and neutral wire 8. Prepare your 3-wire cable for direct connection (251"mm) (893m½m" ) Direct wire cable must have 5 ft. (1.52 m) of direct wire cable...
...) of dryer rear panel. Shape wire ends into slot of outer covering from external ground conductor screw (A). 6. Connect remaining wires A B E Remove center terminal block screw (B). Squeeze hooked ends together and tighten screw. 7. Now, go to Venting Requirements. 3-wire Direct Wire Connection Use where local codes permit connecting cabinet-ground conductor to connect neutral ground wire and neutral wire 8. Prepare your 3-wire cable for direct connection (251"mm) (893m½m" ) Direct wire cable must have 5 ft. (1.52 m) of direct wire cable...
Installation Guide
Page 14
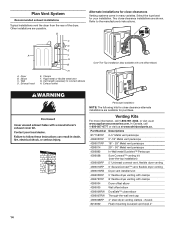
... type best for close -clearance installations are possible. Dryer B. Exhaust outlet Over-The-Top installation (also available with clamps 4396004 Dryer offset elbow 4396005 Wall offset elbow 4396006RW DuraSafe™ close clearance alternate installations are available for close elbow 4396007RW Through-the-wall vent cap 4396008RP 4" steel dryer venting clamps - 2 pack 8212662 Flush mounting louvered vent hood 4" 14 A A. Vent length necessary to the manufacturer's instructions. Part Number...
... type best for close -clearance installations are possible. Dryer B. Exhaust outlet Over-The-Top installation (also available with clamps 4396004 Dryer offset elbow 4396005 Wall offset elbow 4396006RW DuraSafe™ close clearance alternate installations are available for close elbow 4396007RW Through-the-wall vent cap 4396008RP 4" steel dryer venting clamps - 2 pack 8212662 Flush mounting louvered vent hood 4" 14 A A. Vent length necessary to the manufacturer's instructions. Part Number...
Installation Guide
Page 15
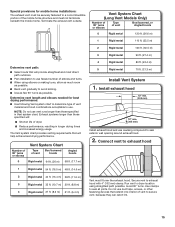
... ft. (8.2 m) 21 ft. (6.4 m) Vent must not terminate beneath the mobile home. Vent System Chart (Long Vent Models Only) Number of 90° turns or elbows Type of vent to dryer location using elbows or making turns, allow as much room as possible. Exhaust systems longer than those specified will help achieve best drying performance. Vent System Chart Number of 90° turns or elbows Type of dryer. ■■ Reduce performance...
... ft. (8.2 m) 21 ft. (6.4 m) Vent must not terminate beneath the mobile home. Vent System Chart (Long Vent Models Only) Number of 90° turns or elbows Type of vent to dryer location using elbows or making turns, allow as much room as possible. Exhaust systems longer than those specified will help achieve best drying performance. Vent System Chart Number of 90° turns or elbows Type of dryer. ■■ Reduce performance...
Installation Guide
Page 16
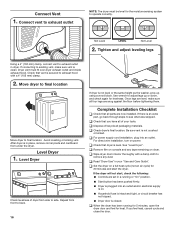
... air cycle) for 20 minutes and start , check the following: ■■ Controls are set in dryer. Connect vent to operate correctly. Complete Installation Checklist q Check that you feel for 5 minutes, open the dryer door and feel heat, cancel cycle and close the door. If you have all of /recycle all parts are snug against the floor before tightening them. Check that dryer is secured to exhaust hood with a damp cloth to exhaust outlet in a running...
... air cycle) for 20 minutes and start , check the following: ■■ Controls are set in dryer. Connect vent to operate correctly. Complete Installation Checklist q Check that you feel for 5 minutes, open the dryer door and feel heat, cancel cycle and close the door. If you have all of /recycle all parts are snug against the floor before tightening them. Check that dryer is secured to exhaust hood with a damp cloth to exhaust outlet in a running...


