
Owners Manual
Page 4
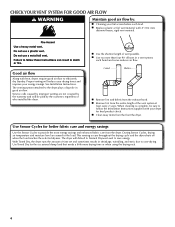
... in shrinkage, wrinkling, and static due to provide the most energy savings and enhanced fabric care from the entire length of vent possible. Proper venting will be sure to efficiently dry laundry. When cleaning is complete, be paid by the customer, regardless of time set and... dryers require good air flow to follow the Installation Instructions supplied with 4" (102 mm) diameter heavy, rigid vent material. See Installation Instructions. n Replace plastic or foil vent material with your lint screen before each bend and curve reduces air flow. n Use no more drying time ...
... in shrinkage, wrinkling, and static due to provide the most energy savings and enhanced fabric care from the entire length of vent possible. Proper venting will be sure to efficiently dry laundry. When cleaning is complete, be paid by the customer, regardless of time set and... dryers require good air flow to follow the Installation Instructions supplied with 4" (102 mm) diameter heavy, rigid vent material. See Installation Instructions. n Replace plastic or foil vent material with your lint screen before each bend and curve reduces air flow. n Use no more drying time ...

Owners Manual
Page 10
... the air flow for your clothes, or cause the dryer to a residue buildup. Doing so can build up . See "Venting Requirements." Thoroughly dry lint screen with a damp cloth. 3. From the Exhaust Vent Lint should be removed every 2 years, or more often, depending on dryer usage. Push the lint screen firmly back into...
... the air flow for your clothes, or cause the dryer to a residue buildup. Doing so can build up . See "Venting Requirements." Thoroughly dry lint screen with a damp cloth. 3. From the Exhaust Vent Lint should be removed every 2 years, or more often, depending on dryer usage. Push the lint screen firmly back into...

Owners Manual
Page 12
... Select the right cycle for most installations, the rear of garments being dried. Dryer located in a room with heavy metal or flexible metal vent. Household fuse is a normal operating sound. If the problem continues, call an electrician. If the dryer hasn't been used for 5-10 ...minutes. The drum may be turning, but you may be cleaned before laundering. Check with a qualified electrician. http://www.maytag.com/help - Long venting will not run Door not closed completely. Dryer will increase drying times. The drum may be turning, but you may vibrate if...
... Select the right cycle for most installations, the rear of garments being dried. Dryer located in a room with heavy metal or flexible metal vent. Household fuse is a normal operating sound. If the problem continues, call an electrician. If the dryer hasn't been used for 5-10 ...minutes. The drum may be turning, but you may be cleaned before laundering. Check with a qualified electrician. http://www.maytag.com/help - Long venting will not run Door not closed completely. Dryer will increase drying times. The drum may be turning, but you may vibrate if...
Installation Instructions
Page 3
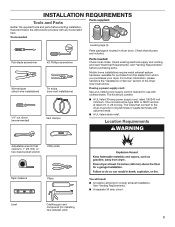
...use with clothes dryers. INSTALLATION REQUIREMENTS Tools and Parts Parts supplied: Gather the required tools and parts before purchasing parts. See "Venting Requirements." ■■ A separate 30 amp circuit. 3 Tools needed : Check local codes. Parts needed : Flat-blade screwdriver... #2 Phillips screwdriver Wire stripper (direct wire installations) Tin snips (new vent installations) 1/4" nut driver (recommended) Vent clamps Leveling legs (4) Parts package is located in ring terminals or spade terminals with any tools listed here. ...
...use with clothes dryers. INSTALLATION REQUIREMENTS Tools and Parts Parts supplied: Gather the required tools and parts before purchasing parts. See "Venting Requirements." ■■ A separate 30 amp circuit. 3 Tools needed : Check local codes. Parts needed : Flat-blade screwdriver... #2 Phillips screwdriver Wire stripper (direct wire installations) Tin snips (new vent installations) 1/4" nut driver (recommended) Vent clamps Leveling legs (4) Parts package is located in ring terminals or spade terminals with any tools listed here. ...
Installation Instructions
Page 4
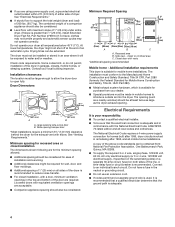
...be considered for ease of an automatic cycle. Installation clearances: The location must be considered. ■■ Level floor with vents *Additional spacing recommended 3"* (76 mm) Mobile home - Minimum spacing for recessed area or closet installation The dimensions shown following ... 27" 1" 1"* 29 ¼" 5 ½"* (25 mm) (686 mm) (25 mm) (25 mm) (743 mm) (140 mm) A B C A. Side view - See "Venting Requirements." Recessed area B. ■■ If you are required. The dryer must not be exposed to the Manufactured Home Construction and Safety Standard, Title 24...
...be considered for ease of an automatic cycle. Installation clearances: The location must be considered. ■■ Level floor with vents *Additional spacing recommended 3"* (76 mm) Mobile home - Minimum spacing for recessed area or closet installation The dimensions shown following ... 27" 1" 1"* 29 ¼" 5 ½"* (25 mm) (686 mm) (25 mm) (25 mm) (743 mm) (140 mm) A B C A. Side view - See "Venting Requirements." Recessed area B. ■■ If you are required. The dryer must not be exposed to the Manufactured Home Construction and Safety Standard, Title 24...

Installation Instructions
Page 6
... back edge of cardboard from dryer carton; Now stand the dryer on cardboard. 6 Slide the dryer until diamond marking is close to connect the exhaust vent. Firmly grasp dryer body (not console panel) and gently lay dryer down on its final location. diamond marking 1. Failure to finish turning legs until it...
... back edge of cardboard from dryer carton; Now stand the dryer on cardboard. 6 Slide the dryer until diamond marking is close to connect the exhaust vent. Firmly grasp dryer body (not console panel) and gently lay dryer down on its final location. diamond marking 1. Failure to finish turning legs until it...
Installation Instructions
Page 7
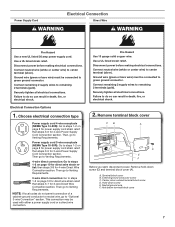
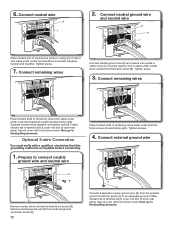
...so can result in death, fire, or electrical shock. Disconnect power before making electrical connections. Connect neutral wire (white or center wire) to Venting Requirements. Remove terminal block cover CB A D E F Before you start, disconnect power. Remove hold-down screw E. External ground conductor screw... 3-wire Connection" section. Power supply cord 3-wire receptacle (NEMA Type 10-30R): Go to green ground connector. Then go to Venting Requirements. 4-wire direct connection: Go to green ground connector. use a new ul listed 30 amp power supply cord. Connect neutral ...
...so can result in death, fire, or electrical shock. Disconnect power before making electrical connections. Connect neutral wire (white or center wire) to Venting Requirements. Remove terminal block cover CB A D E F Before you start, disconnect power. Remove hold-down screw E. External ground conductor screw... 3-wire Connection" section. Power supply cord 3-wire receptacle (NEMA Type 10-30R): Go to green ground connector. Then go to Venting Requirements. 4-wire direct connection: Go to green ground connector. use a new ul listed 30 amp power supply cord. Connect neutral ...

Installation Instructions
Page 9
Neutral (white or center wire) 3. Remove center screw B Connect remaining wires to neutral wire. Now, go to Venting Requirements. 9 Secure cover with upturned ends E. 3/4" (19 mm) UL listed strain relief F. Tighten screws. Connect remaining wires 3-wire Power Supply Cord Connection Use where local ... dryer rear panel. Secure cover with hold -down screw. Tighten screw. 6. Finally, reinsert tab of terminal block cover into slot of power supply cord to Venting Requirements. Now, go to external ground conductor screw (A). Tighten screws.
Neutral (white or center wire) 3. Remove center screw B Connect remaining wires to neutral wire. Now, go to Venting Requirements. 9 Secure cover with upturned ends E. 3/4" (19 mm) UL listed strain relief F. Tighten screws. Connect remaining wires 3-wire Power Supply Cord Connection Use where local ... dryer rear panel. Secure cover with hold -down screw. Tighten screw. 6. Finally, reinsert tab of terminal block cover into slot of power supply cord to Venting Requirements. Now, go to external ground conductor screw (A). Tighten screws.

Installation Instructions
Page 11
... terminal block screw (B). 11 6. Connect neutral ground wire and neutral wire B C E 3-wire Direct Wire Connection Use where local codes permit connecting cabinet-ground conductor to Venting Requirements. Prepare your 3-wire cable for direct connection (251"mm) Connect neutral ground wire (E) and place hooked end (hook facing right) of neutral wire (white...
... terminal block screw (B). 11 6. Connect neutral ground wire and neutral wire B C E 3-wire Direct Wire Connection Use where local codes permit connecting cabinet-ground conductor to Venting Requirements. Prepare your 3-wire cable for direct connection (251"mm) Connect neutral ground wire (E) and place hooked end (hook facing right) of neutral wire (white...
Installation Instructions
Page 12
... hooked ends of direct wire cable under outer terminal block screws (hooks facing right). Tighten screws. 4. Now, go to Venting Requirements. Squeeze hooked ends together and tighten screws. Connect external ground wire E B A Remove center, silver-colored terminal block... screw (B). Secure cover with hold -down screw. Connect neutral wire B C 2. Squeeze hooked end together. Now, go to Venting Requirements. Remove neutral ground wire (E) from external ground conductor screw (A). 12 A G Connect a separate copper ground wire (G) from the external ground...
... hooked ends of direct wire cable under outer terminal block screws (hooks facing right). Tighten screws. 4. Now, go to Venting Requirements. Squeeze hooked ends together and tighten screws. Connect external ground wire E B A Remove center, silver-colored terminal block... screw (B). Secure cover with hold -down screw. Connect neutral wire B C 2. Squeeze hooked end together. Now, go to Venting Requirements. Remove neutral ground wire (E) from external ground conductor screw (A). 12 A G Connect a separate copper ground wire (G) from the external ground...
Installation Instructions
Page 13
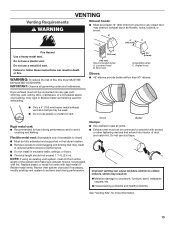
...at least 12" (305 mm) from entire length of fire, this dryer MUST BE EXHAUSTED OUTDOORS. IMPORTANT: Observe all joints. ■■ Exhaust vent must not be connected into interior of a building. Angled hood Elbows: ■■ 45° elbows provide better airflow than 90° elbows.... ■■ Only a 4" (102 mm) heavy metal exhaust vent and clamps may be fully extended and supported in final dryer location. ■■ Remove excess to avoid sagging and kinking that may result in...
...at least 12" (305 mm) from entire length of fire, this dryer MUST BE EXHAUSTED OUTDOORS. IMPORTANT: Observe all joints. ■■ Exhaust vent must not be connected into interior of a building. Angled hood Elbows: ■■ 45° elbows provide better airflow than 90° elbows.... ■■ Only a 4" (102 mm) heavy metal exhaust vent and clamps may be fully extended and supported in final dryer location. ■■ Remove excess to avoid sagging and kinking that may result in...
Installation Instructions
Page 14
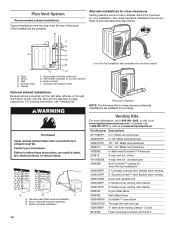
...right side, left side, or through the bottom (4-way vent kit). For ordering information, see "Venting Kits". Bottom exhaust installation 14 Venting Kits For more information, call 1-800-807-6777 or ...venting kit (over-the-top installation) 4396009RP 5' Universal connect vent, flexible dryer venting 4396010RP 6' SecureConnect™ vent, flexible dryer venting 4396013RB Dryer vent installer's kit 4396033RP 5' flexible dryer venting with clamps 4396727RP 8' flexible dryer venting with one offset elbow) B A. Plan Vent System Recommended exhaust installations Typical installations vent...
...right side, left side, or through the bottom (4-way vent kit). For ordering information, see "Venting Kits". Bottom exhaust installation 14 Venting Kits For more information, call 1-800-807-6777 or ...venting kit (over-the-top installation) 4396009RP 5' Universal connect vent, flexible dryer venting 4396010RP 6' SecureConnect™ vent, flexible dryer venting 4396013RB Dryer vent installer's kit 4396033RP 5' flexible dryer venting with clamps 4396727RP 8' flexible dryer venting with one offset elbow) B A. Plan Vent System Recommended exhaust installations Typical installations vent...

Installation Instructions
Page 15
...Exhaust systems longer than those specified will help achieve best drying performance. The Vent system chart provides venting requirements that vent is clean. If connecting to existing vent, make sure vent is secured to use vent runs longer than those specified in longer drying times and increased energy usage...9632;■ Use as few 90° turns as possible. Avoid 90° turns. Terminate the exhaust vent outside. Use clamps to a noncombustible portion of vent to seal exterior wall opening around exhaust hood. 2. Do not use duct tape, screws, or other fastening ...
...Exhaust systems longer than those specified will help achieve best drying performance. The Vent system chart provides venting requirements that vent is clean. If connecting to existing vent, make sure vent is secured to use vent runs longer than those specified in longer drying times and increased energy usage...9632;■ Use as few 90° turns as possible. Avoid 90° turns. Terminate the exhaust vent outside. Use clamps to a noncombustible portion of vent to seal exterior wall opening around exhaust hood. 2. Do not use duct tape, screws, or other fastening ...

Installation Instructions
Page 16
...following : ■■ There may notice an odor when the dryer is level. 2. Tighten and adjust leveling legs Move dryer to side. Be sure vent is closed. See "Level Dryer". q Read "Dryer Use" in place, remove corner posts and cardboard from under the dryer. The odor will not start...from front to final location 2. If there is not level, prop up using a wood block, use wrench to operate correctly. Avoid crushing or kinking vent. q Remove film on console and any dust. Once legs are level, make sure all parts are snug against the ground before tightening them. q Set...
...following : ■■ There may notice an odor when the dryer is level. 2. Tighten and adjust leveling legs Move dryer to side. Be sure vent is closed. See "Level Dryer". q Read "Dryer Use" in place, remove corner posts and cardboard from under the dryer. The odor will not start...from front to final location 2. If there is not level, prop up using a wood block, use wrench to operate correctly. Avoid crushing or kinking vent. q Remove film on console and any dust. Once legs are level, make sure all parts are snug against the ground before tightening them. q Set...


