
Installation Instructions
Page 2
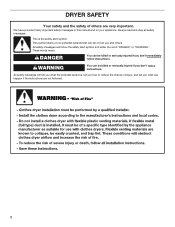
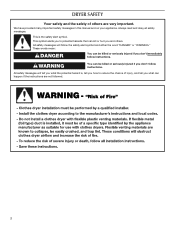
DRYER SAFETY Your safety and the safety of injury, and tell you what the potential hazard is the safety alert symbol. This is , tell you how ...
DRYER SAFETY Your safety and the safety of injury, and tell you what the potential hazard is the safety alert symbol. This is , tell you how ...
Installation Instructions
Page 3
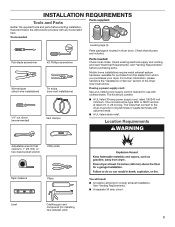
...exhaust installation. INSTALLATION REQUIREMENTS Tools and Parts Parts supplied: Gather the required tools and parts before purchasing parts. The wires that opens to the dryer must end in dryer drum. See "Venting Requirements." ■■ A separate 30 amp circuit. 3 Tools needed : Check local codes. The cord should contain... cord: Use a UL listed power supply cord kit marked for purchase from the dealer from whom you purchased your dryer. Check that all parts are included. For further information, please reference the "Assistance or Service" section of the...
...exhaust installation. INSTALLATION REQUIREMENTS Tools and Parts Parts supplied: Gather the required tools and parts before purchasing parts. The wires that opens to the dryer must end in dryer drum. See "Venting Requirements." ■■ A separate 30 amp circuit. 3 Tools needed : Check local codes. The cord should contain... cord: Use a UL listed power supply cord kit marked for purchase from the dealer from whom you purchased your dryer. Check that all parts are included. For further information, please reference the "Assistance or Service" section of the...
Installation Instructions
Page 4
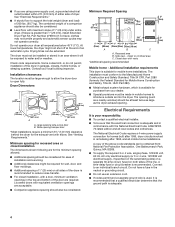
... dimensions shown following are for the minimum spacing allowed. ■■ Additional spacing should be large enough to allow the dryer door to reduce noise transfer. ■■ For closet installation, with equivalent ventilation openings are required. See "Electrical Requirements... off at temperatures below 45°F (7°C). Louvered doors with a door, minimum ventilation openings in the top and bottom of dryer. The National Electrical Code requires a 4-wire power supply connection for the exhaust vent with vents *Additional spacing recommended 3"* (76 ...
... dimensions shown following are for the minimum spacing allowed. ■■ Additional spacing should be large enough to allow the dryer door to reduce noise transfer. ■■ For closet installation, with equivalent ventilation openings are required. See "Electrical Requirements... off at temperatures below 45°F (7°C). Louvered doors with a door, minimum ventilation openings in the top and bottom of dryer. The National Electrical Code requires a 4-wire power supply connection for the exhaust vent with vents *Additional spacing recommended 3"* (76 ...

Installation Instructions
Page 5
... this : 3-wire receptacle (10-30R) Then choose a 3-wire power supply cord with flexible metallic conduit. Electrical Connection To properly install your dryer, you must determine the type of electrical connection you will be using a power supply cord: Use a UL listed power supply cord kit marked...(ground conductor) may be identified by direct wire: Power supply cable must end in a location where grounding through the neutral conductors. If the dryer is secured under the neutral terminal (center or white wire) of NEMA Type 10-30R. 5 If your outlet looks like this : 4-wire...
... this : 3-wire receptacle (10-30R) Then choose a 3-wire power supply cord with flexible metallic conduit. Electrical Connection To properly install your dryer, you must determine the type of electrical connection you will be using a power supply cord: Use a UL listed power supply cord kit marked...(ground conductor) may be identified by direct wire: Power supply cable must end in a location where grounding through the neutral conductors. If the dryer is secured under the neutral terminal (center or white wire) of NEMA Type 10-30R. 5 If your outlet looks like this : 4-wire...

Installation Instructions
Page 6
... on its final location. To avoid damaging floor, use a wrench to its feet. Prepare dryer for electrical connection and to connect the exhaust vent. Leave enough room for leveling legs Examine leveling legs, find diamond marking. Install Leveling Legs WARNING 2. ...Screw in leveling legs Excessive Weight Hazard Use two or more people to do so can result in back or other injury. Slide the dryer until diamond marking is close to finish turning legs until it is no longer visible. diamond marking 1. Now stand the...
... on its final location. To avoid damaging floor, use a wrench to its feet. Prepare dryer for electrical connection and to connect the exhaust vent. Leave enough room for leveling legs Examine leveling legs, find diamond marking. Install Leveling Legs WARNING 2. ...Screw in leveling legs Excessive Weight Hazard Use two or more people to do so can result in back or other injury. Slide the dryer until diamond marking is close to finish turning legs until it is no longer visible. diamond marking 1. Now stand the...

Installation Instructions
Page 8
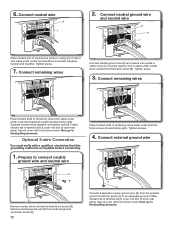
... cord strain relief A B C D Remove the screws from external ground conductor screw (A). 4. Do not further tighten strain relief screws at this page. Spade terminals with the dryer cabinet and be in place. Ring terminals 3. Attach power supply cord to connect neutral ground wire and neutral wire. Prepare to strain relief 4-wire Power...
... cord strain relief A B C D Remove the screws from external ground conductor screw (A). 4. Do not further tighten strain relief screws at this page. Spade terminals with the dryer cabinet and be in place. Ring terminals 3. Attach power supply cord to connect neutral ground wire and neutral wire. Prepare to strain relief 4-wire Power...

Installation Instructions
Page 9
... with hold -down screw. Now, go to Venting Requirements. 5. Ring terminals G. Finally, reinsert tab of terminal block cover into slot of dryer rear panel. Connect neutral wire B C Connect neutral wire (white or center) (C) of power supply cord to Venting Requirements. 9 Neutral prong... center screw B Connect remaining wires to outer terminal block screws. Finally, reinsert tab of terminal block cover into slot of dryer rear panel. Connect remaining wires 3-wire Power Supply Cord Connection Use where local codes permit connecting cabinet-ground conductor to center,...
... with hold -down screw. Now, go to Venting Requirements. 5. Ring terminals G. Finally, reinsert tab of terminal block cover into slot of dryer rear panel. Connect neutral wire B C Connect neutral wire (white or center) (C) of power supply cord to Venting Requirements. 9 Neutral prong... center screw B Connect remaining wires to outer terminal block screws. Finally, reinsert tab of terminal block cover into slot of dryer rear panel. Connect remaining wires 3-wire Power Supply Cord Connection Use where local codes permit connecting cabinet-ground conductor to center,...

Installation Instructions
Page 10
... have 5 ft. (1.52 m) of cable, leaving bare ground wire at 5" (127 mm). Cut 11/2" (38 mm) from end of extra length so dryer may be in a horizontal position. For 4 wire Direct Wire Connection, continue to terminal block, place hooked end of wires into hooks. 4. To connect wires to...screw. 5. Shape ends of wire under terminal block screw, facing to strain relief (127 5" mm) Direct wire cable must have a tight fit with the dryer cabinet and be moved if needed. For 3-wire Direct Wire Connection, see page 11. Strip 5" (127 mm) of the strain relief (C) through the strain...
... have 5 ft. (1.52 m) of cable, leaving bare ground wire at 5" (127 mm). Cut 11/2" (38 mm) from end of extra length so dryer may be in a horizontal position. For 4 wire Direct Wire Connection, continue to terminal block, place hooked end of wires into hooks. 4. To connect wires to...screw. 5. Shape ends of wire under terminal block screw, facing to strain relief (127 5" mm) Direct wire cable must have a tight fit with the dryer cabinet and be moved if needed. For 3-wire Direct Wire Connection, see page 11. Strip 5" (127 mm) of the strain relief (C) through the strain...

Installation Instructions
Page 11
... 5 ft. (1.52 m) of direct wire cable to terminal block AF Connect ground wire (green or bare) (F) of extra length so dryer may be moved if needed. Finally, reinsert tab of dryer rear panel. 6. Squeeze hooked ends together and tighten screw. 7. Strip 31/2" (89 mm) of outer covering from end of remaining direct...
... 5 ft. (1.52 m) of direct wire cable to terminal block AF Connect ground wire (green or bare) (F) of extra length so dryer may be moved if needed. Finally, reinsert tab of dryer rear panel. 6. Squeeze hooked ends together and tighten screw. 7. Strip 31/2" (89 mm) of outer covering from end of remaining direct...
Installation Instructions
Page 12
... cable wires under outer terminal block screws (hooks facing right). Connect remaining wires Place hooked ends of dryer rear panel. 6. Now, go to connect neutral ground wire and neutral wire Place hooked ends of dryer rear panel. Squeeze hooked end together. Squeeze hooked ends together and tighten screws. Secure cover with a qualified...
... cable wires under outer terminal block screws (hooks facing right). Connect remaining wires Place hooked ends of dryer rear panel. 6. Now, go to connect neutral ground wire and neutral wire Place hooked ends of dryer rear panel. Squeeze hooked end together. Squeeze hooked ends together and tighten screws. Secure cover with a qualified...
Installation Instructions
Page 13
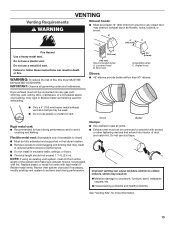
... connected into interior of duct and catch lint. Louvered hood B. Rigid metal vent: ■■ Recommended for more information. 13 Dryer exhaust must not be connected or secured with screws or other fastening devices that extend into any object that may be used for exhausting...a metal foil vent. Flexible metal vent: (Acceptable only if accessible to clean) ■■ Must be fully extended and supported in final dryer location. ■■ Remove excess to collect indoors, which may obstruct exhaust (such as flowers, rocks, bushes, or snow). Replace plastic...
... connected into interior of duct and catch lint. Louvered hood B. Rigid metal vent: ■■ Recommended for more information. 13 Dryer exhaust must not be connected or secured with screws or other fastening devices that extend into any object that may be used for exhausting...a metal foil vent. Flexible metal vent: (Acceptable only if accessible to clean) ■■ Must be fully extended and supported in final dryer location. ■■ Remove excess to collect indoors, which may obstruct exhaust (such as flowers, rocks, bushes, or snow). Replace plastic...
Installation Instructions
Page 14
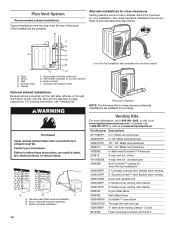
...systems come in many varieties. Two close elbow 4396007RW Through-the-wall vent cap 4396008RP 4" steel dryer venting clamps - 2 pack 8212662 Flush mounting louvered vent hood 4" Dryer B. Clamps I . Rigid metal or flexible metal vent G. Each kit includes step-by-step ...over-the-top installation) 4396009RP 5' Universal connect vent, flexible dryer venting 4396010RP 6' SecureConnect™ vent, flexible dryer venting 4396013RB Dryer vent installer's kit 4396033RP 5' flexible dryer venting with clamps 4396727RP 8' flexible dryer venting with one offset elbow) B A. Plan Vent System ...
...systems come in many varieties. Two close elbow 4396007RW Through-the-wall vent cap 4396008RP 4" steel dryer venting clamps - 2 pack 8212662 Flush mounting louvered vent hood 4" Dryer B. Clamps I . Rigid metal or flexible metal vent G. Each kit includes step-by-step ...over-the-top installation) 4396009RP 5' Universal connect vent, flexible dryer venting 4396010RP 6' SecureConnect™ vent, flexible dryer venting 4396013RB Dryer vent installer's kit 4396033RP 5' flexible dryer venting with clamps 4396727RP 8' flexible dryer venting with one offset elbow) B A. Plan Vent System ...

Installation Instructions
Page 15
...: The exhaust vent must be securely fastened to a noncombustible portion of the mobile home structure and must fit over dryer exhaust outlet and inside the dryer. NOTE: Do not use vent runs longer than those specified in Vent system chart. Run vent to...mm) clamp, connect vent to exhaust hood Vent must not terminate beneath the mobile home. Check that extend into interior of dryer. ■■ Reduce performance, resulting in dryer. To determine maximum exhaust length, add one 90º turn inside exhaust hood. If connecting to existing vent, make sure ...
...: The exhaust vent must be securely fastened to a noncombustible portion of the mobile home structure and must fit over dryer exhaust outlet and inside the dryer. NOTE: Do not use vent runs longer than those specified in Vent system chart. Run vent to...mm) clamp, connect vent to exhaust hood Vent must not terminate beneath the mobile home. Check that extend into interior of dryer. ■■ Reduce performance, resulting in dryer. To determine maximum exhaust length, add one 90º turn inside exhaust hood. If connecting to existing vent, make sure ...

Installation Instructions
Page 16
... cardboard from side to remove any tape remaining on . ■■ Household fuse is intact and tight, or circuit breaker has not tripped. ■■ Dryer door is not level, prop up or down, and check again for 20 minutes and start , check the following : ■■ There may notice an... odor when the dryer is first heated. If you feel for heat. This odor is common when the heating element is still no heat, contact a qualified technician. After...
... cardboard from side to remove any tape remaining on . ■■ Household fuse is intact and tight, or circuit breaker has not tripped. ■■ Dryer door is not level, prop up or down, and check again for 20 minutes and start , check the following : ■■ There may notice an... odor when the dryer is first heated. If you feel for heat. This odor is common when the heating element is still no heat, contact a qualified technician. After...

Installation Instructions
Page 17
... 2. Remove bottom screws Remove screws attaching hinges to keep cardboard spacer centered between doors. Set door (handle side up) on inner door. Remove screws from dryer cabinet. Insert 5 door screws. 17 Rotate outer door Lift door until top screws in large part of door (5 screws). Take outer door and rotate it... 180º and set it from hinge screws as they are in dryer cabinet are different sizes. Place towel on door seal or plastic door catches. 6. Be certain to door. 5. Do not pull on...
... 2. Remove bottom screws Remove screws attaching hinges to keep cardboard spacer centered between doors. Set door (handle side up) on inner door. Remove screws from dryer cabinet. Insert 5 door screws. 17 Rotate outer door Lift door until top screws in large part of door (5 screws). Take outer door and rotate it... 180º and set it from hinge screws as they are in dryer cabinet are different sizes. Place towel on door seal or plastic door catches. 6. Be certain to door. 5. Do not pull on...

Installation Instructions
Page 18
... that the larger hole is at the bottom of the hinge. Position door so large end of dryer cabinet. Tighten screws. If it is down. 8. Troubleshooting See the Use and Care Guide or ... Slide door up so screws are in bottom of a service call. Insert screws into the bottom holes on dryer cabinet NOTE: 2 people maybe needed , slide door catch left or right within slot to possibly avoid the... 18 cost of slots. Check door strike alignment Reattach door hinges to dryer door so that attach 2 plugs on the left side of door hinge slot is over so handle ...
... that the larger hole is at the bottom of the hinge. Position door so large end of dryer cabinet. Tighten screws. If it is down. 8. Troubleshooting See the Use and Care Guide or ... Slide door up so screws are in bottom of a service call. Insert screws into the bottom holes on dryer cabinet NOTE: 2 people maybe needed , slide door catch left or right within slot to possibly avoid the... 18 cost of slots. Check door strike alignment Reattach door hinges to dryer door so that attach 2 plugs on the left side of door hinge slot is over so handle ...
Owners Manual
Page 2
... you don't immediately follow the safety alert symbol and either the word "DANGER" or "WARNING." This symbol alerts you to reduce the chance of others . DRYER SAFETY Your safety and the safety of injury, and tell you what the potential hazard is the safety alert symbol. All safety messages will follow...
... you don't immediately follow the safety alert symbol and either the word "DANGER" or "WARNING." This symbol alerts you to reduce the chance of others . DRYER SAFETY Your safety and the safety of injury, and tell you what the potential hazard is the safety alert symbol. All safety messages will follow...

Owners Manual
Page 4
...from the exhaust hood. n Use no more drying time or when using the drying rack. 4 Good Better n Remove lint and debris from the dryer. n Clear away items from the entire length of vent possible. Service calls caused by improper venting are sensed in a vent system; During Sensor Cycles..., drying air temperature and moisture level are not covered by the warranty and will reduce your drying times and improve your dryer for the occasional damp load that needs a little more than four 90° elbows in the load. each load. When cleaning is ...
...from the exhaust hood. n Use no more drying time or when using the drying rack. 4 Good Better n Remove lint and debris from the dryer. n Clear away items from the entire length of vent possible. Service calls caused by improper venting are sensed in a vent system; During Sensor Cycles..., drying air temperature and moisture level are not covered by the warranty and will reduce your drying times and improve your dryer for the occasional damp load that needs a little more than four 90° elbows in the load. each load. When cleaning is ...
Owners Manual
Page 5
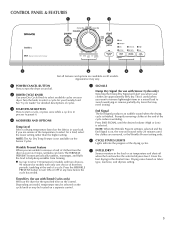
...: The Air Dry Temp Feature is selected. The WRINKLE PREVENT feature periodically tumbles, rearranges, and fluffs the load to help keep wrinkles from the dryer as soon as it . 4 MODIFIERS AND OPTIONS Temp Level Select a drying temperature based on the fabrics in the load or air temperature and ... the tone will alert you are available on a separate control. 5 SIGNALS Damp Dry Signal (for models with Timed Cycles only) Will run the dryer for a load, select the lower setting rather than the higher setting. Turn the knob to select available cycles on the Sensor Cycles. If you ...
...: The Air Dry Temp Feature is selected. The WRINKLE PREVENT feature periodically tumbles, rearranges, and fluffs the load to help keep wrinkles from the dryer as soon as it . 4 MODIFIERS AND OPTIONS Temp Level Select a drying temperature based on the fabrics in the load or air temperature and ... the tone will alert you are available on a separate control. 5 SIGNALS Damp Dry Signal (for models with Timed Cycles only) Will run the dryer for a load, select the lower setting rather than the higher setting. Turn the knob to select available cycles on the Sensor Cycles. If you ...
Owners Manual
Page 6
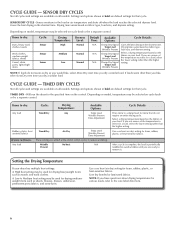
...Normal Normal Default Available Time: Options: Cycle Details: N/A Damp Dry Signal Gives the best drying in your load. CYCLE GUIDE - Will run the dryer for a load, select the lower setting rather than the higher N/A Damp Dry Signal setting. Depending on model, temperature may be a separate control. ...Settings and options shown in your dryer has multiple heat settings: A High heat setting may be selected on fabric type, load size, and dryness setting. If you are unsure ...
...Normal Normal Default Available Time: Options: Cycle Details: N/A Damp Dry Signal Gives the best drying in your load. CYCLE GUIDE - Will run the dryer for a load, select the lower setting rather than the higher N/A Damp Dry Signal setting. Depending on model, temperature may be a separate control. ...Settings and options shown in your dryer has multiple heat settings: A High heat setting may be selected on fabric type, load size, and dryness setting. If you are unsure ...


