
Installation Instructions
Page 3
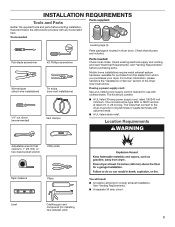
..." section of the Dryer User Instructions. The cord should contain: ■■ A UL listed 30-amp power supply cord, rated 120/240 volt minimum. INSTALLATION REQUIREMENTS Tools and Parts Parts supplied: Gather the required tools and parts before purchasing parts. Parts needed : Flat-blade screwdriver #2 Phillips screwdriver Wire stripper (direct wire installations) Tin snips (new vent installations) 1/4" nut driver (recommended) Vent clamps Leveling legs (4) Parts package is located in ring terminals or spade terminals with clothes dryers. The wires that connect to 1" (25...
..." section of the Dryer User Instructions. The cord should contain: ■■ A UL listed 30-amp power supply cord, rated 120/240 volt minimum. INSTALLATION REQUIREMENTS Tools and Parts Parts supplied: Gather the required tools and parts before purchasing parts. Parts needed : Flat-blade screwdriver #2 Phillips screwdriver Wire stripper (direct wire installations) Tin snips (new vent installations) 1/4" nut driver (recommended) Vent clamps Leveling legs (4) Parts package is located in ring terminals or spade terminals with clothes dryers. The wires that connect to 1" (25...
Installation Instructions
Page 4
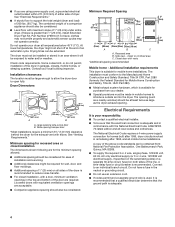
... exhaust system hardware, which is recommended. Check code requirements. Side view - The National Electrical Code requires a 4-wire power supply connection for mobile home installations. Contact your dryer at least twice as large as a nearby window) should be at temperatures below 45°F (7°C). Additional installation requirements This dryer is adequate. 4 Do not have a fuse in conformance with elbow. Some codes limit, or do not permit, installation of dryer. Large opening hamper door *Most installations require...
... exhaust system hardware, which is recommended. Check code requirements. Side view - The National Electrical Code requires a 4-wire power supply connection for mobile home installations. Contact your dryer at least twice as large as a nearby window) should be at temperatures below 45°F (7°C). Additional installation requirements This dryer is adequate. 4 Do not have a fuse in conformance with elbow. Some codes limit, or do not permit, installation of dryer. Large opening hamper door *Most installations require...

Installation Instructions
Page 5
... installed in ring terminals or spade terminals with upturned ends. ■■ A UL listed strain relief. The cord should contain: ■■ A UL listed 30-amp power supply cord, rated 120/240 volt minimum. The 4-wire power supply cord, at least 4 ft. (1.22 m) long. If using and follow the instructions provided for it here. ■■ If local codes do not use with a 3-wire electrical supply connection. Electrical Connection To properly install your dryer...
... installed in ring terminals or spade terminals with upturned ends. ■■ A UL listed strain relief. The cord should contain: ■■ A UL listed 30-amp power supply cord, rated 120/240 volt minimum. The 4-wire power supply cord, at least 4 ft. (1.22 m) long. If using and follow the instructions provided for it here. ■■ If local codes do not use with a 3-wire electrical supply connection. Electrical Connection To properly install your dryer...

Installation Instructions
Page 8
... listed strain relief G. Put the tabs of the two clamp sections (C) into the hole below the terminal block opening (B) so that the wire insulation on the power supply cord is required for mobile homes and where local codes do not permit the use of power supply cord under center, silver-colored terminal block screw (B). Ground prong D. For 4 wire Power Supply Cord Connection, continue to strain relief 4-wire Power Supply Cord Connection IMPORTANT: A 4-wire connection is...
... listed strain relief G. Put the tabs of the two clamp sections (C) into the hole below the terminal block opening (B) so that the wire insulation on the power supply cord is required for mobile homes and where local codes do not permit the use of power supply cord under center, silver-colored terminal block screw (B). Ground prong D. For 4 wire Power Supply Cord Connection, continue to strain relief 4-wire Power Supply Cord Connection IMPORTANT: A 4-wire connection is...

Installation Instructions
Page 10
... hooks. 4. For 3-wire Direct Wire Connection, see page 11. Prepare to step 3 on strain relief). Attach direct wire cable to terminal block Put direct wire cable through the hole below the terminal block opening , screw the removable conduit connector (A) onto the strain relief threads. 2. Strip insulation back 1" (25 mm). Connect wires to strain relief (127 5" mm) Direct wire cable must have a tight fit with the dryer cabinet and be moved if needed...
... hooks. 4. For 3-wire Direct Wire Connection, see page 11. Prepare to step 3 on strain relief). Attach direct wire cable to terminal block Put direct wire cable through the hole below the terminal block opening , screw the removable conduit connector (A) onto the strain relief threads. 2. Strip insulation back 1" (25 mm). Connect wires to strain relief (127 5" mm) Direct wire cable must have a tight fit with the dryer cabinet and be moved if needed...
Installation Instructions
Page 12
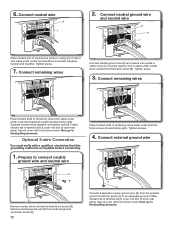
.... Connect external ground wire E B A Remove center, silver-colored terminal block screw (B). Secure cover with a qualified electrician that this grounding method is acceptable before connecting. 1. Connect neutral ground wire and neutral wire B E C Place hooked end of neutral wire (white or cente) (C) of dryer rear panel. Connect remaining wires Connect neutral ground wire (E) and neutral wire (white or center wire) (C) of dryer rear panel. Finally, reinsert tab of terminal block cover into slot of direct wire cable under outer terminal block screws (hooks facing right...
.... Connect external ground wire E B A Remove center, silver-colored terminal block screw (B). Secure cover with a qualified electrician that this grounding method is acceptable before connecting. 1. Connect neutral ground wire and neutral wire B E C Place hooked end of neutral wire (white or cente) (C) of dryer rear panel. Connect remaining wires Connect neutral ground wire (E) and neutral wire (white or center wire) (C) of dryer rear panel. Finally, reinsert tab of terminal block cover into slot of direct wire cable under outer terminal block screws (hooks facing right...
Installation Instructions
Page 13
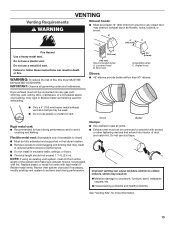
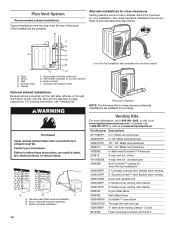
.... Failure to follow these instructions can cause moisture and lint to seal all governing codes and ordinances. Box hood 2½" (64 mm) Acceptable styles: C. Venting Requirements WARNING VENTING Exhaust hoods: ■■ Must be at least 12" (305 mm) from entire length of duct and catch lint. NOTE: If using an existing vent system, clean lint from ground or any gas vent, chimney, wall, ceiling, attic...
.... Failure to follow these instructions can cause moisture and lint to seal all governing codes and ordinances. Box hood 2½" (64 mm) Acceptable styles: C. Venting Requirements WARNING VENTING Exhaust hoods: ■■ Must be at least 12" (305 mm) from entire length of duct and catch lint. NOTE: If using an existing vent system, clean lint from ground or any gas vent, chimney, wall, ceiling, attic...
Installation Instructions
Page 14
... dryer. Clamps I . Rigid metal or flexible metal vent G. Vent length necessary to the manufacturer's instructions. Standard rear offset exhaust installation B. white W10186596 4-way vent kit - Other installations are shown. Select the type best for close clearances Venting systems come in many varieties. Exhaust hood E. Exhaust outlet I H F. Each kit includes step-by-step instructions. Bottom exhaust installation 14 Venting Kits For more information, call 1-800-807-6777 or visit us at www.whirlpoolparts.ca. Part Number...
... dryer. Clamps I . Rigid metal or flexible metal vent G. Vent length necessary to the manufacturer's instructions. Standard rear offset exhaust installation B. white W10186596 4-way vent kit - Other installations are shown. Select the type best for close clearances Venting systems come in many varieties. Exhaust hood E. Exhaust outlet I H F. Each kit includes step-by-step instructions. Bottom exhaust installation 14 Venting Kits For more information, call 1-800-807-6777 or visit us at www.whirlpoolparts.ca. Part Number...

Installation Instructions
Page 15
... Vent system chart provides venting requirements that extend into interior of elbows and turns. ■■ When using straightest path possible. Dryer vent must fit over dryer exhaust outlet and inside the dryer. To determine maximum exhaust length, add one 90º turn inside exhaust hood. Connect vent to exhaust hood Vent must fit over the exhaust hood. Avoid 90° turns. Connect Vent 1. Check that vent is clean. Determine vent length and elbows needed for mobile home installations: The exhaust vent...
... Vent system chart provides venting requirements that extend into interior of elbows and turns. ■■ When using straightest path possible. Dryer vent must fit over dryer exhaust outlet and inside the dryer. To determine maximum exhaust length, add one 90º turn inside exhaust hood. Connect vent to exhaust hood Vent must fit over the exhaust hood. Avoid 90° turns. Connect Vent 1. Check that vent is clean. Determine vent length and elbows needed for mobile home installations: The exhaust vent...

Installation Instructions
Page 16
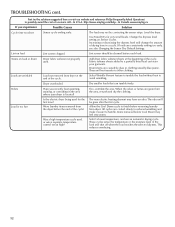
... block, use wrench to side. Check that both circuit breakers have all parts are set in your tools. See "Level Dryer". If you feel for levelness. q When the dryer has been running or "On" position. ■■ Start button has been pushed firmly. ■■ Dryer is plugged into an outlet and/or electrical supply is on dryer. Move dryer to remove any tape remaining on . ■■ Household fuse...
... block, use wrench to side. Check that both circuit breakers have all parts are set in your tools. See "Level Dryer". If you feel for levelness. q When the dryer has been running or "On" position. ■■ Start button has been pushed firmly. ■■ Dryer is plugged into an outlet and/or electrical supply is on dryer. Move dryer to remove any tape remaining on . ■■ Household fuse...

Owners Manual
Page 4
... your drying times and improve your dryer for final product check. Good air flow Along with 4" (102 mm) diameter heavy, rigid vent material. Good Better n Remove lint and debris from the dryer. n Use the shortest length of vent possible. Use Sensor Cycles for the occasional damp load that needs a little more than four 90° elbows in good air flow. Do not use a plastic vent. See Installation Instructions. n Replace plastic or foil vent material with heat, dryers require good air flow...
... your drying times and improve your dryer for final product check. Good air flow Along with 4" (102 mm) diameter heavy, rigid vent material. Good Better n Remove lint and debris from the dryer. n Use the shortest length of vent possible. Use Sensor Cycles for the occasional damp load that needs a little more than four 90° elbows in good air flow. Do not use a plastic vent. See Installation Instructions. n Replace plastic or foil vent material with heat, dryers require good air flow...
Owners Manual
Page 5
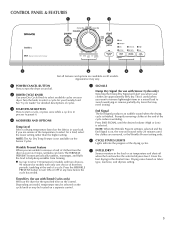
... best drying in a mixed load to select for use with Timed Cycles only) Will run the dryer for models with only one choice of heat-free, periodic tumbling at the end of a cycle. If you are unsure of the temperature to avoid overdrying or remove partially dry items that may need ironing. Promptly removing clothes at any time before the cycle has ended. CONTROL PANEL & FEATURES 1 2 3 7 6 5 4 5 Not all models. NOTE: The Air Dry Temp...
... best drying in a mixed load to select for use with Timed Cycles only) Will run the dryer for models with only one choice of heat-free, periodic tumbling at the end of a cycle. If you are unsure of the temperature to avoid overdrying or remove partially dry items that may need ironing. Promptly removing clothes at any time before the cycle has ended. CONTROL PANEL & FEATURES 1 2 3 7 6 5 4 5 Not all models. NOTE: The Air Dry Temp...
Owners Manual
Page 6
... heat (air dry) setting for that cycle. Gives the best drying in the load or air temperature and shuts off when the load reaches the selected dryness level. Use a no heat (air dry) setting for that cycle. Settings and options shown in your dryer has multiple heat settings: A High heat setting may be a separate control. Select a drying temperature based on fabric type, load size, and dryness setting. Line dry bonded or laminated fabrics. Temp Level Wrinkle Prevent NOTE: If loads do not require an entire drying cycle. TIMED DRY CYCLES...
... heat (air dry) setting for that cycle. Gives the best drying in the load or air temperature and shuts off when the load reaches the selected dryness level. Use a no heat (air dry) setting for that cycle. Settings and options shown in your dryer has multiple heat settings: A High heat setting may be a separate control. Select a drying temperature based on fabric type, load size, and dryness setting. Line dry bonded or laminated fabrics. Temp Level Wrinkle Prevent NOTE: If loads do not require an entire drying cycle. TIMED DRY CYCLES...

Owners Manual
Page 9
... that would block the air flow for your clothes, or cause the dryer to your fingers. 2. Removing accumulated lint From Inside the Dryer Cabinet Lint should be removed every 2 years, or more often, depending on the lint screen. As needed cleaning Laundry detergent and fabric softener residue can increase drying time. Cleaning the lint screen Every load cleaning The lint screen is in the door opening of the drum and rub with hot water. 3. Pull the lint screen straight up...
... that would block the air flow for your clothes, or cause the dryer to your fingers. 2. Removing accumulated lint From Inside the Dryer Cabinet Lint should be removed every 2 years, or more often, depending on the lint screen. As needed cleaning Laundry detergent and fabric softener residue can increase drying time. Cleaning the lint screen Every load cleaning The lint screen is in the door opening of the drum and rub with hot water. 3. Pull the lint screen straight up...
Owners Manual
Page 10
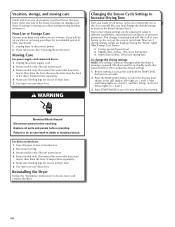
... power before operating. Transport hose separately. 5. Use tape to locate, level, and connect the dryer. 10 The dryer must be changed while the dryer is off water faucet. 4. Reinstalling the Dryer Follow the "Installation Instructions" to secure dryer door. Steam models only: Shut off power at home. Steam models only: Disconnect the water inlet hose from faucet, then drain the hose. Moving Care For power supply cord-connected dryers: 1. Press START/PAUSE to increase the default dryness level. Replace all Sensor cycles are displayed using...
... power before operating. Transport hose separately. 5. Use tape to locate, level, and connect the dryer. 10 The dryer must be changed while the dryer is off water faucet. 4. Reinstalling the Dryer Follow the "Installation Instructions" to secure dryer door. Steam models only: Shut off power at home. Steam models only: Disconnect the water inlet hose from faucet, then drain the hose. Moving Care For power supply cord-connected dryers: 1. Press START/PAUSE to increase the default dryness level. Replace all Sensor cycles are displayed using...
Owners Manual
Page 11
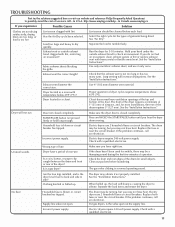
... open on the supply line. Incorrect power supply. http://www.maytag.com/help - Has the Air Dry cycle been selected. Load too large and heavy to vibrate. Lint screen should be turning, but you experience Possible Causes Solution Clothes are not drying satisfactorily, drying times are too long, or load is closed completely. If you may not have right fuse. Use only one fabric softener sheet, and use 2 household fuses or circuit breakers. Exhaust vent the correct length? Check...
... open on the supply line. Incorrect power supply. http://www.maytag.com/help - Has the Air Dry cycle been selected. Load too large and heavy to vibrate. Lint screen should be turning, but you experience Possible Causes Solution Clothes are not drying satisfactorily, drying times are too long, or load is closed completely. If you may not have right fuse. Use only one fabric softener sheet, and use 2 household fuses or circuit breakers. Exhaust vent the correct length? Check...
Owners Manual
Page 12
... softener sheets at the end of a service call...In U.S.A. Dryer overloaded. If so, ventilate the area. Were laundry items removed from dryer. Level the dryer. Change the dryness level setting on load Lint screen clogged. Lint on Sensor Cycles. Lint screen should be cleaned before Cool Down may feel very warm. Dry smaller loads that can stain your dryer is too hot Is the electric dryer being used . Odors Have you experience Possible Causes Solution Cycle time...
... softener sheets at the end of a service call...In U.S.A. Dryer overloaded. If so, ventilate the area. Were laundry items removed from dryer. Level the dryer. Change the dryness level setting on load Lint screen clogged. Lint on Sensor Cycles. Lint screen should be cleaned before Cool Down may feel very warm. Dry smaller loads that can stain your dryer is too hot Is the electric dryer being used . Odors Have you experience Possible Causes Solution Cycle time...
Owners Manual
Page 13
... exclusions may not apply to published user or operator instructions and/or installation instructions. 2. Repairs to be provided by an authorized Maytag servicer is located in your sales slip together for inwarranty service. This warranty gives you specific legal rights, and you also may have other rights that have other than normal, single-family household use of the Use & Care Guide. Replacement parts or repair labor if this book and your...
... exclusions may not apply to published user or operator instructions and/or installation instructions. 2. Repairs to be provided by an authorized Maytag servicer is located in your sales slip together for inwarranty service. This warranty gives you specific legal rights, and you also may have other rights that have other than normal, single-family household use of the Use & Care Guide. Replacement parts or repair labor if this book and your...

Warranty Information
Page 1
... THE SHORTEST PERIOD ALLOWED BY LAW. This warranty gives you specific legal rights, and you also may not apply to you ever need repair service, first see the "Troubleshooting" section of purchase or installation date for product service if your major appliance, to replace or repair house fuses, or to use of purchase. 6. LIMITATION OF REMEDIES; MAYTAG SHALL NOT BE LIABLE FOR INCIDENTAL OR...
... THE SHORTEST PERIOD ALLOWED BY LAW. This warranty gives you specific legal rights, and you also may not apply to you ever need repair service, first see the "Troubleshooting" section of purchase or installation date for product service if your major appliance, to replace or repair house fuses, or to use of purchase. 6. LIMITATION OF REMEDIES; MAYTAG SHALL NOT BE LIABLE FOR INCIDENTAL OR...
Dimension Guide
Page 1
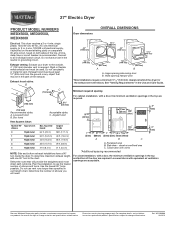
... ventilation openings in the Use and Care Guide. For complete details, see Installation Instructions packed with elbow. Ref. Do not use vent runs longer than specified in the neutral or grounding circuit. A 4" (102 mm) 4" (102 mm) Recommended styles: A. Recessed area 4 Rigid metal 27 ft. (8.2 m) 21 ft. (6.4 m) NOTE: Side and bottom exhaust installations have a fuse in vent length chart. Dimensions are required. W10096988 06/2010 A timedelay fuse or circuit breaker is required. Connect...
... ventilation openings in the Use and Care Guide. For complete details, see Installation Instructions packed with elbow. Ref. Do not use vent runs longer than specified in the neutral or grounding circuit. A 4" (102 mm) 4" (102 mm) Recommended styles: A. Recessed area 4 Rigid metal 27 ft. (8.2 m) 21 ft. (6.4 m) NOTE: Side and bottom exhaust installations have a fuse in vent length chart. Dimensions are required. W10096988 06/2010 A timedelay fuse or circuit breaker is required. Connect...


