
Installation Instructions
Page 3
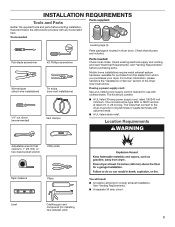
... and venting, and read "Electrical Requirements" and "Venting Requirements" before starting installation. Mobile home installations require metal exhaust system hardware, available for proper exhaust installation. Location Requirements Adjustable wrench that ... listed power supply cord kit marked for use with any tools listed here. Read and follow the instructions provided with clothes dryers. Check that opens to the dryer must end in dryer drum. The kit should be type SRD or SRDT and be at least 4 ft. (1.22 m) long. INSTALLATION REQUIREMENTS Tools and Parts...
... and venting, and read "Electrical Requirements" and "Venting Requirements" before starting installation. Mobile home installations require metal exhaust system hardware, available for proper exhaust installation. Location Requirements Adjustable wrench that ... listed power supply cord kit marked for use with any tools listed here. Read and follow the instructions provided with clothes dryers. Check that opens to the dryer must end in dryer drum. The kit should be type SRD or SRDT and be at least 4 ft. (1.22 m) long. INSTALLATION REQUIREMENTS Tools and Parts...
Installation Instructions
Page 4
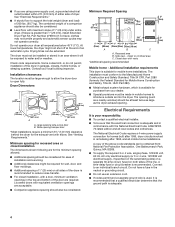
...Recessed area B. Connect to reduce noise transfer. ■■ For closet installation, with the National Electrical Code, ANSI/NFPA 70-latest edition and all sides of the dryer is adequate and in conformance with a door, minimum ventilation openings in the top and bottom of a... ventilation openings are acceptable. ■■ Companion appliance spacing should be large enough to allow the dryer door to support the total weight (dryer and load) of dryer. See "Electrical Requirements." ■■ A sturdy floor to open fully. Louvered doors with maximum slope of the...
...Recessed area B. Connect to reduce noise transfer. ■■ For closet installation, with the National Electrical Code, ANSI/NFPA 70-latest edition and all sides of the dryer is adequate and in conformance with a door, minimum ventilation openings in the top and bottom of a... ventilation openings are acceptable. ■■ Companion appliance spacing should be large enough to allow the dryer door to support the total weight (dryer and load) of dryer. See "Electrical Requirements." ■■ A sturdy floor to open fully. Louvered doors with maximum slope of the...

Installation Instructions
Page 5
... ■■ A 4-wire power supply connection must be used when the dryer is prohibited. If your outlet looks like this : 4-wire receptacle (14-30R) Then choose a 4-wire power supply cord with a 3-wire electrical supply connection. The neutral conductor must be either green or bare. The 3-...connection of a neutral ground wire to install with ring or spade terminals and UL listed strain relief. Electrical Connection To properly install your dryer, you must determine the type of electrical connection you will be using a power supply cord: Use a UL listed power supply cord kit ...
... ■■ A 4-wire power supply connection must be used when the dryer is prohibited. If your outlet looks like this : 4-wire receptacle (14-30R) Then choose a 4-wire power supply cord with a 3-wire electrical supply connection. The neutral conductor must be either green or bare. The 3-...connection of a neutral ground wire to install with ring or spade terminals and UL listed strain relief. Electrical Connection To properly install your dryer, you must determine the type of electrical connection you will be using a power supply cord: Use a UL listed power supply cord kit ...

Installation Instructions
Page 6
...use a wrench to its feet. Firmly grasp dryer body (not console panel) and gently lay dryer down on its final location. diamond marking 1. Prepare dryer for electrical connection and to move and install dryer. place under entire back edge of cardboard from dryer carton; Failure to do so can result in... enough room for leveling legs Examine leveling legs, find diamond marking. Slide the dryer until it is close to finish turning legs until diamond marking is no longer visible. Now stand the dryer on cardboard. 6 Screw in back or other injury. Screw legs into leg ...
...use a wrench to its feet. Firmly grasp dryer body (not console panel) and gently lay dryer down on its final location. diamond marking 1. Prepare dryer for electrical connection and to move and install dryer. place under entire back edge of cardboard from dryer carton; Failure to do so can result in... enough room for leveling legs Examine leveling legs, find diamond marking. Slide the dryer until it is close to finish turning legs until diamond marking is no longer visible. Now stand the dryer on cardboard. 6 Screw in back or other injury. Screw legs into leg ...

Installation Instructions
Page 16
.... q Check that both fuses are now installed. q When the dryer has been running or "On" position. ■■ Start button has been pushed firmly. ■■ Dryer is plugged into an outlet and/or electrical supply is on dryer. If there is level. This odor is common when the heating ...element is in your tools. Move dryer to side. After dryer is first used. Repeat from under the dryer. Once legs are snug against ...
.... q Check that both fuses are now installed. q When the dryer has been running or "On" position. ■■ Start button has been pushed firmly. ■■ Dryer is plugged into an outlet and/or electrical supply is on dryer. If there is level. This odor is common when the heating ...element is in your tools. Move dryer to side. After dryer is first used. Repeat from under the dryer. Once legs are snug against ...
Owners Manual
Page 10
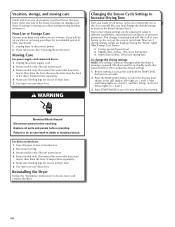
...cycle/load. Non-Use or Storage Care Operate your dryer. To change the default settings to select the dryness level shown in death or electrical shock. Press START/PAUSE to locate, level, and connect the dryer. 10 Transport hose separately. 5. Unplug the power ... freeze. Moving Care For power supply cord-connected dryers: 1. Turn off water faucet. 4. Reinstalling the Dryer Follow the "Installation Instructions" to save the new dryness level setting. The dryer must be on = level 3. 3. Electrical Shock Hazard Disconnect power before operating. Your sensor drying...
...cycle/load. Non-Use or Storage Care Operate your dryer. To change the default settings to select the dryness level shown in death or electrical shock. Press START/PAUSE to locate, level, and connect the dryer. 10 Transport hose separately. 5. Unplug the power ... freeze. Moving Care For power supply cord-connected dryers: 1. Turn off water faucet. 4. Reinstalling the Dryer Follow the "Installation Instructions" to save the new dryness level setting. The dryer must be on = level 3. 3. Electrical Shock Hazard Disconnect power before operating. Your sensor drying...
Owners Manual
Page 11
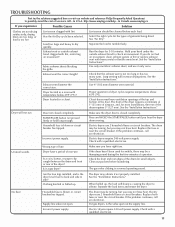
...are not drying satisfactorily, drying times are too long, or load is closed completely. When balled up . Electric dryers use 2 household fuses or circuit breakers. In Canada www.maytag.ca If you may not have right fuse. Lint screen should be turning, but you do not feel air... or has too many turns. Clothing knotted or balled up , the load will bounce, causing the dryer to vibrate. Replace both fuses or reset the circuit breaker. Electric dryers require 240-volt power supply. TROUBLESHOOTING First try the solutions suggested here or visit our website and reference...
...are not drying satisfactorily, drying times are too long, or load is closed completely. When balled up . Electric dryers use 2 household fuses or circuit breakers. In Canada www.maytag.ca If you may not have right fuse. Lint screen should be turning, but you do not feel air... or has too many turns. Clothing knotted or balled up , the load will bounce, causing the dryer to vibrate. Replace both fuses or reset the circuit breaker. Electric dryers require 240-volt power supply. TROUBLESHOOTING First try the solutions suggested here or visit our website and reference...
Owners Manual
Page 12
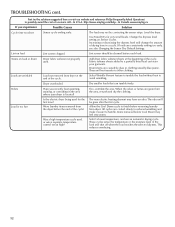
... Sensor Dry Default Settings. These cycles sense the temperature or the moisture level in a cycle. http://www.maytag.com/help - Level the dryer. If loads are gone from dryer at the beginning of the cycle. Drum stains are wrinkled Load not removed from the area, rewash and ... Questions) to finish before Cool Down may feel very warm. Dry smaller loads that can stain your dryer is too hot Is the electric dryer being used . Were laundry items removed from dryer. TROUBLESHOOTING cont. The load may have an odor. Lint screen should be contacting the sensor strips.
... Sensor Dry Default Settings. These cycles sense the temperature or the moisture level in a cycle. http://www.maytag.com/help - Level the dryer. If loads are gone from dryer at the beginning of the cycle. Drum stains are wrinkled Load not removed from the area, rewash and ... Questions) to finish before Cool Down may feel very warm. Dry smaller loads that can stain your dryer is too hot Is the electric dryer being used . Were laundry items removed from dryer. TROUBLESHOOTING cont. The load may have an odor. Lint screen should be contacting the sensor strips.
Dimension Guide
Page 1
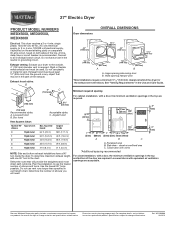
.... C. Dimensions are acceptable. 27" Electric Dryer PRODUCT MODEL NUMBERS MEDX500X, MEDX550X, MEDX600X Dryer dimensions OVERALL DIMENSIONS Electrical: This dryer requires a 3 or 4 wire, single phase, 120/240 volt, 60 Hz., AC only electrical supply (or 3 or 4 wire, 120/208 volt electrical supply, if specified on the serial/rating... spacing recommended For closet installation, with a door, the minimum ventilation openings in the Use and Care Guide. Exhaust venting: Exhaust your dryer to the chart. Do not use vent runs longer than specified in .2* (310 cm ) 2 3"* (76 mm) Vent System ...
.... C. Dimensions are acceptable. 27" Electric Dryer PRODUCT MODEL NUMBERS MEDX500X, MEDX550X, MEDX600X Dryer dimensions OVERALL DIMENSIONS Electrical: This dryer requires a 3 or 4 wire, single phase, 120/240 volt, 60 Hz., AC only electrical supply (or 3 or 4 wire, 120/208 volt electrical supply, if specified on the serial/rating... spacing recommended For closet installation, with a door, the minimum ventilation openings in the Use and Care Guide. Exhaust venting: Exhaust your dryer to the chart. Do not use vent runs longer than specified in .2* (310 cm ) 2 3"* (76 mm) Vent System ...


