Warranty Information
Page 1
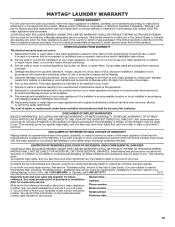
... workmanship and is required to published user or operator instructions and/or installation instructions. 2. Damage resulting from defects in accordance with Maytag published installation instructions. 10. The removal and reinstallation of your major appliance if it is used in this Warranty. DISCLAIMER OF REPRESENTATIONS OUTSIDE OF WARRANTY Maytag makes no representations about the quality, durability, or need repair service, first see the "Troubleshooting" section of the Use & Care Guide. EXCLUSION OF...
... workmanship and is required to published user or operator instructions and/or installation instructions. 2. Damage resulting from defects in accordance with Maytag published installation instructions. 10. The removal and reinstallation of your major appliance if it is used in this Warranty. DISCLAIMER OF REPRESENTATIONS OUTSIDE OF WARRANTY Maytag makes no representations about the quality, durability, or need repair service, first see the "Troubleshooting" section of the Use & Care Guide. EXCLUSION OF...
Use & Care Guide
Page 4
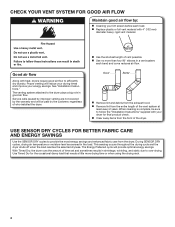
... energy savings and enhanced fabric care from the exhaust hood. The Energy Preferred cycle will reduce your drying times and improve your dryer for the occasional damp load that needs a little more than four 90° elbows in good air flow. With Timed Dry, the dryer runs the amount of vent possible. See "Installation Instructions." Good Better n Remove lint and debris from the dryer. During SENSOR DRY cycles, drying air temperature or moisture level are not covered by the warranty...
... energy savings and enhanced fabric care from the exhaust hood. The Energy Preferred cycle will reduce your drying times and improve your dryer for the occasional damp load that needs a little more than four 90° elbows in good air flow. With Timed Dry, the dryer runs the amount of vent possible. See "Installation Instructions." Good Better n Remove lint and debris from the dryer. During SENSOR DRY cycles, drying air temperature or moisture level are not covered by the warranty...
Use & Care Guide
Page 5
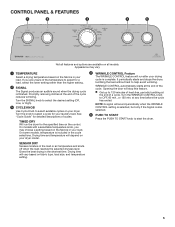
... load. See "Cycle Guide" for your laundry load. Drying time will vary based on fabric type, load size, and temperature setting. 4 WRINKLE CONTROL Feature The WRINKLE CONTROL feature will depend on the fabrics in the shortest time. Opening the door will sound periodically when the WRINKLE CONTROL setting is selected, but only if the Signal is included in the load or air temperature and shuts off when the load reaches the selected dryness level. On some models, temperature...
... load. See "Cycle Guide" for your laundry load. Drying time will vary based on fabric type, load size, and temperature setting. 4 WRINKLE CONTROL Feature The WRINKLE CONTROL feature will depend on the fabrics in the shortest time. Opening the door will sound periodically when the WRINKLE CONTROL setting is selected, but only if the Signal is included in the load or air temperature and shuts off when the load reaches the selected dryness level. On some models, temperature...
Use & Care Guide
Page 6
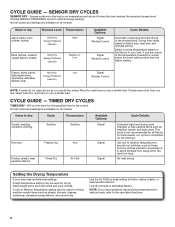
... wear Less Dry Signal Wrinkle Control NOTE: If loads do not interrupt. Use the Air Fluff (no heat) setting for various loads, refer to the care label directions. 6 Line dry bonded or laminated fabrics. SENSOR DRY CYCLES SENSOR DRY - Not all cycles and settings are available on all fabrics. Select a drying temperature based on all models. CYCLE GUIDE - Items to dry: Towels, bedding, children's clothing Cycle: Sanitize Temperature: Sanitize Any load Freshen Up Any Rubber, plastic, heat sensitive fabrics Timed Dry Air Fluff Available...
... wear Less Dry Signal Wrinkle Control NOTE: If loads do not interrupt. Use the Air Fluff (no heat) setting for various loads, refer to the care label directions. 6 Line dry bonded or laminated fabrics. SENSOR DRY CYCLES SENSOR DRY - Not all cycles and settings are available on all fabrics. Select a drying temperature based on all models. CYCLE GUIDE - Items to dry: Towels, bedding, children's clothing Cycle: Sanitize Temperature: Sanitize Any load Freshen Up Any Rubber, plastic, heat sensitive fabrics Timed Dry Air Fluff Available...
Use & Care Guide
Page 7
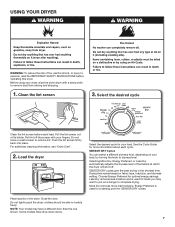
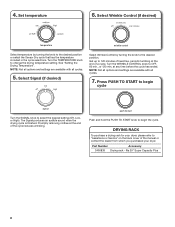
Before using your dryer, wipe the dryer drum with your fingers. Pull the lint screen out of fire, electric shock, or injury to dryness level. For additional cleaning information, see "Dryer Care". 2. See the Cycle Guide for more load moisture. Less Dry removes less moisture and is used for SENSOR DRY cycles. Drying time varies based on your load. Choose Energy Preferred for your load, by turning the knob to persons, read the IMPORTANT SAFETY INSTRUCTIONS before...
Before using your dryer, wipe the dryer drum with your fingers. Pull the lint screen out of fire, electric shock, or injury to dryness level. For additional cleaning information, see "Dryer Care". 2. See the Cycle Guide for more load moisture. Less Dry removes less moisture and is used for SENSOR DRY cycles. Drying time varies based on your load. Choose Energy Preferred for your load, by turning the knob to persons, read the IMPORTANT SAFETY INSTRUCTIONS before...
Use & Care Guide
Page 8
... heat-free, periodic tumbling at the end of the manual or contact the dealer from whom you purchased your dryer, please refer to the desired position or select the Sensor Dry cycle that has the temperature included in the cycle selections. Part Number Accessory 3406839 Drying rack - Push and hold the PUSH TO START knob to begin cycle Turn the SIGNAL knob to the desired position. Set temperature 6. Turn...
... heat-free, periodic tumbling at the end of the manual or contact the dealer from whom you purchased your dryer, please refer to the desired position or select the Sensor Dry cycle that has the temperature included in the cycle selections. Part Number Accessory 3406839 Drying rack - Push and hold the PUSH TO START knob to begin cycle Turn the SIGNAL knob to the desired position. Set temperature 6. Turn...
Use & Care Guide
Page 9
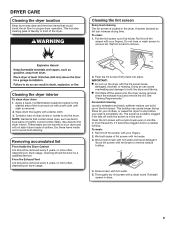
... drying times for proper dryer operation. Clean the lint screen with hot water. 5. Rinse screen with a nylon brush every 6 months, or more often, depending on the lint screen. Roll lint off the screen into place. Cleaning the dryer interior To clean dryer drum 1. Tumble a load of its holder. NOTE: Garments that would block the air flow for your clothes, or cause the dryer to dry the drum. Push the lint screen firmly back into the dryer during removal, check the exhaust hood and remove...
... drying times for proper dryer operation. Clean the lint screen with hot water. 5. Rinse screen with a nylon brush every 6 months, or more often, depending on the lint screen. Roll lint off the screen into place. Cleaning the dryer interior To clean dryer drum 1. Tumble a load of its holder. NOTE: Garments that would block the air flow for your clothes, or cause the dryer to dry the drum. Push the lint screen firmly back into the dryer during removal, check the exhaust hood and remove...

Use & Care Guide
Page 10
... remove fittings attached to gas supply line. 3. Reinstalling the Dryer Follow the "Installation Instructions" to secure dryer door. Plug into a grounded outlet or reconnect power. 10 See "Cleaning the Lint Screen." Cap the open fuel supply line. 5. Turn bulb counterclockwise. Use tape to locate, level, and connect the dryer. 3. Use tape to do so can result in gas supply line. 3. Replace the bulb with the screw. 4. Make sure leveling legs are at fuse or breaker box. 2. For gas dryers: 1. Replace all parts and panels...
... remove fittings attached to gas supply line. 3. Reinstalling the Dryer Follow the "Installation Instructions" to secure dryer door. Plug into a grounded outlet or reconnect power. 10 See "Cleaning the Lint Screen." Cap the open fuel supply line. 5. Turn bulb counterclockwise. Use tape to locate, level, and connect the dryer. 3. Use tape to do so can result in gas supply line. 3. Replace the bulb with the screw. 4. Make sure leveling legs are at fuse or breaker box. 2. For gas dryers: 1. Replace all parts and panels...
Use & Care Guide
Page 11
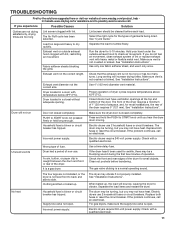
.... When balled up . Separate the load items and restart the dryer. Select the right cycle for the types of fuse. Fabric softener sheets blocking the grille. Exhaust vent diameter not the correct size. Replace both fuses or reset the circuit breaker. Wrong type of garments being dried. A coin, button, or paper clip is caught between the drum and front or rear of the door. Electric dryers require 240-volt power supply. TROUBLESHOOTING First try the solutions suggested...
.... When balled up . Separate the load items and restart the dryer. Select the right cycle for the types of fuse. Fabric softener sheets blocking the grille. Exhaust vent diameter not the correct size. Replace both fuses or reset the circuit breaker. Wrong type of garments being dried. A coin, button, or paper clip is caught between the drum and front or rear of the door. Electric dryers require 240-volt power supply. TROUBLESHOOTING First try the solutions suggested...
Use & Care Guide
Page 12
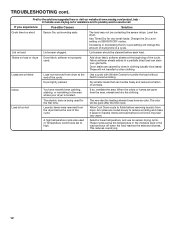
... clothing. Select a lower temperature, and use an sensor drying cycle. If you experience Possible Causes Solution Cycle time too short Sensor Dry cycle ending early. Lint screen should be contacting the sensor strips. Use a cycle with Wrinkle Control to tumble the load without heat to other clothing. The new electric heating element may have recently been painting, staining, or varnishing in clothing (usually blue jeans). Fabric softener sheets added to handle. Load is too hot The electric dryer is located. Items removed...
... clothing. Select a lower temperature, and use an sensor drying cycle. If you experience Possible Causes Solution Cycle time too short Sensor Dry cycle ending early. Lint screen should be contacting the sensor strips. Use a cycle with Wrinkle Control to tumble the load without heat to other clothing. The new electric heating element may have recently been painting, staining, or varnishing in clothing (usually blue jeans). Fabric softener sheets added to handle. Load is too hot The electric dryer is located. Items removed...

Use & Care Guide
Page 13
... Maytag dealer to repair or replace appliance light bulbs, air filters, or water filters. Pick up and delivery. ITEMS EXCLUDED FROM WARRANTY This limited warranty does not cover: 1. Expenses for travel and transportation for future reference. Consumable parts are unable to resolve the problem after checking "Troubleshooting," additional help you obtain assistance or service if you need for other rights that is not installed in accordance with electrical or plumbing codes, or use...
... Maytag dealer to repair or replace appliance light bulbs, air filters, or water filters. Pick up and delivery. ITEMS EXCLUDED FROM WARRANTY This limited warranty does not cover: 1. Expenses for travel and transportation for future reference. Consumable parts are unable to resolve the problem after checking "Troubleshooting," additional help you obtain assistance or service if you need for other rights that is not installed in accordance with electrical or plumbing codes, or use...
Installation Guide
Page 4
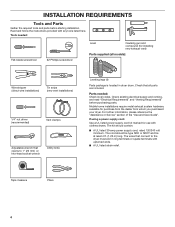
... (4) Parts package is located in ring terminals or spade terminals with upturned ends. ■■ A UL listed strain relief. Check that opens to the dryer must end in dryer drum. The kit should be type SRD or SRDT and be at least 4 ft. (1.22 m) long. Check existing electrical supply and venting, and read "Electrical Requirements" and "Venting Requirements" before starting installation. Tools needed : Check local codes. If using a power supply cord: Use a UL listed power supply cord kit marked for use with any tools listed...
... (4) Parts package is located in ring terminals or spade terminals with upturned ends. ■■ A UL listed strain relief. Check that opens to the dryer must end in dryer drum. The kit should be type SRD or SRDT and be at least 4 ft. (1.22 m) long. Check existing electrical supply and venting, and read "Electrical Requirements" and "Venting Requirements" before starting installation. Tools needed : Check local codes. If using a power supply cord: Use a UL listed power supply cord kit marked for use with any tools listed...
Installation Guide
Page 5
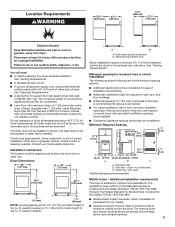
... 24, HUD Part 280). ■■ Metal exhaust system hardware, which is greater than 1" [25 mm], install Extended Dryer Feet Kit, Part Number 279810.) If not level, clothes may not tumble properly and automatic sensor cycles may not operate correctly. A B A. Recessed area B. The opening (such as a nearby window) should be considered. ■■ Level floor with elbow. Check code requirements. Wide opening hamper door *Most installations require a minimum 5½...
... 24, HUD Part 280). ■■ Metal exhaust system hardware, which is greater than 1" [25 mm], install Extended Dryer Feet Kit, Part Number 279810.) If not level, clothes may not tumble properly and automatic sensor cycles may not operate correctly. A B A. Recessed area B. The opening (such as a nearby window) should be considered. ■■ Level floor with elbow. Check code requirements. Wide opening hamper door *Most installations require a minimum 5½...
Installation Guide
Page 6
... National Electrical Code requires a 4-wire power supply connection for use aluminum). ■■ At least 5 ft. (1.52 m) long. 6 A time-delay fuse or circuit breaker is installed with a 3-wire electrical supply connection. If connecting by a white cover. Electrical Requirements It is your responsibility: ■■ To contact a qualified electrical installer. ■■ To be sure that the electrical connection is permanently connected to the neutral conductor (white wire) within the dryer. A copy of the terminal block. The neutral ground wire is...
... National Electrical Code requires a 4-wire power supply connection for use aluminum). ■■ At least 5 ft. (1.52 m) long. 6 A time-delay fuse or circuit breaker is installed with a 3-wire electrical supply connection. If connecting by a white cover. Electrical Requirements It is your responsibility: ■■ To contact a qualified electrical installer. ■■ To be sure that the electrical connection is permanently connected to the neutral conductor (white wire) within the dryer. A copy of the terminal block. The neutral ground wire is...
Installation Guide
Page 9
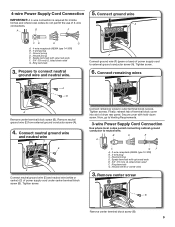
... screws. Connect remaining wires to neutral wire. Now, go to Venting Requirements. 3-wire Power Supply Cord Connection Use where local codes permit connecting cabinet-ground conductor to outer terminal block screws. Ring terminals G. Remove center screw B Remove center terminal block screw (B). 9 Ring terminals 3. F Connect ground wire (F) (green or bare) of 3-wire connections. Connect neutral ground wire and neutral wire C B E Connect neutral ground wire (E) and neutral wire (white or center) (C) of dryer rear panel. A B F 5. Remove neutral ground wire (E) from...
... screws. Connect remaining wires to neutral wire. Now, go to Venting Requirements. 3-wire Power Supply Cord Connection Use where local codes permit connecting cabinet-ground conductor to outer terminal block screws. Ring terminals G. Remove center screw B Remove center terminal block screw (B). 9 Ring terminals 3. F Connect ground wire (F) (green or bare) of 3-wire connections. Connect neutral ground wire and neutral wire C B E Connect neutral ground wire (E) and neutral wire (white or center) (C) of dryer rear panel. A B F 5. Remove neutral ground wire (E) from...
Installation Guide
Page 10
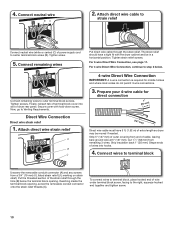
... needed. To connect wires to terminal block, place hooked end of power supply cord to terminal block Unscrew the removable conduit connector (A) and any screws from a 3/4" (19 mm) UL listed strain relief (UL marking on strain relief). 4. For 3-wire Direct Wire Connection, see page 11. Finally, reinsert tab of extra length so dryer may be in a horizontal position. Now, go to outer terminal block screws. Strip 5" (127 mm) of dryer rear panel. Tighten screws. Connect wires...
... needed. To connect wires to terminal block, place hooked end of power supply cord to terminal block Unscrew the removable conduit connector (A) and any screws from a 3/4" (19 mm) UL listed strain relief (UL marking on strain relief). 4. For 3-wire Direct Wire Connection, see page 11. Finally, reinsert tab of extra length so dryer may be in a horizontal position. Now, go to outer terminal block screws. Strip 5" (127 mm) of dryer rear panel. Tighten screws. Connect wires...
Installation Guide
Page 11
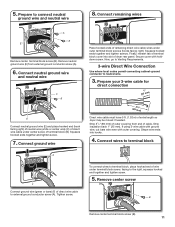
... if needed. Connect ground wire Place hooked ends of remaining direct wire cable wires under center screw of direct wire cable to neutral wire. 3. Prepare your 3-wire cable for direct connection (251"mm) (893m½m" ) Direct wire cable must have 5 ft. (1.52 m) of dryer rear panel. Strip insulation back 1" (25 mm). Connect wires to terminal block A F Connect ground wire (green or bare) (F) of terminal block (B). Finally, reinsert tab of terminal block cover into hooks. 4. Now, go to Venting Requirements. 3-wire Direct Wire Connection Use where local codes permit connecting...
... if needed. Connect ground wire Place hooked ends of remaining direct wire cable wires under center screw of direct wire cable to neutral wire. 3. Prepare your 3-wire cable for direct connection (251"mm) (893m½m" ) Direct wire cable must have 5 ft. (1.52 m) of dryer rear panel. Strip insulation back 1" (25 mm). Connect wires to terminal block A F Connect ground wire (green or bare) (F) of terminal block (B). Finally, reinsert tab of terminal block cover into hooks. 4. Now, go to Venting Requirements. 3-wire Direct Wire Connection Use where local codes permit connecting...
Installation Guide
Page 14
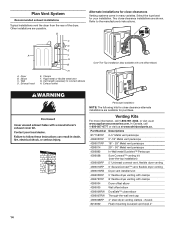
.... A A. Exhaust hood C D E F G B H E. Clamps F. In Canada, call 1-800-901-2042, or visit us at www.applianceaccessories.com. Dryer B. B Alternate installations for purchase. Vent length necessary to the manufacturer's instructions. Part Number Descriptions 8171587RP 0-5" Metal vent periscope 4396037RP 0"-18" Metal vent periscope 4396011RP 18" - 29" Metal vent periscope 4396014 29" - 50" Metal vent periscope 4392892 In-Wall metal DuraVent™ Periscope 4396028 Sure Connect™ venting kit...
.... A A. Exhaust hood C D E F G B H E. Clamps F. In Canada, call 1-800-901-2042, or visit us at www.applianceaccessories.com. Dryer B. B Alternate installations for purchase. Vent length necessary to the manufacturer's instructions. Part Number Descriptions 8171587RP 0-5" Metal vent periscope 4396037RP 0"-18" Metal vent periscope 4396011RP 18" - 29" Metal vent periscope 4396014 29" - 50" Metal vent periscope 4392892 In-Wall metal DuraVent™ Periscope 4396028 Sure Connect™ venting kit...
Installation Guide
Page 15
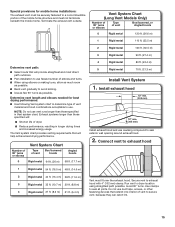
... dryer. ■■ Reduce performance, resulting in Vent system chart. Secure vent to seal exterior wall opening around exhaust hood. 2. Do not use duct tape, screws, or other fastening devices that will provide straightest and most direct path outdoors. ■■ Plan installation to use fewest number of elbows and turns. ■■ When using straightest path possible. Vent System Chart Number of 90° turns...
... dryer. ■■ Reduce performance, resulting in Vent system chart. Secure vent to seal exterior wall opening around exhaust hood. 2. Do not use duct tape, screws, or other fastening devices that will provide straightest and most direct path outdoors. ■■ Plan installation to use fewest number of elbows and turns. ■■ When using straightest path possible. Vent System Chart Number of 90° turns...
Installation Guide
Page 16
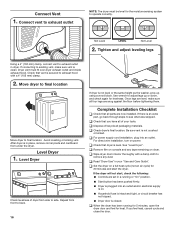
... legs Using a 4" (102 mm) clamp, connect vent to operate correctly. Repeat from side to exhaust outlet NOTE: The dryer must fit over dryer exhaust outlet and inside exhaust hood. Complete Installation Checklist q Check that dryer is plugged into an outlet. q Check that vent is on a full heat cycle (not an air cycle) for heat. q For power supply cord installation, plug into an outlet and/or electrical supply is secured to existing vent, make sure all of your "Use and Care Guide". q Wipe dryer drum interior...
... legs Using a 4" (102 mm) clamp, connect vent to operate correctly. Repeat from side to exhaust outlet NOTE: The dryer must fit over dryer exhaust outlet and inside exhaust hood. Complete Installation Checklist q Check that dryer is plugged into an outlet. q Check that vent is on a full heat cycle (not an air cycle) for heat. q For power supply cord installation, plug into an outlet and/or electrical supply is secured to existing vent, make sure all of your "Use and Care Guide". q Wipe dryer drum interior...


