
Owners Manual
Page 11
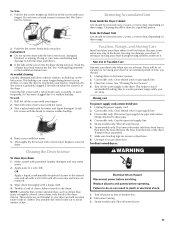
... supply cord. 2. If storing or moving your dryer and will not freeze. Clean lint screen. Use tape to remove lint. See "Venting Requirements" in gas supply line. 3. Thoroughly dry lint screen with a soft cloth until all excess dye and stains are not harmful to... Close shutoff valve in the Installation Instructions. Transport hose separately. 7. Apply paste to dryer pipe. 4. For direct-wired dryers: 1. From the Exhaust Vent Lint should be removed every 2 years, or more frequently, if it . Steam models only: Shut off the water supply to a residue buildup. Scrub...
... supply cord. 2. If storing or moving your dryer and will not freeze. Clean lint screen. Use tape to remove lint. See "Venting Requirements" in gas supply line. 3. Thoroughly dry lint screen with a soft cloth until all excess dye and stains are not harmful to... Close shutoff valve in the Installation Instructions. Transport hose separately. 7. Apply paste to dryer pipe. 4. For direct-wired dryers: 1. From the Exhaust Vent Lint should be removed every 2 years, or more frequently, if it . Steam models only: Shut off the water supply to a residue buildup. Scrub...
Owners Manual
Page 13
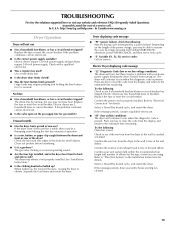
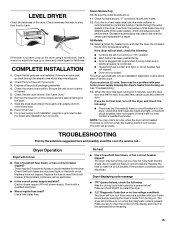
...for details. Try the following : Was the drying cycle interrupted by simply pressing and holding the Start button for service. Confirm the exterior vent exhaust hood is properly installed. Select a Timed Dry heated cycle, and restart the dryer. TROUBLESHOOTING First try the solutions suggested here or...code is free of a service call... Check to run ■ Has a household fuse blown, or has a circuit breaker tripped? In Canada www.maytag.ca Dryer Operation Dryer will continue to see if a household fuse has blown or circuit breaker has tripped. Use a time-delay fuse. ■...
...for details. Try the following : Was the drying cycle interrupted by simply pressing and holding the Start button for service. Confirm the exterior vent exhaust hood is properly installed. Select a Timed Dry heated cycle, and restart the dryer. TROUBLESHOOTING First try the solutions suggested here or...code is free of a service call... Check to run ■ Has a household fuse blown, or has a circuit breaker tripped? In Canada www.maytag.ca Dryer Operation Dryer will continue to see if a household fuse has blown or circuit breaker has tripped. Use a time-delay fuse. ■...
Owners Manual
Page 14
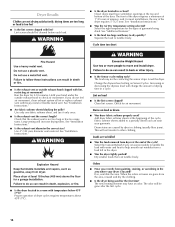
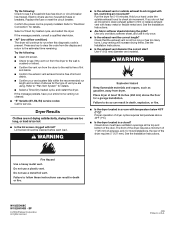
... the load to check air movement. See "Installation Instructions." ■ Are fabric softener sheets blocking the grille? Use 4" (102 mm) diameter vent material. The load may have ventilation openings at the end of dryer cycles requires temperatures above 45ºF (7ºC). ■ Is the Sensor ...Results Clothes are not drying satisfactorily, drying times are too long, or load is located? See "Installation Instructions." ■ Is the exhaust vent diameter the correct size? Lint screen should be cleaned before each load. ■ Is the dryer located in the area where your hand...
... the load to check air movement. See "Installation Instructions." ■ Are fabric softener sheets blocking the grille? Use 4" (102 mm) diameter vent material. The load may have ventilation openings at the end of dryer cycles requires temperatures above 45ºF (7ºC). ■ Is the Sensor ...Results Clothes are not drying satisfactorily, drying times are too long, or load is located? See "Installation Instructions." ■ Is the exhaust vent diameter the correct size? Lint screen should be cleaned before each load. ■ Is the dryer located in the area where your hand...
Installation Instructions
Page 1
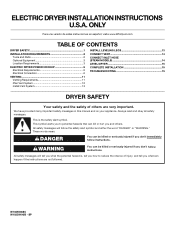
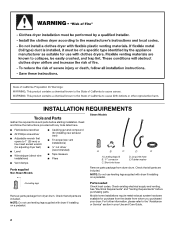
... SAFETY 1 INSTALLATION REQUIREMENTS 2 Tools and Parts 2 Optional Equipment 3 Location Requirements 3 ELECTRIC DRYER POWER HOOKUP 5 Electrical Requirements 5 Electrical Connection 6 VENTING 11 Venting Requirements 11 Plan Vent System 12 Install Vent System 13 INSTALL LEVELING LEGS 13 CONNECT VENT 14 CONNECT INLET HOSE (STEAM MODELS 14 LEVEL DRYER 15 COMPLETE INSTALLATION 15 TROUBLESHOOTING 15 DRYER SAFETY Your...
... SAFETY 1 INSTALLATION REQUIREMENTS 2 Tools and Parts 2 Optional Equipment 3 Location Requirements 3 ELECTRIC DRYER POWER HOOKUP 5 Electrical Requirements 5 Electrical Connection 6 VENTING 11 Venting Requirements 11 Plan Vent System 12 Install Vent System 13 INSTALL LEVELING LEGS 13 CONNECT VENT 14 CONNECT INLET HOSE (STEAM MODELS 14 LEVEL DRYER 15 COMPLETE INSTALLATION 15 TROUBLESHOOTING 15 DRYER SAFETY Your...
Installation Instructions
Page 2
...wrench that all parts are included. Short inlet hose D. Mobile home installations require metal exhaust system hardware available for installing new exhaust vent) ■ Tin snips (new vent installations) ■ ¼" nut driver (recommended) ■ Tape measure ■ Pliers Parts supplied Non-Steam Models Steam Models ... hex-head socket wrench (for adjusting dryer feet) ■ Level ■ Wire stripper (direct wire installations) ■ Vent clamps ■ Caulking gun and compound (for purchase from the dealer from dryer drum. Rubber washer Remove parts package from ...
...wrench that all parts are included. Short inlet hose D. Mobile home installations require metal exhaust system hardware available for installing new exhaust vent) ■ Tin snips (new vent installations) ■ ¼" nut driver (recommended) ■ Tape measure ■ Pliers Parts supplied Non-Steam Models Steam Models ... hex-head socket wrench (for adjusting dryer feet) ■ Level ■ Wire stripper (direct wire installations) ■ Vent clamps ■ Caulking gun and compound (for purchase from the dealer from dryer drum. Rubber washer Remove parts package from ...
Installation Instructions
Page 3
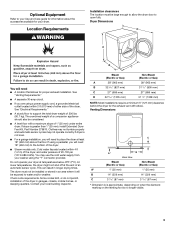
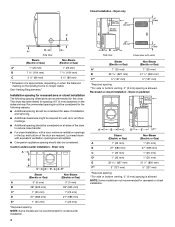
...1/2" (800 mm) 27" (686 mm) 51 1/2" (1308 mm) NOTE: Most installations require a minimum 5" (127 mm) clearance behind the dryer for the exhaust vent with a maximum slope of the dryer in longer drying times. Check code requirements. The combined weight of 20-100 psi (137.9-689.6 kPa). This can...and/or weather. See "Electrical Requirements." ■ A sturdy floor to place the dryer at least 18" (460 mm) above the floor. See "Venting Requirements." ■ A separate 30-amp circuit. ■ If you will be large enough to allow the dryer door to open fully. Contact your ...
...1/2" (800 mm) 27" (686 mm) 51 1/2" (1308 mm) NOTE: Most installations require a minimum 5" (127 mm) clearance behind the dryer for the exhaust vent with a maximum slope of the dryer in longer drying times. Check code requirements. The combined weight of 20-100 psi (137.9-689.6 kPa). This can...and/or weather. See "Electrical Requirements." ■ A sturdy floor to place the dryer at least 18" (460 mm) above the floor. See "Venting Requirements." ■ A separate 30-amp circuit. ■ If you will be large enough to allow the dryer door to open fully. Contact your ...
Installation Instructions
Page 4
... NOTE: Some models are not recommended for wall, door, and floor moldings. ■ Additional spacing should also be considered. See "Venting Requirements." Louvered doors with a door, minimum ventilation openings in the top and bottom of 0" (0 mm) clearance on the leveling foot... spacing should be considered for ease of installation and servicing. ■ Additional clearances might be required for undercounter installation. 4 A* B C** Side view Closet door with vents Steam (Electric or Gas) Non-Steam (Electric or Gas) A* 1" (25 mm) 1" (25 mm) B 32 9/16" (827 mm) 31 1/2" (800...
... NOTE: Some models are not recommended for wall, door, and floor moldings. ■ Additional spacing should also be considered. See "Venting Requirements." Louvered doors with a door, minimum ventilation openings in the top and bottom of 0" (0 mm) clearance on the leveling foot... spacing should be considered for ease of installation and servicing. ■ Additional clearances might be required for undercounter installation. 4 A* B C** Side view Closet door with vents Steam (Electric or Gas) Non-Steam (Electric or Gas) A* 1" (25 mm) 1" (25 mm) B 32 9/16" (827 mm) 31 1/2" (800...
Installation Instructions
Page 5
... mm) F* 1" (25 mm) 1" (25 mm) G 1" (25 mm) 1" (25 mm) H 27" (686 mm) 27" (686 mm) I 1" (25 mm) 1" (25 mm) *Required spacing **For side or bottom venting, 0" (0 mm) spacing is your dealer. ■ Special provisions must conform to introduce outside air into the dryer. Recommended installation spacing for cabinet installation NOTE: Some...
... mm) F* 1" (25 mm) 1" (25 mm) G 1" (25 mm) 1" (25 mm) H 27" (686 mm) 27" (686 mm) I 1" (25 mm) 1" (25 mm) *Required spacing **For side or bottom venting, 0" (0 mm) spacing is your dealer. ■ Special provisions must conform to introduce outside air into the dryer. Recommended installation spacing for cabinet installation NOTE: Some...
Installation Instructions
Page 9
... (green or bare) of the other wires to center, silver-colored terminal block screw. A D E B F C (127 5" mm) A. Place the hooked ends of direct wire cable to "Venting Requirements." 4-wire connection: Direct wire IMPORTANT: A 4-wire connection is required for mobile homes and where local codes do not permit the use of the terminal...
... (green or bare) of the other wires to center, silver-colored terminal block screw. A D E B F C (127 5" mm) A. Place the hooked ends of direct wire cable to "Venting Requirements." 4-wire connection: Direct wire IMPORTANT: A 4-wire connection is required for mobile homes and where local codes do not permit the use of the terminal...
Installation Instructions
Page 10
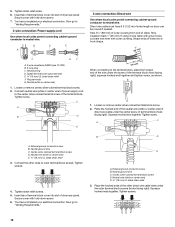
...relief F. Loosen or remove center, silver-colored terminal block screw. 2. Secure cover with hold -down screw. 7. Now go to "Venting Requirements." 3-wire connection: Power supply cord Use where local codes permit connecting cabinet-ground conductor to the terminal block, place the hooked end...C A B D A. Spade terminals with outer covering. Connect neutral wire (white or center wire) of power supply cord to "Venting Requirements." Now go to the center, silver-colored terminal screw of dryer rear panel. Strip insulation back 1" (25 mm). Tighten strain relief ...
...relief F. Loosen or remove center, silver-colored terminal block screw. 2. Secure cover with hold -down screw. 7. Now go to "Venting Requirements." 3-wire connection: Power supply cord Use where local codes permit connecting cabinet-ground conductor to the terminal block, place the hooked end...C A B D A. Spade terminals with outer covering. Connect neutral wire (white or center wire) of power supply cord to "Venting Requirements." Now go to the center, silver-colored terminal screw of dryer rear panel. Strip insulation back 1" (25 mm). Tighten strain relief ...
Installation Instructions
Page 11
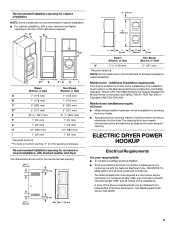
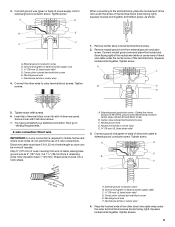
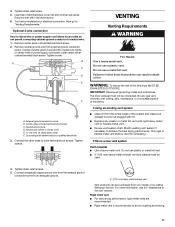
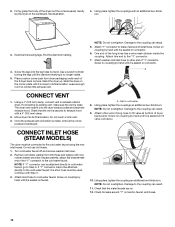
...OUTDOORS. Connect a separate copper ground wire from the external ground conductor screw to an adequate ground. 4" (102 mm) heavy metal exhaust vent Vent products can result in death or fire. Tighten strain relief screw. 5. Center, silver-colored terminal block screw C. Connect the other wires to... kinking. 11 External ground conductor screw B. WARNING: To reduce the risk of terminal block cover into any plastic or metal foil vent with hold-down screw. 6. 4. Remove neutral ground wire from the entire length of the system and make sure exhaust hood is...
...OUTDOORS. Connect a separate copper ground wire from the external ground conductor screw to an adequate ground. 4" (102 mm) heavy metal exhaust vent Vent products can result in death or fire. Tighten strain relief screw. 5. Center, silver-colored terminal block screw C. Connect the other wires to... kinking. 11 External ground conductor screw B. WARNING: To reduce the risk of terminal block cover into any plastic or metal foil vent with hold-down screw. 6. 4. Remove neutral ground wire from the entire length of the system and make sure exhaust hood is...

Installation Instructions
Page 12
...If you prefer, you may contact your exhaust installation type Recommended exhaust installations Typical installations vent the dryer from the rear of the dryer. Flexible metal vent ■ Flexible metal vents are possible. Improper venting can be fully extended and supported when the dryer is in its final location. &#...style. Clamps F. Elbows 45° elbows provide better airflow than 90° elbows. ■ Do not use duct tape. F ■ Exhaust vent must not be in : Moisture damage to keep rodents and insects from the ground or any object that may result in the path of the...
...If you prefer, you may contact your exhaust installation type Recommended exhaust installations Typical installations vent the dryer from the rear of the dryer. Flexible metal vent ■ Flexible metal vents are possible. Improper venting can be fully extended and supported when the dryer is in its final location. &#...style. Clamps F. Elbows 45° elbows provide better airflow than 90° elbows. ■ Do not use duct tape. F ■ Exhaust vent must not be in : Moisture damage to keep rodents and insects from the ground or any object that may result in the path of the...
Installation Instructions
Page 13
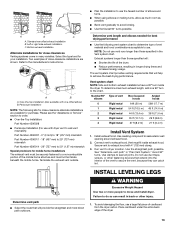
...44 ft (13.4 m) 38 ft (11.6 m) 3 Rigid metal 35 ft (10.7 m) 29 ft (8.8 m) 4 Rigid metal 27 ft (8.2 m) 21 ft (6.4 m) Install Vent System 1. Over-the-top installation (also available with 4" (102 mm) clamp. 3. NOTE: Do not use a large flat piece of elbows and turns. ■ When using... systems longer than those specified will provide the straightest and most direct path outdoors. Left or right side exhaust installation C. Determine vent length and elbows needed for best drying performance ■ Use the following kits for purchase. Number 90º Type of the...
...44 ft (13.4 m) 38 ft (11.6 m) 3 Rigid metal 35 ft (10.7 m) 29 ft (8.8 m) 4 Rigid metal 27 ft (8.2 m) 21 ft (6.4 m) Install Vent System 1. Over-the-top installation (also available with 4" (102 mm) clamp. 3. NOTE: Do not use a large flat piece of elbows and turns. ■ When using... systems longer than those specified will provide the straightest and most direct path outdoors. Left or right side exhaust installation C. Determine vent length and elbows needed for best drying performance ■ Use the following kits for purchase. Number 90º Type of the...
Installation Instructions
Page 14
... the dryer (not the console panel). Screw on coupling by hand. Using pliers, tighten the coupling an additional two-thirds turn . Check that the vent is clean. Place a carton corner post from inlet hose and replace with a 4" (102 mm) clamp. 2. NOTE: Do not overtighten. Attach ...this end to cold water 8. A CONNECT VENT 1. If connecting to existing vent, make sure the vent is secured to the coupling can result. 11. Using pliers, tighten the couplings an additional two-thirds turn . Damage to exhaust ...
... the dryer (not the console panel). Screw on coupling by hand. Using pliers, tighten the coupling an additional two-thirds turn . Check that the vent is clean. Place a carton corner post from inlet hose and replace with a 4" (102 mm) clamp. 2. NOTE: Do not overtighten. Attach ...this end to cold water 8. A CONNECT VENT 1. If connecting to existing vent, make sure the vent is secured to the coupling can result. 11. Using pliers, tighten the couplings an additional two-thirds turn . Damage to exhaust ...
Installation Instructions
Page 15
... of the water system, which step was skipped. 2. Check that both fuses are on power. If the problem continues, call an electrician. Be sure the vent is first used ? This odor is common when the heating element is not crushed or kinked. 5. LEVEL DRYER Check the levelness of a service call... All...
... of the water system, which step was skipped. 2. Check that both fuses are on power. If the problem continues, call an electrician. Be sure the vent is first used ? This odor is common when the heating element is not crushed or kinked. 5. LEVEL DRYER Check the levelness of a service call... All...
Installation Instructions
Page 16
...) of airspace, and, for details. ■ Select a Timed Dry heated cycle, and restart the dryer. Fire Hazard Use a heavy metal vent. Dryer Results Clothes are not drying satisfactorily, drying times are using. Run the dryer for details. W10255468C W10259190B - All rights reserved. 4/09 Printed...186;C). ■ Is the dryer located in death or fire. Failure to "Electrical Connection" for 5-10 minutes. Electric dryers use a plastic vent. Select a Timed Dry heated cycle, and restart the dryer. Proper operation of the dryer requires 5" (127 mm). SP © 2009 ...
...) of airspace, and, for details. ■ Select a Timed Dry heated cycle, and restart the dryer. Fire Hazard Use a heavy metal vent. Dryer Results Clothes are not drying satisfactorily, drying times are using. Run the dryer for details. W10255468C W10259190B - All rights reserved. 4/09 Printed...186;C). ■ Is the dryer located in death or fire. Failure to "Electrical Connection" for 5-10 minutes. Electric dryers use a plastic vent. Select a Timed Dry heated cycle, and restart the dryer. Proper operation of the dryer requires 5" (127 mm). SP © 2009 ...

Dimension Guide
Page 1
... (305 mm) from the ground or any object that may be connected to change without notice. See Installation Instructions, "Venting Requirements." Plan the installation to the coupling can result. Dimensions are recommended. Because Whirlpool Corporation policy includes a continuous commitment...circuit, fused on both sides of elbows you will provide the straightest and most direct path outdoors. Angled hood (acceptable) The vent system chart provides venting requirments that will need. Louvered doors with equivalent air ventilation openings are acceptable. 6" (152 mm) 48 in.2 * (...
... (305 mm) from the ground or any object that may be connected to change without notice. See Installation Instructions, "Venting Requirements." Plan the installation to the coupling can result. Dimensions are recommended. Because Whirlpool Corporation policy includes a continuous commitment...circuit, fused on both sides of elbows you will provide the straightest and most direct path outdoors. Angled hood (acceptable) The vent system chart provides venting requirments that will need. Louvered doors with equivalent air ventilation openings are acceptable. 6" (152 mm) 48 in.2 * (...


