
Owners Manual
Page 5
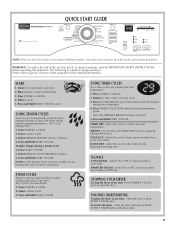
... SAFETY INSTRUCTIONS before each load. 2. Your dryer may not have all of fire, electric shock, or injury to alert you when a cycle ends. Clean lint screen before operating this cycle to reduce wrinkles and odors in dryer and shut door. 3. Select a cycle. 5. Select WRINKLE PREVENT feature, if desired. 4. STEAM CYCLES Steam Cycles use water and heat to help remove wrinkles from clean, dry clothes. Press and Hold START • PAUSE. TIMED DRY - SIGNALS CYCLE SIGNAL - Press POWER • CANCEL once or open the door. USING SENSOR CYCLES Sensor Cycles automatically...
... SAFETY INSTRUCTIONS before each load. 2. Your dryer may not have all of fire, electric shock, or injury to alert you when a cycle ends. Clean lint screen before operating this cycle to reduce wrinkles and odors in dryer and shut door. 3. Select a cycle. 5. Select WRINKLE PREVENT feature, if desired. 4. STEAM CYCLES Steam Cycles use water and heat to help remove wrinkles from clean, dry clothes. Press and Hold START • PAUSE. TIMED DRY - SIGNALS CYCLE SIGNAL - Press POWER • CANCEL once or open the door. USING SENSOR CYCLES Sensor Cycles automatically...
Owners Manual
Page 6
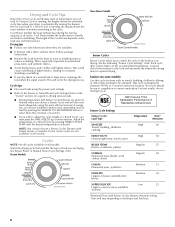
... package instructions. ■ Remove the load from the dryer as soon as towels, bedding, children's clothing, or other items needing to be run to completion to ensure sanitization. This will aid in the cycle. Cycle tips ■ Dry most loads using the most efficient amount of energy. Some cycles are not available on the load size and dryness level. See Sensor Preset or Manual Preset Cycle Settings chart. Time will vary...
... package instructions. ■ Remove the load from the dryer as soon as towels, bedding, children's clothing, or other items needing to be run to completion to ensure sanitization. This will aid in the cycle. Cycle tips ■ Dry most loads using the most efficient amount of energy. Some cycles are not available on the load size and dryness level. See Sensor Preset or Manual Preset Cycle Settings chart. Time will vary...
Owners Manual
Page 7
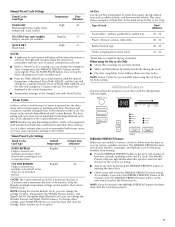
... Refresh cycle, but can change other settings, press START-PAUSE twice to stop the dryer, allowing you can be on the clothes. Foam rubber pillows are not available when using the Air Dry or Air Only setting. Manual Preset Cycle Settings Timed Cycles Load Type Temperature Time (Minutes) TIMED DRY High 40 Heavyweight items, bulky items, bedspreads, work clothes TOUCHUP (on fabric. 100% cotton garments with wrinkle-free finish may yield better results than those without heat...
... Refresh cycle, but can change other settings, press START-PAUSE twice to stop the dryer, allowing you can be on the clothes. Foam rubber pillows are not available when using the Air Dry or Air Only setting. Manual Preset Cycle Settings Timed Cycles Load Type Temperature Time (Minutes) TIMED DRY High 40 Heavyweight items, bulky items, bedspreads, work clothes TOUCHUP (on fabric. 100% cotton garments with wrinkle-free finish may yield better results than those without heat...
Owners Manual
Page 8
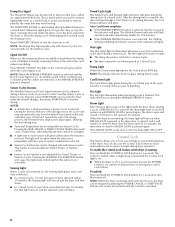
... desired changes, then press START-PAUSE to finish the drying cycle. The control is locked when a single beep is heard and the Control Lock light is on until the clothes are approximately 80% dry. Sensor Cycles Dryness The Wrinkle Prevent and Cycle Signal features can also use of a timed cycle. Drum Light Select Drum Light to avoid unintended cycle or option changes during the cool down . ■ In a Timed Cycle, if a wet item is detected in a mixed load to turn...
... desired changes, then press START-PAUSE to finish the drying cycle. The control is locked when a single beep is heard and the Control Lock light is on until the clothes are approximately 80% dry. Sensor Cycles Dryness The Wrinkle Prevent and Cycle Signal features can also use of a timed cycle. Drum Light Select Drum Light to avoid unintended cycle or option changes during the cool down . ■ In a Timed Cycle, if a wet item is detected in a mixed load to turn...
Owners Manual
Page 9
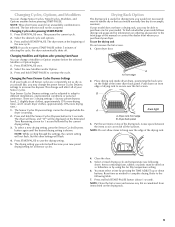
.... 3. Press and hold START-PAUSE to save the drying setting. 5. The dryer will beep, and "CF" will be changed while the dryer is useful for drying items you purchased your model allows drying rack usage and for your model does not have a drying rack, you selected will flash. 4. Drying Rack Option The drying rack is running. 2. Dryer rack front edge B. Dryer back panel 3. Items containing foam, rubber, or plastic must select a time by using the Air Dry temperature setting. 6. Refer to...
.... 3. Press and hold START-PAUSE to save the drying setting. 5. The dryer will beep, and "CF" will be changed while the dryer is useful for drying items you purchased your model allows drying rack usage and for your model does not have a drying rack, you selected will flash. 4. Drying Rack Option The drying rack is running. 2. Dryer rack front edge B. Dryer back panel 3. Items containing foam, rubber, or plastic must select a time by using the Air Dry temperature setting. 6. Refer to...

Owners Manual
Page 10
... floor. Clean the lint screen before each load. 10 The pedestal will need to the "Assistance or Service" section. Ask for Part Number 8212640. Backguard If you are available in the door opening of combustion and ventilation air. This chart shows examples of washer/dryer backguards. Do not use Sensor cycles with drawer. DRYER CARE Cleaning the Dryer Location Keep dryer area clear and free from items that can increase drying time. Optional Accessories Pedestals Are you...
... floor. Clean the lint screen before each load. 10 The pedestal will need to the "Assistance or Service" section. Ask for Part Number 8212640. Backguard If you are available in the door opening of combustion and ventilation air. This chart shows examples of washer/dryer backguards. Do not use Sensor cycles with drawer. DRYER CARE Cleaning the Dryer Location Keep dryer area clear and free from items that can increase drying time. Optional Accessories Pedestals Are you...
Owners Manual
Page 11
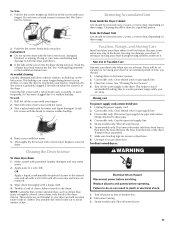
... completely dry. See "Venting Requirements" in gas supply line. 3. These stains are away. Non-Use or Vacation Care Operate your dryer where it . Clean lint screen. Turn off while the screen is in dryer. Doing so can damage your dryer during removal, check the exhaust hood and remove the lint. The screen is probably clogged if lint falls off power at home. Cleaning should be done by a qualified person. Moving care For power supply cord-connected dryers: 1. Steam models only: Shut off water faucet. 6. Replace screen...
... completely dry. See "Venting Requirements" in gas supply line. 3. These stains are away. Non-Use or Vacation Care Operate your dryer where it . Clean lint screen. Turn off while the screen is in dryer. Doing so can damage your dryer during removal, check the exhaust hood and remove the lint. The screen is probably clogged if lint falls off power at home. Cleaning should be done by a qualified person. Moving care For power supply cord-connected dryers: 1. Steam models only: Shut off water faucet. 6. Replace screen...
Owners Manual
Page 12
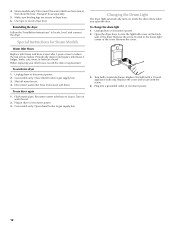
... valve in dryer base. 6. Remove the cover. 3. Plug into a grounded outlet or reconnect power. 12 Unplug dryer or disconnect power. 2. Remove the screw located in the lower right corner of replacement. Turn bulb counterclockwise. Transport hose separately. 5. Make sure leveling legs are found. Periodically inspect and replace inlet hoses if bulges, kinks, cuts, wear, or leaks are secure in gas supply line. Turn on inside the dryer drum when you open the door. To change the drum light 1. Locate...
... valve in dryer base. 6. Remove the cover. 3. Plug into a grounded outlet or reconnect power. 12 Unplug dryer or disconnect power. 2. Remove the screw located in the lower right corner of replacement. Turn bulb counterclockwise. Transport hose separately. 5. Make sure leveling legs are found. Periodically inspect and replace inlet hoses if bulges, kinks, cuts, wear, or leaks are secure in gas supply line. Turn on inside the dryer drum when you open the door. To change the drum light 1. Locate...
Owners Manual
Page 13
.... The dryer will turn, but you may require pressing and holding START-PAUSE; Try the following : Was the drying cycle interrupted by simply pressing and holding the Start button for details. Refer to "Electrical Connection" for 2-5 seconds. Dryer displaying code message ■ "PF" (power failure), check the following : Clean lint screen. Confirm your home power supply keeping the dryer's heater from the dryer to the wall is properly installed. Replace the fuse or reset the circuit breaker...
.... The dryer will turn, but you may require pressing and holding START-PAUSE; Try the following : Was the drying cycle interrupted by simply pressing and holding the Start button for details. Refer to "Electrical Connection" for 2-5 seconds. Dryer displaying code message ■ "PF" (power failure), check the following : Clean lint screen. Confirm your home power supply keeping the dryer's heater from the dryer to the wall is properly installed. Replace the fuse or reset the circuit breaker...
Owners Manual
Page 14
... sheets at the end of lint or replace exhaust vent with lint? Change the dryness level setting on load ■ Is the lint screen clogged? Stains on some models) to other clothing. This will increase drying times. Odors ■ Have you do not feel air movement, clean exhaust system of the cycle? See "Installation Instructions." ■ Is the dryer located in a room with water and heat to check air movement. The odor will change the amount of the dryer requires...
... sheets at the end of lint or replace exhaust vent with lint? Change the dryness level setting on load ■ Is the lint screen clogged? Stains on some models) to other clothing. This will increase drying times. Odors ■ Have you do not feel air movement, clean exhaust system of the cycle? See "Installation Instructions." ■ Is the dryer located in a room with water and heat to check air movement. The odor will change the amount of the dryer requires...
Owners Manual
Page 15
... Maytag servicer is required to instruct you . You will pay for future reference. Repairs to know your authorized Maytag dealer to repair or replace appliance light bulbs, air filters or water filters. The removal and reinstallation of your major appliance to you ever need to parts or systems resulting from accident, alteration, misuse, abuse, fire, flood, acts of God, improper installation, installation not in accordance with electrical or plumbing codes, or use...
... Maytag servicer is required to instruct you . You will pay for future reference. Repairs to know your authorized Maytag dealer to repair or replace appliance light bulbs, air filters or water filters. The removal and reinstallation of your major appliance to you ever need to parts or systems resulting from accident, alteration, misuse, abuse, fire, flood, acts of God, improper installation, installation not in accordance with electrical or plumbing codes, or use...
Installation Instructions
Page 2
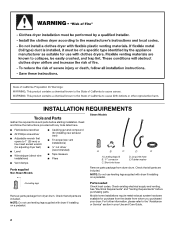
... with dryer if installing on a pedestal. 4 Leveling legs Remove parts package from dryer drum. Long inlet hose E. NOTE: Do not use leveling legs supplied with dryer if installing on a pedestal. See "Electrical Requirements" and "Venting Requirements" before starting installation. Check existing electrical supply and venting. Parts needed Check local codes. Short inlet hose D. Leveling legs (4) B. Check that opens to the "Assistance or Service" section in your dryer. Mobile home installations require metal exhaust system hardware available for installing new exhaust vent...
... with dryer if installing on a pedestal. 4 Leveling legs Remove parts package from dryer drum. Long inlet hose E. NOTE: Do not use leveling legs supplied with dryer if installing on a pedestal. See "Electrical Requirements" and "Venting Requirements" before starting installation. Check existing electrical supply and venting. Parts needed Check local codes. Short inlet hose D. Leveling legs (4) B. Check that opens to the "Assistance or Service" section in your dryer. Mobile home installations require metal exhaust system hardware available for installing new exhaust vent...
Installation Instructions
Page 3
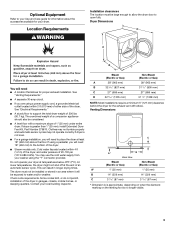
Optional Equipment Refer to your Use and Care guide for information about the accessories available for your washer using the "Y" connector provided. Location Requirements Installation clearances The location must not be large enough to allow the dryer door to water and/or weather. Dryer Dimensions D A B C You will need 18" (460 mm) to the bottom of the dryer. ■ Steam models only: Cold water faucets located within 2 ft (610 mm) of either side...
Optional Equipment Refer to your Use and Care guide for information about the accessories available for your washer using the "Y" connector provided. Location Requirements Installation clearances The location must not be large enough to allow the dryer door to water and/or weather. Dryer Dimensions D A B C You will need 18" (460 mm) to the bottom of the dryer. ■ Steam models only: Cold water faucets located within 2 ft (610 mm) of either side...
Installation Instructions
Page 5
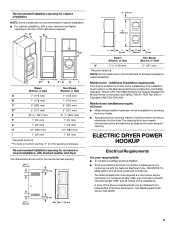
... large as the dryer exhaust opening (such as a nearby window) should be sure that the electrical connection is your dealer. ■ Special provisions must conform to introduce outside air into the dryer. The National Electrical Code requires a 4-wire power supply connection for homes built after 1996, dryer circuits involved in remodeling after 1996, and all local codes and ordinances. Additional installation requirements This dryer is allowed. The opening . ELECTRIC DRYER POWER HOOKUP Electrical Requirements It is...
... large as the dryer exhaust opening (such as a nearby window) should be sure that the electrical connection is your dealer. ■ Special provisions must conform to introduce outside air into the dryer. The National Electrical Code requires a 4-wire power supply connection for homes built after 1996, dryer circuits involved in remodeling after 1996, and all local codes and ordinances. Additional installation requirements This dryer is allowed. The opening . ELECTRIC DRYER POWER HOOKUP Electrical Requirements It is...

Installation Instructions
Page 6
... 5 ft (1.52 m) long. Securely tighten all electrical connections. Disconnect Power. 6 If the dryer is adequate. The neutral conductor must be removed from the neutral conductor. ■ If local codes do not permit the connection of a neutral ground wire to install with clothes dryers. Connect remaining 2 supply wires to an individual branch circuit. A timedelay fuse or circuit breaker is prohibited. Connect to remaining 2 terminals (gold). The kit should be type SRD or SRDT...
... 5 ft (1.52 m) long. Securely tighten all electrical connections. Disconnect Power. 6 If the dryer is adequate. The neutral conductor must be removed from the neutral conductor. ■ If local codes do not permit the connection of a neutral ground wire to install with clothes dryers. Connect remaining 2 supply wires to an individual branch circuit. A timedelay fuse or circuit breaker is prohibited. Connect to remaining 2 terminals (gold). The kit should be type SRD or SRDT...
Installation Instructions
Page 11
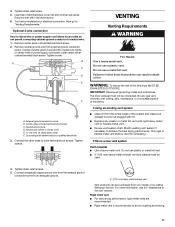
... Whirlpool Service. Tighten screws. Do not use a metal foil vent. WARNING: To reduce the risk of dryer rear panel. IMPORTANT: Observe all governing codes and ordinances. If using an existing vent system ■ Clean lint from the entire length of power supply cord/cable under center, silvercolored terminal block screw. Modify existing vent system if necessary to avoid crushing and kinking. 11 If this dryer MUST BE EXHAUSTED OUTDOORS...
... Whirlpool Service. Tighten screws. Do not use a metal foil vent. WARNING: To reduce the risk of dryer rear panel. IMPORTANT: Observe all governing codes and ordinances. If using an existing vent system ■ Clean lint from the entire length of power supply cord/cable under center, silvercolored terminal block screw. Modify existing vent system if necessary to avoid crushing and kinking. 11 If this dryer MUST BE EXHAUSTED OUTDOORS...
Installation Instructions
Page 13
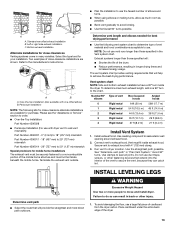
... installation (also available with one 90º turn inside exhaust hood. NOTE: Do not use duct tape, screws, or other fastening devices that extend into the interior of the vent to avoid kinking. ■ Use the fewest 90° turns possible. To determine maximum exhaust length, add one offset elbow) B. Connect vent to the manufacturer's instructions. Secure vent to exhaust hood with dryer vent to wall vent mismatch): Part Number...
... installation (also available with one 90º turn inside exhaust hood. NOTE: Do not use duct tape, screws, or other fastening devices that extend into the interior of the vent to avoid kinking. ■ Use the fewest 90° turns possible. To determine maximum exhaust length, add one offset elbow) B. Connect vent to the manufacturer's instructions. Secure vent to exhaust hood with dryer vent to wall vent mismatch): Part Number...
Installation Instructions
Page 15
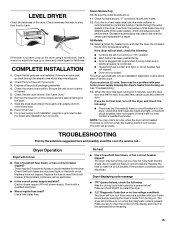
... the dryer. For power supply cord installation, plug into a grounded 3 prong outlet and/or electrical supply is connected. ■ Household fuse is intact and tight, or circuit breaker has not tripped. ■ Dryer door is recommended to adjust the legs up the dryer using a wood block. If you feel for certain part replacement or repair. All Models: 13. If you live in a running for 5 minutes, open the dryer door and feel heat, cancel cycle and close the door. Check...
... the dryer. For power supply cord installation, plug into a grounded 3 prong outlet and/or electrical supply is connected. ■ Household fuse is intact and tight, or circuit breaker has not tripped. ■ Dryer door is recommended to adjust the legs up the dryer using a wood block. If you feel for certain part replacement or repair. All Models: 13. If you live in a running for 5 minutes, open the dryer door and feel heat, cancel cycle and close the door. Check...
Installation Instructions
Page 16
... to check air movement. All rights reserved. 4/09 Printed in death or fire. WARNING ■ Is the exhaust vent or outside exhaust hood to follow these instructions can result in U.S.A. Long venting will continue to "Electrical Connection" for details. ■ Select a Timed Dry heated cycle, and restart the dryer. Proper operation of the door. If the message persists, have ventilation openings at the top and bottom of dryer cycles requires temperatures above 45...
... to check air movement. All rights reserved. 4/09 Printed in death or fire. WARNING ■ Is the exhaust vent or outside exhaust hood to follow these instructions can result in U.S.A. Long venting will continue to "Electrical Connection" for details. ■ Select a Timed Dry heated cycle, and restart the dryer. Proper operation of the door. If the message persists, have ventilation openings at the top and bottom of dryer cycles requires temperatures above 45...

Warranty Information
Page 1
.... MAYTAG® LAUNDRY WARRANTY LIMITED WARRANTY For one year from the date of purchase, when this major appliance is operated and maintained according to instructions attached to or furnished with the product, Maytag brand of Whirlpool Corporation or Whirlpool Canada LP (hereafter "Maytag") will need repair service, first see the "Troubleshooting" section of the Use & Care Guide. ITEMS EXCLUDED FROM WARRANTY This limited warranty does not cover...
.... MAYTAG® LAUNDRY WARRANTY LIMITED WARRANTY For one year from the date of purchase, when this major appliance is operated and maintained according to instructions attached to or furnished with the product, Maytag brand of Whirlpool Corporation or Whirlpool Canada LP (hereafter "Maytag") will need repair service, first see the "Troubleshooting" section of the Use & Care Guide. ITEMS EXCLUDED FROM WARRANTY This limited warranty does not cover...


