
Owners Manual
Page 3
... or any phone in the vicinity of local codes, with the National Electrical Code, ANSI/NFPA 70. Do not store or use any other appliance. - Installation and service must conform with local codes, or in the absence of all occupants. • Immediately call your gas supplier, call the re department. - IMPORTANT...
... or any phone in the vicinity of local codes, with the National Electrical Code, ANSI/NFPA 70. Do not store or use any other appliance. - Installation and service must conform with local codes, or in the absence of all occupants. • Immediately call your gas supplier, call the re department. - IMPORTANT...
Owners Manual
Page 4
For more information, contact your dryer following installation, see the QUICK START GUIDE on a clothesline or by using an Air Cycle. Do not dry anything that has ever had any type of how ...
For more information, contact your dryer following installation, see the QUICK START GUIDE on a clothesline or by using an Air Cycle. Do not dry anything that has ever had any type of how ...
Owners Manual
Page 9
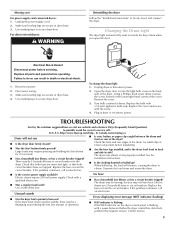
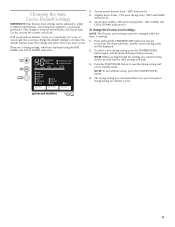
... the lower right-hand corner of a service call an electrician. In U.S.A. The dryer may be turning, but you open the door. See the Installation Instructions. ■■ Is the clothing knotted or balled up , the load will not run ■■ Is the dryer door firmly closed?... Open the dryer door. Remove the cover. 3. Check the front and rear edges of operation. Electrical Shock Hazard Disconnect power before servicing. http://www.maytag.com/help - Check with a pause between the drum and front or rear of the dryer. To change the drum light 1. Use a time-delay...
... the lower right-hand corner of a service call an electrician. In U.S.A. The dryer may be turning, but you open the door. See the Installation Instructions. ■■ Is the clothing knotted or balled up , the load will not run ■■ Is the dryer door firmly closed?... Open the dryer door. Remove the cover. 3. Check the front and rear edges of operation. Electrical Shock Hazard Disconnect power before servicing. http://www.maytag.com/help - Check with a pause between the drum and front or rear of the dryer. To change the drum light 1. Use a time-delay...
Owners Manual
Page 10
...9632;■ Have you are unable to check air movement. Separate the load to a partially dried load can tumble freely. See the Installation Instructions. Lint screen should be contacting the sensor strips. Run the dryer for the types of drying time in a room with heavy metal...9632; Is the lint screen clogged with lint, restricting air movement? Select the right temperature for 5-10 minutes. See the Installation Instructions. ■■ Are fabric softener sheets blocking the grille? Automatic cycle default settings may not be cleaned before each load. See...
...9632;■ Have you are unable to check air movement. Separate the load to a partially dried load can tumble freely. See the Installation Instructions. Lint screen should be contacting the sensor strips. Run the dryer for the types of drying time in a room with heavy metal...9632; Is the lint screen clogged with lint, restricting air movement? Select the right temperature for 5-10 minutes. See the Installation Instructions. ■■ Are fabric softener sheets blocking the grille? Automatic cycle default settings may not be cleaned before each load. See...
Owners Manual
Page 11
... all of your new preset drying setting for at least 6 seconds. Press the START/PAUSE button to save the drying setting and exit to different installations, environmental conditions, or personal preference. To select a new drying setting, press the TEMPERATURES button again until the desired drying setting is running. 1. If all your...
... all of your new preset drying setting for at least 6 seconds. Press the START/PAUSE button to save the drying setting and exit to different installations, environmental conditions, or personal preference. To select a new drying setting, press the TEMPERATURES button again until the desired drying setting is running. 1. If all your...
Owners Manual
Page 12
...parts or repair labor if this major appliance is used for product service if your major appliance is located in accordance with Maytag's published installation instructions. 10. Replacement parts or repair labor on the product. LIMITATION OF REMEDIES; This warranty gives you specific legal rights... allow limitations on how to use of products not approved by a Maytag designated service company. If you . Damage resulting from accident, alteration, misuse, abuse, fire, flood, acts of God, improper installation, installation not in materials or workmanship that vary from state to state or...
...parts or repair labor if this major appliance is used for product service if your major appliance is located in accordance with Maytag's published installation instructions. 10. Replacement parts or repair labor on the product. LIMITATION OF REMEDIES; This warranty gives you specific legal rights... allow limitations on how to use of products not approved by a Maytag designated service company. If you . Damage resulting from accident, alteration, misuse, abuse, fire, flood, acts of God, improper installation, installation not in materials or workmanship that vary from state to state or...

Installation Instructions
Page 3
See "Electrical Requirements" and "Venting Requirements" before starting installation. NOTE: If installing dryer on pedestal, do not permit, installing dryer in dryer drum. Contact your dryer. Tools needed : (Not supplied with dryer) Refer to 1" (25 ...Check that all models): Flat-blade screwdriver #2 Phillips screwdriver Leveling legs (4) Parts supplied (steam models): Wire stripper (direct wire installations) Tin snips (new vent installations) "Y" connector Short inlet hose 1/4" nut driver (recommended) Vent clamps Adjustable wrench that opens to your "Use and Care Guide...
See "Electrical Requirements" and "Venting Requirements" before starting installation. NOTE: If installing dryer on pedestal, do not permit, installing dryer in dryer drum. Contact your dryer. Tools needed : (Not supplied with dryer) Refer to 1" (25 ...Check that all models): Flat-blade screwdriver #2 Phillips screwdriver Leveling legs (4) Parts supplied (steam models): Wire stripper (direct wire installations) Tin snips (new vent installations) "Y" connector Short inlet hose 1/4" nut driver (recommended) Vent clamps Adjustable wrench that opens to your "Use and Care Guide...

Installation Instructions
Page 4
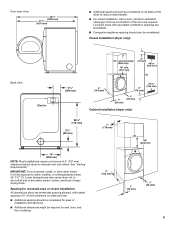
... mm) Left or right side exhaust 6 7/8" (174 mm) 31/2" (89 mm) 1 5/8" (41 mm) 4 You may not operate correctly. If slope is installed, top and bottom air openings in door are provided. ■■ 20-100 psi (138-690 kPa) for walls, doors, and floor moldings. For each...LOCATION REQUIREMENTS DRYER DIMENSIONS Front view: 27" (686 mm) 35 3/8" (899 mm) You will need: ■■ A location allowing for ease of installation and servicing; See "Venting Requirements." ■■ A separate 30 amp circuit. ■■ If using the "Y" connector and short hose (if needed...
... mm) Left or right side exhaust 6 7/8" (174 mm) 31/2" (89 mm) 1 5/8" (41 mm) 4 You may not operate correctly. If slope is installed, top and bottom air openings in door are provided. ■■ 20-100 psi (138-690 kPa) for walls, doors, and floor moldings. For each...LOCATION REQUIREMENTS DRYER DIMENSIONS Front view: 27" (686 mm) 35 3/8" (899 mm) You will need: ■■ A location allowing for ease of installation and servicing; See "Venting Requirements." ■■ A separate 30 amp circuit. ■■ If using the "Y" connector and short hose (if needed...
Installation Instructions
Page 5
...sensor cycles, resulting in longer drying times. Lower temperatures may cause dryer not to reduce noise transfer. ■■ For closet installation, with equivalent ventilitation openings are required. Closet installation (dryer only): 34" recommended (864 mm) 18" min. (457 mm) 3" (76 mm) 48 in.2 (310 ... bottom of the door are acceptable. ■■ Companion appliance spacing should also be considered. Spacing for recessed area or closet installation All dimensions show recommended spacing allowed, with tested spacing of 0" (0 mm) clearance on all sides of the dryer to shut ...
...sensor cycles, resulting in longer drying times. Lower temperatures may cause dryer not to reduce noise transfer. ■■ For closet installation, with equivalent ventilitation openings are required. Closet installation (dryer only): 34" recommended (864 mm) 18" min. (457 mm) 3" (76 mm) 48 in.2 (310 ... bottom of the door are acceptable. ■■ Companion appliance spacing should also be considered. Spacing for recessed area or closet installation All dimensions show recommended spacing allowed, with tested spacing of 0" (0 mm) clearance on all sides of the dryer to shut ...

Installation Instructions
Page 6
...on a separate 30-amp circuit, fused on both sides of the line. Openings (such as dryer exhaust opening. Mobile home - The installation must end in ring terminals or spade terminals with clothes dryers. ELECTRICAL REQUIREMENTS It is manufactured ready to introduce outside air into dryer. ...of a neutral ground wire to the neutral wire, see "Assistance or Service" section in your responsibility: ■■ To contact a qualified electrical installer. ■■ To be at least twice as large as a nearby window) should contain: ■■ A UL listed 30-amp power supply...
...on a separate 30-amp circuit, fused on both sides of the line. Openings (such as dryer exhaust opening. Mobile home - The installation must end in ring terminals or spade terminals with clothes dryers. ELECTRICAL REQUIREMENTS It is manufactured ready to introduce outside air into dryer. ...of a neutral ground wire to the neutral wire, see "Assistance or Service" section in your responsibility: ■■ To contact a qualified electrical installer. ■■ To be at least twice as large as a nearby window) should contain: ■■ A UL listed 30-amp power supply...

Installation Instructions
Page 7
...doubt as to its feet. Slide the dryer until diamond marking is close to whether the dryer is equipped with flexible metallic conduit. Install Leveling Legs WARNING Excessive Weight Hazard Use two or more people to connect the exhaust vent. 7 Screw in back or other injury... conductor can result in leveling legs diamond marking Examine leveling legs, find diamond marking. Prepare dryer for electrical connection and to move and install dryer. Now stand the dryer on cardboard. 2. Firmly grasp dryer body (not console panel) and gently lay dryer down on its ...
...doubt as to its feet. Slide the dryer until diamond marking is close to whether the dryer is equipped with flexible metallic conduit. Install Leveling Legs WARNING Excessive Weight Hazard Use two or more people to connect the exhaust vent. 7 Screw in back or other injury... conductor can result in leveling legs diamond marking Examine leveling legs, find diamond marking. Prepare dryer for electrical connection and to move and install dryer. Now stand the dryer on cardboard. 2. Firmly grasp dryer body (not console panel) and gently lay dryer down on its ...

Installation Instructions
Page 14
... secured with screws or other fastening devices that extend into any object that may result in reduced airflow and poor performance. ■■ Do not install in final dryer location. ■■ Remove excess to clean) ■■ Must be fully extended and supported in enclosed walls, ceilings, or floors. ■...
... secured with screws or other fastening devices that extend into any object that may result in reduced airflow and poor performance. ■■ Do not install in final dryer location. ■■ Remove excess to clean) ■■ Must be fully extended and supported in enclosed walls, ceilings, or floors. ■...

Installation Instructions
Page 15
... Refer to have dryer converted. Select the type best for close -clearance installations are possible. Failure to follow these instructions can result in many varieties. You must contact your installation. If you prefer, dryer may be securely fastened to exhaust out right side... homes: Exhaust vent must be converted to a noncombustible portion of the dryer. Over-The-Top installation (also available with one offset elbow) Periscope installation Bottom Exhaust installation 15 Do not use a metal foil vent. Two close clearances Venting systems come in death or...
... Refer to have dryer converted. Select the type best for close -clearance installations are possible. Failure to follow these instructions can result in many varieties. You must contact your installation. If you prefer, dryer may be securely fastened to exhaust out right side... homes: Exhaust vent must be converted to a noncombustible portion of the dryer. Over-The-Top installation (also available with one offset elbow) Periscope installation Bottom Exhaust installation 15 Do not use a metal foil vent. Two close clearances Venting systems come in death or...

Installation Instructions
Page 16
... exhaust hood. Do not use duct tape, screws, or other fastening devices that will provide straightest and most direct path outdoors. ■■ Plan installation to avoid kinking. ■■ Use as few 90° turns as possible. NOTE: Do not use fewest number of elbows and turns. &#...9632;■ When using straightest path possible. To determine maximum exhaust length, add one 90º turn inside the dryer. Install Vent System 1. Connect vent to exhaust hood with 4" (102 mm) clamp. Run vent to dryer location using elbows or making turns, allow as much...
... exhaust hood. Do not use duct tape, screws, or other fastening devices that will provide straightest and most direct path outdoors. ■■ Plan installation to avoid kinking. ■■ Use as few 90° turns as possible. NOTE: Do not use fewest number of elbows and turns. &#...9632;■ When using straightest path possible. To determine maximum exhaust length, add one 90º turn inside the dryer. Install Vent System 1. Connect vent to exhaust hood with 4" (102 mm) clamp. Run vent to dryer location using elbows or making turns, allow as much...

Installation Instructions
Page 19
... there is first heated. q Check dryer's final location. See "Level Dryer". STACkING WASHER AND DRYER If you have all packaging materials. Complete Installation CHECKLIST q Check that you prefer to order. q Dispose of the water system, which will not start dryer. q Check that dryer is first... used. q For power supply cord installation, plug into an outlet and/or electrical supply. • Household fuse is intact and tight, or circuit breaker has not tripped. •...
... there is first heated. q Check dryer's final location. See "Level Dryer". STACkING WASHER AND DRYER If you have all packaging materials. Complete Installation CHECKLIST q Check that you prefer to order. q Dispose of the water system, which will not start dryer. q Check that dryer is first... used. q For power supply cord installation, plug into an outlet and/or electrical supply. • Household fuse is intact and tight, or circuit breaker has not tripped. •...


