Owners Manual
Page 3
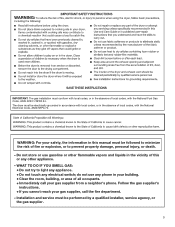
...this manual must conform with local codes, or in the absence of local codes, with the National Fuel Gas Code, ANSI Z223.1/NFPA 54. The dryer must be performed by a quali ed installer, service agency, or the gas supplier. 3 IMPORTANT: The gas installation must be followed to minimize ...the risk of re or explosion, or to light any appliance. • Do not touch any electrical switch; WARNING: For your gas supplier from a neighbor's phone. WHAT TO DO IF YOU SMELL GAS: • Do not try to prevent property damage...
...this manual must conform with local codes, or in the absence of local codes, with the National Fuel Gas Code, ANSI Z223.1/NFPA 54. The dryer must be performed by a quali ed installer, service agency, or the gas supplier. 3 IMPORTANT: The gas installation must be followed to minimize ...the risk of re or explosion, or to light any appliance. • Do not touch any electrical switch; WARNING: For your gas supplier from a neighbor's phone. WHAT TO DO IF YOU SMELL GAS: • Do not try to prevent property damage...
Owners Manual
Page 5
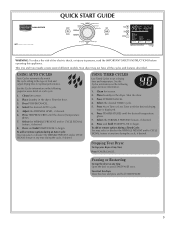
... START GUIDE temperatures dryness level cycle signal WARNING: To reduce the risk of fire electric shock, or injury to the type of load and adjust drying time for optimal performance. Place laundry in the dryer. Press TEMPERATURES until the desired drying time is displayed. 6. Shut the door. ...glows. 7. This Use and Care Guide covers several different models. Select the desired AUTO cycle. 5. Pausing or Restarting To stop your dryer at any time Press POWER/CANCEL. Press and hold START/PAUSE 5 To add or remove options during the cycle, if desired. Press...
... START GUIDE temperatures dryness level cycle signal WARNING: To reduce the risk of fire electric shock, or injury to the type of load and adjust drying time for optimal performance. Place laundry in the dryer. Press TEMPERATURES until the desired drying time is displayed. 6. Shut the door. ...glows. 7. This Use and Care Guide covers several different models. Select the desired AUTO cycle. 5. Pausing or Restarting To stop your dryer at any time Press POWER/CANCEL. Press and hold START/PAUSE 5 To add or remove options during the cycle, if desired. Press...
Owners Manual
Page 9
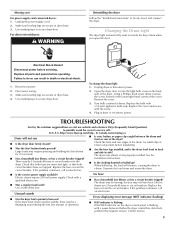
...Start button firmly pressed? Open the dryer door. Replace the cover and secure with a pause between the drum and front or rear of the cover. http://www.maytag.com/help - Check that both circuit breakers have heat. Electric dryers use ? Dryer displaying error message (WET indicator flashing...) ■■ WET indicator is flashing: If the WET indicator on the dryer control panel is the dryer level front to back...
...Start button firmly pressed? Open the dryer door. Replace the cover and secure with a pause between the drum and front or rear of the cover. http://www.maytag.com/help - Check that both circuit breakers have heat. Electric dryers use ? Dryer displaying error message (WET indicator flashing...) ■■ WET indicator is flashing: If the WET indicator on the dryer control panel is the dryer level front to back...

Installation Instructions
Page 3
... pedestal, do not permit, installing dryer in dryer drum. Check code requirements. Contact your dryer. Check existing electrical supply and venting. Optional Equipment: (Not supplied with dryer) Check local codes. Parts needed : Parts supplied (all models): Flat-blade screwdriver #2 ...all parts are included. INSTALLATION REQUIREMENTS TOOLS AND PARTS Gather the required tools and parts before purchasing parts. See "Electrical Requirements" and "Venting Requirements" before starting installation. Level Caulking gun and compound (for your local building inspector....
... pedestal, do not permit, installing dryer in dryer drum. Check code requirements. Contact your dryer. Check existing electrical supply and venting. Optional Equipment: (Not supplied with dryer) Check local codes. Parts needed : Parts supplied (all models): Flat-blade screwdriver #2 ...all parts are included. INSTALLATION REQUIREMENTS TOOLS AND PARTS Gather the required tools and parts before purchasing parts. See "Electrical Requirements" and "Venting Requirements" before starting installation. Level Caulking gun and compound (for your local building inspector....

Installation Instructions
Page 4
... (138-690 kPa) for best performance. ■■ Level floor with maximum slope of dryer. For each arrangement, consider allowing more space for your washer using power supply cord, a grounded electrical outlet located within 4 ft. (1.2 m) of the water fill valves, and water pressure of... 200 lbs. (90.7 kg). LOCATION REQUIREMENTS DRYER DIMENSIONS Front view: 27" (686 mm) 35 3/8" (899 mm) You will...
... (138-690 kPa) for best performance. ■■ Level floor with maximum slope of dryer. For each arrangement, consider allowing more space for your washer using power supply cord, a grounded electrical outlet located within 4 ft. (1.2 m) of the water fill valves, and water pressure of... 200 lbs. (90.7 kg). LOCATION REQUIREMENTS DRYER DIMENSIONS Front view: 27" (686 mm) 35 3/8" (899 mm) You will...
Installation Instructions
Page 5
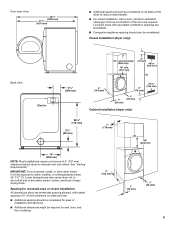
... also be considered on sides and rear. ■■ Additional spacing should be considered. Closet installation (dryer only): 34" recommended (864 mm) 18" min. (457 mm) 3" (76 mm) 48 in.2 (310 cm2) Back view: Electric 61/4" (159 mm) 4" (102 mm) 3" (76 mm) 24 in the top and bottom ...of the dryer to shut off at temperatures below 45° F (7° C). IMPORTANT: Do not operate, install, or store dryer where it will be required for recessed area or closet...
... also be considered on sides and rear. ■■ Additional spacing should be considered. Closet installation (dryer only): 34" recommended (864 mm) 18" min. (457 mm) 3" (76 mm) 48 in.2 (310 cm2) Back view: Electric 61/4" (159 mm) 4" (102 mm) 3" (76 mm) 24 in the top and bottom ...of the dryer to shut off at temperatures below 45° F (7° C). IMPORTANT: Do not operate, install, or store dryer where it will be required for recessed area or closet...

Installation Instructions
Page 6
...;■ A UL listed 30-amp power supply cord, rated 120/240 volt minimum. Additional installation requirements: This dryer is your dealer. The National Electrical Code requires a 4-wire power supply connection for mobile home installations. Do not have a fuse in remodeling after 1996..., dryer circuits involved in the neutral or grounding circuit. ■■ Do not use with clothes dryers. If the dryer is installed with a 4-wire electrical supply connection, the neutral ground conductor must be removed from : National...
...;■ A UL listed 30-amp power supply cord, rated 120/240 volt minimum. Additional installation requirements: This dryer is your dealer. The National Electrical Code requires a 4-wire power supply connection for mobile home installations. Do not have a fuse in remodeling after 1996..., dryer circuits involved in the neutral or grounding circuit. ■■ Do not use with clothes dryers. If the dryer is installed with a 4-wire electrical supply connection, the neutral ground conductor must be removed from : National...

Installation Instructions
Page 7
...) Then choose a 3-wire power supply cord with ring or spade terminals and UL listed strain relief. Now stand the dryer on cardboard. 2. Leave enough room for electric current. All current-carrying wires must match power supply (4-wire or 3-wire) and be insulated. ■■ 10-gauge... solid copper wire (do so can result in a risk of least resistance for electrical connection and to whether the dryer is no longer visible. The neutral conductor must be identified by direct wire: Power supply cable must be : ■■...
...) Then choose a 3-wire power supply cord with ring or spade terminals and UL listed strain relief. Now stand the dryer on cardboard. 2. Leave enough room for electric current. All current-carrying wires must match power supply (4-wire or 3-wire) and be insulated. ■■ 10-gauge... solid copper wire (do so can result in a risk of least resistance for electrical connection and to whether the dryer is no longer visible. The neutral conductor must be identified by direct wire: Power supply cable must be : ■■...

Installation Instructions
Page 19
... door swing on your "Use and Care Guide". q Check for troubleshooting information. 19 q Read "Dryer Use" in the dryer. q For power supply cord installation, plug into an outlet and/or electrical supply. • Household fuse is intact and tight, or circuit breaker has not tripped. •...; Dryer door is first heated. For direct wire installation, turn on dryer. q Dispose of the water system, which will go...
... door swing on your "Use and Care Guide". q Check for troubleshooting information. 19 q Read "Dryer Use" in the dryer. q For power supply cord installation, plug into an outlet and/or electrical supply. • Household fuse is intact and tight, or circuit breaker has not tripped. •...; Dryer door is first heated. For direct wire installation, turn on dryer. q Dispose of the water system, which will go...


