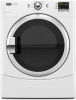
Owners Manual
Page 2
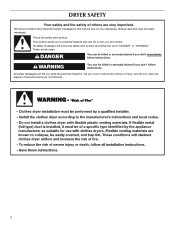
... can kill or hurt you don't immediately follow instructions. All safety messages will follow the safety alert symbol and either the word "DANGER" or "WARNING." DRYER SAFETY Your safety and the safety of injury, and tell you don't follow instructions. These words mean: DANGER You can happen if the instructions are...
... can kill or hurt you don't immediately follow instructions. All safety messages will follow the safety alert symbol and either the word "DANGER" or "WARNING." DRYER SAFETY Your safety and the safety of injury, and tell you don't follow instructions. These words mean: DANGER You can happen if the instructions are...
Owners Manual
Page 3
... call your gas supplier, call the re department. - Follow the gas supplier's instructions. • If you cannot reach your gas supplier from a neighbor's phone. The dryer must be electrically grounded in accordance with local codes, or in the absence of local codes, with the National Fuel Gas Code, ANSI Z223.1/NFPA...
... call your gas supplier, call the re department. - Follow the gas supplier's instructions. • If you cannot reach your gas supplier from a neighbor's phone. The dryer must be electrically grounded in accordance with local codes, or in the absence of local codes, with the National Fuel Gas Code, ANSI Z223.1/NFPA...
Owners Manual
Page 4
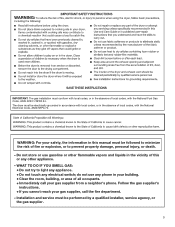
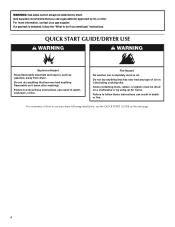
For more information, contact your dryer following installation, see the QUICK START GUIDE on it (even after washing). Do not dry anything that has ever had any type of how to .... Failure to follow the "What to follow these instructions can result in death or fire. Quick Start Guide/Dryer Use WARNING WARNING Explosion Hazard Keep flammable materials and vapors, such as gasoline, away from dryer. WARNING: Gas leaks cannot always be dried on it (including cooking oils). If a gas leak is detected...
For more information, contact your dryer following installation, see the QUICK START GUIDE on it (even after washing). Do not dry anything that has ever had any type of how to .... Failure to follow the "What to follow these instructions can result in death or fire. Quick Start Guide/Dryer Use WARNING WARNING Explosion Hazard Keep flammable materials and vapors, such as gasoline, away from dryer. WARNING: Gas leaks cannot always be dried on it (including cooking oils). If a gas leak is detected...
Owners Manual
Page 5
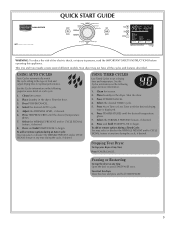
... the desired AUTO cycle. 5. USING TIMED CYCLES Use Timed Cycles to begin . Select the WRINKLE PREVENT feature, if desired. 8. Stopping Your Dryer To stop the dryer at any time Open the door or press START/PAUSE once. Press TEMPERATURES until the desired temperature glows. 7. Press POWER/CANCEL. 4. To ...Press POWER/CANCEL. 4. To add or remove options during a Timed Cycle: You may not have all the cycles and features described. Your dryer may select or deselect the WRINKLE PREVENT and/or CYCLE SIGNAL feature at any time during the cycle, if desired. See the Cycles information...
... the desired AUTO cycle. 5. USING TIMED CYCLES Use Timed Cycles to begin . Select the WRINKLE PREVENT feature, if desired. 8. Stopping Your Dryer To stop the dryer at any time Open the door or press START/PAUSE once. Press TEMPERATURES until the desired temperature glows. 7. Press POWER/CANCEL. 4. To ...Press POWER/CANCEL. 4. To add or remove options during a Timed Cycle: You may not have all the cycles and features described. Your dryer may select or deselect the WRINKLE PREVENT and/or CYCLE SIGNAL feature at any time during the cycle, if desired. See the Cycles information...

Owners Manual
Page 7
... Changing settings on during the cycle You can change the temperature setting at any time before activating the Lock/Unlock Controls feature. The dryer will continue to check and clean the lint screen. This indicator stays on Timed Cycles during Wrinkle Prevent Wrinkle Prevent The Wrinkle Prevent light...heard and the Lock/Unlock Controls status light is a reminder to run for 3 seconds. This ends the current cycle and turns the dryer OFF. 2. The dryer starts at any time during the cool down part of the new cycle. Cool Down The Cool Down light illuminates during the cycle ...
... Changing settings on during the cycle You can change the temperature setting at any time before activating the Lock/Unlock Controls feature. The dryer will continue to check and clean the lint screen. This indicator stays on Timed Cycles during Wrinkle Prevent Wrinkle Prevent The Wrinkle Prevent light...heard and the Lock/Unlock Controls status light is a reminder to run for 3 seconds. This ends the current cycle and turns the dryer OFF. 2. The dryer starts at any time during the cool down part of the new cycle. Cool Down The Cool Down light illuminates during the cycle ...
Owners Manual
Page 8
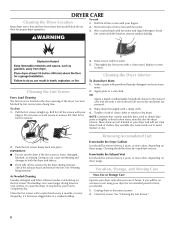
... Needed Cleaning Laundry detergent and fabric softener residue can increase drying time. This buildup can cause overheating and damage to remove residue buildup. 4. Unplug dryer or disconnect power. 2. Wet a nylon brush with hot water. 3. Replace screen in the door opening of lint screen with hot water and ...Roll lint off the screen with a soft cloth until all excess dye and stains are not harmful to the stained area and rub with your dryer and will be removed every 2 years, or more often, depending on vacation or not using your load is hard to a residue buildup. To...
... Needed Cleaning Laundry detergent and fabric softener residue can increase drying time. This buildup can cause overheating and damage to remove residue buildup. 4. Unplug dryer or disconnect power. 2. Wet a nylon brush with hot water. 3. Replace screen in the door opening of lint screen with hot water and ...Roll lint off the screen with a soft cloth until all excess dye and stains are not harmful to the stained area and rub with your dryer and will be removed every 2 years, or more often, depending on vacation or not using your load is hard to a residue buildup. To...
Owners Manual
Page 9
...the circuit breaker. When balled up ? Replace the fuse or reset the circuit breaker. In Canada www.maytag.ca Dryer will bounce, causing the dryer to possibly avoid the cost of the dryer? Large loads may vibrate if not properly installed. Make sure leveling legs are intact and tight, or ...an electrician. Use masking tape to side? Replace the cover and secure with a 10-watt appliance bulb only. http://www.maytag.com/help - Unusual sounds ■■ Has the dryer had a period of operation. There may be a thumping sound during the first few minutes of non-use 2 household ...
...the circuit breaker. When balled up ? Replace the fuse or reset the circuit breaker. In Canada www.maytag.ca Dryer will bounce, causing the dryer to possibly avoid the cost of the dryer? Large loads may vibrate if not properly installed. Make sure leveling legs are intact and tight, or ...an electrician. Use masking tape to side? Replace the cover and secure with a 10-watt appliance bulb only. http://www.maytag.com/help - Unusual sounds ■■ Has the dryer had a period of operation. There may be a thumping sound during the first few minutes of non-use 2 household ...
Owners Manual
Page 10
... ■■ Was the load removed from the area, rewash, and dry the clothing. 10 If so, ventilate the area. Run the dryer for the types of garments being dried. Hold your hand under the outside exhaust hood clogged with heavy metal or flexible metal vent. See Changing... Auto Cycles Default Settings. ■■ Is the exhaust vent the correct length? Proper operation of the cycle. ■■ Was the dryer overloaded? See the Installation Instructions. Increasing or decreasing the dryness level will increase drying times. Stains on load or drum ■■ Was the...
... ■■ Was the load removed from the area, rewash, and dry the clothing. 10 If so, ventilate the area. Run the dryer for the types of garments being dried. Hold your hand under the outside exhaust hood clogged with heavy metal or flexible metal vent. See Changing... Auto Cycles Default Settings. ■■ Is the exhaust vent the correct length? Proper operation of the cycle. ■■ Was the dryer overloaded? See the Installation Instructions. Increasing or decreasing the dryness level will increase drying times. Stains on load or drum ■■ Was the...
Owners Manual
Page 11
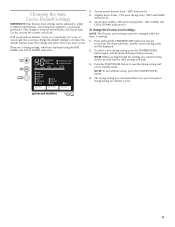
... Cycles Default Settings IMPORTANT: Your dryness level settings can be lit solid, but the other settings will flash. 3. The dryer will beep, and the current drying mode will be changed while the dryer is retained and will affect all Auto Cycles are displayed using the WET, DAMP, and COOL DOWN indicators: 1. (factory...
... Cycles Default Settings IMPORTANT: Your dryness level settings can be lit solid, but the other settings will flash. 3. The dryer will beep, and the current drying mode will be changed while the dryer is retained and will affect all Auto Cycles are displayed using the WET, DAMP, and COOL DOWN indicators: 1. (factory...

Installation Instructions
Page 2
... important. All safety messages will follow instructions. Always read and obey all safety messages. All safety messages will tell you and others are not followed. 2 DRYER SAFETY Your safety and the safety of injury, and tell you what can kill or hurt you what the potential hazard is the safety alert...
... important. All safety messages will follow instructions. Always read and obey all safety messages. All safety messages will tell you and others are not followed. 2 DRYER SAFETY Your safety and the safety of injury, and tell you what can kill or hurt you what the potential hazard is the safety alert...

Installation Instructions
Page 3
... AND PARTS Gather the required tools and parts before purchasing parts. Optional Equipment: (Not supplied with dryer) Check local codes. Tools needed : (Not supplied with dryer) Refer to 1" (25 mm) or hex-head socket wrench Utility knife Tape measure Pliers Long ...Rubber washer Parts package is located in garages, closets, mobile homes, or sleeping quarters. Contact your dryer. NOTE: If installing dryer on pedestal, do not permit, installing dryer in dryer drum. Level Caulking gun and compound (for your local building inspector. See "Electrical Requirements" and...
... AND PARTS Gather the required tools and parts before purchasing parts. Optional Equipment: (Not supplied with dryer) Check local codes. Tools needed : (Not supplied with dryer) Refer to 1" (25 mm) or hex-head socket wrench Utility knife Tape measure Pliers Long ...Rubber washer Parts package is located in garages, closets, mobile homes, or sleeping quarters. Contact your dryer. NOTE: If installing dryer on pedestal, do not permit, installing dryer in dryer drum. Level Caulking gun and compound (for your local building inspector. See "Electrical Requirements" and...

Installation Instructions
Page 4
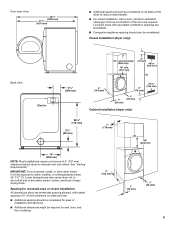
... for companion appliances and clearances for ease of installation and servicing; Add spacing on all sides of dryer to fully open. Space must support dryer weight of 200 lbs. (90.7 kg). If not level, clothes may not tumble properly and automatic sensor cycles may use ...psi (138-690 kPa) for proper exhaust installation. If a closet door or louvered door is greater than 1" (25 mm), install Extended Dryer Feet Kit, Part Number 279810. LOCATION REQUIREMENTS DRYER DIMENSIONS Front view: 27" (686 mm) 35 3/8" (899 mm) You will need: ■■ A location allowing for best ...
... for companion appliances and clearances for ease of installation and servicing; Add spacing on all sides of dryer to fully open. Space must support dryer weight of 200 lbs. (90.7 kg). If not level, clothes may not tumble properly and automatic sensor cycles may use ...psi (138-690 kPa) for proper exhaust installation. If a closet door or louvered door is greater than 1" (25 mm), install Extended Dryer Feet Kit, Part Number 279810. LOCATION REQUIREMENTS DRYER DIMENSIONS Front view: 27" (686 mm) 35 3/8" (899 mm) You will need: ■■ A location allowing for best ...
Installation Instructions
Page 5
...for recessed area or closet installation All dimensions show recommended spacing allowed, with tested spacing of 0" (0 mm) clearance on all sides of the dryer to reduce noise transfer. ■■ For closet installation, with a door, minimum ventilation openings in longer drying times. IMPORTANT: Do not ...cm2) Back view: Electric 61/4" (159 mm) 4" (102 mm) 3" (76 mm) 24 in.2 (155 cm2) 1" (25 mm) 1" (25 mm) Cabinet installation (dryer only): 281/8" (715 mm) 31/2" (89 mm) 7" (178 mm) 18" (460 mm) 14" (358 mm) NOTE: Most installations require a minimum of automatic sensor cycles...
...for recessed area or closet installation All dimensions show recommended spacing allowed, with tested spacing of 0" (0 mm) clearance on all sides of the dryer to reduce noise transfer. ■■ For closet installation, with a door, minimum ventilation openings in longer drying times. IMPORTANT: Do not ...cm2) Back view: Electric 61/4" (159 mm) 4" (102 mm) 3" (76 mm) 24 in.2 (155 cm2) 1" (25 mm) 1" (25 mm) Cabinet installation (dryer only): 281/8" (715 mm) 31/2" (89 mm) 7" (178 mm) 18" (460 mm) 14" (358 mm) NOTE: Most installations require a minimum of automatic sensor cycles...

Installation Instructions
Page 6
...hardware, available for Mobile home construction and Safety, Title 24, HUD Part 280) or Standard CAN/CSA-Z240 MH. Openings (such as dryer exhaust opening. Connect to the Manufactured Home Construction and Safety Standard, Title 24 CFR, Part 3280 (formerly the Federal Standard for purchase from ...the external ground connector (green screw), and secured under counter installation (dryer only): 39" min. (990 mm) 1" (25 mm) 1" (25 mm) NOTE: Some models not recommended for homes built after 1996, and...
...hardware, available for Mobile home construction and Safety, Title 24, HUD Part 280) or Standard CAN/CSA-Z240 MH. Openings (such as dryer exhaust opening. Connect to the Manufactured Home Construction and Safety Standard, Title 24 CFR, Part 3280 (formerly the Federal Standard for purchase from ...the external ground connector (green screw), and secured under counter installation (dryer only): 39" min. (990 mm) 1" (25 mm) 1" (25 mm) NOTE: Some models not recommended for homes built after 1996, and...

Installation Instructions
Page 7
... like this : 3-wire receptacle (10-30R) Then choose a 3-wire power supply cord with all local codes and ordinances. Failure to move and install dryer. All current-carrying wires must have 4 10-gauge solid copper wires and match a 4-wire receptacle of NEMA Type 10-30R. SAVE THESE INSTRUCTIONS To... the exhaust vent. 7 Install Leveling Legs WARNING Excessive Weight Hazard Use two or more people to do not use a wrench to whether the dryer is equipped with flexible metallic conduit. The plug must be insulated. ■■ 10-gauge solid copper wire (do so can result in ...
... like this : 3-wire receptacle (10-30R) Then choose a 3-wire power supply cord with all local codes and ordinances. Failure to move and install dryer. All current-carrying wires must have 4 10-gauge solid copper wires and match a 4-wire receptacle of NEMA Type 10-30R. SAVE THESE INSTRUCTIONS To... the exhaust vent. 7 Install Leveling Legs WARNING Excessive Weight Hazard Use two or more people to do not use a wrench to whether the dryer is equipped with flexible metallic conduit. The plug must be insulated. ■■ 10-gauge solid copper wire (do so can result in ...

Installation Instructions
Page 9
... supply cord to connect neutral ground wire and neutral wire. Connect ground wire 4-wire receptacle (NEMA type 14-30R) 4-prong plug Spade terminals with the dryer cabinet and be in a horizontal position.
... supply cord to connect neutral ground wire and neutral wire. Connect ground wire 4-wire receptacle (NEMA type 14-30R) 4-prong plug Spade terminals with the dryer cabinet and be in a horizontal position.

Installation Instructions
Page 10
Tighten screw. 3. Connect remaining wires 2. Finally, reinsert tab of terminal block cover into slot of dryer rear panel. Secure cover with hold -down screw. Now, go to "Venting Requirements". 3-wire Power Supply Cord Connection Use where local codes... permit connecting cabinet-ground conductor to neutral wire. Connect neutral wire (white or center) (C) of dryer rear panel. Tighten screws. Connect remaining wires 3-wire receptacle (NEMA type 14-30R) 3-prong plug Spade terminals with hold -down screw. Secure cover ...
Tighten screw. 3. Connect remaining wires 2. Finally, reinsert tab of terminal block cover into slot of dryer rear panel. Secure cover with hold -down screw. Now, go to "Venting Requirements". 3-wire Power Supply Cord Connection Use where local codes... permit connecting cabinet-ground conductor to neutral wire. Connect neutral wire (white or center) (C) of dryer rear panel. Tighten screws. Connect remaining wires 3-wire receptacle (NEMA type 14-30R) 3-prong plug Spade terminals with hold -down screw. Secure cover ...

Installation Instructions
Page 11
...: A 4-wire connection is required for direct connection (251"mm) (127 5" mm) Direct wire cable must have a tight fit with the dryer cabinet and be moved if needed. Tighten strain relief screw against the direct wire cable. If your 4-wire cable for mobile homes and where local... your wiring looks like this: 4-wire direct connection: Go to 4-Wire Direct Connection on strain relief). Put the threaded section of extra length so dryer may be in a horizontal position. The strain relief should have 5 ft. (1.52 m) of the strain relief (C) through the strain relief. Attach...
...: A 4-wire connection is required for direct connection (251"mm) (127 5" mm) Direct wire cable must have a tight fit with the dryer cabinet and be moved if needed. Tighten strain relief screw against the direct wire cable. If your 4-wire cable for mobile homes and where local... your wiring looks like this: 4-wire direct connection: Go to 4-Wire Direct Connection on strain relief). Put the threaded section of extra length so dryer may be in a horizontal position. The strain relief should have 5 ft. (1.52 m) of the strain relief (C) through the strain relief. Attach...

Installation Instructions
Page 12
... wire (white or center wire) (C) of direct wire cable under terminal block screw, facing to terminal block, place hooked end of extra length so dryer may be moved if needed. Squeeze hooked ends together and tighten screw. 5. Tighten screw. 6. Finally, reinsert tab of terminal block cover into hooks... tighten screw. 3. Connect ground wire A F (893m½m" ) Direct wire cable must have 5 ft. (1.52 m) of wire under center screw of dryer rear panel. Remove center terminal block screw (B). 12 If using 3-wire cable with ground wire, cut bare wire even with hold-down screw. Now, go...
... wire (white or center wire) (C) of direct wire cable under terminal block screw, facing to terminal block, place hooked end of extra length so dryer may be moved if needed. Squeeze hooked ends together and tighten screw. 5. Tighten screw. 6. Finally, reinsert tab of terminal block cover into hooks... tighten screw. 3. Connect ground wire A F (893m½m" ) Direct wire cable must have 5 ft. (1.52 m) of wire under center screw of dryer rear panel. Remove center terminal block screw (B). 12 If using 3-wire cable with ground wire, cut bare wire even with hold-down screw. Now, go...

Installation Instructions
Page 13
... must verify with hold -down screw. Connect neutral wire 2. Squeeze hooked end together. Tighten screw. 3. Finally, reinsert tab of terminal block cover into slot of dryer rear panel. Now, go to connect neutral ground wire and neutral wire 4. Connect a separate copper ground wire (G) from external ground conductor screw (A). Finally, reinsert tab...
... must verify with hold -down screw. Connect neutral wire 2. Squeeze hooked end together. Tighten screw. 3. Finally, reinsert tab of terminal block cover into slot of dryer rear panel. Now, go to connect neutral ground wire and neutral wire 4. Connect a separate copper ground wire (G) from external ground conductor screw (A). Finally, reinsert tab...


