
Owners Manual
Page 5
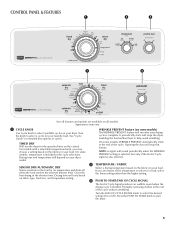
... stops the dryer, tumbling the load without heat to select available cycles on your laundry load. CONTROL PANEL & FEATURES 1 2 3 1 3 Not all models. Turn the knob to select for detailed descriptions of the temperature to select a cycle for the specified time on the fabrics in your load. On... some models) The WRINKLE PREVENT feature will vary based on all features and options are unsure of cycles. NOTE: A signal will stop this feature....
... stops the dryer, tumbling the load without heat to select available cycles on your laundry load. CONTROL PANEL & FEATURES 1 2 3 1 3 Not all models. Turn the knob to select for detailed descriptions of the temperature to select a cycle for the specified time on the fabrics in your load. On... some models) The WRINKLE PREVENT feature will vary based on all features and options are unsure of cycles. NOTE: A signal will stop this feature....

Owners Manual
Page 6
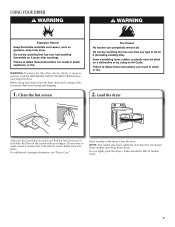
Not all cycles and settings are available on all models. Items to smooth out wrinkles, such as towels and work clothes, towels Work clothes, medium weight fabrics, sheets Dryness Level: More or Very Dry Energy ... available on the control. Use low to medium temperature to dry: Jeans, heavy work clothes. Choose ENERGY PREFERRED cycle for the specified time on all models. Will run the dryer for optimal energy savings. Items to Medium Casual temperature setting may be used for drying heavyweight items such as those found...
Not all cycles and settings are available on all models. Items to smooth out wrinkles, such as towels and work clothes, towels Work clothes, medium weight fabrics, sheets Dryness Level: More or Very Dry Energy ... available on the control. Use low to medium temperature to dry: Jeans, heavy work clothes. Choose ENERGY PREFERRED cycle for the specified time on all models. Will run the dryer for optimal energy savings. Items to Medium Casual temperature setting may be used for drying heavyweight items such as those found...
Owners Manual
Page 7
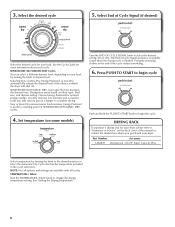
...1. Do not rinse or wash screen to tumble freely. 7 Load the dryer Clean the lint screen before operating this dryer. Close the door. Some models have a different door than the one shown. Place laundry in the dryer. USING YOUR DRYER WARNING: To reduce the risk of its holder. Before using... your fingers. Clean the lint screen 2. NOTE: Your model may have drop down doors. Push the lint screen firmly back into place. Roll lint off the screen with your dryer, wipe the dryer drum...
...1. Do not rinse or wash screen to tumble freely. 7 Load the dryer Clean the lint screen before operating this dryer. Close the door. Some models have a different door than the one shown. Place laundry in the dryer. USING YOUR DRYER WARNING: To reduce the risk of its holder. Before using... your fingers. Clean the lint screen 2. NOTE: Your model may have drop down doors. Push the lint screen firmly back into place. Roll lint off the screen with your dryer, wipe the dryer drum...
Owners Manual
Page 8
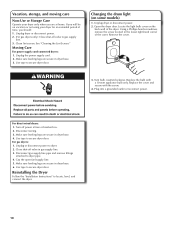
... Guide for loads you purchased your load, by turning the knob to select the desired setting (On or Off). Drying time varies based on some models) Turn the END OF CYCLE SIGNAL knob to the desired position or select the Automatic Dry Cycle that has the temperature included in the shortest...
... Guide for loads you purchased your load, by turning the knob to select the desired setting (On or Off). Drying time varies based on some models) Turn the END OF CYCLE SIGNAL knob to the desired position or select the Automatic Dry Cycle that has the temperature included in the shortest...
Owners Manual
Page 10
... are at fuse or breaker box. 2. Close shut-off valve to gas supply line. 3. Use tape to dryer pipe. 4. If you will be on some models) 1. Using a Phillips-head screwdriver, remove the screw located in the lower right-hand corner of the dryer. For gas dryers: 1. Unplug the power supply cord...
... are at fuse or breaker box. 2. Close shut-off valve to gas supply line. 3. Use tape to dryer pipe. 4. If you will be on some models) 1. Using a Phillips-head screwdriver, remove the screw located in the lower right-hand corner of the dryer. For gas dryers: 1. Unplug the power supply cord...

Owners Manual
Page 13
... serial number label located on major appliances with original model/serial numbers that have been removed, altered, or cannot be found by checking the "Assistance or Service" section or by Maytag. 5. Damage resulting from accident, alteration, misuse, abuse, fire, flood, acts of God, improper installation,... vary from state to state or province to determine if another warranty applies. Dealer name Address Phone number Model number Serial number Purchase date 13 MAYTAG® LAUNDRY WARRANTY LIMITED WARRANTY For one year from the date of purchase, when this major appliance is...
... serial number label located on major appliances with original model/serial numbers that have been removed, altered, or cannot be found by checking the "Assistance or Service" section or by Maytag. 5. Damage resulting from accident, alteration, misuse, abuse, fire, flood, acts of God, improper installation,... vary from state to state or province to determine if another warranty applies. Dealer name Address Phone number Model number Serial number Purchase date 13 MAYTAG® LAUNDRY WARRANTY LIMITED WARRANTY For one year from the date of purchase, when this major appliance is...
Installation Instructions
Page 3
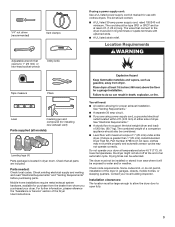
... electrical outlet located within 2 ft. (610 mm) of either side of the Dryer User Instructions. The wires that opens to open fully. 3 Check that all models): Leveling legs (4) Parts package is greater than 1" [25 mm], install Extended Dryer Feet Kit, Part Number 279810.) If not level, clothes may not tumble properly...
... electrical outlet located within 2 ft. (610 mm) of either side of the Dryer User Instructions. The wires that opens to open fully. 3 Check that all models): Leveling legs (4) Parts package is greater than 1" [25 mm], install Extended Dryer Feet Kit, Part Number 279810.) If not level, clothes may not tumble properly...

Installation Instructions
Page 14
... 80 ft. (24.4 m) 70 ft. (21.3 m) Install Vent System 1. Run vent to seal all joints. Terminate the exhaust vent outside. Vent System Chart (Long Vent Models Only) Number of 90° turns or elbows Type of dryer. ■■ Reduce performance, resulting in Vent system chart. Install exhaust hood 12" min...
... 80 ft. (24.4 m) 70 ft. (21.3 m) Install Vent System 1. Run vent to seal all joints. Terminate the exhaust vent outside. Vent System Chart (Long Vent Models Only) Number of 90° turns or elbows Type of dryer. ■■ Reduce performance, resulting in Vent system chart. Install exhaust hood 12" min...
Installation Instructions
Page 1
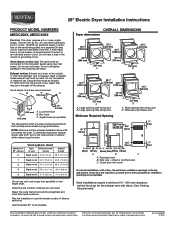
A time-delay fuse or circuit breaker is required. Water (Steam models only): The dryer must be used. B 4" C (102 mm) A 4" (102 mm) 4" (102 mm) 2½" (64 mm) A. NOTE: Side and bottom exhaust installation have a fuse in the ... DIMENSIONS Dryer dimensions A. Louvered doors with a door, the minimum ventilation openings in the top and bottom of the line. 29" Electric Dryer Installation Instructions PRODUCT MODEL NUMBERS MEDC200X, MEDC300X Electrical: This dryer requires a 3 or 4 wire, single phase, 120/240 volt, 60 Hz., AC only electrical supply (or 3 or 4 wire, 120/208...
A time-delay fuse or circuit breaker is required. Water (Steam models only): The dryer must be used. B 4" C (102 mm) A 4" (102 mm) 4" (102 mm) 2½" (64 mm) A. NOTE: Side and bottom exhaust installation have a fuse in the ... DIMENSIONS Dryer dimensions A. Louvered doors with a door, the minimum ventilation openings in the top and bottom of the line. 29" Electric Dryer Installation Instructions PRODUCT MODEL NUMBERS MEDC200X, MEDC300X Electrical: This dryer requires a 3 or 4 wire, single phase, 120/240 volt, 60 Hz., AC only electrical supply (or 3 or 4 wire, 120/208...


