Owners Manual
Page 10
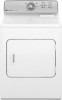
...power supply cord-connected dryers: 1. Unplug the power supply cord. 2. Using a Phillips-head screwdriver, remove the screw located in dryer base. 6. Remove the cover. 3. Disconnect wiring. 3. See "Cleaning the Lint Screen." Use tape to secure dryer door. Open the dryer door. Plug into a grounded outlet or reconnect power...the lower right-hand corner of the dryer. Make sure leveling legs are secure in dryer base. 3. Unplug dryer or disconnect power. 2. Locate the light bulb cover on the back wall of the cover. Replace the bulb with the screw. 4. Replace the...
...power supply cord-connected dryers: 1. Unplug the power supply cord. 2. Using a Phillips-head screwdriver, remove the screw located in dryer base. 6. Remove the cover. 3. Disconnect wiring. 3. See "Cleaning the Lint Screen." Use tape to secure dryer door. Open the dryer door. Plug into a grounded outlet or reconnect power...the lower right-hand corner of the dryer. Make sure leveling legs are secure in dryer base. 3. Unplug dryer or disconnect power. 2. Locate the light bulb cover on the back wall of the cover. Replace the bulb with the screw. 4. Replace the...
Installation Instructions
Page 3
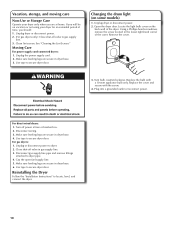
... 30 amp circuit. ■■ If you are included. Do not operate your local building inspector. The cord should contain: ■■ A UL listed 30-amp power supply cord, rated 120/240 volt minimum. Check existing electrical supply and venting, and read "Electrical Requirements" and "Venting...need: ■■ A location allowing for installing new exhaust vent) Parts supplied (all parts are using a power supply cord: Use a UL listed power supply cord kit marked for purchase from the dealer from whom you purchased your dryer. Some codes limit, or do not permit...
... 30 amp circuit. ■■ If you are included. Do not operate your local building inspector. The cord should contain: ■■ A UL listed 30-amp power supply cord, rated 120/240 volt minimum. Check existing electrical supply and venting, and read "Electrical Requirements" and "Venting...need: ■■ A location allowing for installing new exhaust vent) Parts supplied (all parts are using a power supply cord: Use a UL listed power supply cord kit marked for purchase from the dealer from whom you purchased your dryer. Some codes limit, or do not permit...
Installation Instructions
Page 4
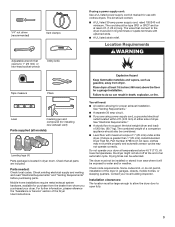
... through the neutral conductors. 4 Do not have a fuse in the neutral or grounding circuit. ■■ Do not use an extension cord. ■■ If codes permit and a separate ground wire is used when the dryer is recommended to install with a 3-wire electrical supply... connection. The neutral ground wire is recommended. The National Electrical Code requires a 4-wire power supply connection for the exhaust vent with a 4-wire electrical supply connection, the neutral ground wire must be obtained from your dryer, you...
... through the neutral conductors. 4 Do not have a fuse in the neutral or grounding circuit. ■■ Do not use an extension cord. ■■ If codes permit and a separate ground wire is used when the dryer is recommended to install with a 3-wire electrical supply... connection. The neutral ground wire is recommended. The National Electrical Code requires a 4-wire power supply connection for the exhaust vent with a 4-wire electrical supply connection, the neutral ground wire must be obtained from your dryer, you...
Installation Instructions
Page 5
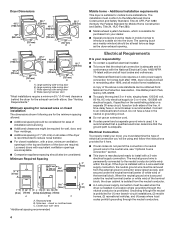
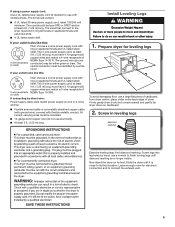
...copper wires and match a 4-wire receptacle of NEMA Type 14-30 R. If your outlet looks like this : Then choose a 4-wire power supply cord with flexible metallic conduit. Screw in leveling legs diamond marking Examine leveling legs, find diamond marking. Slide the dryer until diamond marking is... close to finish turning legs until it is no longer visible. If using a power supply cord: Use a UL listed power supply cord kit marked for leveling legs To avoid damaging floor, use a large flat piece of cardboard from dryer carton; The...
...copper wires and match a 4-wire receptacle of NEMA Type 14-30 R. If your outlet looks like this : Then choose a 4-wire power supply cord with flexible metallic conduit. Screw in leveling legs diamond marking Examine leveling legs, find diamond marking. Slide the dryer until diamond marking is... close to finish turning legs until it is no longer visible. If using a power supply cord: Use a UL listed power supply cord kit marked for leveling legs To avoid damaging floor, use a large flat piece of cardboard from dryer carton; The...
Installation Instructions
Page 6
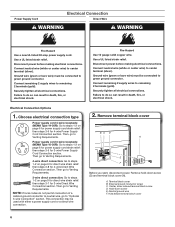
...Use a UL listed strain relief. Ground wire (green or bare wire) must be used with either a power supply cord or a direct wire connection. 2. Choose electrical connection type Power supply cord 4-wire receptacle (NEMA Type 14-30R): Go to steps 1-2 on page 9 for direct wire strain relief:...Securely tighten all electrical connections. Then go to Venting Requirements. 4-wire direct connection: Go to steps 1-2 on page 6 for power supply cord strain relief: then steps 3-5 for 4-wire Direct Wire Connection section. This connection may be connected to remaining 2 terminals (gold...
...Use a UL listed strain relief. Ground wire (green or bare wire) must be used with either a power supply cord or a direct wire connection. 2. Choose electrical connection type Power supply cord 4-wire receptacle (NEMA Type 14-30R): Go to steps 1-2 on page 9 for direct wire strain relief:...Securely tighten all electrical connections. Then go to Venting Requirements. 4-wire direct connection: Go to steps 1-2 on page 6 for power supply cord strain relief: then steps 3-5 for 4-wire Direct Wire Connection section. This connection may be connected to remaining 2 terminals (gold...
Installation Instructions
Page 7
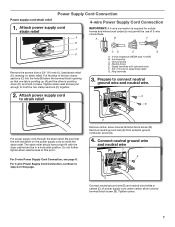
... a tight fit with upturned ends F. 3/4" (19 mm) UL listed strain relief G. Do not further tighten strain relief screws at this page. Ground prong D. For 3-wire Power Supply Cord Connection, see page 8. Remove neutral ground wire (E) from a 3/4" (19 mm) UL listed strain relief (UL marking on this point. CD E G A. 4-wire receptacle (NEMA type...
... a tight fit with upturned ends F. 3/4" (19 mm) UL listed strain relief G. Do not further tighten strain relief screws at this page. Ground prong D. For 3-wire Power Supply Cord Connection, see page 8. Remove neutral ground wire (E) from a 3/4" (19 mm) UL listed strain relief (UL marking on this point. CD E G A. 4-wire receptacle (NEMA type...

Installation Instructions
Page 8
...-colored terminal block screw (B). Finally, reinsert tab of terminal block cover into slot of dryer rear panel. Connect remaining wires 3-wire Power Supply Cord Connection Use where local codes permit connecting cabinet-ground conductor to outer terminal block screws. Connect remaining wires Connect remaining wires to neutral...hold -down screw. Now, go to outer terminal block screws. Connect neutral wire BC Connect neutral wire (white or center) (C) of power supply cord to external ground conductor screw (A). Connect ground wire A F Connect ground wire (F) (green or bare) of...
...-colored terminal block screw (B). Finally, reinsert tab of terminal block cover into slot of dryer rear panel. Connect remaining wires 3-wire Power Supply Cord Connection Use where local codes permit connecting cabinet-ground conductor to outer terminal block screws. Connect remaining wires Connect remaining wires to neutral...hold -down screw. Now, go to outer terminal block screws. Connect neutral wire BC Connect neutral wire (white or center) (C) of power supply cord to external ground conductor screw (A). Connect ground wire A F Connect ground wire (F) (green or bare) of...
Installation Instructions
Page 11
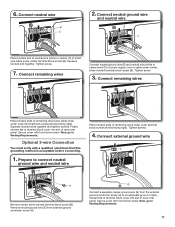
... A B E Remove center, silver-colored terminal block screw (B). Connect neutral ground wire and neutral wire B C Place hooked end of neutral wire (white or center) (C) of power supply cord or cable under center terminal block screw (B). Connect remaining wires E Connect neutral ground wire (E) and neutral wire (white or center wire) (C) of direct wire cable...
... A B E Remove center, silver-colored terminal block screw (B). Connect neutral ground wire and neutral wire B C Place hooked end of neutral wire (white or center) (C) of power supply cord or cable under center terminal block screw (B). Connect remaining wires E Connect neutral ground wire (E) and neutral wire (white or center wire) (C) of direct wire cable...

Installation Instructions
Page 15
... sensing system to see what was skipped. After dryer is in your tools. Complete Installation Checklist q Check that vent is clean. q For power supply cord installation, plug into an outlet and/or electrical supply is on a full heat cycle (not an air cycle) for levelness. See "Level Dryer...exhaust outlet NOTE: The dryer must fit over dryer exhaust outlet and inside exhaust hood. Connect vent to remove any tape remaining on power. Check that all four legs are now installed. Move dryer to final location Move dryer to back. Level Dryer Check levelness of dryer...
... sensing system to see what was skipped. After dryer is in your tools. Complete Installation Checklist q Check that vent is clean. q For power supply cord installation, plug into an outlet and/or electrical supply is on a full heat cycle (not an air cycle) for levelness. See "Level Dryer...exhaust outlet NOTE: The dryer must fit over dryer exhaust outlet and inside exhaust hood. Connect vent to remove any tape remaining on power. Check that all four legs are now installed. Move dryer to final location Move dryer to back. Level Dryer Check levelness of dryer...


