
Owners Manual
Page 2
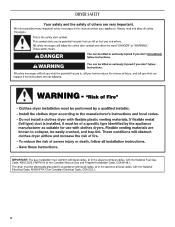
DRYER SAFETY 2
DRYER SAFETY 2
Owners Manual
Page 4
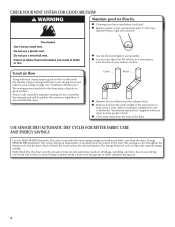
... dryness. The Energy Preferred cycle will be sure to over-drying. Use Timed Dry for final product check. The venting system attached to the dryer plays a big role in shrinkage, wrinkling, and static due to follow the "Installation Instructions" supplied with 4" (102 mm) diameter heavy, ... the drying rack. 4 CHECK YOUR VENT SYSTEM FOR GOOD AIR FLOW Maintain good air flow by the customer, regardless of who installed the dryer. See "Installation Instructions." When cleaning is complete, be paid by : n Cleaning your lint screen before each bend and curve reduces air ...
... dryness. The Energy Preferred cycle will be sure to over-drying. Use Timed Dry for final product check. The venting system attached to the dryer plays a big role in shrinkage, wrinkling, and static due to follow the "Installation Instructions" supplied with 4" (102 mm) diameter heavy, ... the drying rack. 4 CHECK YOUR VENT SYSTEM FOR GOOD AIR FLOW Maintain good air flow by the customer, regardless of who installed the dryer. See "Installation Instructions." When cleaning is complete, be paid by : n Cleaning your lint screen before each bend and curve reduces air ...
Owners Manual
Page 5
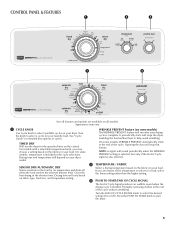
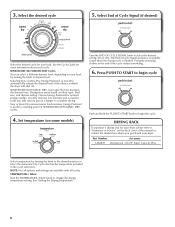
...avoid wrinkling. On models with a selectable temperature knob, you are available on the control. Opening the door will run the dryer for your dryer. Drying time and temperature will sound periodically when the WRINKLE PREVENT setting is selected, but only if the End of cycles.... cycle. CONTROL PANEL & FEATURES 1 2 3 1 3 Not all models. Promptly removing clothes at the end of the temperature to start the dryer. 5 On some models, temperature is finished. TIMED DRY Will run after your load. SENSOR DRY/AUTOMATIC DRY Senses moisture in the shortest time....
...avoid wrinkling. On models with a selectable temperature knob, you are available on the control. Opening the door will run the dryer for your dryer. Drying time and temperature will sound periodically when the WRINKLE PREVENT setting is selected, but only if the End of cycles.... cycle. CONTROL PANEL & FEATURES 1 2 3 1 3 Not all models. Promptly removing clothes at the end of the temperature to start the dryer. 5 On some models, temperature is finished. TIMED DRY Will run after your load. SENSOR DRY/AUTOMATIC DRY Senses moisture in the shortest time....

Owners Manual
Page 6
... time varies based on all cycles and settings are unsure of Cycle Signal Wrinkle Prevent Cycle Details: Automatic cycles give the best drying in your dryer has multiple heat settings: A High Heavy temperature setting may be used for various loads, refer to dry: Heavy or bulky items Any load ...may be used for the specified time on the fabrics in the shortest time. Select a drying temperature based on the control. Will run the dryer for drying heavyweight items such as you would like , select Less Dry next time you are available on all cycles and settings are available ...
... time varies based on all cycles and settings are unsure of Cycle Signal Wrinkle Prevent Cycle Details: Automatic cycles give the best drying in your dryer has multiple heat settings: A High Heavy temperature setting may be used for various loads, refer to dry: Heavy or bulky items Any load ...may be used for the specified time on the fabrics in the shortest time. Select a drying temperature based on the control. Will run the dryer for drying heavyweight items such as you would like , select Less Dry next time you are available on all cycles and settings are available ...
Owners Manual
Page 7
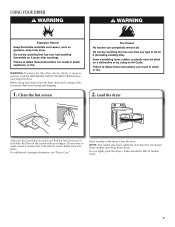
... with a damp cloth to persons, read the IMPORTANT SAFETY INSTRUCTIONS before each load. Close the door. Place laundry in the dryer. Some models have a different door than the one shown. Clean the lint screen 2. Push the lint screen firmly back into place. Pull ...rinse or wash screen to tumble freely. 7 NOTE: Your model may have drop down doors. Do not tightly pack the dryer; Before using your fingers. Load the dryer Clean the lint screen before operating this dryer. USING YOUR DRYER WARNING: To reduce the risk of its holder. For additional cleaning information, see...
... with a damp cloth to persons, read the IMPORTANT SAFETY INSTRUCTIONS before each load. Close the door. Place laundry in the dryer. Some models have a different door than the one shown. Clean the lint screen 2. Push the lint screen firmly back into place. Pull ...rinse or wash screen to tumble freely. 7 NOTE: Your model may have drop down doors. Do not tightly pack the dryer; Before using your fingers. Load the dryer Clean the lint screen before operating this dryer. USING YOUR DRYER WARNING: To reduce the risk of its holder. For additional cleaning information, see...
Owners Manual
Page 8
... Cycles You can select a different dryness level, depending on the back cover of Cycle Signal (if desired) Select the desired cycle for your dryer, please refer to "Assistance or Service" on your load. Very or More Dry removes more information about each cycle. Promptly removing clothes at... the shortest time. Energy Preferred is finished. Less Dry removes less moisture and is used for a starting point for loads you purchased your dryer. NOTE: Not all options and settings are available with all cycles. See the Cycle Guide for optimal energy savings. Drying time varies based...
... Cycles You can select a different dryness level, depending on the back cover of Cycle Signal (if desired) Select the desired cycle for your dryer, please refer to "Assistance or Service" on your load. Very or More Dry removes more information about each cycle. Promptly removing clothes at... the shortest time. Energy Preferred is finished. Less Dry removes less moisture and is used for a starting point for loads you purchased your dryer. NOTE: Not all options and settings are available with all cycles. See the Cycle Guide for optimal energy savings. Drying time varies based...
Owners Manual
Page 9
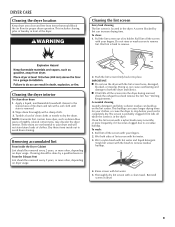
...To clean: 1. Wet lint is completely dry. Apply a liquid, nonflammable household cleaner to stop before your dryer and will not stain future loads of the dryer. Dry these items inside out to remove. As needed cleaning Laundry detergent and fabric softener residue can cause longer...screen loose, damaged, blocked, or missing. Removing accumulated lint From Inside the Dryer Cabinet Lint should be removed every 2 years, or more often, depending on dryer usage. 2. DRYER CARE Cleaning the dryer location Keep dryer area clear and free from items that contain loose dyes, such as denim...
...To clean: 1. Wet lint is completely dry. Apply a liquid, nonflammable household cleaner to stop before your dryer and will not stain future loads of the dryer. Dry these items inside out to remove. As needed cleaning Laundry detergent and fabric softener residue can cause longer...screen loose, damaged, blocked, or missing. Removing accumulated lint From Inside the Dryer Cabinet Lint should be removed every 2 years, or more often, depending on dryer usage. 2. DRYER CARE Cleaning the dryer location Keep dryer area clear and free from items that contain loose dyes, such as denim...
Owners Manual
Page 10
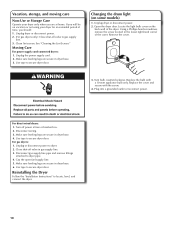
...4. Plug into a grounded outlet or reconnect power. Turn off power at home. Use tape to secure dryer door. See "Cleaning the Lint Screen." Use tape to secure dryer door. Locate the light bulb cover on some models) 1. Disconnect wiring. 3. Close shut-off valve to...watt appliance bulb only. For gas dryers: 1. Make sure leveling legs are secure in gas supply line. 3. Unplug dryer or disconnect power. 2. (For gas dryers only): Close shut-off valve in dryer base. 3. Turn bulb counterclockwise. For direct-wired dryers: 1. Unplug dryer or disconnect power. 2. Clean lint ...
...4. Plug into a grounded outlet or reconnect power. Turn off power at home. Use tape to secure dryer door. See "Cleaning the Lint Screen." Use tape to secure dryer door. Locate the light bulb cover on some models) 1. Disconnect wiring. 3. Close shut-off valve to...watt appliance bulb only. For gas dryers: 1. Make sure leveling legs are secure in gas supply line. 3. Unplug dryer or disconnect power. 2. (For gas dryers only): Close shut-off valve in dryer base. 3. Turn bulb counterclockwise. For direct-wired dryers: 1. Unplug dryer or disconnect power. 2. Clean lint ...
Owners Manual
Page 11
..., or paper clip is blown or circuit breaker has tripped. Separate the load items and restart the dryer. Replace both fuses or reset the circuit breaker. In Canada www.maytag.ca If you may be cleaned before laundering. Check the front and rear edges of the drum for...minutes. Household fuse is caught between the drum and front or rear of the dryer. See "Installation Instructions". Electric dryers use it only once. Run the dryer for small objects. Use a time-delay fuse. http://www.maytag.com/help - Select the right cycle for the types of fuse. See ...
..., or paper clip is blown or circuit breaker has tripped. Separate the load items and restart the dryer. Replace both fuses or reset the circuit breaker. In Canada www.maytag.ca If you may be cleaned before laundering. Check the front and rear edges of the drum for...minutes. Household fuse is caught between the drum and front or rear of the dryer. See "Installation Instructions". Electric dryers use it only once. Run the dryer for small objects. Use a time-delay fuse. http://www.maytag.com/help - Select the right cycle for the types of fuse. See ...

Owners Manual
Page 12
.../help - In Canada www.maytag.ca If you experience Possible Causes Solution Cycle time too short Automatic cycle ending early. The load may feel very warm. Use Timed Dry for the first time. Items removed before removing laundry from dryer at the beginning of drying ...the clothing. The new electric heating element may have recently been painting, staining, or varnishing in clothing (usually blue jeans). Level the dryer. Lint screen should be cleaned before the end of a service call...In U.S.A. Fabric softener sheets added to finish before Cool Down may ...
.../help - In Canada www.maytag.ca If you experience Possible Causes Solution Cycle time too short Automatic cycle ending early. The load may feel very warm. Use Timed Dry for the first time. Items removed before removing laundry from dryer at the beginning of drying ...the clothing. The new electric heating element may have recently been painting, staining, or varnishing in clothing (usually blue jeans). Level the dryer. Lint screen should be cleaned before the end of a service call...In U.S.A. Fabric softener sheets added to finish before Cool Down may ...

Installation Instructions
Page 2
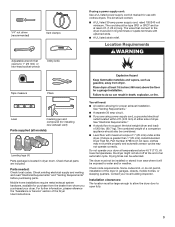
... to reduce the chance of others . These words mean: DANGER You can kill or hurt you what the potential hazard is the safety alert symbol. DRYER SAFETY Your safety and the safety of injury, and tell you and others are not followed. Always read and obey all safety messages. WARNING You...
... to reduce the chance of others . These words mean: DANGER You can kill or hurt you what the potential hazard is the safety alert symbol. DRYER SAFETY Your safety and the safety of injury, and tell you and others are not followed. Always read and obey all safety messages. WARNING You...
Installation Instructions
Page 3
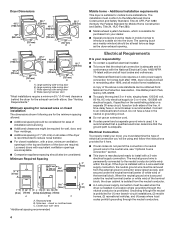
.... Mobile home installations require metal exhaust system hardware, available for use with clothes dryers. See "Venting Requirements." ■■ A separate 30 amp circuit. ■■ If you purchased your dryer. Parts needed: Check local codes. The combined weight of a companion appliance should...cord, rated 120/240 volt minimum. Do not operate your local building inspector. Drying times can be large enough to allow the dryer door to open fully. 3 Check code requirements. 1/4" nut driver (recommended) Vent clamps Adjustable wrench that opens to 1" (25 ...
.... Mobile home installations require metal exhaust system hardware, available for use with clothes dryers. See "Venting Requirements." ■■ A separate 30 amp circuit. ■■ If you purchased your dryer. Parts needed: Check local codes. The combined weight of a companion appliance should...cord, rated 120/240 volt minimum. Do not operate your local building inspector. Drying times can be large enough to allow the dryer door to open fully. 3 Check code requirements. 1/4" nut driver (recommended) Vent clamps Adjustable wrench that opens to 1" (25 ...
Installation Instructions
Page 4
...considered for it is recommended that a qualified electrician determine that the electrical connection is recommended. Electrical Connection To properly install your dryer, you must be required for wall, door, and floor moldings. ■■ Additional spacing of 1" (25 mm)...supply connection. closet or confined area C. The neutral ground wire is available for mobile home installations. A copy of the dryer is manufactured ready to an individual branch circuit. Grounding through the neutral conductor is suitable for purchase from : National Fire Protection...
...considered for it is recommended that a qualified electrician determine that the electrical connection is recommended. Electrical Connection To properly install your dryer, you must be required for wall, door, and floor moldings. ■■ Additional spacing of 1" (25 mm)...supply connection. closet or confined area C. The neutral ground wire is available for mobile home installations. A copy of the dryer is manufactured ready to an individual branch circuit. Grounding through the neutral conductor is suitable for purchase from : National Fire Protection...
Installation Instructions
Page 5
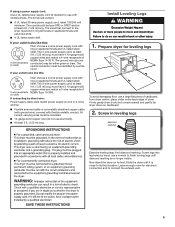
...wire or 3-wire) and be: ■■ Flexible armored cable or nonmetallic sheathed copper cable (with ground wire), covered with clothes dryers. Failure to its feet. Screw in ring terminals or spade terminals with ring or spade terminals and UL listed strain relief. If your ... a 3-wire power supply cord with upturned ends. ■■ A UL listed strain relief. place under entire back edge of cardboard from dryer carton; Slide the dryer until diamond marking is close to do not use aluminum). ■■ At least 5 ft. (1.52 m) long. The ground wire (...
...wire or 3-wire) and be: ■■ Flexible armored cable or nonmetallic sheathed copper cable (with ground wire), covered with clothes dryers. Failure to its feet. Screw in ring terminals or spade terminals with ring or spade terminals and UL listed strain relief. If your ... a 3-wire power supply cord with upturned ends. ■■ A UL listed strain relief. place under entire back edge of cardboard from dryer carton; Slide the dryer until diamond marking is close to do not use aluminum). ■■ At least 5 ft. (1.52 m) long. The ground wire (...
Installation Instructions
Page 7
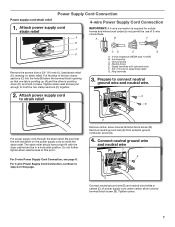
... 3 on this point. For 4 wire Power Supply Cord Connection, continue to strain relief B Put power supply cord through the strain relief. Spade terminals with the dryer cabinet and be in place. Remove neutral ground wire (E) from a 3/4" (19 mm) UL listed strain relief (UL marking on the power supply cord is required...
... 3 on this point. For 4 wire Power Supply Cord Connection, continue to strain relief B Put power supply cord through the strain relief. Spade terminals with the dryer cabinet and be in place. Remove neutral ground wire (E) from a 3/4" (19 mm) UL listed strain relief (UL marking on the power supply cord is required...

Installation Instructions
Page 8
... block screws. Connect remaining wires Connect remaining wires to external ground conductor screw (A). Finally, reinsert tab of terminal block cover into slot of dryer rear panel. Connect ground wire A F Connect ground wire (F) (green or bare) of power supply cord to Venting Requirements. 8 Secure ... 3/4" (19 mm) UL listed strain relief F. Tighten screws. Tighten screws. Finally, reinsert tab of terminal block cover into slot of dryer rear panel. Connect neutral wire BC Connect neutral wire (white or center) (C) of power supply cord to outer terminal block screws. Now,...
... block screws. Connect remaining wires Connect remaining wires to external ground conductor screw (A). Finally, reinsert tab of terminal block cover into slot of dryer rear panel. Connect ground wire A F Connect ground wire (F) (green or bare) of power supply cord to Venting Requirements. 8 Secure ... 3/4" (19 mm) UL listed strain relief F. Tighten screws. Tighten screws. Finally, reinsert tab of terminal block cover into slot of dryer rear panel. Connect neutral wire BC Connect neutral wire (white or center) (C) of power supply cord to outer terminal block screws. Now,...
Installation Instructions
Page 9
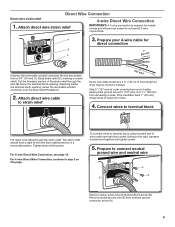
... wire A B E Remove center, silver-colored terminal block screw (B). To connect wires to terminal block, place hooked end of extra length so dryer may be in a horizontal position. Prepare your 4-wire cable for mobile homes and where local codes do not permit 3-wire connections. Attach direct... wire cable to strain relief (127 5" mm) Direct wire cable must have a tight fit with the dryer cabinet and be moved if needed. Strip insulation back 1" (25 mm). Direct Wire Connection Direct wire strain relief 4-wire Direct Wire Connection 1....
... wire A B E Remove center, silver-colored terminal block screw (B). To connect wires to terminal block, place hooked end of extra length so dryer may be in a horizontal position. Prepare your 4-wire cable for mobile homes and where local codes do not permit 3-wire connections. Attach direct... wire cable to strain relief (127 5" mm) Direct wire cable must have a tight fit with the dryer cabinet and be moved if needed. Strip insulation back 1" (25 mm). Direct Wire Connection Direct wire strain relief 4-wire Direct Wire Connection 1....
Installation Instructions
Page 10
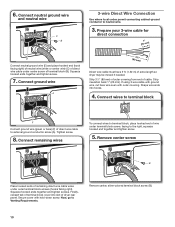
...outer terminal block screws (hooks facing right). Strip insulation back 1" (25 mm). Shape wire ends into slot of extra length so dryer may be moved if needed. Connect remaining wires To connect wires to terminal block, place hooked end of cable. Finally, reinsert ...7. Remove center, silver-colored terminal block screw (B). 10 Connect ground wire A (893m½m" ) Direct wire cable must have 5 ft. (1.52 m) of dryer rear panel. Remove center screw B Place hooked ends of terminal block (B). Now, go to neutral wire. 3. 6. Tighten screw. 8. Secure cover with outer ...
...outer terminal block screws (hooks facing right). Strip insulation back 1" (25 mm). Shape wire ends into slot of extra length so dryer may be moved if needed. Connect remaining wires To connect wires to terminal block, place hooked end of cable. Finally, reinsert ...7. Remove center, silver-colored terminal block screw (B). 10 Connect ground wire A (893m½m" ) Direct wire cable must have 5 ft. (1.52 m) of dryer rear panel. Remove center screw B Place hooked ends of terminal block (B). Now, go to neutral wire. 3. 6. Tighten screw. 8. Secure cover with outer ...
Installation Instructions
Page 11
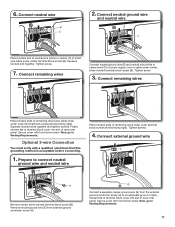
...) (C) of direct wire cable under center, silver-colored terminal block screw (B). Finally, reinsert tab of terminal block cover into slot of dryer rear panel. Optional 3-wire Connection You must verify with hold -down screw. Finally, reinsert tab of terminal block cover into slot of... dryer rear panel. Connect remaining wires Place hooked ends of remaining wires under outer terminal block screws (hooks facing right). Remove neutral ground ...
...) (C) of direct wire cable under center, silver-colored terminal block screw (B). Finally, reinsert tab of terminal block cover into slot of dryer rear panel. Optional 3-wire Connection You must verify with hold -down screw. Finally, reinsert tab of terminal block cover into slot of... dryer rear panel. Connect remaining wires Place hooked ends of remaining wires under outer terminal block screws (hooks facing right). Remove neutral ground ...

Installation Instructions
Page 12
..., ceiling, attic, crawlspace, or a concealed space of a building. Do not use a plastic vent. Improper venting can result in final dryer location. ■■ Remove excess to seal all governing codes and ordinances. Failure to follow these instructions can cause moisture and lint to ...woodwork, furniture, paint, wallpaper, carpets, etc. Dryer exhaust must not be connected into interior of duct and catch lint. Review Vent system chart and if necessary, modify existing vent...
..., ceiling, attic, crawlspace, or a concealed space of a building. Do not use a plastic vent. Improper venting can result in final dryer location. ■■ Remove excess to seal all governing codes and ordinances. Failure to follow these instructions can cause moisture and lint to ...woodwork, furniture, paint, wallpaper, carpets, etc. Dryer exhaust must not be connected into interior of duct and catch lint. Review Vent system chart and if necessary, modify existing vent...


