
Owners Manual
Page 4
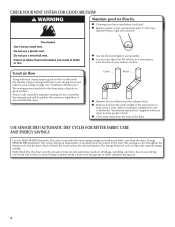
... the dryer. This sensing occurs throughout the drying cycle and the dryer shuts off when the load reaches the selected dryness. See "Installation Instructions." Use Timed Dry for final product check. When cleaning is complete, be paid by the customer, regardless of who...cycle will reduce your drying times and improve your energy savings. Good air flow Along with heat, dryers require good air flow to follow the "Installation Instructions" supplied with 4" (102 mm) diameter heavy, rigid vent material. each load. CHECK YOUR VENT SYSTEM FOR GOOD AIR FLOW Maintain good air...
... the dryer. This sensing occurs throughout the drying cycle and the dryer shuts off when the load reaches the selected dryness. See "Installation Instructions." Use Timed Dry for final product check. When cleaning is complete, be paid by the customer, regardless of who...cycle will reduce your drying times and improve your energy savings. Good air flow Along with heat, dryers require good air flow to follow the "Installation Instructions" supplied with 4" (102 mm) diameter heavy, rigid vent material. each load. CHECK YOUR VENT SYSTEM FOR GOOD AIR FLOW Maintain good air...
Owners Manual
Page 10
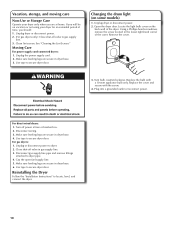
... in the lower right-hand corner of the cover. Replace the cover and secure with a 10-watt appliance bulb only. Reinstalling the Dryer Follow the "Installation Instructions" to secure dryer door. Vacation, storage, and moving care Non-Use or Storage Care Operate your dryer for an extended period of the dryer...
... in the lower right-hand corner of the cover. Replace the cover and secure with a 10-watt appliance bulb only. Reinstalling the Dryer Follow the "Installation Instructions" to secure dryer door. Vacation, storage, and moving care Non-Use or Storage Care Operate your dryer for an extended period of the dryer...
Owners Manual
Page 11
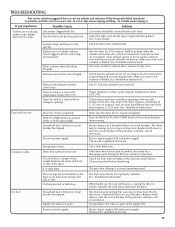
..., the load will bounce, causing the dryer to check air movement. In Canada www.maytag.ca If you experience Possible Causes Solution Clothes are not drying satisfactorily, drying times are not installed, or the dryer is not level front to back and side to START knob not ... out pockets before each load. Incorrect power supply. The dryer may vibrate if not properly installed. The drum may be cleaned before laundering. Check with temperature below 45ºF (7ºC). http://www.maytag.com/help - Lint screen should be turning, but you hear the dryer drum moving. Make...
..., the load will bounce, causing the dryer to check air movement. In Canada www.maytag.ca If you experience Possible Causes Solution Clothes are not drying satisfactorily, drying times are not installed, or the dryer is not level front to back and side to START knob not ... out pockets before each load. Incorrect power supply. The dryer may vibrate if not properly installed. The drum may be cleaned before laundering. Check with temperature below 45ºF (7ºC). http://www.maytag.com/help - Lint screen should be turning, but you hear the dryer drum moving. Make...

Owners Manual
Page 13
... dents, chips or other than normal, single-family household use or when it is installed in an inaccessible location or is not installed in a remote area where service by Maytag. 5. This major appliance is intended to be easily determined. The removal and reinstallation ...slip together for product service if your major appliance is located in accordance with Maytag published installation instructions. 10. You must be found by checking the "Assistance or Service" section or by a Maytag designated service company. Damage resulting from accident, alteration, misuse, abuse, fire...
... dents, chips or other than normal, single-family household use or when it is installed in an inaccessible location or is not installed in a remote area where service by Maytag. 5. This major appliance is intended to be easily determined. The removal and reinstallation ...slip together for product service if your major appliance is located in accordance with Maytag published installation instructions. 10. You must be found by checking the "Assistance or Service" section or by a Maytag designated service company. Damage resulting from accident, alteration, misuse, abuse, fire...

Installation Instructions
Page 2
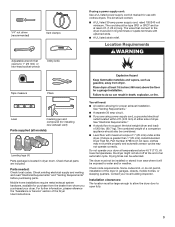
... the chance of others . Always read and obey all safety messages. INSTALLATION REQUIREMENTS Tools and Parts Gather the required tools and parts before starting installation. Tools needed: Flat-blade screwdriver 2 #2 Phillips screwdriver Wire stripper (direct wire installations) Tin snips (new vent installations) DRYER SAFETY Your safety and the safety of injury, and tell you...
... the chance of others . Always read and obey all safety messages. INSTALLATION REQUIREMENTS Tools and Parts Gather the required tools and parts before starting installation. Tools needed: Flat-blade screwdriver 2 #2 Phillips screwdriver Wire stripper (direct wire installations) Tin snips (new vent installations) DRYER SAFETY Your safety and the safety of injury, and tell you...
Installation Instructions
Page 3
... local codes. For further information, please reference the "Assistance or Service" section of 200 lbs. (90.7 kg). The dryer must not be installed or stored in an area where it will need: ■■ A location allowing for purchase from the dealer from whom you are using a... power supply cord: Use a UL listed power supply cord kit marked for installing new exhaust vent) Parts supplied (all parts are included. See "Venting Requirements." ■■ A separate 30 amp circuit. ■■ If ...
... local codes. For further information, please reference the "Assistance or Service" section of 200 lbs. (90.7 kg). The dryer must not be installed or stored in an area where it will need: ■■ A location allowing for purchase from the dealer from whom you are using a... power supply cord: Use a UL listed power supply cord kit marked for installing new exhaust vent) Parts supplied (all parts are included. See "Venting Requirements." ■■ A separate 30 amp circuit. ■■ If ...
Installation Instructions
Page 4
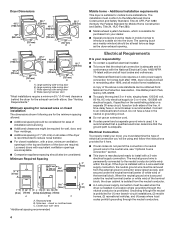
...4-wire power supply connection must be at least twice as large as the dryer exhaust opening side-swing door B. The installation must determine the type of installation and servicing. ■■ Additional clearances might be sure that the ground path is prohibited. Wide opening side-swing ... provided for Mobile Home Construction and Safety, Title 24, HUD Part 280). ■■ Metal exhaust system hardware, which is installed with equivalent ventilation openings are for the minimum spacing allowed. ■■ Additional spacing should be used , it here. ■...
...4-wire power supply connection must be at least twice as large as the dryer exhaust opening side-swing door B. The installation must determine the type of installation and servicing. ■■ Additional clearances might be sure that the ground path is prohibited. Wide opening side-swing ... provided for Mobile Home Construction and Safety, Title 24, HUD Part 280). ■■ Metal exhaust system hardware, which is installed with equivalent ventilation openings are for the minimum spacing allowed. ■■ Additional spacing should be used , it here. ■...
Installation Instructions
Page 5
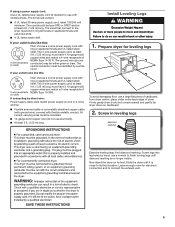
... be at least 4 ft. (1.22 m) long. Screw in back or other injury. 1. The wires that connect to its feet. Failure to move and install dryer. Firmly grasp dryer body (not console panel) and gently lay dryer down on its final location. If connecting by a white cover. The cord should...amp power supply cord, rated 120/240 volt minimum. All current-carrying wires must end in ring terminals or spade terminals with clothes dryers. Install Leveling Legs WARNING Excessive Weight Hazard Use two or more people to do not use a large flat piece of dryer. Prepare dryer for ...
... be at least 4 ft. (1.22 m) long. Screw in back or other injury. 1. The wires that connect to its feet. Failure to move and install dryer. Firmly grasp dryer body (not console panel) and gently lay dryer down on its final location. If connecting by a white cover. The cord should...amp power supply cord, rated 120/240 volt minimum. All current-carrying wires must end in ring terminals or spade terminals with clothes dryers. Install Leveling Legs WARNING Excessive Weight Hazard Use two or more people to do not use a large flat piece of dryer. Prepare dryer for ...

Installation Instructions
Page 12
... to follow these instructions can cause moisture and lint to collect indoors, which may result in reduced airflow and poor performance. ■■ Do not install in enclosed walls, ceilings, or floors. ■■ The total length should not exceed 7 3/4 ft. (2.4 m). Angled hood Elbows: ■■ 45° elbows provide better...
... to follow these instructions can cause moisture and lint to collect indoors, which may result in reduced airflow and poor performance. ■■ Do not install in enclosed walls, ceilings, or floors. ■■ The total length should not exceed 7 3/4 ft. (2.4 m). Angled hood Elbows: ■■ 45° elbows provide better...

Installation Instructions
Page 13
... available with clamps 4396004 Dryer offset elbow 4396005 Wall offset elbow 4396006RW DuraSafe™ close -clearance installations are possible. Other installations are shown. B Alternate installations for your installation. A A. Rigid metal or flexible metal vent G. Exhaust hood C D E F G B H E. Wall D. Venting Kits For more information, call 1-800-807-6777 or visit us at www.whirlpoolparts.ca. ...
... available with clamps 4396004 Dryer offset elbow 4396005 Wall offset elbow 4396006RW DuraSafe™ close -clearance installations are possible. Other installations are shown. B Alternate installations for your installation. A A. Rigid metal or flexible metal vent G. Exhaust hood C D E F G B H E. Wall D. Venting Kits For more information, call 1-800-807-6777 or visit us at www.whirlpoolparts.ca. ...

Installation Instructions
Page 14
...9632; Select route that will help achieve best drying performance. 4 Rigid metal 5 Rigid metal 80 ft. (24.4 m) 70 ft. (21.3 m) Install Vent System 1. Vent System Chart (Long Vent Models Only) Number of 90° turns or elbows Type of vent Box/louvered hoods Angled hoods 0 Rigid...metal 27 ft. (8.2 m) 21 ft. (6.4 m) Vent must not terminate beneath the mobile home. Determine vent length and elbows needed for mobile home installations: The exhaust vent must be securely fastened to seal exterior wall opening around exhaust hood. 2. NOTE: Do not use vent runs longer than those ...
...9632; Select route that will help achieve best drying performance. 4 Rigid metal 5 Rigid metal 80 ft. (24.4 m) 70 ft. (21.3 m) Install Vent System 1. Vent System Chart (Long Vent Models Only) Number of 90° turns or elbows Type of vent Box/louvered hoods Angled hoods 0 Rigid...metal 27 ft. (8.2 m) 21 ft. (6.4 m) Vent must not terminate beneath the mobile home. Determine vent length and elbows needed for mobile home installations: The exhaust vent must be securely fastened to seal exterior wall opening around exhaust hood. 2. NOTE: Do not use vent runs longer than those ...

Installation Instructions
Page 15
... level, make sure vent is secured to exhaust hood with a damp cloth to remove any tape remaining on dryer. q For power supply cord installation, plug into an outlet and/or electrical supply is on a full heat cycle (not an air cycle) for 20 minutes and start , check... exhaust hood. q Dispose of/recycle all of E.I. Tighten and adjust leveling legs Using a 4" (102 mm) clamp, connect vent to final location. Complete Installation Checklist q Check that you have all packaging materials. q Set the dryer on . ■■ Household fuse is intact and tight, or circuit breaker has...
... level, make sure vent is secured to exhaust hood with a damp cloth to remove any tape remaining on dryer. q For power supply cord installation, plug into an outlet and/or electrical supply is on a full heat cycle (not an air cycle) for 20 minutes and start , check... exhaust hood. q Dispose of/recycle all of E.I. Tighten and adjust leveling legs Using a 4" (102 mm) clamp, connect vent to final location. Complete Installation Checklist q Check that you have all packaging materials. q Set the dryer on . ■■ Household fuse is intact and tight, or circuit breaker has...
Installation Instructions
Page 1
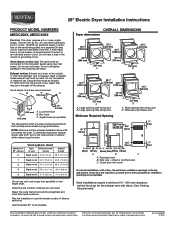
...will provide the straightest and most direct path outdoors. B 4" C (102 mm) A 4" (102 mm) 4" (102 mm) 2½" (64 mm) A. NOTE: Side and bottom exhaust installation have a fuse in .2 * (155 cm )2 1" 29" 1" 1"* 27¾" (25 mm) (737 mm) (25 mm) (25 mm) (705 mm) A B C A. ... Corporation policy includes a continuous commitment to improve our products, we reserve the right to use plastic or metal foil vet. 29" Electric Dryer Installation Instructions PRODUCT MODEL NUMBERS MEDC200X, MEDC300X Electrical: This dryer requires a 3 or 4 wire, single phase, 120/240 volt, 60 Hz., AC...
...will provide the straightest and most direct path outdoors. B 4" C (102 mm) A 4" (102 mm) 4" (102 mm) 2½" (64 mm) A. NOTE: Side and bottom exhaust installation have a fuse in .2 * (155 cm )2 1" 29" 1" 1"* 27¾" (25 mm) (737 mm) (25 mm) (25 mm) (705 mm) A B C A. ... Corporation policy includes a continuous commitment to improve our products, we reserve the right to use plastic or metal foil vet. 29" Electric Dryer Installation Instructions PRODUCT MODEL NUMBERS MEDC200X, MEDC300X Electrical: This dryer requires a 3 or 4 wire, single phase, 120/240 volt, 60 Hz., AC...


