
Owners Manual
Page 5
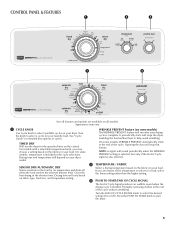
...A signal will vary based on your load. CONTROL PANEL & FEATURES 1 2 3 1 3 Not all models. On some models, WRINKLE PREVENT automatically starts at the end of Cycle signal is included in your dryer model. Turn the knob to select a cycle for a load, select the lower setting rather than the higher setting.... 3 PUSH TO START/END OF CYCLE SIGNAL The End of the temperature to start the dryer. 5 SENSOR DRY/AUTOMATIC DRY Senses...
...A signal will vary based on your load. CONTROL PANEL & FEATURES 1 2 3 1 3 Not all models. On some models, WRINKLE PREVENT automatically starts at the end of Cycle signal is included in your dryer model. Turn the knob to select a cycle for a load, select the lower setting rather than the higher setting.... 3 PUSH TO START/END OF CYCLE SIGNAL The End of the temperature to start the dryer. 5 SENSOR DRY/AUTOMATIC DRY Senses...

Owners Manual
Page 6
...time you have questions about drying temperatures for the specified time on fabric type, load size, and dryness setting. Senses moisture in your dryer has multiple heat settings: A High Heavy temperature setting may be used for drying medium-weight items such as towels and work clothes, ...heavyweight items such as sheets, blouses, dresses, underwear, permanent press fabrics, and some knits. Not all cycles and settings are available on all models. Use the Air Fluff (no heat) setting for optimal energy savings. NOTE: If you dry a similar load. Not all cycles and settings...
...time you have questions about drying temperatures for the specified time on fabric type, load size, and dryness setting. Senses moisture in your dryer has multiple heat settings: A High Heavy temperature setting may be used for drying medium-weight items such as towels and work clothes, ...heavyweight items such as sheets, blouses, dresses, underwear, permanent press fabrics, and some knits. Not all cycles and settings are available on all models. Use the Air Fluff (no heat) setting for optimal energy savings. NOTE: If you dry a similar load. Not all cycles and settings...
Owners Manual
Page 7
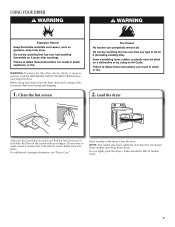
... the one shown. NOTE: Your model may have drop down doors. clothes should be able to remove lint. USING YOUR DRYER WARNING: To reduce the risk of its holder. Load the dryer Clean the lint screen before operating this dryer. Place laundry in the dryer. Do not tightly pack the dryer; Roll lint off the screen...
... the one shown. NOTE: Your model may have drop down doors. clothes should be able to remove lint. USING YOUR DRYER WARNING: To reduce the risk of its holder. Load the dryer Clean the lint screen before operating this dryer. Place laundry in the dryer. Do not tightly pack the dryer; Roll lint off the screen...
Owners Manual
Page 8
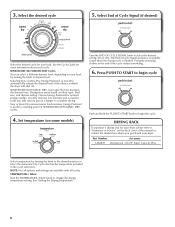
... manual or contact the dealer from whom you may want to put on your dryer. SENSOR DRY/AUTOMATIC DRY cycles give the best drying in the cycle selections. Promptly removing clothes at which the... dryer will shut off. fits 29" Super Capacity Plus Select temperature by turning the knob to select the... drying rack for optimal energy savings. Energy Preferred is finished. Drying time varies based on some models) Turn the END OF CYCLE SIGNAL knob to dryness level.
... manual or contact the dealer from whom you may want to put on your dryer. SENSOR DRY/AUTOMATIC DRY cycles give the best drying in the cycle selections. Promptly removing clothes at which the... dryer will shut off. fits 29" Super Capacity Plus Select temperature by turning the knob to select the... drying rack for optimal energy savings. Energy Preferred is finished. Drying time varies based on some models) Turn the END OF CYCLE SIGNAL knob to dryness level.
Owners Manual
Page 10
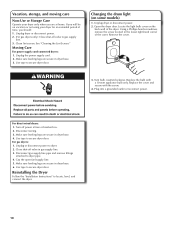
Moving Care For power supply cord-connected dryers: 1. Open the dryer door. Locate the light bulb cover on some models) 1. Remove the cover. 3. Replace the cover and secure with a 10-watt appliance bulb only. Make sure leveling legs are secure in dryer base. 3. For gas dryers: 1. Close shut-off valve to gas supply line. 3. Use tape...
Moving Care For power supply cord-connected dryers: 1. Open the dryer door. Locate the light bulb cover on some models) 1. Remove the cover. 3. Replace the cover and secure with a 10-watt appliance bulb only. Make sure leveling legs are secure in dryer base. 3. For gas dryers: 1. Close shut-off valve to gas supply line. 3. Use tape...
Installation Instructions
Page 3
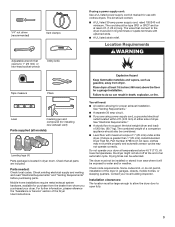
...: The location must end in garages, closets, mobile homes, or sleeping quarters. Check that all models): Leveling legs (4) Parts package is greater than 1" [25 mm], install Extended Dryer Feet Kit, Part Number 279810.) If not level, clothes may not tumble properly and automatic sensor cycles... supply cord, a grounded electrical outlet located within 2 ft. (610 mm) of either side of dryer. You will be exposed to the dryer must be considered. ■■ Level floor with clothes dryers. See "Venting Requirements." ■■ A separate 30 amp circuit. ■■ If you ...
...: The location must end in garages, closets, mobile homes, or sleeping quarters. Check that all models): Leveling legs (4) Parts package is greater than 1" [25 mm], install Extended Dryer Feet Kit, Part Number 279810.) If not level, clothes may not tumble properly and automatic sensor cycles... supply cord, a grounded electrical outlet located within 2 ft. (610 mm) of either side of dryer. You will be exposed to the dryer must be considered. ■■ Level floor with clothes dryers. See "Venting Requirements." ■■ A separate 30 amp circuit. ■■ If you ...

Installation Instructions
Page 14
...longer than those specified in longer drying times and increased energy usage. Exhaust systems longer than those specified will: ■■ Shorten life of dryer. ■■ Reduce performance, resulting in Vent system chart. Connect vent to exhaust hood Vent System Chart Number of 90° turns ... to use . Run vent to use fewest number of elbows and turns. ■■ When using straightest path possible. Vent System Chart (Long Vent Models Only) Number of 90° turns or elbows Type of vent Box/louvered, or Angled hoods 0 Rigid metal 120 ft. (36.6 m) 1 Rigid...
...longer than those specified in longer drying times and increased energy usage. Exhaust systems longer than those specified will: ■■ Shorten life of dryer. ■■ Reduce performance, resulting in Vent system chart. Connect vent to exhaust hood Vent System Chart Number of 90° turns ... to use . Run vent to use fewest number of elbows and turns. ■■ When using straightest path possible. Vent System Chart (Long Vent Models Only) Number of 90° turns or elbows Type of vent Box/louvered, or Angled hoods 0 Rigid metal 120 ft. (36.6 m) 1 Rigid...
Installation Instructions
Page 1
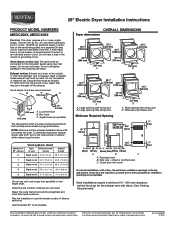
... Corporation policy includes a continuous commitment to improve our products, we reserve the right to change materials and specifications without notice. Water (Steam models only): The dryer must be used. Do not use old hoses. B 4" C (102 mm) A 4" (102 mm) 4" (102 mm) 2½... 3"* (76 mm) For closet installation, with elbow. Specifications subject to change without notice. 29" Electric Dryer Installation Instructions PRODUCT MODEL NUMBERS MEDC200X, MEDC300X Electrical: This dryer requires a 3 or 4 wire, single phase, 120/240 volt, 60 Hz., AC only electrical supply ...
... Corporation policy includes a continuous commitment to improve our products, we reserve the right to change materials and specifications without notice. Water (Steam models only): The dryer must be used. Do not use old hoses. B 4" C (102 mm) A 4" (102 mm) 4" (102 mm) 2½... 3"* (76 mm) For closet installation, with elbow. Specifications subject to change without notice. 29" Electric Dryer Installation Instructions PRODUCT MODEL NUMBERS MEDC200X, MEDC300X Electrical: This dryer requires a 3 or 4 wire, single phase, 120/240 volt, 60 Hz., AC only electrical supply ...


