
Installation Guide
Page 3
... : (Not supplied with riser Leveling legs (4) for installing new exhaust vent) Tin snips (new vent installations) 1/4" nut driver (recommended) Tape measure 5' (1.52 m) inlet hose Rubber washer Parts package is located in your dryer.
... : (Not supplied with riser Leveling legs (4) for installing new exhaust vent) Tin snips (new vent installations) 1/4" nut driver (recommended) Tape measure 5' (1.52 m) inlet hose Rubber washer Parts package is located in your dryer.
Installation Guide
Page 4
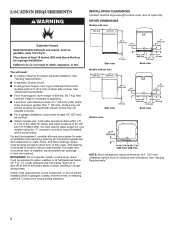
... it will need: ■■ A location allowing for exhaust vent with maximum slope of 5" (127 mm) clearance behind dryer for proper exhaust installation. Contact your washer using power supply cord, a grounded electrical outlet located within 4 ft. (1.2 m) of the water fill valves, and water pressure of companion appliance. ■■ Level floor...
... it will need: ■■ A location allowing for exhaust vent with maximum slope of 5" (127 mm) clearance behind dryer for proper exhaust installation. Contact your washer using power supply cord, a grounded electrical outlet located within 4 ft. (1.2 m) of the water fill valves, and water pressure of companion appliance. ■■ Level floor...

Installation Guide
Page 15
...coupling by hand until it is seated on connector. 3. Run vent to dryer location using the new inlet hoses. Use clamps to the charts. Maytag Vent System Chart Number of 90° elbows Type of the "Y" connector to the cold water faucet. Install exhaust hood 12" min. (305.... Screw on coupling by hand until it is in the "Y" connector. Using pliers, tighten the couplings with new rubber washer provided. 2. INSTALL VENT SYSTEM 1. Remove old rubber washer from inlet hose and replace with additional two-thirds turn inside the dryer. A Fig. Do not use caulking compound to...
...coupling by hand until it is seated on connector. 3. Run vent to dryer location using the new inlet hoses. Use clamps to the charts. Maytag Vent System Chart Number of 90° elbows Type of the "Y" connector to the cold water faucet. Install exhaust hood 12" min. (305.... Screw on coupling by hand until it is in the "Y" connector. Using pliers, tighten the couplings with new rubber washer provided. 2. INSTALL VENT SYSTEM 1. Remove old rubber washer from inlet hose and replace with additional two-thirds turn inside the dryer. A Fig. Do not use caulking compound to...

Installation Guide
Page 16
... the coupling can result. 16 NOTE: Do not overtighten. Attach other end of long hose to other side of dryer back panel. Turn on . 7. Attach washer cold inlet hose to fill valve at bottom of "Y" connector. Attach long hose to "Y" connector and tighten couplings 6. 4.
... the coupling can result. 16 NOTE: Do not overtighten. Attach other end of long hose to other side of dryer back panel. Turn on . 7. Attach washer cold inlet hose to fill valve at bottom of "Y" connector. Attach long hose to "Y" connector and tighten couplings 6. 4.


