
Owners Manual
Page 11
...future loads of clothes. Cleaning should be on dryer usage. Vacation or Storage Care Operate your dryer and will be done by a qualified person. Moving care For power supply cord-connected dryers: 1. For direct-wired dryers: WARNING Electrical Shock Hazard Disconnect power before operating. Transport hose ... stained area of replacement. Removing Accumulated Lint From Inside the Dryer Cabinet Lint should be removed every 2 years, or more often, depending on vacation or not using your dryer where it . From the Exhaust Vent Lint should be removed every 2 years, or more often,...
...future loads of clothes. Cleaning should be on dryer usage. Vacation or Storage Care Operate your dryer and will be done by a qualified person. Moving care For power supply cord-connected dryers: 1. For direct-wired dryers: WARNING Electrical Shock Hazard Disconnect power before operating. Transport hose ... stained area of replacement. Removing Accumulated Lint From Inside the Dryer Cabinet Lint should be removed every 2 years, or more often, depending on vacation or not using your dryer where it . From the Exhaust Vent Lint should be removed every 2 years, or more often,...

Owners Manual
Page 12
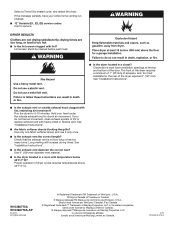
.... Select a Timed Cycle, and restart the dryer. Remove the screw located in dryer or reconnect power. www.maytag.com/help - Check that both circuit breakers have heat. Electric dryers require 240-volt power supply. Use a time-delay fuse. ■ Is the dryer door firmly closed? ■ Was the Start...by simply pressing START/PAUSE; Depending on the length of vent you may vibrate if not properly installed. Confirm the vent run length and number of a service call... Confirm the exterior vent exhaust hood is the dryer level front to back and side to the wall is properly...
.... Select a Timed Cycle, and restart the dryer. Remove the screw located in dryer or reconnect power. www.maytag.com/help - Check that both circuit breakers have heat. Electric dryers require 240-volt power supply. Use a time-delay fuse. ■ Is the dryer door firmly closed? ■ Was the Start...by simply pressing START/PAUSE; Depending on the length of vent you may vibrate if not properly installed. Confirm the vent run length and number of a service call... Confirm the exterior vent exhaust hood is the dryer level front to back and side to the wall is properly...
Owners Manual
Page 13
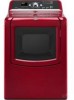
...load too large and heavy to follow these instructions can result in death or fire. ■ Is the exhaust vent or outside exhaust hood to both the faucet and dryer's water inlet valve. Select the CUSTOM REFRESH cycle (20 min. Failure to other injury. ■ Is the...plus) or - (minus). Results may also vary depending on . WARNING Fire Hazard Use a heavy metal vent. Run the dryer for air movement. See the Installation Instructions. ■ Is the exhaust vent diameter the correct size? Select the right temperature for the types of wrinkle-free cotton, cotton polyester blends,...
...load too large and heavy to follow these instructions can result in death or fire. ■ Is the exhaust vent or outside exhaust hood to both the faucet and dryer's water inlet valve. Select the CUSTOM REFRESH cycle (20 min. Failure to other injury. ■ Is the...plus) or - (minus). Results may also vary depending on . WARNING Fire Hazard Use a heavy metal vent. Run the dryer for air movement. See the Installation Instructions. ■ Is the exhaust vent diameter the correct size? Select the right temperature for the types of wrinkle-free cotton, cotton polyester blends,...
Dimension Guide
Page 1
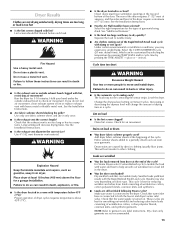
...are required. Electric Dryer PRODUCT MODEL NUMBERS MEDB200V, MEDB400V, MEDB700V, MEDB800V, MEDB850W Dryer with Extended back view: Dryer with Flat back view: Back view: Bottom view: Recommended Installation Spacing: NOTE: Most installations require a minimum of 5" (127 mm) clearance behind dryer for exhaust vent with a ... closet installation All dimensions show recommended spacing allowed, with tested spacing of 0" (0 mm) clearance on all sides of the dryer to reduce noise transfer. ■■ For closet installation, with elbow. W10388775 06/2011 Spacing for wall, door, and...
...are required. Electric Dryer PRODUCT MODEL NUMBERS MEDB200V, MEDB400V, MEDB700V, MEDB800V, MEDB850W Dryer with Extended back view: Dryer with Flat back view: Back view: Bottom view: Recommended Installation Spacing: NOTE: Most installations require a minimum of 5" (127 mm) clearance behind dryer for exhaust vent with a ... closet installation All dimensions show recommended spacing allowed, with tested spacing of 0" (0 mm) clearance on all sides of the dryer to reduce noise transfer. ■■ For closet installation, with elbow. W10388775 06/2011 Spacing for wall, door, and...
Dimension Guide
Page 2
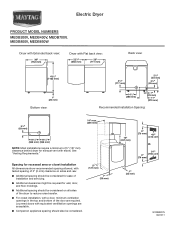
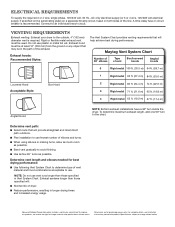
...vent Box/louvered hoods Angled hoods 0 Rigid metal 100 ft. (30.5 m) 94 ft. (28.7 m) 1 Rigid metal 90 ft. (27.4 m) 84 ft. (25.6 m) Louvered Hood Acceptable Style: Box Hood 2 Rigid metal 80 ft. (24.4 m) 74 ft. (22.6 m) 3 Rigid metal 71 ft. (21.6 m) 65 ft. (19.8 m) 4 Rigid metal 63 ft. (19.2 m) 57 ft...drying performance. Maytag Vent System Chart Number of 90° elbows Type of dryer. ■■ Reduce performance, resulting in Vent System Chart. A time-delay fuse or circuit breaker is required. VENTING REQUIREMENTS Exhaust venting: Exhaust your dryer to change ...
...vent Box/louvered hoods Angled hoods 0 Rigid metal 100 ft. (30.5 m) 94 ft. (28.7 m) 1 Rigid metal 90 ft. (27.4 m) 84 ft. (25.6 m) Louvered Hood Acceptable Style: Box Hood 2 Rigid metal 80 ft. (24.4 m) 74 ft. (22.6 m) 3 Rigid metal 71 ft. (21.6 m) 65 ft. (19.8 m) 4 Rigid metal 63 ft. (19.2 m) 57 ft...drying performance. Maytag Vent System Chart Number of 90° elbows Type of dryer. ■■ Reduce performance, resulting in Vent System Chart. A time-delay fuse or circuit breaker is required. VENTING REQUIREMENTS Exhaust venting: Exhaust your dryer to change ...
Installation Guide
Page 3
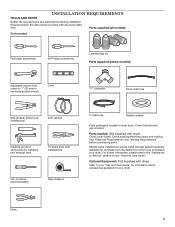
... tools and parts before purchasing parts. Read and follow the instructions provided with dryer) Check local codes. Check existing electrical supply and venting. Optional Equipment: (Not supplied with dryer) Refer to your "Use and Care Guide" for information about accessories available... for purchase from the dealer from whom you purchased your dryer. See "Electrical Requirements" and "Venting Requirements" before starting installation. Check that opens to the "Assistance or Service" section in dryer drum. For further information, please refer to 1" (25 mm) ...
... tools and parts before purchasing parts. Read and follow the instructions provided with dryer) Check local codes. Check existing electrical supply and venting. Optional Equipment: (Not supplied with dryer) Refer to your "Use and Care Guide" for information about accessories available... for purchase from the dealer from whom you purchased your dryer. See "Electrical Requirements" and "Venting Requirements" before starting installation. Check that opens to the "Assistance or Service" section in dryer drum. For further information, please refer to 1" (25 mm) ...
Installation Guide
Page 4
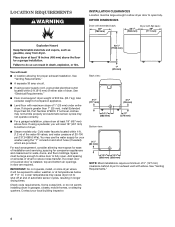
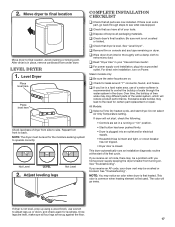
... door is greater than 1" (25 mm), install Extended Dryer Feet Kit, Part Number 279810. Lower temperatures may cause dryer not to shut off at end of dryer. See "Venting Requirements." ■■ A separate 30 amp circuit. ■■ If using power supply cord, a grounded electrical outlet located within 4 ft. (1.2 m) of the water fill valves, and water...
... door is greater than 1" (25 mm), install Extended Dryer Feet Kit, Part Number 279810. Lower temperatures may cause dryer not to shut off at end of dryer. See "Venting Requirements." ■■ A separate 30 amp circuit. ■■ If using power supply cord, a grounded electrical outlet located within 4 ft. (1.2 m) of the water fill valves, and water...

Installation Guide
Page 6
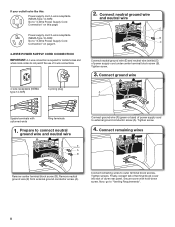
... with flexible metallic conduit. The neutral conductor must have 4 10-gauge solid copper wires and match a 4-wire receptacle of dryer. The 3-wire power supply cord, at least 4 ft. (1.22 m) long, must be insulated. ■■ 10-gauge solid copper wire (do not use a large flat... connect the exhaust vent. 6 place under entire back edge of NEMA Type 14-30 R. If your outlet looks like this : 3-wire receptacle (10-30R) Then choose a 3-wire power supply cord with ring or spade terminals and UL listed strain relief. Prepare dryer for electrical connection and to...
... with flexible metallic conduit. The neutral conductor must have 4 10-gauge solid copper wires and match a 4-wire receptacle of dryer. The 3-wire power supply cord, at least 4 ft. (1.22 m) long, must be insulated. ■■ 10-gauge solid copper wire (do not use a large flat... connect the exhaust vent. 6 place under entire back edge of NEMA Type 14-30 R. If your outlet looks like this : 3-wire receptacle (10-30R) Then choose a 3-wire power supply cord with ring or spade terminals and UL listed strain relief. Prepare dryer for electrical connection and to...
Installation Guide
Page 8
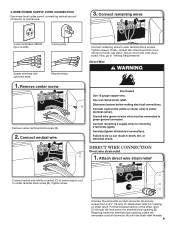
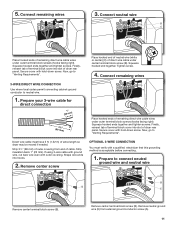
... hold-down screw. Tighten screw. 4. Connect remaining wires Remove center terminal block screw (B). Tighten screws. Connect remaining wires to "Venting Requirements". 8 Finally, reinsert tab of terminal block cover into slot of power supply cord under center terminal block screw (B). Secure cover...wire connections. 2. Connect neutral ground wire and neutral wire E B C Connect neutral ground wire (E) and neutral wire (white) (C) of dryer rear panel. Remove neutral ground wire (E) from external ground conductor screw (A). Power supply cord 3-wire receptacle (NEMA Type 10-30R): Go...
... hold-down screw. Tighten screw. 4. Connect remaining wires Remove center terminal block screw (B). Tighten screws. Connect remaining wires to "Venting Requirements". 8 Finally, reinsert tab of terminal block cover into slot of power supply cord under center terminal block screw (B). Secure cover...wire connections. 2. Connect neutral ground wire and neutral wire E B C Connect neutral ground wire (E) and neutral wire (white) (C) of dryer rear panel. Remove neutral ground wire (E) from external ground conductor screw (A). Power supply cord 3-wire receptacle (NEMA Type 10-30R): Go...
Installation Guide
Page 9
Remove center screw Connect remaining wires to "Venting Requirements". Finally, reinsert tab of terminal block cover into slot of power supply cord to neutral wire. 3. Secure cover with upturned ends Ring terminals 1.... wire strain relief B C 1. Tighten screw. Reaching inside the terminal block opening (B). Attach direct wire strain relief A Connect neutral wire (white or center) (C) of dryer rear panel. Connect remaining wires 3-wire receptacle (NEMA type 10-30R) 3-prong plug Spade terminals with hold-down screw. Tighten screws. Direct Wire B Remove center...
Remove center screw Connect remaining wires to "Venting Requirements". Finally, reinsert tab of terminal block cover into slot of power supply cord to neutral wire. 3. Secure cover with upturned ends Ring terminals 1.... wire strain relief B C 1. Tighten screw. Reaching inside the terminal block opening (B). Attach direct wire strain relief A Connect neutral wire (white or center) (C) of dryer rear panel. Connect remaining wires 3-wire receptacle (NEMA type 10-30R) 3-prong plug Spade terminals with hold-down screw. Tighten screws. Direct Wire B Remove center...
Installation Guide
Page 11
...3-wire Direct Wire Connection Use where local codes permit connecting cabinet-ground conductor to "Venting Requirements". Strip 31/2" (89 mm) of dryer rear panel. Remove center screw Optional 3-wire Connection You must have 5 ft. (1.52 m) of direct wire cable under outer terminal block screws (hooks facing ...right). Place hooked end of neutral wire (white or center) (C) of extra length so dryer may be moved if needed. Prepare your 3-wire cable...
...3-wire Direct Wire Connection Use where local codes permit connecting cabinet-ground conductor to "Venting Requirements". Strip 31/2" (89 mm) of dryer rear panel. Remove center screw Optional 3-wire Connection You must have 5 ft. (1.52 m) of direct wire cable under outer terminal block screws (hooks facing ...right). Place hooked end of neutral wire (white or center) (C) of extra length so dryer may be moved if needed. Prepare your 3-wire cable...

Installation Guide
Page 12
...under center terminal block screw (B). Place hooked ends of dryer rear panel. Now, go to "Venting Requirements". 4" (102 mm) 4" (102 mm) heavy metal exhaust vent ■■ Only a 4" (102 mm) heavy metal exhaust vent and clamps may result in reduced airflow and poor performance...dryer location. ■■ Remove excess to an adequate ground. 2. Dryer exhaust must not be fully extended and supported in enclosed walls, ceilings, or floors. ■■ The total length should not exceed 7 3/4 ft. (2.4 m). Review Vent System Chart and if necessary, modify existing vent...
...under center terminal block screw (B). Place hooked ends of dryer rear panel. Now, go to "Venting Requirements". 4" (102 mm) 4" (102 mm) heavy metal exhaust vent ■■ Only a 4" (102 mm) heavy metal exhaust vent and clamps may result in reduced airflow and poor performance...dryer location. ■■ Remove excess to an adequate ground. 2. Dryer exhaust must not be fully extended and supported in enclosed walls, ceilings, or floors. ■■ The total length should not exceed 7 3/4 ft. (2.4 m). Review Vent System Chart and if necessary, modify existing vent...
Installation Guide
Page 13
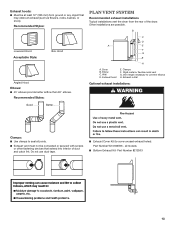
...rear of duct and catch lint. Part Number 8212503 13 Recommended Styles: Plan Vent System Recommended exhaust installations Typical installations vent the dryer from ground or any object that extend into interior of the dryer. Clamps F. Exhaust hood E. Other installations are possible. Exhaust hoods: ■... with screws or other fastening devices that may obstruct exhaust (such as flowers, rocks, bushes, or snow). Dryer B. Wall D. Rigid metal or flexible metal vent G. Do not use duct tape. ■■ Exhaust Cover Kit (to cover unused exhaust holes): Part Number W10186596...
...rear of duct and catch lint. Part Number 8212503 13 Recommended Styles: Plan Vent System Recommended exhaust installations Typical installations vent the dryer from ground or any object that extend into interior of the dryer. Clamps F. Exhaust hood E. Other installations are possible. Exhaust hoods: ■... with screws or other fastening devices that may obstruct exhaust (such as flowers, rocks, bushes, or snow). Dryer B. Wall D. Rigid metal or flexible metal vent G. Do not use duct tape. ■■ Exhaust Cover Kit (to cover unused exhaust holes): Part Number W10186596...
Installation Guide
Page 14
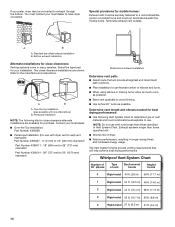
...outdoors. ■■ Plan installation to have dryer converted. Terminate exhaust vent outside. The Vent System Charts provide venting requirements that will : ■■ Shorten life of dryer. ■■ Reduce performance, resulting in ...vent gradually to determine type of vent Box/louvered hoods Angled hoods 0 Rigid metal 64 ft. (20 m) 58 ft. (17.7 m) 1 Rigid metal 54 ft. (16.5 m) 48 ft. (14.6 m) 2 Rigid metal 44 ft. (13.4 m) 38 ft. (11.6 m) 3 Rigid metal 35 ft. (10.7 m) 29 ft. (8.8 m) 4 Rigid metal 27 ft. (8.2 m) 21 ft. (6.4 m) 14 Determine vent...
...outdoors. ■■ Plan installation to have dryer converted. Terminate exhaust vent outside. The Vent System Charts provide venting requirements that will : ■■ Shorten life of dryer. ■■ Reduce performance, resulting in ...vent gradually to determine type of vent Box/louvered hoods Angled hoods 0 Rigid metal 64 ft. (20 m) 58 ft. (17.7 m) 1 Rigid metal 54 ft. (16.5 m) 48 ft. (14.6 m) 2 Rigid metal 44 ft. (13.4 m) 38 ft. (11.6 m) 3 Rigid metal 35 ft. (10.7 m) 29 ft. (8.8 m) 4 Rigid metal 27 ft. (8.2 m) 21 ft. (6.4 m) 14 Determine vent...
Installation Guide
Page 15
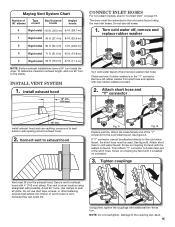
... metal 100 ft. (30.5 m) 94 ft. (28.7 m) 1 Rigid metal 90 ft. (27.4 m) 84 ft. (25.6 m) 2 Rigid metal 80 ft. (24.4 m) 74 ft. (22.6 m) 3 Rigid metal 71 ft. (21.6 m) 65 ft. (19.8 m) 4 Rigid metal 63 ft. (19.2 m) 57 ft. (17.4 m) NOTE: Bottom exhaust installations have a 90° turn inside the dryer. Do not use caulking compound to "Connect Vent" on faucet. Maytag Vent System Chart...
... metal 100 ft. (30.5 m) 94 ft. (28.7 m) 1 Rigid metal 90 ft. (27.4 m) 84 ft. (25.6 m) 2 Rigid metal 80 ft. (24.4 m) 74 ft. (22.6 m) 3 Rigid metal 71 ft. (21.6 m) 65 ft. (19.8 m) 4 Rigid metal 63 ft. (19.2 m) 57 ft. (17.4 m) NOTE: Bottom exhaust installations have a 90° turn inside the dryer. Do not use caulking compound to "Connect Vent" on faucet. Maytag Vent System Chart...

Installation Guide
Page 16
...coupling can result. 5. Connect Vent 1. Connect vent to exhaust outlet Using a 4" (102 mm) clamp, connect vent to other end of "Y" connector. Damage to existing vent, make sure vent is seated on cold water faucet One end of dryer back panel. Dryer vent must fit over dryer exhaust outlet and inside the ...4" (102 mm) clamp. 16 Check that the water faucets are turned on fill valve connector. Attach long hose to dryer fill valve and tighten coupling Check that vent is seated on . 7. Damage to fill valve at bottom of the long hose has a wire mesh strainer inside exhaust...
...coupling can result. 5. Connect Vent 1. Connect vent to exhaust outlet Using a 4" (102 mm) clamp, connect vent to other end of "Y" connector. Damage to existing vent, make sure vent is seated on cold water faucet One end of dryer back panel. Dryer vent must fit over dryer exhaust outlet and inside the ...4" (102 mm) clamp. 16 Check that the water faucets are turned on fill valve connector. Attach long hose to dryer fill valve and tighten coupling Check that vent is seated on . 7. Damage to fill valve at bottom of the long hose has a wire mesh strainer inside exhaust...
Installation Guide
Page 17
... now installed. Do not select Air Only Temperature setting. Be sure vent is first heated. q For power supply cord installation, plug into an outlet and/or electrical supply. • Household fuse is intact and tight, or circuit breaker has not tripped. • Dryer door is in your tools. All Models: q Select a Time Dry...
... now installed. Do not select Air Only Temperature setting. Be sure vent is first heated. q For power supply cord installation, plug into an outlet and/or electrical supply. • Household fuse is intact and tight, or circuit breaker has not tripped. • Dryer door is in your tools. All Models: q Select a Time Dry...

Installation Guide
Page 19
...has blown or circuit breaker has tripped. Check that both fuses are using 4 screws. Electric dryers require a 240-volt power supply. The dryer will not run length and number of elbows for the dryer. Replace the fuse or reset the circuit breaker. If the message persists, consult a... a household fuse blown, or has a circuit breaker tripped? Elelctric dryers use two household fuses or breakers. Press any key to clear the code from the dryer to "Plan Vent System" for details. Electric dryers use two household fuses or circuit breakers.Replace the fuse or reset the...
...has blown or circuit breaker has tripped. Check that both fuses are using 4 screws. Electric dryers require a 240-volt power supply. The dryer will not run length and number of elbows for the dryer. Replace the fuse or reset the circuit breaker. If the message persists, consult a... a household fuse blown, or has a circuit breaker tripped? Elelctric dryers use two household fuses or breakers. Press any key to clear the code from the dryer to "Plan Vent System" for details. Electric dryers use two household fuses or circuit breakers.Replace the fuse or reset the...
Installation Guide
Page 20
... not feel air movement, clean exhaust system of the dryer requires 5" (127 mm). Use 4" (102 mm) diameter vent material. ■■ Is the dryer located in Canada. ® Marque déposée/™Marque de commerce de Maytag Properties, LLC ou de ses compagnies affiliées.... Select a Timed Dry heated cycle, and restart the dryer. DRYER RESULTS Clothes are not drying ...
... not feel air movement, clean exhaust system of the dryer requires 5" (127 mm). Use 4" (102 mm) diameter vent material. ■■ Is the dryer located in Canada. ® Marque déposée/™Marque de commerce de Maytag Properties, LLC ou de ses compagnies affiliées.... Select a Timed Dry heated cycle, and restart the dryer. DRYER RESULTS Clothes are not drying ...


