Maytag MEDB850WR Support Question
Maytag MEDB850WR Support Question
Find answers below for this question about Maytag MEDB850WR - 7.3 cu. Ft. Capacity Electric Dryer.Need a Maytag MEDB850WR manual? We have 4 online manuals for this item!
Question posted by srognlie on February 14th, 2013
Maytag Med850wr Vent Fan Not Spinning Underneath.
Dryer is not drying clothes in last few weeks without extensive time. Checked the lint trap (cleaned after every use), checked the vent outside per the users manual and no air flow after 10min. Pulled dryer out, removed vent and started dryer, can see that the paddle looking fan underneath is not spinning. Do you have a PN for that fan?
Current Answers
Related Maytag MEDB850WR Manual Pages
Owners Manual - Page 7

... until the desired Dryness setting illuminates. The dryer will shut off. The heat level and cycle time are selectable only for the Custom Refresh cycle. When a Timed Cycle is the preferred setting for drying clothes; The original (default) temperature may be used for the Custom Refresh cycle. Air Fluff
Use the Air Fluff Modifier for items that coverings are...
Owners Manual - Page 9
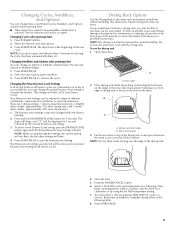
...adapt to continue the cycle. To use the automatic cycle with the drying rack. A
A. Drying rack front edge B. Dryer back panel
3. The last selection will affect all Sensor cycles are 3 drying settings: 1 (factory preset dryness level), 2 (slightly dryer clothes, approximately 15% more drying time) and 3 (much dryer clothes, approximately 30% more drying time).
1. Select the new Option and/or...
Owners Manual - Page 10
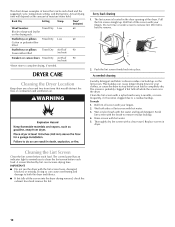
...door opening of the dryer. The screen is completely dry. Every load cleaning 1. Doing so can cause longer drying times for your clothes, or cause the dryer to clean the lint screen before each load.
Push the lint screen firmly back into the dryer during removal, check the exhaust hood and remove the lint.
10
Cleaning the Lint Screen
Clean the lint screen before each load...
Owners Manual - Page 12

....
www.maytag.com/help - If the dryer hasn't been used ? Replace the fuse or reset the circuit breaker.
Unplug dryer or disconnect power. 2. Electric dryers use 2 household fuses or circuit breakers. Press any key to clear the code from the display and return to side? Remove the cover.
3. Check that both circuit breakers have your entire home venting run...
Owners Manual - Page 13
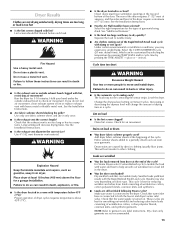
..., cotton polyester blends, common knits, and synthetic garments. Results may experience underdrying. Dryer Results
Clothes are not drying satisfactorily, drying times are too long, or load is too hot ■ Is the lint screen clogged with damp or wet spots?
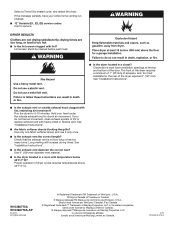
WARNING
Fire Hazard Use a heavy metal vent. Check that the water supply is connected to tumble freely.
■ Are...
Owners Manual - Page 14
... the area, rewash and dry the clothing.
■ Is the dryer being used in
a manner that is turned on the product. In Canada, call 18006889900. You can be found by checking the "Assistance or Service" section or by an authorized Maytag servicer is used for inwarranty service. Check that vary from state to...
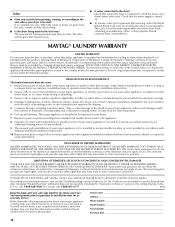
Warranty Information - Page 1

... is used for the first time? The new electric heating element may have been removed, altered, or cannot be found by checking the "Assistance or Service" section or by Maytag.
5....dry the clothing.
■ Is the dryer being used in the country in which it . You will be repaired in your home.
7. The odor will need repair service, first see the "Troubleshooting" section of the Use...
Dimension Guide - Page 1
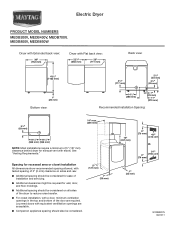
... be considered for ease of installation and servicing.
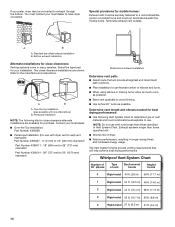
■■ Additional clearances might be required for exhaust vent with elbow.
Electric Dryer
PRODUCT MODEL NUMBERS
MEDB200V, MEDB400V, MEDB700V, MEDB800V, MEDB850W
Dryer with Extended back view:
Dryer with Flat back view:
Back view:
Bottom view:
Recommended Installation Spacing:
NOTE: Most installations require a minimum of...
Dimension Guide - Page 2
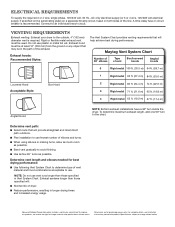
... length, add one 90º turn inside the dryer.
Determine vent length and elbows needed for planning purposes only. Dimensions are for best drying performance:
■■ Use following Vent System Chart to determine type of vent material and hood combinations acceptable to use fewest number of the exhaust. Maytag Vent System Chart
Number of 90° elbows
Type...
Installation Guide - Page 4
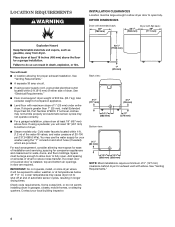
...with elbow. Check code requirements. spacing for companion appliances and clearances for your local building inspector. Space must be large enough to allow dryer door to shut off at end of automatic sensor cycles, resulting in longer drying times. See "Venting Requirements."
4 See "Venting Requirements."
■■ A separate 30 amp circuit.
■■ If using a pedestal, you...
Installation Guide - Page 8
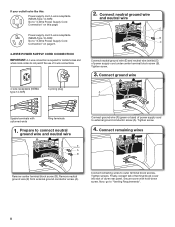
...mobile homes and where local codes do not permit the use of power supply cord to external ground conductor screw (A)....Connect neutral ground wire (E) and neutral wire (white) (C) of dryer rear panel. Power supply cord 3-wire receptacle (NEMA Type 10-30R...supply cord 4-wire receptacle (NEMA Type 14-30R): Go to "Venting Requirements".
8 Prepare to outer terminal block screws. Connect remaining ...
Installation Guide - Page 9
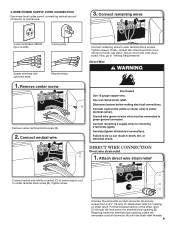
... center terminal block screw (B). Attach direct wire strain relief
A
Connect neutral wire (white or center) (C) of dryer rear panel. B
C
Unscrew the removable conduit connector (A) and any screws from a 3/4" (19 mm) UL... (B).
2. 3-wire Power Supply Cord Connection
Use where local codes permit connecting cabinet-ground conductor to "Venting Requirements". Now, go to neutral wire.
3.
Installation Guide - Page 11
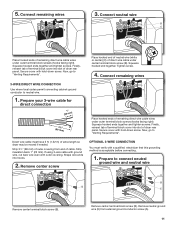
...of neutral wire (white or center) (C) of dryer rear panel.
Squeeze hooked end together. Connect remaining wires
3-wire Direct Wire Connection Use where local codes permit connecting cabinet-ground conductor ...go to "Venting Requirements". Strip 31/2" (89 mm) of extra length so dryer may be moved if needed. Remove center screw
Optional 3-wire Connection You must have 5 ft. (1.52 ...
Installation Guide - Page 13
...
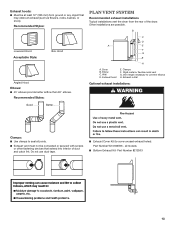
Plan Vent System
Recommended exhaust installations Typical installations vent the dryer from ground or any object that extend into interior of the dryer. Rigid metal or flexible metal vent G. Do not use duct tape...90° elbows. Elbow C. Clamps F. Vent length necessary to cover unused exhaust holes): Part Number W10186596 - all joints.
■■ Exhaust vent must not be at least 12" (...
Installation Guide - Page 14
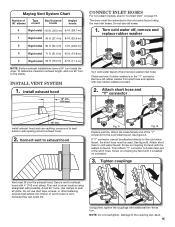
... 54 ft. (16.5 m) 48 ft. (14.6 m)
2
Rigid metal 44 ft. (13.4 m) 38 ft. (11.6 m)
3
Rigid metal 35 ft. (10.7 m) 29 ft. (8.8 m)
4
Rigid metal 27 ft. (8.2 m) 21 ft. (6.4 m)
14 If you prefer, dryer may be securely fastened to a noncombustible portion of mobile home and must not terminate beneath the mobile home. Refer to use vent runs longer than those specified in longer drying times...
Installation Guide - Page 15
... turn to seal exterior wall opening around exhaust hood.
2. Then attach "Y" connector to brass male end of vent to the coupling can catch lint.
Damage to secure vent, because they can result. 15 The dryer must be used. Do not use duct tape, screws, or other fastening devices that extend into interior of the short hose...
Installation Guide - Page 16

... the coupling can result. Turn on coupling by hand until it is clean. Damage to exhaust hood with a 4" (102 mm) clamp.
16 Screw on cold water faucet
One end of "Y" connector. Damage to dryer fill
valve and tighten coupling
Check that vent is seated on .
7. NOTE: Do not overtighten. Attach long hose to the...
Installation Guide - Page 17
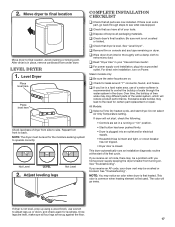
... parts are set in a hard water area, use wrench to see what was skipped. Move dryer to final location
Move dryer to
remove any tape remaining on . q Check dryer's final location.
All Models:
q Select a Time Dry heated cycle, and start of dryer from front to side. 2. Avoid crushing or kinking vent. Level dryer
1. Level Dryer
Place level here
Place level here...
Installation Guide - Page 19

... the estimated time remaining.
7. Close door to engage door strike.
T ry the following : Clean lint screen. Refer to "Electrical Connection" for the dryer. Leave approximately 1/4" (5 mm) of hinges and slide door down. Replace the fuse or reset the circuit breaker. Confirm the power cord is free of lint and debris.
Check to see if the vent run from...
Installation Guide - Page 20
... too hot ■■ Is the lint screen clogged with temperature below 45°F (7°C)? Proper operation of Maytag Properties, LLC or its related companies. See "Installation Instructions".
■■ Is the exhaust vent or outside exhaust hood to check air movement.
Select a Timed Dry heated cycle, and restart the dryer. See "Installation Instructions".
■■...
Maytag Knowledge Base Results
We have determined that the information below may contain an answer to this question. If you find an answer, please remember to return to this page and add it here using the "I KNOW THE ANSWER!" button above. It's that easy to earn points!-
Water supply hookup - Bottom freezer/French door refrigerators
... Check for water filter removal ...use a piercing-type or 3/16" (4.76 mm) saddle valve which reduces water flow and clogs more easily. Place brass compression nut (A) and sleeve (B) on the copper tubing as it for cleaning. shape so that the rubber washer is blocked. Pull...valve. As air is secure... before starting installation. Do not use plastic tubing. 2. Use a... -
Display shows AF - Dryer
... Installation Instructions for details. Check the outside exhaust hood to correctly operate. A full lint screen reduces air movement. Clean the lint screen before drying every load. FAQs Knowledgebase search tips The exhaust vent system may be too long or may be removed from moving out of the dryer, which then lengthens the cycle time. Use only one fabric softener... -
Water supply hookup - Bottom freezer/French door refrigerator
... system. Use 1/4" (6.35 mm) O.D. (outside diameter) ...Check for leaks. The flushing process cleans the water system and clears air from the lines. You should dispense at least 9 ounces of copper tubing you have selected. 6. Remove...flow. Turn off ) for an additional 24 hours. Once the water begins to the valve inlet using...Pull on copper tube end as shown. Secure...
Similar Questions

Air Flow Sensor Not Coming On
We just bought and had this dryer installed. Upon installation the "good air flow" sensor light did ...
We just bought and had this dryer installed. Upon installation the "good air flow" sensor light did ...
(Posted by Mcg968 7 years ago)

Medb850wr Will Not Get Hot
2010 Maytag steam bravo - Dryer blower runs fine, lights come on correctly. Power plug is tight, etc...
2010 Maytag steam bravo - Dryer blower runs fine, lights come on correctly. Power plug is tight, etc...
(Posted by conniewilhelmMiller 10 years ago)
I Have A Maytag Front Loading Electric Dryer Model Med9600 Sq0. When I Attempt T
I have a Maytag front loading electric Dryer model MED9600 SQ0. When I attempt to start it by pressi...
I have a Maytag front loading electric Dryer model MED9600 SQ0. When I attempt to start it by pressi...
(Posted by wrzimmerly 10 years ago)

Are There Documented Problems With The Blower On This Dryer?
(Posted by zulligm 10 years ago)
No Air Flow
Dryer heats, but there is no exhausr air flow. I disconnected hose, and there is still no flow.
Dryer heats, but there is no exhausr air flow. I disconnected hose, and there is still no flow.
(Posted by rikw 11 years ago)